
How to Build a Reactive Microservice API with Spring Boot, Spring Webflux and DynamoDB Using Kotlin
Introduction
In this tutorial, you will be walked through on how to create a Reactive Microservice API using Kotlin and Spring based frameworks: Spring Boot and Spring WebFlux, coupled with DynamoDB.
This Microservice will have the capabilities to:
- accept a Http
POSTrequest containing a customer information and store it in a DynamoDB table. - accept a Http
GETrequest containingcustomerIdand return the customer record retrieved from a DynamoDB table.
This tutorial is based on MacOS and IntelliJ as the editor. The Github repo is available for cloning here.
Reactive Programming
Reactive programming is a style of programming that is focused on the flow or stream of data, from start to finish (or from input to output). All the transformations and changes of the data are passed through from one component to the next within the flow or stream. The flow or stream (and its components) will process incoming data as soon as it becomes available, hence, it’s called Reactive.
Spring Boot
Spring Boot is a Spring based framework that allows you to build Microservice applications with ease. It is designed so that you can start your application with as minimum dependencies as possible (bootstrapped).
Spring WebFlux
Spring WebFlux is another Spring based framework that supports Reactive Programming for web application. Spring WebFlux implements the Project Reactor for its Reactive APIs.
Getting Started
One of the easiest ways to start a Spring Boot project is by using Spring Initialzr. Let’s go ahead and go to the Spring Initializr website on the browser.
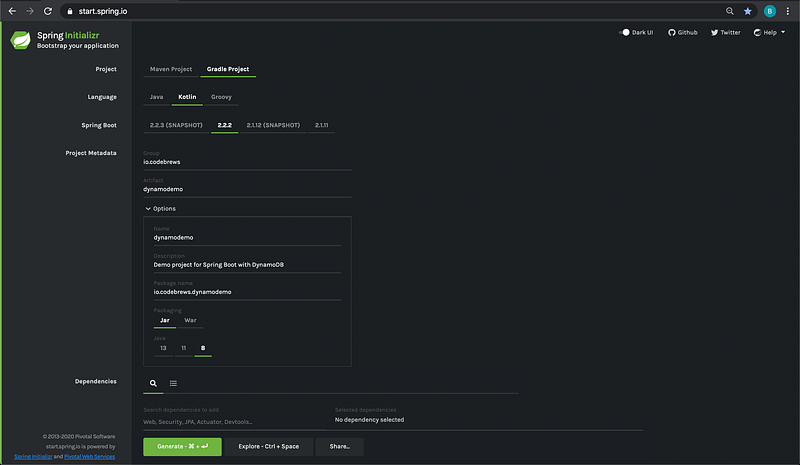
Project configurations and dependencies
For this tutorial, we will have the following configurations:
- build tool: Gradle
- programming language: Kotlin
- Spring Boot version: 2.2.2
- group: io.codebrews
- artifact: dynamodemo
- packaging: Jar
- Java version: 8
Next, we will choose the dependencies we want to include in our project. Go ahead and type “web” in the search box, like so:
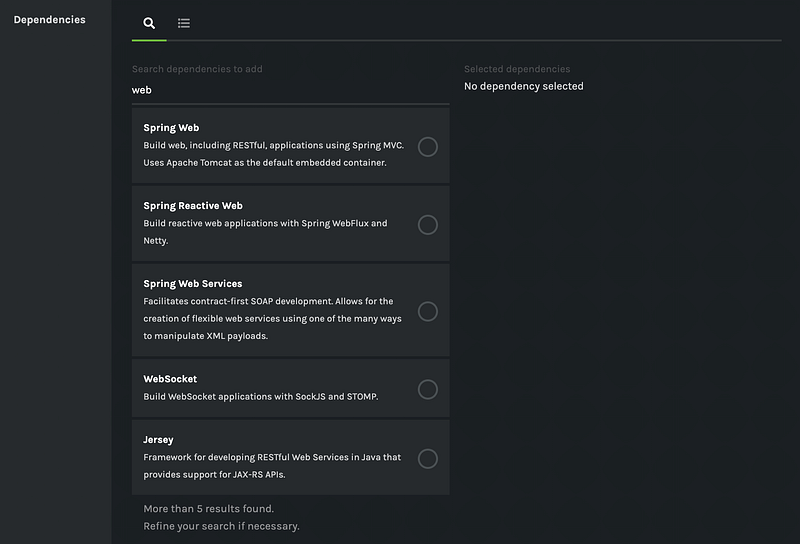
Let’s select Spring Reactive Web as the dependency. Finally, this is how the project configurations and dependencies will look like.
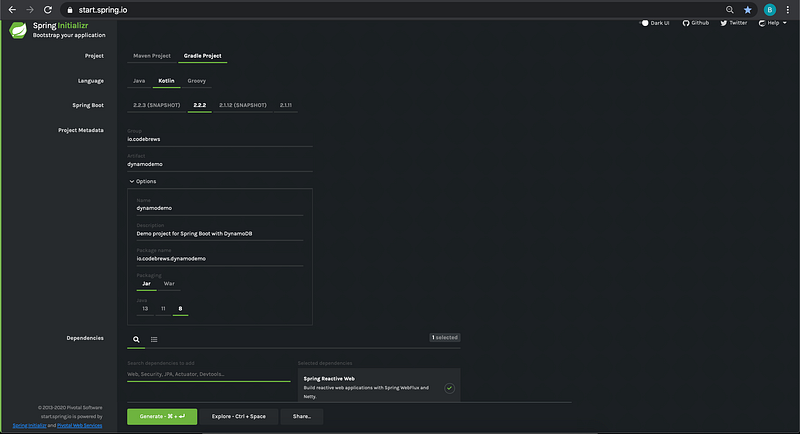
Go ahead and click on Generate. This will prompt you to download a .zip file. Save it on your computer.

Initialise the project local repo
From terminal, go to the folder where you save the .zip file in and unzip the file.
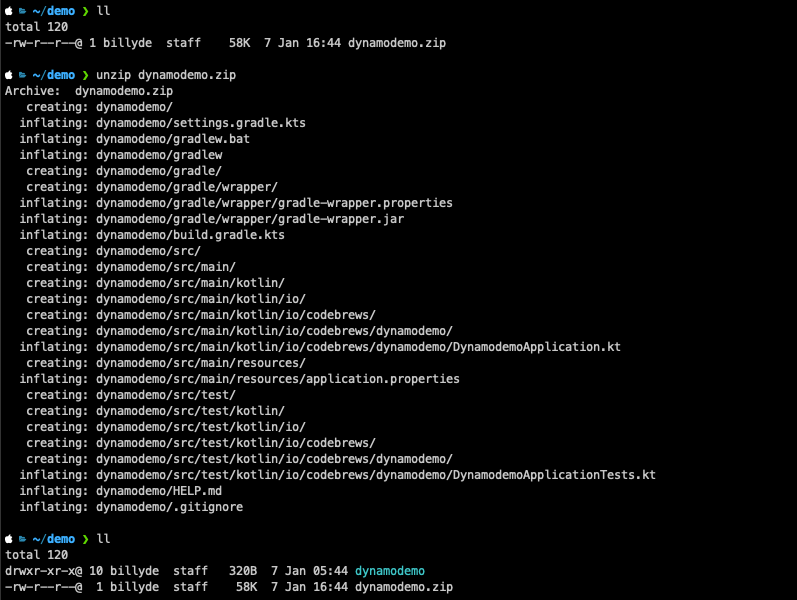
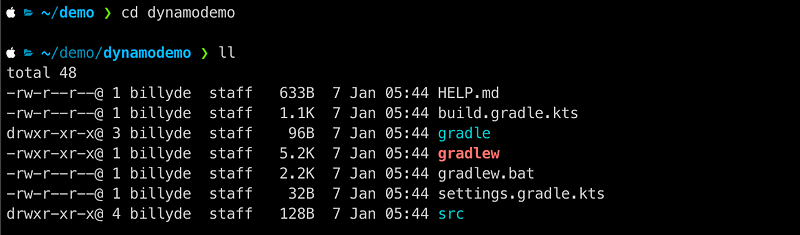
After unzipping, let’s change directory to the project folder. This is what you will see in the root project folder.
Okay. Now, we are ready to get to the action. :)
Build the Microservice
There are three things we are going to need to build our Reactive Microservice API:
Routesclass: to define the API endpoints and accept Http requests from a client via aRouterFunction. There will be 2 x API endpoints.Handlerclass: which will be passed to theRouterclass to process incoming Http request and return a Http response.DynamoDBImplementationclass: which will be passed to ourHandlerto interact with DynamoDB.
You will see a lot of Mono objects in different places. Mono is a container of an object, which is one of the building blocks of the Reactive API.
Spring Boot will manage our application’s dependency injection via different annotations, such as @Configuration, @Component, @Repository and @Value.
We will also define our application’s configuration in application.yml file (instead of the default application.properties file) within src/main/resources folder.
Add DynamoDB dependencies
In order to be able to communicate with DynamoDB, we need to add the AWS SDK for DynamoDB to our project. To start with, this is the default build.gradle.kts as generated from Spring Initializr.
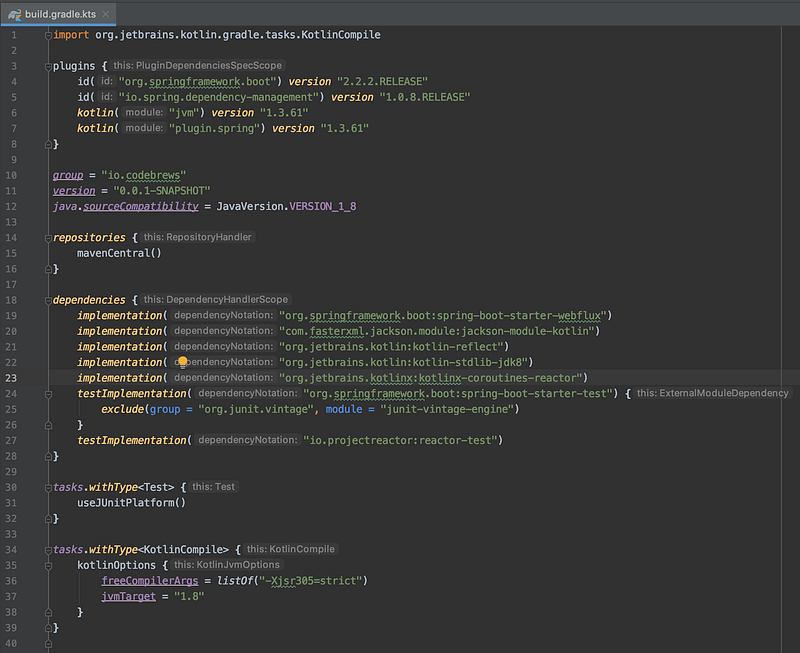
Let’s add the package required for DynamoDB, which is software.amazon.awssdk:dynamodb.
dependencies {
   implementation("org.springframework.boot:spring-boot-starter-webflux")
   implementation("com.fasterxml.jackson.module:jackson-module-kotlin")
   implementation("org.jetbrains.kotlin:kotlin-reflect")
   implementation("org.jetbrains.kotlin:kotlin-stdlib-jdk8")
   implementation("org.jetbrains.kotlinx:kotlinx-couroutines-reactor")
   implementation("software.amazon.awssdk:dynamodb:2.10.42")
   testImplementation("org.springframework.boot:spring-boot-starter-test") {
      exclude(group = "org.junit.vintage", module = "junit-vintage-engine")
   }
   testImplementation("io.projectreactor:reactor-test")
}
Besides adding the software.amazon.awssdk:dynamodb package, we also need to add the Maven BOM for AWS SDK in your build.gradle.kts like below.
import io.spring.gradle.dependencymanagement.dsl.DependencyManagementExtension...
...
...configure<DependencyManagementExtension> {
imports {
mavenBom("software.amazon.awssdk:bom:2.10.42")
}
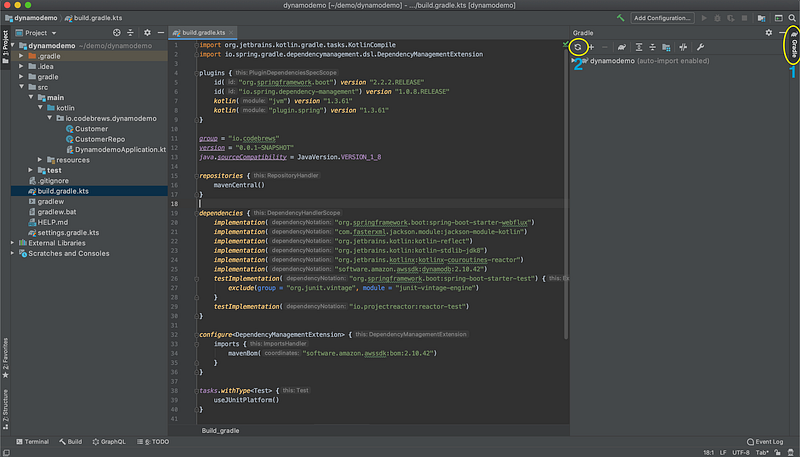
}The reason for adding this Maven BOM (Bill of Materials) is so that Maven can ensure it pulls the right dependencies for the DynamoDB SDK package we intend to use in our project. Your current build.gradle.kts should be like the following.
After you have done the 2 steps above, reimport the Gradle project. Below image shows how to reimport Gradle project in IntelliJ.
- Click Gradle build tool.
- Click Reimport all Gradle projects.
Write DynamoDB implementation class
Next, we will create two new Kotlin files to contain the following:
Customer.ktfile:Customerobject model class (adata class) that represents the Http request body from the client andCustomerPersistobject model class (also adata class) that represents the customer object that gets persisted to the DynamoDB table.CustomerRepo.ktfile: DynamoDB implementation class that enables DynamoDB operations.
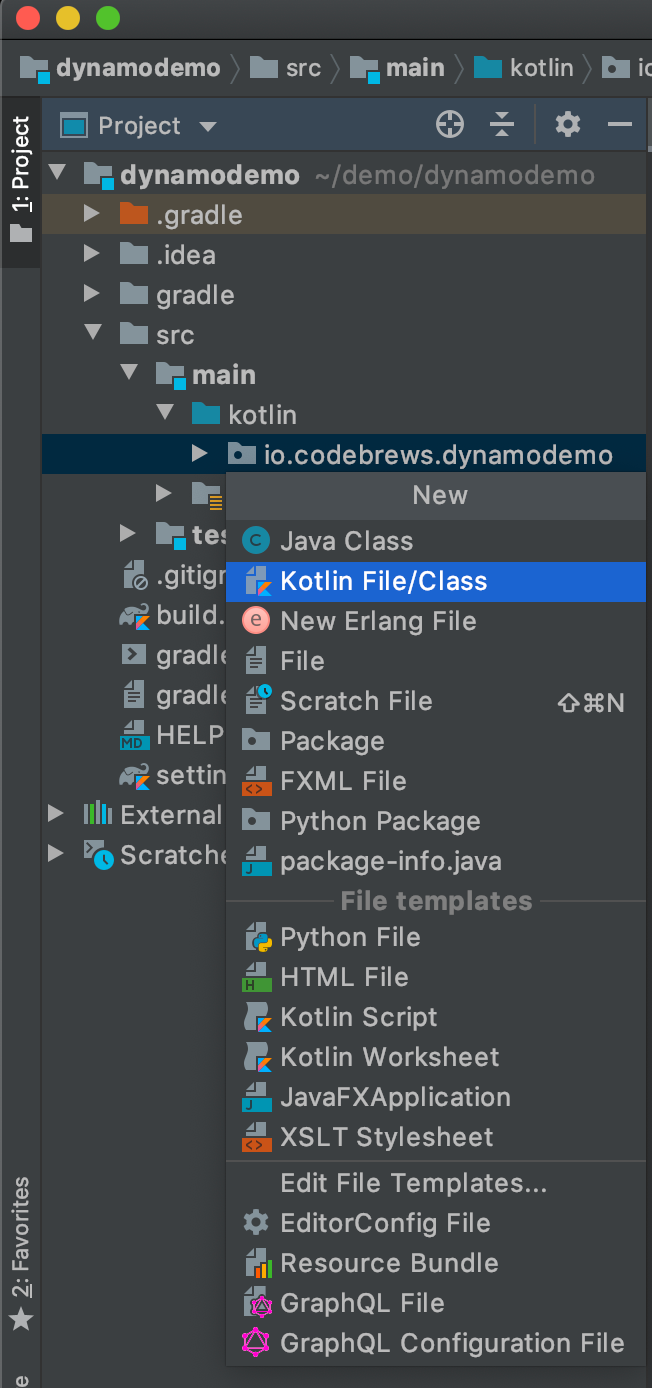
Let’s start with our object model classes. To create a new file, highlight or select the io.codebrews.dynamo folder on the project pane on the left hand side of the editor, press CMD + n and select Kotlin File/Class.
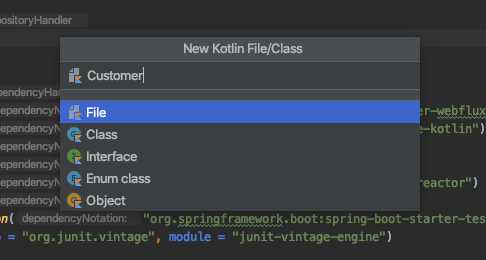
A New Kotlin File/Class window will pop up and here, you can type Customer for the file name.
The Customer.kt file contains data class Customer and data class CustomerPersist. As mentioned previously, the former one represents the object sent by the client and the latter one the object that will be stored in the DynamoDB table. The reason for this is because our Microservice will generate the customerId upon receiving a request to store customer information.
Next, we will create the DynamoDB implementation class and name it CustomerRepo.kt. In this class, we will have the following components:
client: we are usingDynamoDbAsyncClientto support asynchronous DynamoDB operations.customerTableName: it is managed and will be injected by Spring Boot via the@Valueannotation. We’ll get to this later.logger: it will be used to log any error that might arise.fun saveCustomer: it is a function that will doPutItemoperation to store customer information into the customer table.fun retrieveCustomer: it is a function that will doGetItemoperation to retrieve existing customer information from the customer table.
Let’s also add error logging to both functions so that if any of the PutItem and GetItem operation fails, we can see the Exception.
For saveCustomer:
return Mono.fromFuture(client.putItem(putItemRequest))
    .doOnError { logger.error("Exception while saving Customer information - $it") }
and for retrieveCustomer:
return Mono.fromFuture(client.getItem(getItemRequest))
    .map { response ->
        CustomerPersist(
            customerId,
            (response.item()["emailAddress"] ?: error("emailAddress N/A")).s(),
            (response.item()["firstName"] ?: error("firstName N/A")).s(),
            (response.item()["lastName"] ?: error("lastName N/A")).s())
    }
    .doOnError { logger.error("Exception while retrieving Customer information - $it") }
and finally, the CustomerRepo.kt will look like this.
Note: saveCustomer returns a Mono of PutItemResponse, whereas retrieveCustomer a Mono of Customer. The reason is that when we save customer information, we expect it to be successful and so, we do not need to return the CustomerPersist object back to our client.
For reference, please note that PutItemResponse contains a field namedItem and its value is an empty Map. On the other hand, when our client requests for customer information, we obviously want to return the CustomerPersist object, hence, the return type is Mono<CustomerPersist> for retrieveCustomer.
Configure the DynamoDbAsyncClient
Currently, our DynamoDbAsyncClient does not have the information about the DynamoDB, i.e. region and endpoint. We need to set these properties or else our DynamoDB client will not be able to perform any DynamoDB operations and will encounter ResourceNotFoundException.
Let’s create a new Kotlin File/Class and name it DynamoClientProperties.kt. This file will define our DynamoDB async client, so it knows which DynamoDB to communicate with when performing DynamoDB operations.
Again, you will see that we have region and endpoint values that will be injected by Spring Boot via the @Value annotation. We’ll go through this next.
Put DynamoDB configuration in application.yml
Spring Initialzr by default will generate application.properties, however, in this tutorial, we are going to use application.yml file instead (I am a fan of yml file, that’s why 😄).
So, let’s rename the existing application.properties to application.yml by selecting application.properties, which is in src/main/resources folder, on the Project pane on the left hand side, then press F6 key from your keyboard, rename the file and finally, click on Refactor.
This is going to be the content of your application.yml.
By having defined these configurations, Spring will be able to inject the following values via the @Value annotation:
customerTableNameinCustomerRepo.ktregionandendpointinDynamoClientProperties.kt
Write the Handler class
The Handler class is responsible to process the incoming Http request from the client/ caller of our API. In Spring WebFlux, a Http request is of ServerRequest type and so, our Handler class’s methods should accept a ServerRequest object.
Let’s create a new Kotlin File/Class and name it CustomerHandler.kt. In this class, we are going to have the following components:
customerRepo: it will contain aCustomerRepoobject we defined inCustomerRepo.ktclass in the previous section. We will use this object to handle DynamoDB operations.logger: it will be used to log any error that might arise.fun saveCustomerInformation: it is a function that will accept a Http request to store a customer record and returns the corresponding Http response, i.e.200 OK — No Content, if successful.fun retrieveCustomerInformation: it is a function that will accept a Http request to retrieve an existing customer record and returns it in a Http response, i.e.200 OK — CustomerPersist JSON Object, if existing and successful.
Write the Router class
The final step of building the Microservice is to define our Routes class. So, go ahead and create a new Kotlin File/Class and name it Routes.kt.
The Routes class will have the following components:
logger: it will be used to log any error that might arise.fun route: it is a function that defines our API endpoints and handles Http requests.
We will create 2 x API endpoints as follows:
POST /usersGET /users/{userId}
Our router function will be written in Kotlin’s RouterFunctionDsl, which allows a very clean and concise code.
Set up local DynamoDB docker
In order to see whether our application works, let’s spin up a local DynamoDB Docker via the official AWS DynamoDB docker image amazon/dynamodb-local.
Add this file docker-compose-dynamodb-local.yaml to the root project folder.
Run the following command from terminal to start the local DynamoDB.

Next, let’s create a table named demo-customer-info, which is according to the configuration defined in the application.yml. This table will have customerId as its Hash key.
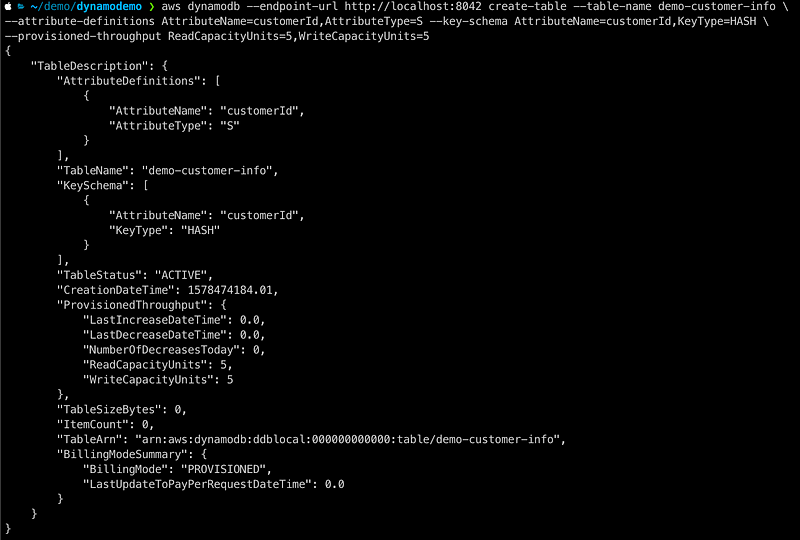
Here’s the Github gist so you can copy and paste since it’s a pretty long command. 😝
One last thing, we need to update our DynamoDB’s endpoint configuration in application.yml to point to localhost port 8042 (as defined in docker-compose-dynamodb-local.yaml).
Run the main class
By this point, all of the building blocks for our Microservice API are ready (except the test cases, which is not included in the scope of this tutorial). We can now run the application’s main class.
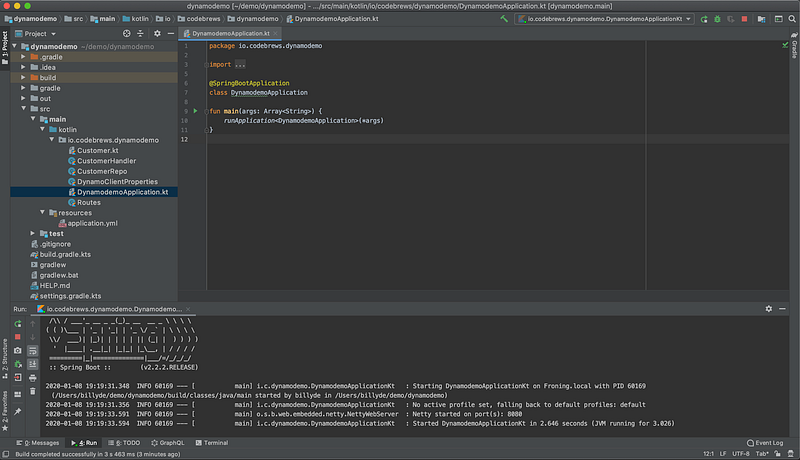
Spring Initializr generates the main class for our application and it should be contained in the file named DynamodemoApplication.kt. Now, open that file and run the application by clicking on the green triangle on the left hand side of the fun main. You should see some logs on the console indicating that our Spring Boot application is up and running on port 8080. 💪
Send Http requests
It’s time to see our application in action. Let’s do a POST request via curl to create a new customer record in our DynamoDB table.
~/demo/dynamodemo ❯ curl -H "Content-type: application/json" -X POST http://localhost:8080/users -d '{"emailAddress": "[email protected]", "firstName": "Bob", "lastName": "Jones"}'You should see the following response.

Looking good so far! 😜 Now, let’s do a GET request to try to retrieve the customer we just created by querying our service via the customerId. Again, we will be using curl to call our service.
~/demo/dynamodemo ❯ curl http://localhost:8080/users/16c07cc3-da69-4960-98f5-040e0ad5f4d8And you should get the following response.

Perfect! We have a fully functioning Reactive Microservice API now. Well done! 🙂
Things to Note
- This is definitely not a production-grade application, however, it forms the basic building blocks.
- There are many improvements that can be made, including but not limited to, logging, existing record validation, duplication prevention and error handling.
- Unit tests of the application are not covered in this walkthrough. (I might write another article to cover this in the near future)


