
How to make money from unused disk space with Storj
Do you have extra storage that you are not using? Now you can monetize it with Storj.

Nowadays there is a lot of formats and options to make money online.
Most of us are trying to create multiple income streams and achieve that passive income dream of earning money while we sleep.
One of the best ways to achieve this is to sell your extra storage space to cloud providers or data hosting solutions.
Besides the setup and configuration, there is nothing more that you need to do, except make sure your server is running and online.
Today we will take a look at one of these solutions that provide decentralized storage called Storj.
This article will also be my journey while I try, test, and report on the earnings.
You will have all the knowledge to create a node yourself and start making money by the end.
Let’s start our journey.
What is Storj?
Storj is a DCS (Decentralized Cloud Storage) where the files are not stored in a central data center, but instead in several nodes across the world.
The files are encrypted, split into pieces, and distributed in a global cloud network.
Each encrypted file is stored in diverse nodes, making data breaches impossible and also providing redundancy.
Each file is split into 80 pieces, but only 29 are required to recover a file.
Each of the 80 pieces is stored in different nodes, in different geographical regions.
Although the storage nodes are distributed in (almost) every continent, Storj operates its regions within 3 major ones;
- Europe
- United States
- Asia-Pacific

Its major features include:
- Open-Source, you can inspect the code
- Security, encrypted files, split pieces and stored in several nodes
- Privacy, every file is encrypted before uploading
- Availability, decentralized network, data is multi-region by default
- Performance, download and upload speeds are better than cloud providers
- S3 compatibility works with the tools you already have
Storj integrates with almost all of the cloud storage tools and software like:
- Filezilla
- Fastly
- Filebase
- Duplicati
- and many more…
The Storj network stats, as of the end of October 2021:
- 12.000 nodes
- 5,6PB of storage
- 360 Million objects
- 29 Billion object pieces
Hosting a Node
Now that you know more about Storj, how do you make money with it? The answer is, you become a storage node.
Of course, you can also use the network to store your files, a free plan is available to try, but we want to monetize our unused disk space, so let’s see what is needed.
To host a Storj node, there are some recommended requirements (in terms of hardware):
- At least 1 processor core dedicated to the node services
- 8TB of storage (maximum 24TB and minimum of 550GB)
- 16+TB of unmetered monthly bandwidth, preferable unlimited (minimum of 2TB)
- 100Mbps bandwidth upstream (minimum 5Mbps)
- 100Mbps bandwidth downstream (minimum 25Mbps)
- Uptime of 99,5% per month (minimum 99,3% per month, maximum 5 hours of downtime per month)
As you can see, these requirements are achievable for most people.
It is recommended to have UPS battery backup and also use a LAN cable connection instead of Wi-Fi for the Internet connection.
In terms of software requirements:
- Windows 8, Windows Server 2012, or later
- Debian, Fedora, or Ubuntu 64-bit versions (preferred)
- macOS Sierra 10.12 and newer macOS releases are supported (installing a node on macOS requires attentive monitoring, issues with Docker can cause the node to become offline and a node restart is needed)
In my case, I will not host a node at home, although it is perfectly ok and possible to do, as we just saw from the requirements.
I have a bare metal server hosted on Hetzner (affiliate link), which I use for my development and test VMs with Proxmox and for some production hosting for clients.
But that also means that from the available 64TB of storage (or 45TB due to RAID), I am at the moment using less than half of that, so that is why I decided to try Storj.
To be able to become a storage node in Storj, all is needed is to follow 4 simple steps:
- Get the authentication token
- Generate the node identity
- Configure port forwarding
- Setup the interface
We will take a look in more detail at these steps in the next section.
In terms of payouts for hosting a node, the average payouts are:
- Egress Bandwith is $20/TB
- Repair Egress Bandwith is $10/TB
- Disk space is $1.5/TB
- Audit Bandwith is $10/TB
Of course, these numbers can vary depending on actual usage and load on the node, but it allows us to have a general idea of the possible income.
Each new node goes through a vetting period to determine its reliability and that means that in the initial months you will receive more test data than user data.
You will be paid for this data, but there will also be held amounts until the 15th month to compensate for the fact that the node might leave the network.
All of this means that earning income with Storj is a long-term investment and that you should be prepared to have a lower income in the initial months.
Installation and setup
I will be installing the Storj node in a VM of Ubuntu 20.04, as the Linux setup is described as the more stable one.
Step 1 — Get the Authentication token
The first step is to get the auth token, for this we go to https://storj.io/host-a-node and fill in step 1:
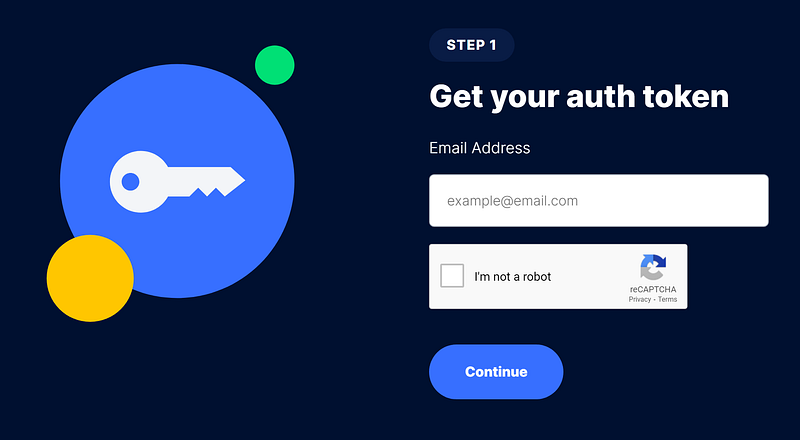
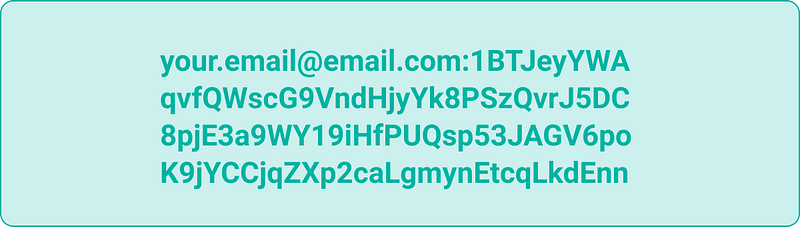
You will receive in your email the auth token string, which looks like this:
Step 2 — Configure the port forwarding
Storj nodes need to communicate with the main control nodes, called satellites, to receive and send data.
For this purpose, you will need to configure port forwarding to port 28967.
Additionally, you also need to make sure that you have a public static IP, or if that is not the case, then signup for a DDNS (Dynamic DNS) service like No-IP.
You can check more documentation on: https://docs.storj.io/node/dependencies/port-forwarding
Step 3 — Prerequisites
Before installing the node and configuring our identity, let's take care of some prerequisites to make sure we have all prepared before starting up the node.
In Linux is recommended to do a static mount of the hard drive used for Storj to make sure that is always correctly mounted.
For that, you can follow the excellent Storj documentation at: https://docs.storj.io/node/resources/faq/linux-static-mount
Another prerequisite is having an ETH wallet since the payout will be delivered in STORJ tokens on the Ethereum network.
There are 2 main payout options:
- Ethereum layer 1 — these are the default transactions but have much higher fees and a minimum payout of around $50 (depending on the current fees).
- zkSync layer 2 — new option. You can opt into them, and the fees are much lower, with a minimum payout of around $1 (depending on the current fees)
In my case, I have opted to go with zkSync payouts because I want to receive them in a more regular fashion.
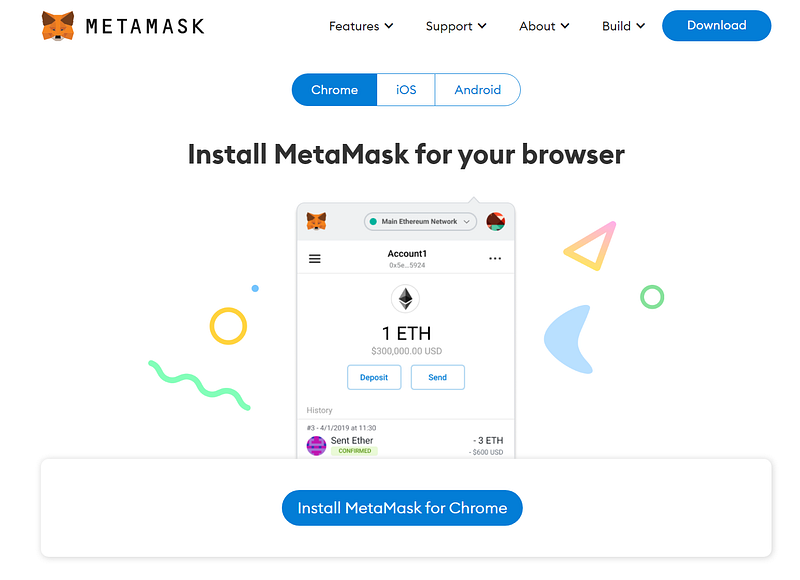
I have decided to use the wallet from MetaMask for ETH which can easily be combined with zkSync.
Signup for a wallet at MetaMask by downloading and using the browser extension. Make sure to save your wallet secret in a secure place:
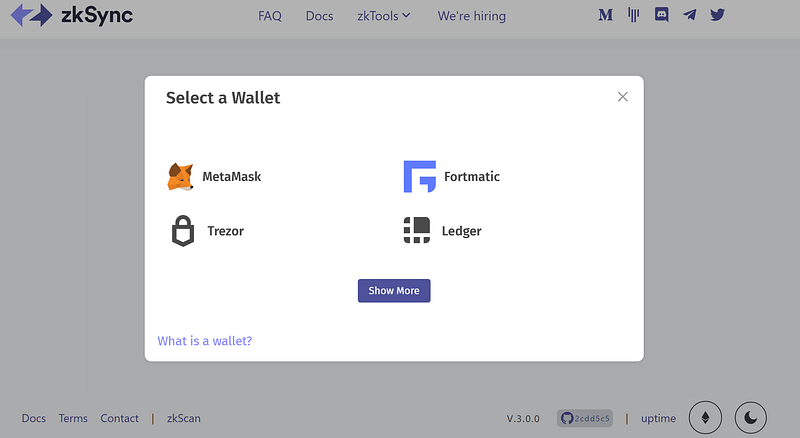
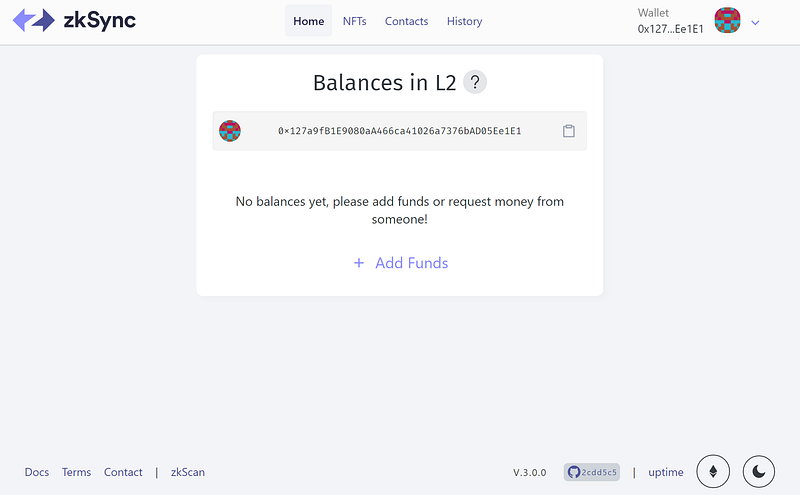
Now you can now go to zkSync and connect your MetaMask wallet:
In the end, you will have your ETH wallet synced with zkSync like this:
Step 4 — Storj node installation and configuration
Finally, we arrived at the Storj node installation procedure.
Generating Identity
First, we start by downloading the file needed to generate the identity, open a Terminal window and execute:
$ curl -L https://github.com/storj/storj/releases/latest/download/identity_linux_amd64.zip -o identity_linux_amd64.zip$ unzip -o identity_linux_amd64.zip$ chmod +x identity $ sudo mv identity /usr/local/bin/identityNext, we generate the identity for the node. This process can take several hours:
$ identity create storagenodeAt the end you will have the following output:
2021/11/06 17:55:23 proto: duplicate proto type registered: node.SigningRequest
2021/11/06 17:55:23 proto: duplicate proto type registered: node.SigningResponse
Generating key with a minimum a difficulty of 36...
Generated 103593218 keys; best difficulty so far: 39
Found a key with difficulty 39!
Unsigned identity is located in "/home/nunobispo/.local/share/storj/identity/storagenode"
Please *move* CA key to secure storage - it is only needed for identity management and isn't needed to run a storage node                                !
        /home/nunobispo/.local/share/storj/identity/storagenode/ca.key
Next, we need to authorize the identity with our previous generated auth token:
$ identity authorize storagenode <email:characterstring>We can confirm if the identity was successfully by running:
$ grep -c BEGIN ~/.local/share/storj/identity/storagenode/ca.cert$ grep -c BEGIN ~/.local/share/storj/identity/storagenode/identity.certThe first command should return 2 and the second should return 3, if that is not the case your identity is not confirmed. Make sure that your auth token is correct and try the previous steps again.
Docker Installation
The package version available at the Ubuntu repositories is outdated so it is best to follow the directions at Docker Installation for the installation procedure.
Also, make sure to do the post-installation steps to be able to run docker as a normal user.
Node Installation
We start by downloading the docker image for the node:
$ docker pull storjlabs/storagenode:latestThe first time we set up a node we need to run the setup docker container:
$ docker run --rm -e SETUP="true" \
--mount type=bind,source="<identity-dir>",destination=/app/identity \
--mount type=bind,source="<storage-dir>",destination=/app/config \     --name storagenode storjlabs/storagenode:latest
Replace the <identity-dir> and <storage-dir> with your parameters.
To enable support for zkSync, the config.yaml file needs to be edited, check the documentation at: https://docs.storj.io/node/dependencies/storage-node-operator-payout-information/zk-sync-opt-in-for-snos
But basically, you need to add the following line to the docker config.yaml file:
operator.wallet-features: ["zksync"]Now we can finally run the Storj node:
$ docker run -d --restart unless-stopped --stop-timeout 300 \
-p 28967:28967/tcp \
-p 28967:28967/udp \
-p 14002:14002 \
-e WALLET="0xXXXXXXXXXXXXXXXXXXXXXXXXXXXXXXXXXXXXXXXX" \
-e EMAIL="[email protected]" \
-e ADDRESS="domain.ddns.net:28967" \
-e STORAGE="2TB" \
--mount type=bind,source="<identity-dir>",destination=/app/identity \
--mount type=bind,source="<storage-dir>",destination=/app/config \     --name storagenode storjlabs/storagenode:latest
Edit the WALLET, EMAIL, ADDRESS, STORAGE and replace the <identity-dir>, and <storage-dir> with your parameters.
You are now a Storj Node operator! 🎉
You can check the running docker containers with:
$ docker ps -aNode Updates
To make sure our node is always up to date we can run another docker container to handle automatic updates.
Let's download the docker image:
$ docker pull storjlabs/watchtowerWe can run the docker container with:
$ docker run -d --restart=always --name watchtower -v /var/run/docker.sock:/var/run/docker.sock storjlabs/watchtower storagenode watchtower --stop-timeout 300sYou can check the running docker containers with:
$ docker ps -aDashboard
You check how the node is performing by opening the link directly on your node http://127.0.0.1:14002/ or from your internal network http://
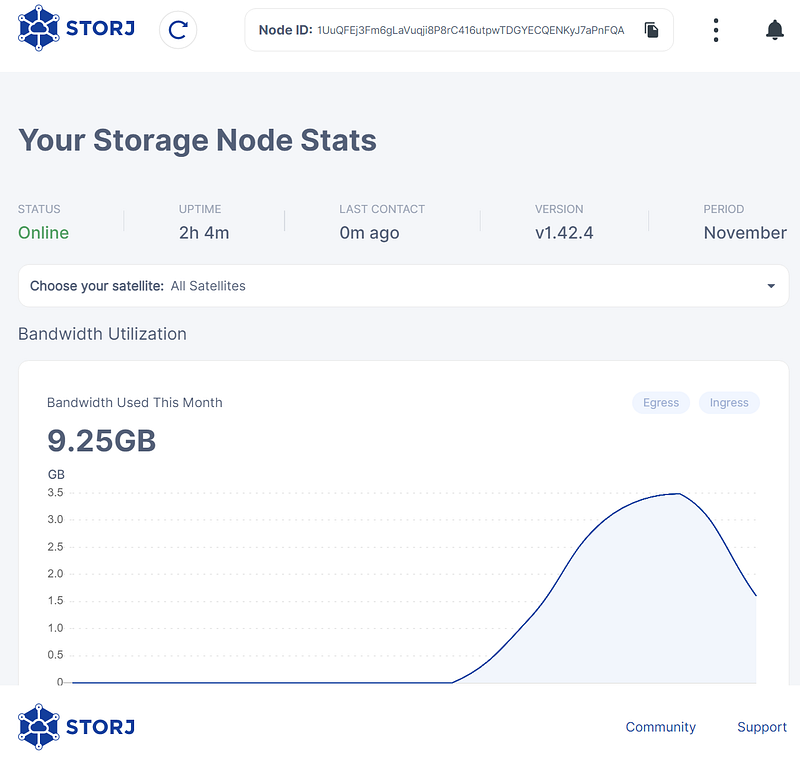
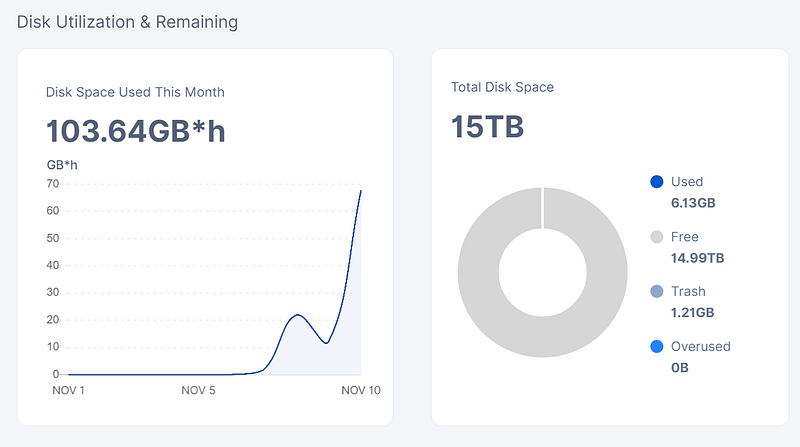
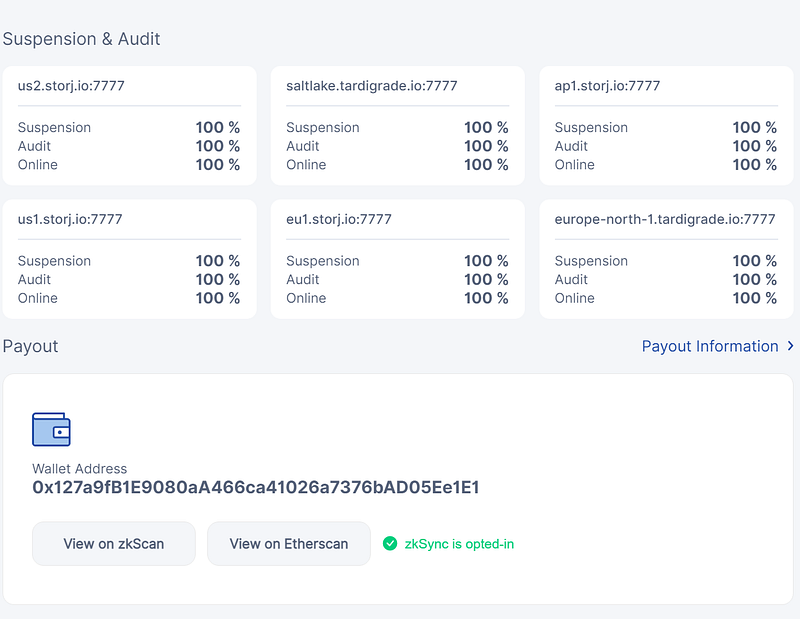

Within the dashboard you can check the following metrics:
- Bandwidth utilization
- Disk space
- Suspension and audit
- Payout information
You should keep an eye out on the Suspension and Audit information, a score below 60% here can cause your node to be disqualified from the network.
Keep an eye out for your uptime and make sure that you have a stable internet connection.
Earnings
Storj does not provide an official Earnings calculator but the community maintains its own calculator, you can check it at: https://forum.storj.io/t/realistic-earnings-estimator/6693
My earnings so far, with 10 days of being a Storj node is as follows:
So far only $0.04 of earnings in about 10 days, not much but also not bad, considering that all I did was set it up and do not need to do anything else, so these 4 cents was indeed passive income.
Conclusion
Storj is a very good option to monetize your unused disk space at home, on a VPS, or even in a NAS.
During the first year, due to the vetting process and the held amounts, the profit will not be tremendous, but after that, the expectation is that it will generate a nice passive income.
Of course, it depends on the network usage and your node score, which you can increase with your uptime, bandwidth, and available space.
It is a long-term investment, but it is also a set and forget after it is up and running, with very minimal maintenance other than making sure it is running and connected to the internet.
I will report back in this article next month with updated earnings after the first month of hosting a node.
For other topics, you can also check out some of my other stories:
Follow me on Twitter: https://twitter.com/DevAsService
Check out my website at: https://developer-service.io/
If you enjoyed reading this article and found it useful, you can support me by signing up for a Medium membership (if you are not a member). It will only cost you $5 a month — this will give you access to all stories on Medium! (and I will receive a small commission)
Besides that, if you want to stay updated when I post a new article, you can signup for my free newsletter!


