
The cheap way how to use Docker to deploy your FastAPI
FastAPI is a powerful API framework for Python that allows to quickly create and develop APIs in Python. But how to deploy those APIs ?
What is FastAPI?
From the FastAPI website:
FastAPI is a modern, fast (high-performance), web framework for building APIs with Python 3.6+ based on standard Python type hints.
What does this mean? It means that FastAPI allows to quickly build and develop APIs with some powerful features:
- OpenAPI for API declaration
- Automatic data model documentation with JSON Schema
- Automatic client code generation in many languages
- Automatic docs with Swagger UI (allows testing the API from the docs) and ReDoc
- Standard Python type declarations, no new syntax needed
- Sensible defaults
- Validations for all Python types, including JSON dict and list, all the way to URL and Email
- Security and Authentication with HTTP Basic, OAuth2 and passing of api keys
Building a quick API with FastAPI
First step is, of course, to install FastAPI with PIP:
pip install fastapi
We also need to install a ASGI server to run and test the API:
pip install uvicorn
Now let’s create a quick and simple API to get domain name information:
For our API we also need to install the “requests” library:
pip install requests
As you can see, with 15 lines of code we have an API created, so now let’s examine the code:
- Line 1 and 2, we perform our imports
- Line 4, we define our main application
- Line 7, we define our root endpoint
- Line 12, we define our search endpoint, this endpoint uses request to perform a simple API call to an external domain API and return a JSON
For reference here is the requirements.txt file:
To run our API with start our Uvicorn server with:
uvicorn main:app
Opening our browser in http://127.0.0.1:8000/docs we can see the docs:
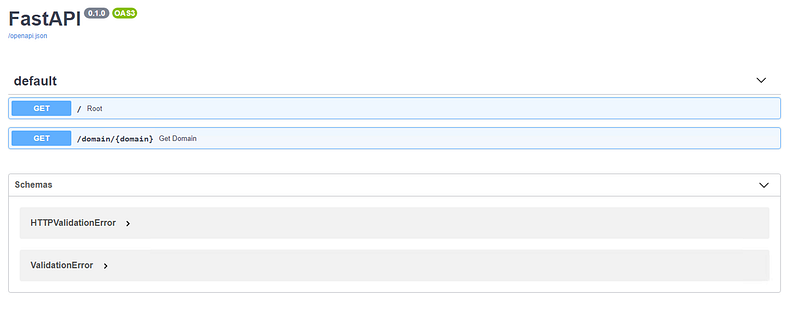
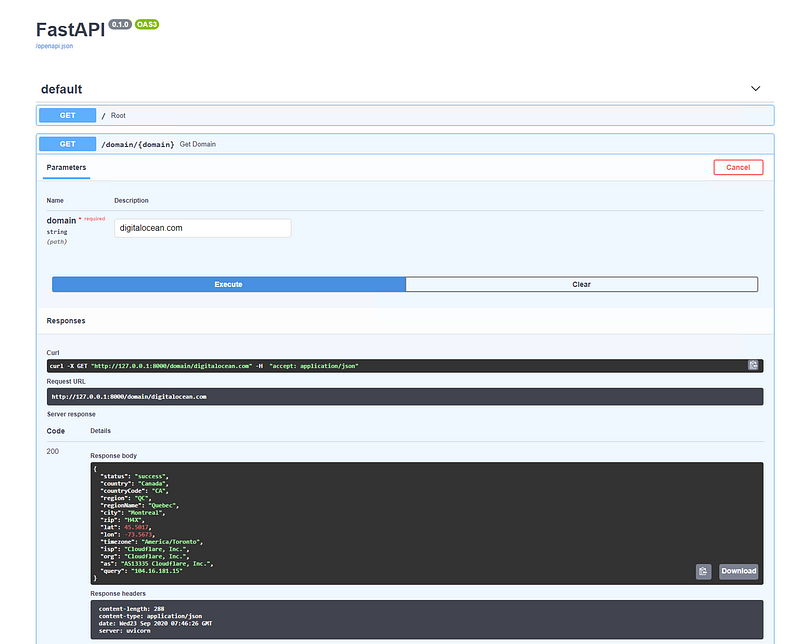
From the documentation we can test our API with a test request and check the response:
Deploy the API with Docker
Now that we have our API code and we have tested it, we need to deploy it in our “Production” environment to make it accessible to the world.
For that we can choose from different possibilities:
- Create a VM in the cloud, install Python and the necessary dependencies and run our API
- Deploy to AWS Lambda (or other cloud based execution service)
- Run a Docker container and expose it directly (or with Nginx)
In this case we will deploy our API to a Docker container and use Nginx to expose our API to the outside world.
Exposing our API with Nginx has several advantages but the main one for this example is the ability to easily add an SSL certificate with Let’s Encrypt.
In order to expose our API we will create the following structure for our Docker infrastructure, which will be up and running in a cloud VPS:
- A Docker instance running our FastAPI application
- A Docker instance running Nginx with SSL to receive the requests and pass them on to the API instance
In order to achieve this combination of Docker instances we will use docker-compose.
But first let’s start by creating our file structure to have our Dockerfiles organized:
Our file tree starts with the docker-compose.yaml file and two directories for the two docker instances:
- domainchecker folder contains our FastAPI file and the Dockerfile for that docker instance
- nginx folder contains the nginx.conf config file, associated files for the SSL certificate and the Dockerfile for that instance
Let’s check our docker-compose file:
In our docker-compose file we define the following services:
- web, contains the nginx instance. We expose ports 80 and 443 (HTTP and HTTPS), define a dependency on having the api docker instance available and that we want to build from the Dockerfile in the nginx folder.
- api, contains our FastAPI instance. We expose port 8080 with an environment variable to the instance and we build it with the Dockerfile from the domainchecker folder
Our docker-compose file depends on the Dockerfiles in each folder to create each instance, so let’s examine those files:
For the FastAPI build, we retrieve the official FastAPI docker image, copy the requirements file, install those requirements and finally copy our app to the docker instance ‘/app’ folder (FastAPI docker image expects the application in that folder).
For the nginx build, we retrieve the official nginx docker image, copy the nginx configuration file and all the files associated with the SSL certificates.
Let’s check the nginx configuration file to see how these files will be used:
The nginx configuration file follows the standard recommend configuration, but let’s discuss the main sections:
- upstream app server, contains the definition of our API endpoint, as you can see if references the url ‘api:8080’ (api is our other docker instance name from the docker-compose file, this allows cross communication between instances)
- server_name, defines the correct domain name for our nginx server
- location @proxy_to_app, defines the proxy rules to reach and serve the API endpoints
- listen 443 ssl, defines listen to requests with SSL and the files to support the SSL endpoint
This is all the configurations files that we need to get our API up and running with Docker.
Now we just need to start up our docker-compose instances (on the folder containing the docker-compose.yaml file):
We run the docker-compose with the build tag in this case to force rebuilding the docker instances.
As you can see, the files for the API are copied and the API server started, the nginx configuration files are copied and the server started.
You can now reach the endpoint at your defined server_name url endpoint.
Final considerations
As you saw in this article it is very simple and fast to create an API with FastAPI, including documentation.
Also, using Docker, after the proper configuration files are created (docker-compose.yaml and Dockerfiles), it is also easy and fast to deploy the API for live usage.
The beauty of Docker is that this blueprint can be copied and used with other API deployments.
With this skills you can now create your own API and even sell it on RapidAPI, for instance.
You can checkout the live API that powered this example at: https://rapidapi.com/nunobispo/api/domain-checker8
You can check out my GitHub at https://github.com/nunombispo
Or check my website at https://developer-service.io
For low cost Nextcloud hosting, check out: https://cloudhomelab.com (50% discount with promo code 50OFF)
Until the next article…
If you enjoyed reading this article and found it usefull, you can support me by signing up for a Medium membership (if you are not a member). It will only cost you $5 a month — this will give you access to all stories on Medium! (and I will receive a small commission)
Besides that, if you want to stay updated when I post a new story, you can signup for my free newsletter!


