
How to Install Private Python Packages in Artifact Registry When Building Docker Images with Cloud Build
Learn to build and publish both Python packages and Docker images with Cloud Build

In previous posts, we introduced how to store Python packages and Docker images in Google Artifact Registry, respectively. In this post, we will try to connect these two techniques and introduce how to install private Python packages in Artifact Registry when building Docker images with Cloud Build. Using Cloud Build, we can automate the processes to build and publish both Python and Docker artifacts.
We will introduce how to set up Cloud Build configuration files (cloudbuild.yaml) for building and uploading Python packages and Docker images in Artifact Registry. Especially, when building Docker images, the special setups for installing private Python packages stored in Artifact Registry will be introduced in more detail as it can often be tricky for many beginners.
Preparation
In order to follow the instructions in this post, we need to have our computer set up for GCP and create a Python Artifact Registry repository and a Docker one.
However, it is not needed if you just want to check the configuration files (Dockerfile) for Docker and (cloudbuid.yaml) for Cloud Build. You can go directly to the next section.
Create requirement.txt
In order to use Cloud Build to build and publish Python packages, we need to create a requirement.txt file and put all dependencies there:
build
setuptools
twine
keyrings.google-artifactregistry-auth
Especially, keyrings.google-artifactregistry-auth is the Artifact Registry keyring backend that handles authentication with Artifact Registry for pip and Twine. It can read authentication information from Google Application Default Credentials.
Build and publish Python packages using Cloud Build
We can now write the configuration file for building and uploading our private Python package:
steps:
  - name: python
    entrypoint: pip
    args: ["install", "-r", "requirements.txt", "--user"]
  - name: python
    entrypoint: python
    args:
      - "-m"
      - "build"
  - name: python
    entrypoint: python
    args:
      - "-m"
      - "twine"
      - "upload"
      - "--repository-url"
      - "https://${_LOCATION}-python.pkg.dev/$PROJECT_ID/${_REPOSITORY}/"
      - "dist/*"
There are three steps in this configuration file, which install the dependencies, build the package and upload it, respectively.
- The
namefield specifies a Cloud builder which is basically a Docker image to execute the task. In this example, the official Python Docker image is used. - The
entrypointspecifies the command in the Docker image to run to execute the task. Thepipandpythoncommands are used in these steps. argsspecifies the arguments for theentrypointcommand, similar to theCMDcommand in a Dockerfile. Some basic knowledge of Docker is helpful to understandentrypointandargs.
Then we can use the gcloud builds submit command to run the Cloud Build job locally.
gcloud builds submit --config=cloudbuild-python.yaml \
  --substitutions=_LOCATION="europe-north1",_REPOSITORY="standard-python-repo"
We can also push the code to a GitHub repository, connect it to Cloud Build and create a trigger for it, as demonstrated in this post.
Some caveats here:
- We cannot separate the user-defined substitution variables
_LOCATIONand_REPOSITORYwith whitespaces, otherwise, the command won’t work. - You cannot run the
gcloud builds submitcommand twice otherwise the package cannot be uploaded the second time. You need to change theversioninsetup.cfgto run it the second time. - Similarly, we cannot use Twine to upload the package and also specify
python_packagesfield in the configuration file, otherwise, the package will be tried to be uploaded twice and the Cloud Build job will fail. The benefit of using thepython_packagesfield is that the provenance information can be available.
After the package is uploaded to Artifact Registry, we can install it with pip by specifying the index-url option. We can also configure pip to install packages in Artifact Registry without specifying the index-url or extra-index-url options explicitly.
pip install --index-url=https://europe-north1-python.pkg.dev/superdataminer/standard-python-repo/simple/ div-mod==0.1.0
If you are prompted to enter your username and password for the installation command. You need to set up your local environment with these commands:
gcloud auth login
gcloud config set project <Your-Project-ID>
gcloud auth application-default login
After the library is installed successfully, you can then import it and use it in your Python code:
from div_mod_pkg import div_mod

div_mod(10,7)
# (1, 3)
Install private Python packages in Dockerfile
Now that our private Python package is published in Artifact Registry, we can install it in a Dockerfile like any other third-party library. However, it turns out that it’s not that simple.
The reason is that we need to authenticate pip to make it able to install the package in an isolated environment when the Docker image is being built. It cannot use the authentication information in our local environment directly.
A simple and feasible solution is to use a service account for which a key file can be created and used in isolated environments.
It is recommended to create dedicated service accounts with minimum privileges for different applications. Let’s create a service account that can only read Artifact Registry repositories:
gcloud iam service-accounts create sa-artifact-registry --display-name "Artifact Registry Service Account"

gcloud projects add-iam-policy-binding PROJECT_ID --member=serviceAccount:sa-artifact-registry@PROJECT_ID.iam.gserviceaccount.com --role=roles/artifactregistry.reader

gcloud iam service-accounts keys create sa-artifact-registry.json --iam-account sa-artifact-registry@PROJECT_ID.iam.gserviceaccount.com
Replace the PROJECT_ID with your own. The key file sa-artifact-registry.json is also created for our service account which can be used for authentication in Docker.
It’s better to pass the content of the key file to Docker rather than copy the whole file there because it is easier to specify the content of the key file as plain text for a substitution variable in a Cloud Build trigger.
However, the content of the key file is a JSON spanning multiple lines and cannot be passed to Docker directly. We can use the base64 command to convert the content to a single long string which can then be conveniently passed as a build argument for Docker.
Let’s first see how the service account key file should be handled in the Dockerfile:
FROM python:3.11-slim

# Define build argument.
ARG SA_KEY_BASE64

# Create a temp key file with the service account key.
RUN echo $SA_KEY_BASE64 | base64 -d> /tmp/sa-artifact-registry.json

# Set the environment variable for the service account key.
ENV GOOGLE_APPLICATION_CREDENTIALS=/tmp/sa-artifact-registry.json

RUN pip install --no-cache-dir -U pip && \
    pip install --no-cache-dir -U keyrings.google-artifactregistry-auth

RUN pip install --no-cache-dir -U \
    --index-url=https://europe-north1-python.pkg.dev/superdataminer/standard-python-repo/simple/ \
    div-mod==0.1.0

# Remove the service acccount key file.
RUN rm /tmp/sa-artifact-registry.json

CMD [ "div-mod-example" ]
Pay special attention to how the service account key file is handled in Dockefile. The following steps are implemented:
- Use the
ARGcommand to read the encoded content of the file. The value of the variableSA_KEY_BASE64is passed in with thebuild-argoption ofdocker buildas we will see soon. - The encoded content of the service key file is then decoded and saved to a file.
- By setting the
GOOGLE_APPLICATION_CREDENTIALSvariable to the path of the key file, pip will then be able to install packages from Artifact Registry through thekeyrings.google-artifactregistry-authlibrary. - Remember to remove the key file from the Docker image so it won’t be leaked, especially when the Docker image is to be published publicly.
We can use this Dockerfile to build a Docker image for testing locally:
docker build --build-arg SA_KEY_BASE64=`base64 -w0 sa-artifact-registry.json` -t div-mod:latest .When a Docker container is started with this image, the command specified in the CMD command in the Dockerfile will be run:
docker run -it --rm div-mod:latest

A custom divide/modulo script.

Example usage:
div_mod_script.py 10 3
Finally, let’s create a configuration yaml file for building and uploading Docker images with Cloud build:
steps:
  - name: "gcr.io/cloud-builders/docker"
    args:
      [
        "build",
        "--build-arg",
        "SA_KEY_BASE64=$_SA_KEY_BASE64",
        "-t",
        "${_LOCATION}-docker.pkg.dev/$PROJECT_ID/${_REPOSITORY}/${_IMAGE}:latest",
        ".",
      ]
images:
  - "${_LOCATION}-docker.pkg.dev/$PROJECT_ID/${_REPOSITORY}/${_IMAGE}:latest"
Note the default substitution $COMMIT_SHA which is commonly used as a hashtag for Docker images can only be used when a trigger is created from a code repository like GitHub.
Similar to the example of the Python package above, we can submit Cloud Build jobs locally by specifying the required substitution variables:
gcloud builds submit --config=cloudbuild-docker.yaml \
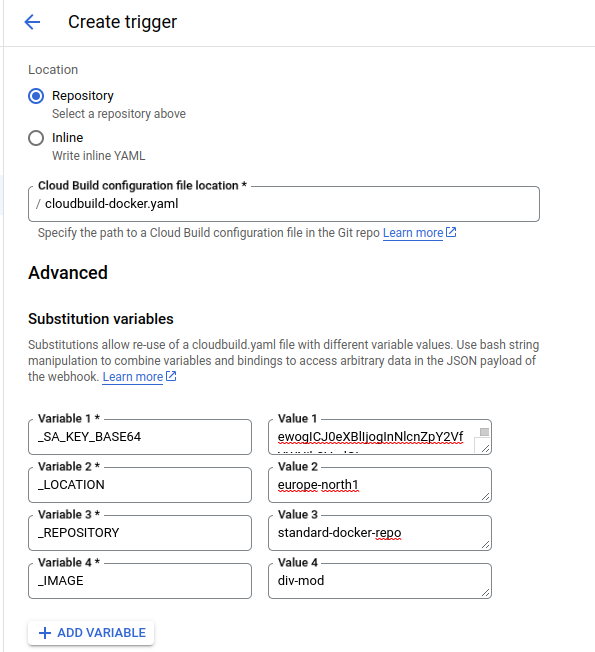
--substitutions=_SA_KEY_BASE64=`base64 -w0 sa-artifact-registry.json`,_LOCATION="europe-north1",_REPOSITORY="standard-docker-repo",_IMAGE="div-mod" .If a Cloud Build trigger is created, these substitution variables can be created with a user interface:
In this post, we have introduced how to set up Cloud Build configuration files (cloudbuild.yaml) for building and uploading Python packages and Docker images in Artifact Registry. Especially, when building Docker images, the special setups for installing private Python packages stored in Artifact Registry are introduced in detail which can be tricky for many beginners.
Related Posts:
- Build a Docker image automatically with Cloud Build in Google Cloud Platform
- How to Store Python Packages in Google Artifact Registry
Level Up Coding
Thanks for being a part of our community! Before you go:
- 👏 Clap for the story and follow the author 👉
- 📰 View more content in the Level Up Coding publication
- 💰 Free coding interview course ⇒ View Course
- 🔔 Follow us: Twitter | LinkedIn | Newsletter
🚀👉 Join the Level Up talent collective and find an amazing job


