
How to Store Python Packages in Google Artifact Registry
Learn a secure way to store your private packages on the Google Cloud Platform

The Artifact Registry of the Google Cloud Platform (GCP) provides a central location for storing and managing “build artifacts” such as Docker images, Python packages, NPM packages, and many more. It’s especially useful if you need to store these build artifacts in a secure way and incorporate them in your in-house DevOps pipelines.
Hosting Python packages in Artifact Registry can be helpful if some common packages need to be shared by different projects. By putting these common packages in Artifact Registry we can access in-house code securely and also reduce code repetition in our projects.
In this post, we will introduce how to set up our local environment properly to work with Google Artifact Registry. Then step-by-step instructions for uploading packages to Artifact Registry and installing them for end uses will be introduced with simple examples.
Set up our local computer for working with GCP
Since we will upload our Python packages to Artifact Registry later, we need to set up our local computer properly so it can be authenticated properly.
If your Google account has the required permissions to work with Artifact Registry directly, you can run the following commands to authenticate your local environment:
gcloud auth login
gcloud config set project <Your-Project-ID>
gcloud auth application-default login
However, if your Google account does not have the required permissions or if used in some DevOps pipeline, you can use an authenticated service account to do so. We can down the JSON key file of the service account and use it for authentication by setting the GOOGLE_APPLICATION_CREDENTIALS environment variable to the path of the JSON key file.
$ export GOOGLE_APPLICATION_CREDENTIALS=path/to/JSON_key.jsonCreate an Artifact Registry repository
Now let’s first create an Artifact Registry repository that will work as the container to store our Python packages.
The repository here is different from the repository concept you may have before. For example, in GitHub, a repository is a place that contains all of your project’s files and each file’s revision history. However, in Artifact Registry a repository is a place where you can store, manage, and secure your software artifacts such as Docker images or Python packages.
Therefore, we can store multiple Python packages, which are normally stored in multiple GitHub repositories, in a single Artifact Registry repository.
Try to find Artifact Registory in the GCP console and click the “CREATE REPOSITORY” button to create a new one. The following page will be opened:
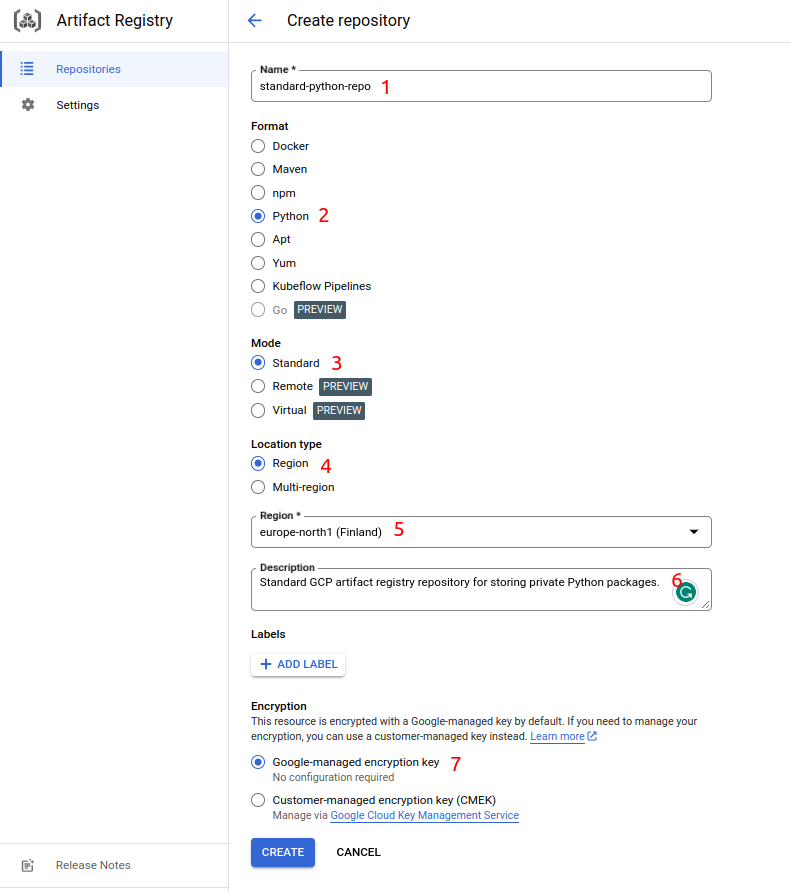
Fill in or choose the repository name, format, mode, location type, region, and encryption as indicated above.
Some important notes here:
- The repository name is NOT the package name and does not correspond to a GitHub repository. It should preferably be a container name indicating that it can store multiple Python packages.
- Choose Python as the format as we will store Python packages in this repo.
- The mode should be standard, meaning it’s a regular repository storing private packages. Remote and virtual repositories are still in the preview status at the time of writing, but they can be very helpful in some cases.
We can also create the repository with this command:
gcloud artifacts repositories create standard-python-repo \
    --repository-format=python \
    --location=europe-north1 \
    --description="Standard GCP artifact registry repository for storing private Python packages."
Using the GCP console is easier to get started and you can get help more easily, whereas using the command line is better for version control and automatic operations.
After the repository is created, you can find it on the Artifact Registry Repositories page:

The above information for the repository can also be obtained by this command:
gcloud artifacts repositories list --location=europe-north1
Build a Python project
Then we need to build our Python package so it can it uploaded to the Artifact Registry repository created above.
First let’s install some tools that will be used to configure, build and publish Python packages. It’s recommended to create a virtual environment with the latest version of Python and install the libraries in it:
$ conda create -n packaging python=3.11
$ conda activate packaging

$ (packaging) pip install -U setuptools build twine
Three tools are installed, namely setuptools, build, and twine, which will be used to configure, build and publish Python packages respectively.
If you want to follow along in this post, or if you want to get some sample code to play with, you can clone the repo and then build the package.
git clone https://github.com/lynnkwong/div_mod.git

cd div_mod/by_modules/
python -m build
The details of the settings can be found in setup.cfg.
After the package is built, you will have a directory structure as follows:
by_modules/
├── dist
│   ├── div_mod_1234-0.0.1-py3-none-any.whl
│   └── div_mod_1234-0.0.1.tar.gz
├── div_mod_1234.egg-info
│   ├── dependency_links.txt
│   ├── PKG-INFO
│   ├── SOURCES.txt
│   └── top_level.txt
├── div_mod.py
├── LICENSE
├── pyproject.toml
├── README.md
└── setup.cfg
When a Python project is built for distribution, the archives are saved in the dist subdirectory in your Python project, which can be uploaded to the Artifact Registry repository with Twine, a utility for publishing Python packages.
Set up authentication to Artifact Registry with Python
We will use the Python keyring library to store the credentials for connecting to Artifact Registry repositories. It’s recommended as we don’t need to provide a username and password as plain text in this way.
Install the following libraries in our virtual environment in order to use the Python keyring library for authentication:
$(packaging) pip install keyring
$(packaging) pip install keyrings.google-artifactregistry-auth
Then we need to get the repository configuration to add to the Python project. We can find the command in the way shown in the picture below:
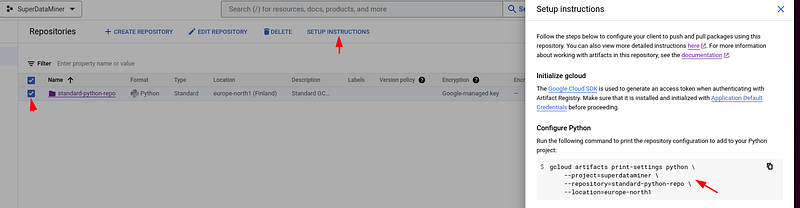
Run the command shown above in the console:
gcloud artifacts print-settings python \
    --project=superdataminer \
    --repository=standard-python-repo \
    --location=europe-north1
Note you need to replace the project ID, repository, and location with your own settings.
When this command is run, you will see something like:
# Insert the following snippet into your .pypirc

[distutils]
index-servers =
    standard-python-repo

[standard-python-repo]
repository: https://europe-north1-python.pkg.dev/superdataminer/standard-python-repo/

# Insert the following snippet into your pip.conf

[global]
extra-index-url = https://europe-north1-python.pkg.dev/superdataminer/standard-python-repo/simple/
As indicated above, we need to update the .pypirc and pip.conf files respectively.
The .pypirc file allows us to define the configuration for package indexes so that you don’t have to enter the URL, username, or password whenever you upload a package with Twine. The custom index server, namely the Artifact Registry repository created above is added here. If you need to upload packages to PyPI, the credentials will be put here as well.
The .pypirc file should be put in the home directory. If it’s not there, you need to create it by yourself:
vi $HOME/.pypircCopy and paste the .pypic section shown above to it:
[distutils]
index-servers =
    standard-python-repo

[standard-python-repo]
repository: https://europe-north1-python.pkg.dev/superdataminer/standard-python-repo/
standard-python-repo is the alias for the custom index server and can be used by Twine with the -r option as we will see soon.
On the other hand, the pip.conf file is a configuration file for pip which allows us to set default values for pip command line options. The most common settings in pip.conf are index-url and extra-index-url. index-url specifies the default package index. If it’s not set then it defaults to the Python Package Index (PyPI). extra-index-url provides an additional index URL to the one specified in index-url, which is useful when you want pip to search for packages in both PyPI and an additional package index such as the Artifact Registry Repository created in this post.
If you don’t use a virtual environment, then the pip.conf file is located in the home directory as well. Otherwise, it’s located in the virtual environment root folder, which can be extracted from the path of the pip command:
export VIRTUAL_ENV=$(dirname $(dirname $(which pip)))

vi $VIRTUAL_ENV/pip.conf
Then copy and paste the pip.conf section above to it.
[global]
extra-index-url = https://europe-north1-python.pkg.dev/superdataminer/standard-python-repo/simple/
In case you are wondering, the simple part of the URL indicates that the repository supports the “Simple Repository API” which provides an easy-to-use, minimal interface for pip to search for packages.
Upload packages to Artifact Registry
Now all preparations are completed, we use Twine to upload the built packages located in the dist folder to our Artifact Registry repository:
twine upload -r standard-python-repo dist/*

# OR

python -m twine upload -r standard-python-repo dist/*
The -r option specifies the repository that the packages will be uploaded to. The repository alias standard-python-repo specified in $HOME/.pypirc is used here.
When the above command is run, you will see the packages uploaded to the Artifact Registry repository:
Uploading distributions to https://europe-north1-python.pkg.dev/superdataminer/standard-python-repo/
Uploading div_mod_1234-0.0.1-py3-none-any.whl
100% ━━━━━━━━━━━━━━━━━━━━━━━━━━━━━━━━━━━━━━━━ 6.0/6.0 kB • 00:00 • ?
Uploading div_mod_1234-0.0.1.tar.gz
100% ━━━━━━━━━━━━━━━━━━━━━━━━━━━━━━━━━━━━━━━━ 5.5/5.5 kB • 00:00 • ?
And you can then check the uploaded packages in the Artifact Registry:
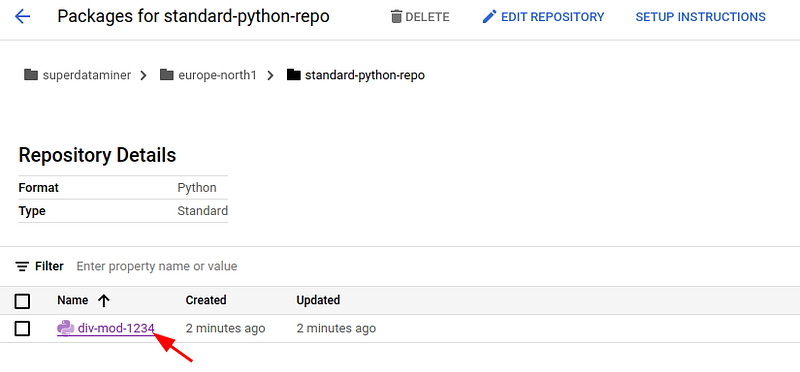
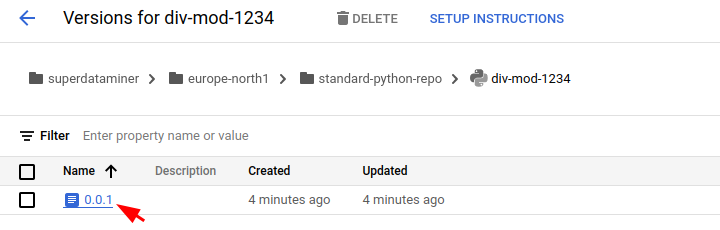
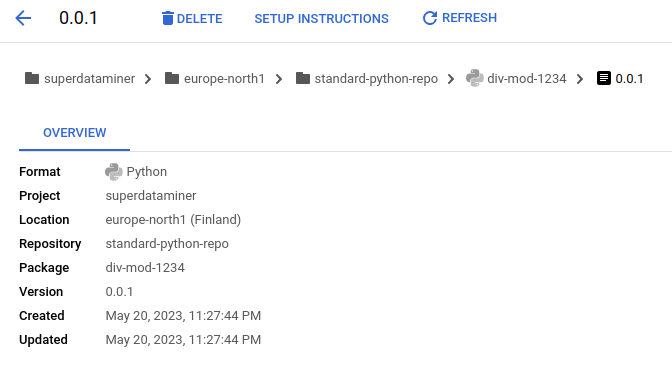
Install packages stored in Artifact Registry
Since the div-mod-1234 package is hosted in Artifact Registry now, we can install it using pip.
If you are just an end user of the package, you still need to authenticate your local environment, either with your Google account directly, or through a service account, as demonstrated above. Then update the pip.conf file as shown above as well.
In order to prove that the div-mod-1234 package is installed from Artifact Registry successfully, let’s navigate out of the local package folder and then install and import the package from there:
$(packaging) cd $HOME
$(packaging) pip install div-mod-1234
You will see it’s indeed installed from Artifact Registry:
Looking in indexes: https://pypi.org/simple, https://europe-north1-python.pkg.dev/superdataminer/standard-python-repo/simple/
Collecting div-mod-1234
  Downloading https://europe-north1-python.pkg.dev/superdataminer/standard-python-repo/div-mod-1234/div_mod_1234-0.0.1-py3-none-any.whl (2.7 kB)
Installing collected packages: div-mod-1234
Successfully installed div-mod-1234-0.0.1
If there is an existing package with the same name as that of your private one in PyPI, you would need to create a virtual repository to specify multiple upstream repositories and set the priorities accordingly.
When the above package is installed, you can then use it in your code in the same way as any third-party package:
$(packaging) python

>>> from div_mod import div_mod
>>> div_mod(10, 3)
(3, 1)
Cheers! Everything works as expected!
In this post, we have introduced how to set up our local environment properly to work with Google Artifact Registry. The step-by-step instructions for uploading packages to an Artifact Registry repository and installing them for end uses are introduced with simple examples. Now we can start to use Artifact Registry for hosting in-house packages which will be shared by different projects.
Related articles
- How to configure, build, and publish your Python projects to PyPI
- How to Set Up Your Local Environment to Work With GCP
More content at PlainEnglish.io.
Sign up for our free weekly newsletter. Follow us on Twitter, LinkedIn, YouTube, and Discord.


