
How to Implement Dependency Injection Dagger Hilt in Your Existing MVVM Android application
This is the second part of my blog, you can find the link of first blog below. In the first part I implemented the MVVM architecture, and here I want to show how to implement dagger hilt on our existing application.
Understanding Dependency Injection
1. Why we need dependency injection dagger in Android Application?
Dagger is a dependency injection framework for Android that facilitates testability, and maintainability of code.
It promotes the Dependency Injection (DI) pattern, reducing boilerplate code and making unit testing easier by allowing the injection of dependencies or repositories.
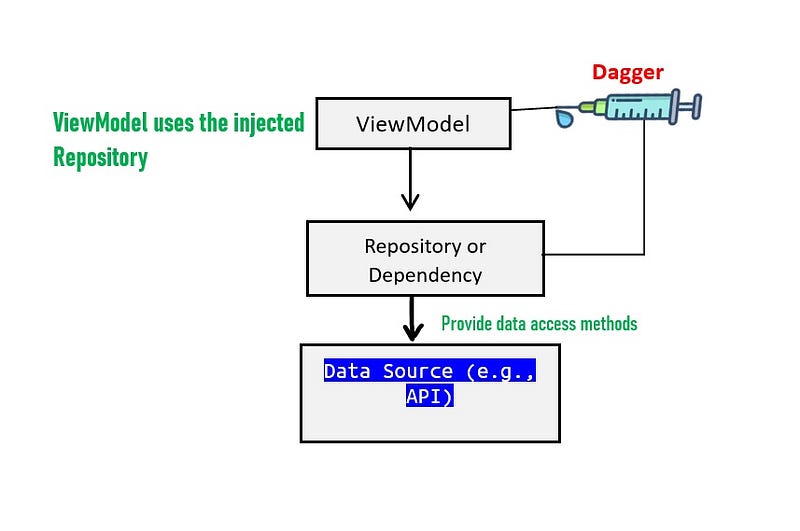
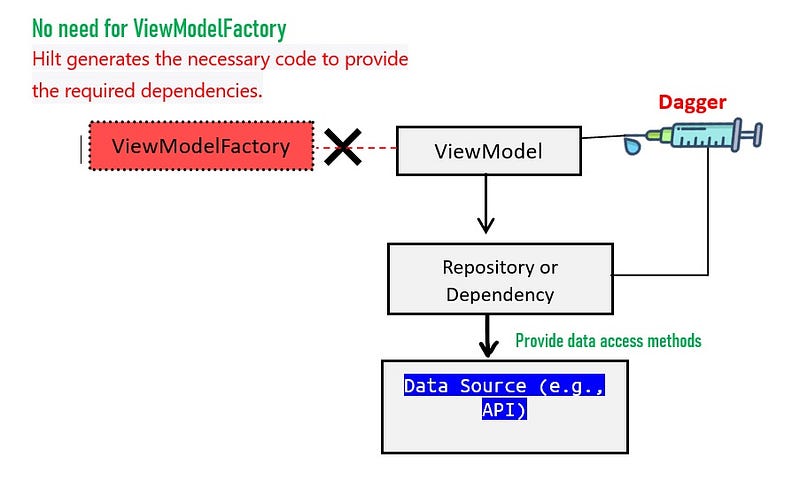
Dagger eliminates the need for manual creation of objects from other classes, as it automates the creation and provision of these objects. This simplifies the testing process and ensures proper dependency management. As shown in the figure below, we inject the repository into our ViewModel. This approach makes testing easier, as our ViewModel is no longer directly dependent on the Repository.
2. Dagger2 vs Dagger Hilt, Which one we should use?
2.1 Dagger2:
Dagger 2 is a widely used dependency injection framework in Android development, but it does have some complexities and challenges that developers have encountered.
- Boilerplate Code
- Configuration error
- Lack of Built-in Android Integration
- Scoping challenges
- Code complexity
2.2 Dagger Hilt:
Dagger Hilt is a dependency injection framework for Android that is built on top of the Dagger2 framework.
One of the key benefits of Dagger Hilt is that it reduces the amount of boilerplate code that developers have to write when compared to using Dagger2 directly in Android applications.
Dagger Hilt simplifies the configuration and setup of Dagger2 by providing high-level annotations and automatic code generation.
Here are a few ways in which Dagger Hilt simplifies the implementation of Dagger2 in Android:
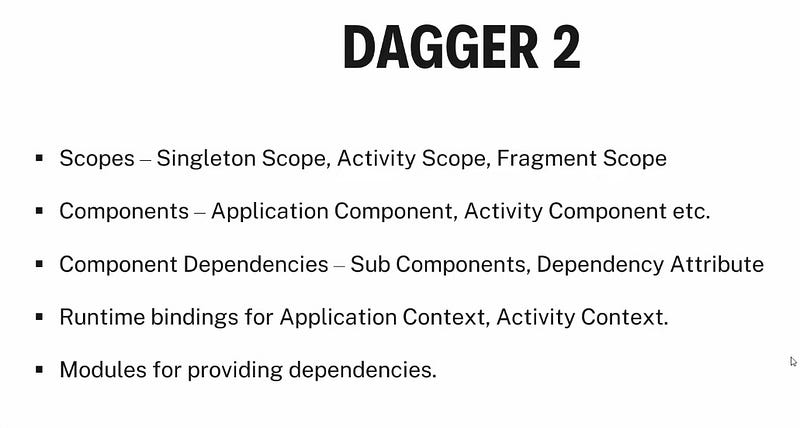
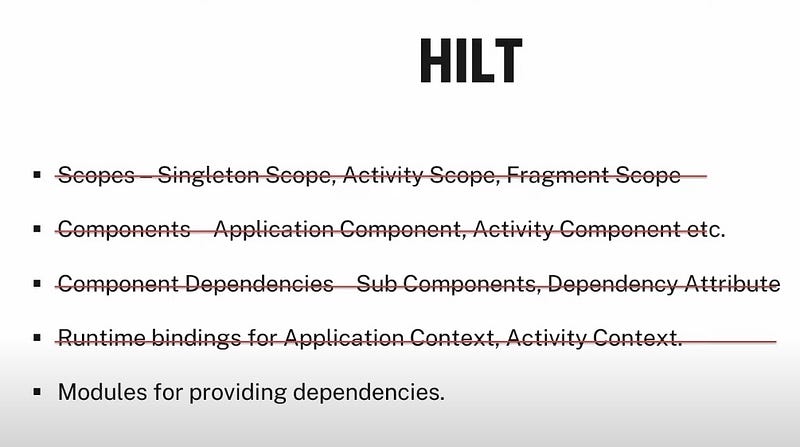
In Dagger Hilt we don’t need to create or manage the following parts, it’s created automatically for us as show in figure below.
Making Automatic Dagger Setup:
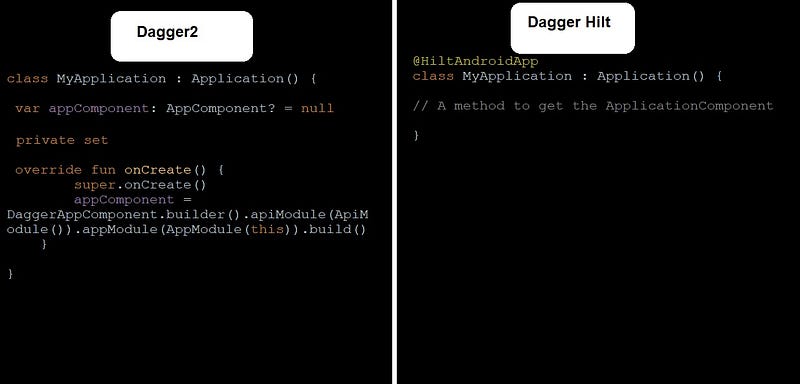
With Dagger Hilt, you don’t need to manually create and configure Dagger2 instances in your application class. Hilt simplify this setup for you, reducing the initialization code you need to write.
As you can see in figure below how Dagger Hilt reduce the code for creating Dagger instance for us, we don’t need to write anything in our Application class, Dagger Hilt will do it for us.
Please note: we still need to add the Application class in our AndroidManifest.xml
Automatic Component Generation:
Dagger Hilt generates Dagger 2 components (such as @Component interfaces) automatically based on your module and dependency requirements. You no longer need to write these components manually.
Simplified Scoping:
Hilt simplifies the scoping of dependencies by providing annotations like @Singleton and @ActivityScoped, which are commonly used in Android apps. This makes it easier to manage the lifecycle and scope of objects.
View Model Injection(No need for ViewModelFactory):
Hilt provides an easy way to inject dependencies into Android ViewModel instances using the @ViewModelInject and @HiltViewModel annotation, which simplifies ViewModel creation and injection.
By using these annotations, you can eliminate the need for a ViewModelFactory, making ViewModel creation and injection more straightforward and concise. Hilt’s ViewModel support streamlines the dependency injection process for ViewModels in Android applications.
Let’s start with the code, we will divide our code in 2 parts.
Part 1 without dagger and Part 2 with dagger
Part 1:
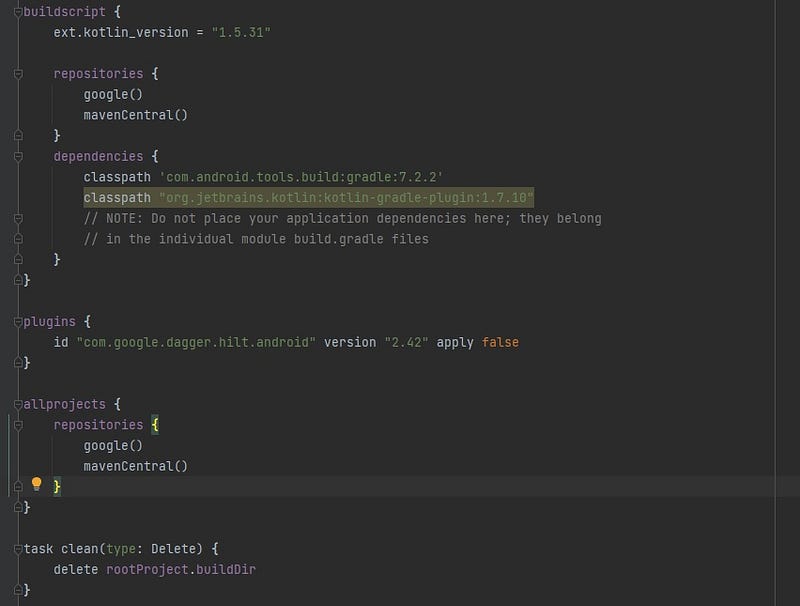
Step 1: adding plugin to your build.gradle file
add in your build.gradle file in App Project level
Please note: if you are using old version of android such as 1.7 or less use 2.42 dagger hilt verion .
For latest version of android 1.8 or 1.9 use dagger hilt 2.48.
plugins {
    id "com.google.dagger.hilt.android" version "2.42" apply false
}
Also udpate your build.gradle App(module) level file
plugins {
    id 'com.android.application'
    id 'kotlin-android'
    id 'kotlin-kapt'
    id 'com.google.dagger.hilt.android'
}


dependencies {
 implementation "com.google.dagger:hilt-android:2.42"
 kapt "com.google.dagger:hilt-compiler:2.42"
}
Step 2: Create our model data class
data class GithubRepositoryModel(
    val id: Int,
    val node_id: String,
    val name: String,
    val full_name: String,
    val private: Boolean,
    val owner: Owner,
    val html_url: String,
    val description: String?,
    val fork: Boolean,
    val url: String,
    val created_at: String,
    val updated_at: String,
    val pushed_at: String,
    val homepage: String?,
    val size: Int,
    val stargazers_count: Int,
    val watchers_count: Int,
    val language: String?,
    val forks_count: Int,
    val open_issues_count: Int,
    val default_branch: String
) {
    data class Owner(
        val login: String,
        val id: Int,
        val node_id: String,
        val avatar_url: String,
        val gravatar_id: String,
        val url: String,
        val received_events_url: String,
        val type: String
    )
}
Step 3: Create Api Interface class for our endpoint
interface ApiEndPoint {

  @GET("repositories")
   suspend fun getRepo() : Response<List<GithubRepositoryModel>>


}
********************************************************
********************************************************
Part 2: Dagger Hilt Implementation
Step 1: Creating our NetworkModules class
@Module
@InstallIn(SingletonComponent::class)
object NetworkModules {

    val baseUrl = "https://api.github.com/"

    @Provides
    @Singleton
    fun provideRetrofit(): Retrofit {
        return Retrofit.Builder()
            .baseUrl(baseUrl) // Replace with your base URL
            .addConverterFactory(GsonConverterFactory.create())
            .build()
    }

    @Provides
    @Singleton
    fun provideApiService(retrofit: Retrofit): ApiEndPoint {
        return retrofit.create(ApiEndPoint::class.java)
    }
}
→ In this class we have annoation @Module , This annotation indicates that the class is a Dagger Hilt module, responsible for providing dependencies.
we are providing two dependency as you can see from the above code
- Retrofit
- ApiEndPoint
→ @InstallIn(SingletonComponent::class), This annotation specifies that the module should be installed in the SingletonComponent, which means that the provided dependencies will have a singleton scope, and there will be only one instance of each provided dependency within the application's lifetime.
Step 2: Create the Application class
@HiltAndroidApp
class MyApplication : Application() {
    // A method to get the ApplicationComponent

}
Please note: Here we don’t need to create the Dagger instance Hilt will automatically create it for us, we only need to annotate it with @HiltAndroidApp
Step 3: Create our Repository class
Now we will create our Repo GithubRepository class which will call the ApiEndPoint to get the response.
class GithubRepository @Inject constructor(private val apiEndPoint: ApiEndPoint) {
   suspend fun getAllRepository() = apiEndPoint.getRepo()
}
This is very important class to understant the Dagger hilt
In this class we have the annoation in constructor@Inject constructor(private val apiEndPoint: ApiEndPoint) , This annotation is used to signal to the Dagger Hilt dependency injection framework that instances of GithubRepository should be created and provided with an ApiEndPoint dependency automatically.
In other words, when you request an instance of GithubRepository through Dagger Hilt, it will ensure that the required ApiEndPoint dependency is injected into the constructor.
Step 4: Error Handling class
data class SuccessResult<out T>(
    val status: Status,
    val data: T?,
    val message: String?
) {

    companion object {

        fun <T> success(data: T?): SuccessResult<T> {
            return SuccessResult(Status.SUCCESS, data, null)
        }

        fun <T> error(msg: String, data: T?): SuccessResult<T> {
            return SuccessResult(Status.ERROR, data, msg)
        }

        fun <T> loading(data: T?): SuccessResult<T> {
            return SuccessResult(Status.LOADING, data, null)
        }

    }
}
Step 5: Enum Status file
enum class Status {
        SUCCESS,
        ERROR,
        LOADING
    }
Step 6: Repository injection in ViewModel
@HiltViewModel
class MainViewModel @Inject constructor(private val mainRepository: MainRepository): ViewModel() {

    private val _repo = MutableLiveData<SuccessResult<List<GithubRepositoryModel>>>()
    val repo : LiveData<SuccessResult<List<GithubRepositoryModel>>>
        get() = _repo

    init {
        getAllRepo()
    }

    fun getAllRepo(){

        viewModelScope.launch {

            mainRepository.getRepo().let {
                if (it.isSuccessful){
                    _repo.postValue(SuccessResult.success(it.body()))
                }
                else{
                    _repo.postValue(SuccessResult.error(it.errorBody().toString(), null))
                }
            }

        }

    }

}@HiltViewModelis an annotation by the Dagger Hilt, we used it to indicate that the MainViewModel class should be treated as a ViewModel and managed by the Dagger Hilt.
@Inject constructor() annotation is used to indicate that Dagger Hilt should provide the dependencies required for the constructor of this class. In this case, it's requesting the injection of the mainRepository dependency.
Step 7: Adapter class for displaying data
class RepoAdapter() : RecyclerView.Adapter<RepoAdapter.MyViewHolder>() {

    override fun onCreateViewHolder(parent: ViewGroup, viewType: Int): RepoAdapter.MyViewHolder {
        val itemBinding = ItemsRepoBinding.inflate(LayoutInflater.from(parent.context), parent, false)
        return MyViewHolder(itemBinding)
    }

    override fun onBindViewHolder(holder: RepoAdapter.MyViewHolder, position: Int) {
        holder.bind(position)
    }

    override fun getItemCount(): Int {
        return differ.currentList.size
    }

    private val diffCallback = object : DiffUtil.ItemCallback<GithubRepositoryModel>(){
        override fun areItemsTheSame(oldItem: GithubRepositoryModel, newItem: GithubRepositoryModel): Boolean {
            return oldItem.id == newItem.id
        }

        override fun areContentsTheSame(oldItem: GithubRepositoryModel, newItem: GithubRepositoryModel): Boolean {
            return oldItem.hashCode() == newItem.hashCode()
        }
    }

    private val differ = AsyncListDiffer(this,diffCallback)

    fun submitList(list: List<GithubRepositoryModel>) = differ.submitList(list)

    inner class MyViewHolder(private val itemBinding: ItemsRepoBinding) : RecyclerView.ViewHolder(itemBinding.root) {

        fun bind(position: Int) {
            val item = differ.currentList[position]
            itemBinding.nameTextView.text = "Name: ${item.name}" // Set the name property
            itemBinding.descTextView.text = "Full Name: ${item.full_name}" // Set the full_name property
            itemBinding.createdDateTextView.text = "Owner: ${item.owner}" // Set the owner property
        }

    }
}
Our adapter xml layout file
<?xml version="1.0" encoding="utf-8"?>
    <LinearLayout
        xmlns:android="http://schemas.android.com/apk/res/android"
        xmlns:app="http://schemas.android.com/apk/res-auto"
        android:layout_width="match_parent"
        android:layout_height="wrap_content"
        android:orientation="horizontal">


    <LinearLayout
            android:layout_width="match_parent"
            android:layout_height="wrap_content"
            android:orientation="vertical">

            <TextView android:id="@+id/nameTextView"
                android:layout_width="match_parent"
                android:layout_height="wrap_content"
                android:textSize="18sp"
                android:textColor="@color/design_default_color_on_primary"
                android:layout_margin="10dp"
                android:textStyle="bold" />

            <TextView android:id="@+id/descTextView"
                android:layout_width="match_parent"
                android:layout_height="wrap_content"
                android:textSize="14sp"
                android:layout_marginStart="10dp"
                />

            <TextView android:id="@+id/createdDateTextView"
                android:layout_width="match_parent"
                android:layout_height="wrap_content"
                android:textSize="14sp"
                android:textColor="#000000"
                android:layout_marginStart="10dp"
                android:layout_marginTop="10dp"
                android:layout_marginBottom="10dp"/>

        </LinearLayout>
    </LinearLayout>
Step 8: MainActivity changes for Dagger2:
@AndroidEntryPoint
class MainActivity : AppCompatActivity() {

    private val mainViewModel: MainViewModel by viewModels()
    private lateinit var adapter: RepoAdapter

    private lateinit var binding: ActivityMainBinding

    override fun onCreate(savedInstanceState: Bundle?) {
        super.onCreate(savedInstanceState)
        binding = ActivityMainBinding.inflate(layoutInflater)
        val view = binding.root
        setContentView(view)

        adapter = RepoAdapter()
        binding.rvRepo.layoutManager = LinearLayoutManager(this)
        binding.rvRepo.adapter = adapter


        initObserve()
    }

    private fun initObserve() {
        mainViewModel.repo.observe(this, Observer {
            when (it.status) {
                Status.SUCCESS -> {
                    binding.progress.visibility = View.GONE
                    binding.rvRepo.visibility = View.VISIBLE
                    adapter.submitList(it.data!!)
                }

                Status.LOADING -> {
                    binding.progress.visibility = View.VISIBLE
                    binding.rvRepo.visibility = View.GONE
                }
                Status.ERROR -> {
                    binding.progress.visibility = View.GONE
                    binding.rvRepo.visibility = View.VISIBLE
                }

            }

        })
    }
}
In the MainActivity or Fragment you only have to write the @AndroidEntryPoint
Source code:
That’s it! We have successfully implemented Dependency Injection (DI) using Dagger-Hilt along with Retrofit using coroutines.
Now, build and run your app!
For a complete code reference, please check out this GitHub repository. Happy coding!
Stackademic
Thank you for reading until the end. Before you go:
- Please consider clapping and following the writer! 👏
- Follow us on Twitter(X), LinkedIn, and YouTube.
- Visit Stackademic.com to find out more about how we are democratizing free programming education around the world.


