
Mastering Android MVVM: Kotlin example to Create High-Quality Android App for Fetching data from web service by using Best Practices
What is MVVM architecture?
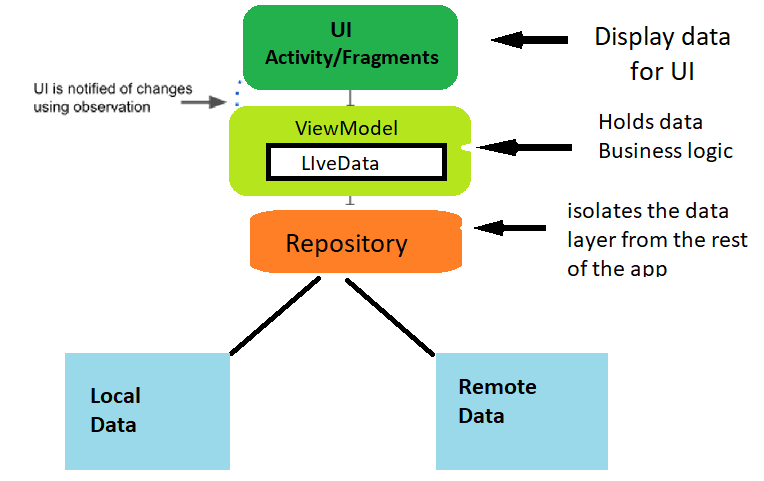
MVVM stands for Model-View-ViewModel, is a design pattern that facilitates separation of concerns between the user interface (View), the data (Model), and the business logic (ViewModel) of an application. This separation of concerns makes it easier to test, modify, and maintain different parts of the application independently.
Figure 1. shows the overview of MVVM architecture, in which each layer is separated from other.
Project Overview:
Technologies Used:
- Retrofit
- BindingAdapter
- CallBacks
- LiveData
- ViewModel
- Fragment
****************************Let’s Start Coding **************************
********************************Step 1************************************
The first step is to add dependencies in build.gradle(Module level) file and enable dataBinding as we will be using dataBinding.
built.gradle
android{

dataBinding{

        enabled = true
    }
}

dependencies {

implementation 'com.squareup.retrofit2:retrofit:2.9.0'
implementation 'androidx.recyclerview:recyclerview:1.2.0-beta01'
implementation 'com.github.bumptech.glide:glide:4.12.0'
implementation 'com.squareup.retrofit2:converter-gson:2.9.0'
implementation 'androidx.lifecycle:lifecycle-extensions:2.2.0'
}
*****************************Step 2*********************************
For webservices we need the end point for fetching the data from api service, for this we will create the interface class in package network → ApiEndPoint.kt we will be using the following base url https://api.github.com/ to get gitHub Repository profile data.
ApiEndPoint.kt
interface ApiEndPoint {
    @GET("search/repositories")
    fun getAllRepo(@Query("q") q : String) : Call<GithubResponseModel>
}
********************************Step 3**********************************
Now we need the retrofit client for HTTP request and add the baseUrl in package network → RetrofitClient.kt.
class RetrofitClient {

    companion object{

        val baseUrl = "https://api.github.com/"

        fun getRetrofitInstance(): Retrofit {

            return Retrofit.Builder()
                .baseUrl(baseUrl)
                .addConverterFactory(GsonConverterFactory.create())
                .build()
        }
    }
}
In the above code we added the baseUrl, a converter to convert Json to Kotlin data class or vice versa.
******************************Step 4***********************************
For the web service API values we also need data class to hold the values, Let’s create the model class in package data → model →
GithubResponseModel.kt
data class GithubResponseModel(val items: ArrayList<MyData>)

data class MyData(val name: String, val description: String, val created_at: String, val owner: Owner)

data class Owner(val avatar_url: String)
*******************************Step 5************************************
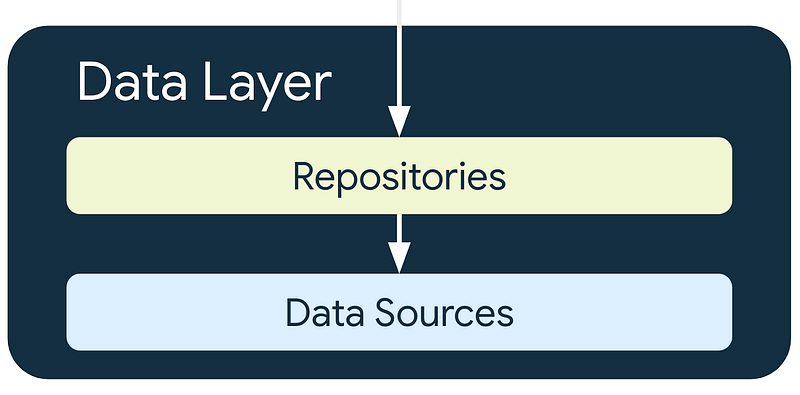
For clean architecture we need repository class, we will create GithubRepository.kt class in package data, repository is used to abstract the data layer, and later we will be integrating the repository class to the ViewModel .
GithubRepository.kt
class GithubRepository {
    private val retrofit = RetrofitClient.getRetrofitInstance().create(ApiEndPoint::class.java)

    fun getAllRepository(query : String) = retrofit.getAllRepo(query)
}
******************************Step 6**********************************
To show the data in list we are adding recylerview in package data → adapter → DataAdapter.kt
class DataAdapter: RecyclerView.Adapter<DataAdapter.MyViewHolder>() {
    var items = ArrayList<MyData>()

    fun setData(data : ArrayList<MyData>){
        this.items = data
    }

    override fun onCreateViewHolder(parent: ViewGroup, viewType: Int): MyViewHolder {
      val layoutInflater = LayoutInflater.from(parent.context)
        val binding = RecyclerLayoutBinding.inflate(layoutInflater)
        return MyViewHolder(binding)
    }

    override fun getItemCount(): Int {
       return items.size
    }


    override fun onBindViewHolder(holder: MyViewHolder, position: Int) {
        holder.bind(items[position])
    }

    class MyViewHolder(val binding: RecyclerLayoutBinding):RecyclerView.ViewHolder(binding.root){

        fun bind(data: MyData){
            binding.gitHubData = data
            binding.executePendingBindings()
        }

    }

}
Here is the layout for our recyclereview
recyler_layout.xml
<?xml version="1.0" encoding="utf-8"?>
<layout xmlns:android="http://schemas.android.com/apk/res/android"
    xmlns:app="http://schemas.android.com/apk/res-auto"

    >
    <data>
        <variable
            name="gitHubData"
            type="com.example.githubrepo_livedata.data.model.MyData" />
    </data>

    <LinearLayout
        android:layout_width="match_parent"
        android:layout_height="wrap_content"
        android:orientation="horizontal">
    <ImageView android:id="@+id/thubmImage"
        android:layout_width="100dp"
        android:layout_height="100dp"
        android:layout_gravity="center"
        android:layout_margin="10dp"
        app:loadImage='@{gitHubData.owner.avatar_url}'
        />


    <LinearLayout
        android:layout_width="match_parent"
        android:layout_height="wrap_content"
        android:orientation="vertical">

        <TextView android:id="@+id/nameTextView"
            android:layout_width="match_parent"
            android:layout_height="wrap_content"
            android:textSize="18sp"
            android:textColor="@color/design_default_color_on_primary"
            android:layout_margin="10dp"
            android:textStyle="bold"
            android:text='@{gitHubData.name}'/>

        <TextView android:id="@+id/descTextView"
            android:layout_width="match_parent"
            android:layout_height="wrap_content"
            android:textSize="14sp"
            android:layout_marginStart="10dp"
            android:text='@{gitHubData.description ?? "No Desc avaialable"}'
            />

        <TextView android:id="@+id/createdDateTextView"
            android:layout_width="match_parent"
            android:layout_height="wrap_content"
            android:textSize="14sp"
            android:textColor="#000000"
            android:layout_marginStart="10dp"
            android:layout_marginTop="10dp"
            android:layout_marginBottom="10dp"
            text='@{gitHubData.created_at}'/>

    </LinearLayout>
    </LinearLayout>
</layout>
************************************Step 7**********************************
Adding BindingAdapter for setImage in our recylerview layout.
BindingAdapterUtils.kt
@BindingAdapter("loadImage")
fun loadImage(thumbimg : ImageView, url : String){
        Glide.with(thumbimg)
            .load(url)
            .circleCrop()
            .placeholder(R.drawable.ic_launcher_foreground)
            .error(R.drawable.ic_launcher_foreground)
            .fallback(R.drawable.ic_launcher_foreground)
            .into(thumbimg)

    }
*******************************Step 8***********************************
The next step is about viewModel, we will add our ViewModel class in package viewmodel → MainViewModel.kt.
Why we use ViewModel?
The ViewModel class is for holding and managing UI-related data in a life-cycle conscious way. This allows data to survive configuration changes such as screen rotations. ViewModels separate UI implementation from your app’s data.
MainViewModel.kt
class MainViewModel(private val repository: GithubRepository) : ViewModel() {

    private val _githubResponseData = MutableLiveData<GithubResponseModel>()
    val githubResponseData : LiveData<GithubResponseModel> = _githubResponseData

    var dataAdapter: DataAdapter = DataAdapter()

    init {
        makeApiCall()
    }
    fun getAdapter(): DataAdapter {
        return dataAdapter
    }

    fun setAdapterData(data : ArrayList<MyData>){
        dataAdapter.setData(data)
        dataAdapter.notifyDataSetChanged()
    }


    fun makeApiCall(input: String?=null) {
        val myData = RetrofitClient.getRetrofitInstance().create(ApiEndPoint::class.java)
        repository.getAllRepository("kotlin").enqueue(object : retrofit2.Callback<GithubResponseModel> {
            override fun onFailure(call: Call<GithubResponseModel>, t: Throwable) {
                _githubResponseData.value = null
            }

            override fun onResponse(
                call: Call<GithubResponseModel>,
                response: Response<GithubResponseModel>
            ) {
                if (!response.isSuccessful()) _githubResponseData.value =
                    null else _githubResponseData.value = response.body()
            }


        })

    }

}
As you can see from the code above we pass the respository to viewModel which will call for the data from webservice.
Please note that for passing parameter’s in viewmodel constructor we need to create ViewModel Factory.
********************************Step 9******************************
MainViewModelFactory.kt
class MainViewModelFactory : ViewModelProvider.Factory {
    override fun <T : ViewModel?> create(modelClass: Class<T>): T {
        return MainViewModel(
            repository = GithubRepository()
        ) as T
    throw IllegalArgumentException("Unknown ViewModel class")
    }
}
*********************************Step 10*******************************
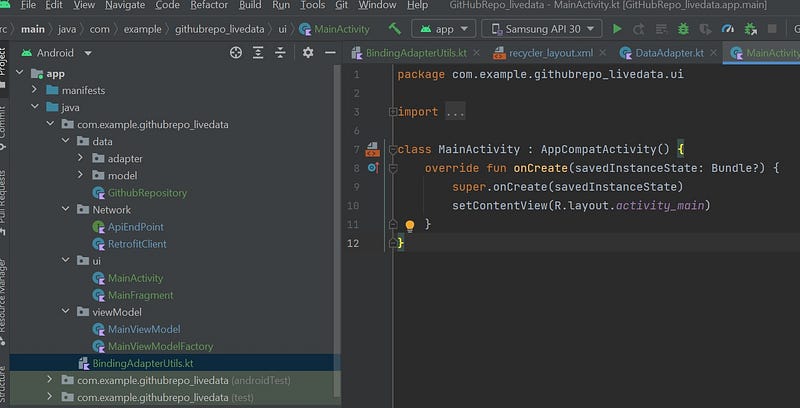
In this application we are using fragment so in our ui → MainActivity.kt class we did not added any code, we only have FragmentContainerView in our xml activity_main.xml layout file.
MainActivity.kt
class MainActivity : AppCompatActivity() {
    override fun onCreate(savedInstanceState: Bundle?) {
        super.onCreate(savedInstanceState)
        setContentView(R.layout.activity_main)
    }
}
activity_main.xml
<?xml version="1.0" encoding="utf-8"?>

<androidx.constraintlayout.widget.ConstraintLayout
    xmlns:android="http://schemas.android.com/apk/res/android"
    xmlns:app="http://schemas.android.com/apk/res-auto"
    xmlns:tools="http://schemas.android.com/tools"
    android:layout_width="match_parent"
    android:layout_height="match_parent"
    tools:context=".ui.MainActivity">

    <androidx.fragment.app.FragmentContainerView
        android:layout_width="match_parent"
        android:layout_height="match_parent"
        android:id="@+id/fragment_container_view"
        android:name="com.example.githubrepo_livedata.ui.MainFragment"
        app:layout_constraintEnd_toEndOf="parent"
        app:layout_constraintEnd_toStartOf="parent"
        app:layout_constraintBottom_toBottomOf="parent"
        app:layout_constraintTop_toTopOf="parent" />

</androidx.constraintlayout.widget.ConstraintLayout>
******************************Step 11************************************
In final step we will be creating our MainFragment.kt class in our ui package.
Why Fragments instead of activity?
Fragments do not need to be full screen, lots of flexibility in designing them. Fragments do not need to inflate layout if views are not necessary. Several activities can use the same fragment
MainFragment.kt
class MainFragment : Fragment() {

    private lateinit var mainViewModel: MainViewModel
    private lateinit var _binding: FragmentMainBinding

    private val binding get() = _binding

    override fun onCreateView(
        inflater: LayoutInflater, container: ViewGroup?,
        savedInstanceState: Bundle?
    ): View? {
        // Inflate the layout for this fragment
        _binding = FragmentMainBinding.inflate(inflater, container, false)
        return binding.root
    }

    override fun onViewCreated(view: View, savedInstanceState: Bundle?) {
        super.onViewCreated(view, savedInstanceState)

        mainViewModel = ViewModelProvider(this, MainViewModelFactory())[MainViewModel::class.java]

        binding.setVariable(BR.viewModel, mainViewModel)
        binding.executePendingBindings()

        binding.recyclerView.apply {
            layoutManager = LinearLayoutManager(requireContext())
            val decoration = DividerItemDecoration(requireContext(), LinearLayoutManager.VERTICAL)
            addItemDecoration(decoration)
        }


        initObserver()

    }

    private fun initObserver() {

        mainViewModel.githubResponseData.observe(viewLifecycleOwner, Observer {
            if (it != null) {
                binding.progressbar.visibility = View.INVISIBLE
                mainViewModel.setAdapterData(it.items)

            } else {
                Toast.makeText(requireContext(), "Error Fetching Data", Toast.LENGTH_LONG).show()
            }
        })

    }

}
As we are using bindingAdapter, our xml is interacting with viewmodel and we are directly calling setAdapter fun in viewmodel from our xml.
app:setAdapter='@{viewModel.getAdapter()}fragment_main.xml
<?xml version="1.0" encoding="utf-8"?>
<layout xmlns:android="http://schemas.android.com/apk/res/android">
    <data>
        <variable
            name="viewModel"
            type="com.example.githubrepo_livedata.viewModel.MainViewModel" />
    </data>
    <androidx.constraintlayout.widget.ConstraintLayout
        xmlns:app="http://schemas.android.com/apk/res-auto"
        xmlns:tools="http://schemas.android.com/tools"
        android:layout_width="match_parent"
        android:layout_height="match_parent"
        tools:context=".ui.MainActivity">

        <androidx.recyclerview.widget.RecyclerView
            android:id="@+id/recyclerView"
            android:layout_width="match_parent"
            android:layout_height="wrap_content"
            app:layout_constraintTop_toTopOf="parent"
            app:layout_constraintStart_toStartOf="parent"
            app:setAdapter='@{viewModel.getAdapter()}'/>

        <ProgressBar android:id="@+id/progressbar"
            android:layout_width="wrap_content"
            android:layout_height="wrap_content"
            app:layout_constraintStart_toStartOf="parent"
            app:layout_constraintEnd_toEndOf="parent"
            app:layout_constraintTop_toTopOf="parent"
            app:layout_constraintBottom_toBottomOf="parent"/>


    </androidx.constraintlayout.widget.ConstraintLayout>

</layout>
******************************* OutPut ********************************
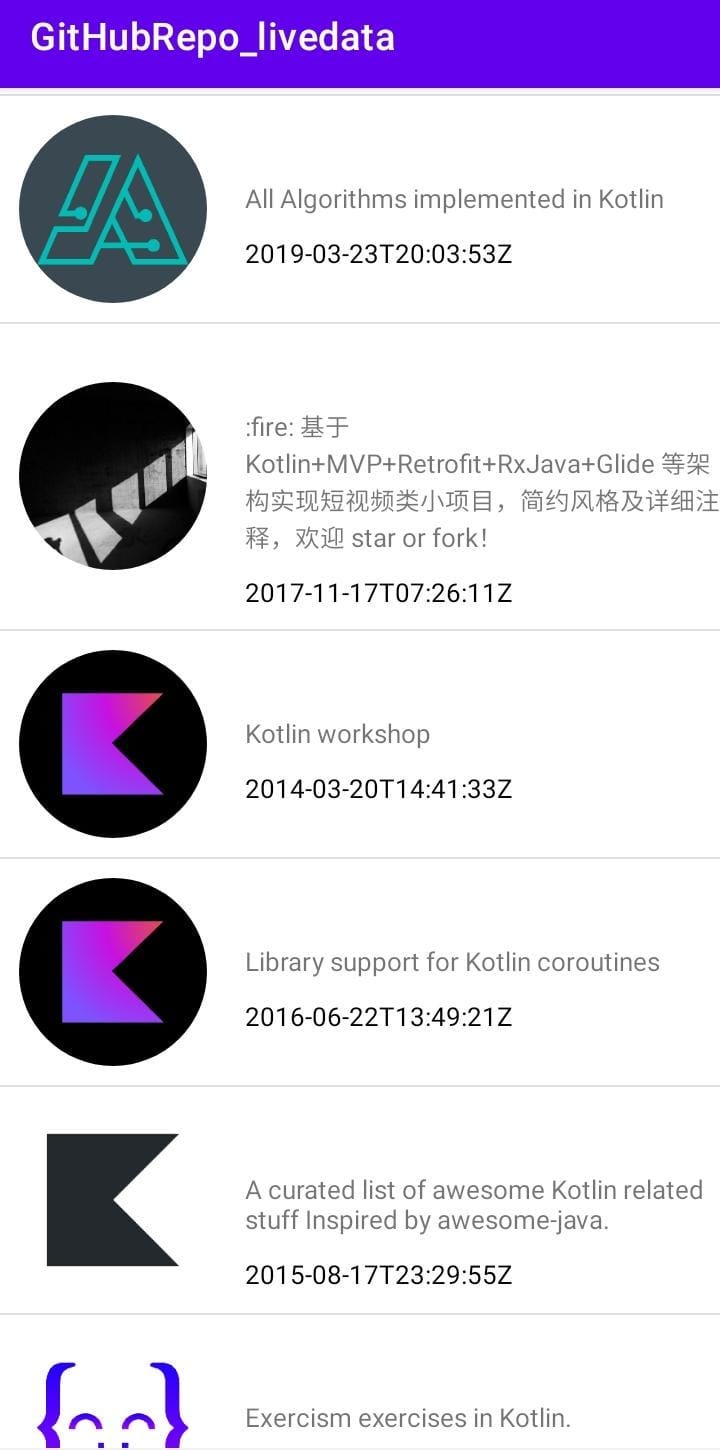
You can find the full code and working project from my GitHub. I wanted to write this blog post and create the project in GitHub because it can then just be easily cloned so there’s no need to write all this from scratch each time when starting a new project :) I hope you also got something out of this!
Give me a follow if you want to see more blogs!


