
Get Started With React.js
An Introduction to the Popular Frontend Library
You’ve done a splendid job in developing the backend part of your web applications. But many people have commented that your applications need to look better, that is, they feel that a good front-end can bring your app to the next level. Upon doing research, you find out that a popular solution for such a task is a library called React.
In this article, we will commence our learning journey to the React.js library.
Introduction
What is React?
React.js builds user interfaces for single-page web apps by dividing the UI into composable elements. React.Js is a UI library, that was originally developed as an in-house library for Facebook, and then it was later open-sourced in 2013. It's famous and mostly used for a multitude of reasons
Why Use React.js?
- Easy To Learn: Since it requires a minimal understanding of JavaScript and HTML, the learning curve is fairly low. In some cases, we will even be using the ‘vanilla DOM JavaScript API’(you’ll see what I mean later), which means that the programmer doesn’t need to learn anything new before getting started.
- Reusable Components: If you’ve developed simple websites in HTML, there might’ve been times where you wanted to group a bunch of HTML elements and then save them into some sort of ‘variable’ so that it could be re-used later on. For a developer, this is a lifesaver. React has the ability to implement such a facility.
There are more reasons which are covered in-depth in this well-written article.
Now that we’ve gotten this out of the way, it’s finally time to get our feet wet!
Getting Started: Installing React
First, go to the terminal and then type,
npx create-react-app app-nameThis instruction creates a template of a React application with the name of app-name .
Note: npx is not a typo. It is a package runner command included within npm .
Now, you need to navigate to the directory of this application and then view it in your browser like so:
cd app-name
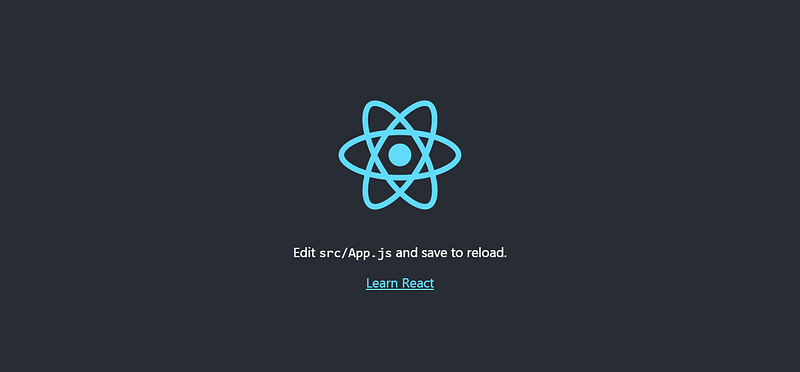
npm startIf the above operation is successful, your browser will open up to a URL of localhost:3000 . This is the output in the browser
Now let’s create a simple Hello World! application with this project.
Hello World! — With React
Within your project directory, go to src/index.js and replace the contents of the file index.jsas follows:

Lines 1 and 2:Importing thereactandreact-domlibraries. Thereactmodule is used to write HTML code within JavaScript(also known as JSX) andreact-appis used to execute therenderfunction that will display the contents onto the page.Line 5: Render anh1element in a container which has anidof root. The explanation of this method is done in the next part.
The output of the code is as follows:

Note: You might be wondering that HTML tags within JavaScript are incorrect syntax. You’re absolutely right, but the React Library uses its own language that is similar to JavaScript but can use JSX within the language.
The render method
The root.render method can be explained as follows:

As the syntax suggests, the
- The
containerobject specifies where you want to display the element. In normal convention, it’s adivelement with the id ofroot. We use the JavaScript DOM API to identify this such element. - The
root.renderfunction specifies what element you want to display the element. In the above example, we rendered anh1element with the textHello World.
Question: Where can I find this div element that has the id of 'root’ ?
Look into the code of the HTML file, public/index.html . Notice at line 31 :
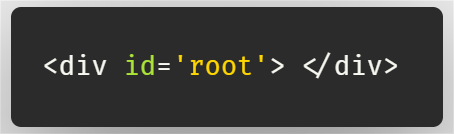
All of the elements we specify in the element argument will be displayed within the div element that has the specified id of root .
Thus, the compiler tells the browser that: the element will be displayed within container .
But there are several things you should know when using this method:
Things to know about root.render()
The root.render method cannot contain two-parent elements in the first argument. The example below is wrong and will give you an error:

Instead, you can do this:
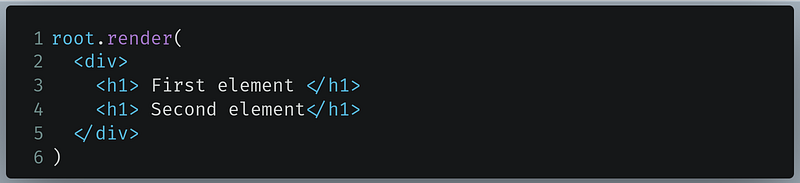
We can specify one single parent element to display 2 child h1 elements on the page.
We can even display a small unordered list as follows:

In practical cases though, it’s not feasible to insert 40+ lines of HTML in the render method. This is where Functional Components come into place.
Functional Components
Let’s take this piece of HTML code:
As a React developer, it’s not viable to put so many elements within the render method. It is good practice to implement modularity.
You can put the elements you want to render within a separate function.
Core Idea
function ComponentName() {
     return(
      <component> </component>
   )
}root.render(<ComponentName/> , document.getElementById('root'))component is the HTML element you want to render, like h1 or p .
Basic Example
As an example, let’s rewrite the function of the Hello World! app.
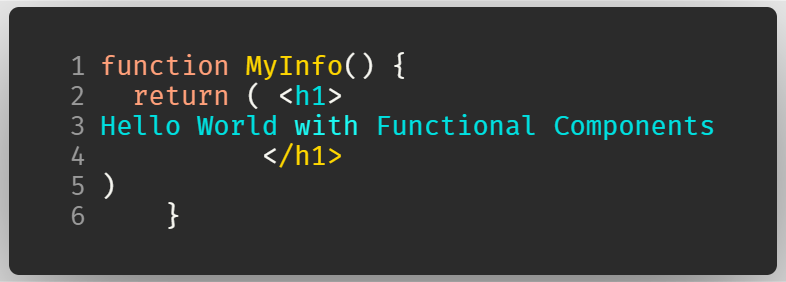
Note: Always remember to use return on your elements, otherwise, it will throw an error
To render it,

As you can notice, we can write our function as a JSX tag.
Keep in mind that you should
- use self-closing tags.
- Your function should start with a capital letter.
The code gives the following output

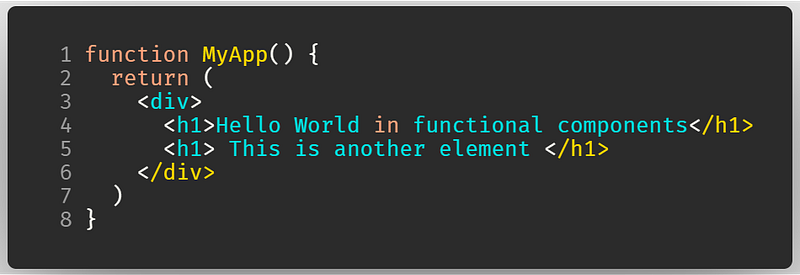
Here also, we cannot have multiple parent elements. Like before, we will use one parent element with two child elements.
Exercise
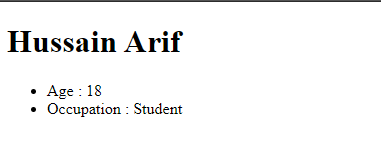
As a little task, I want you to render an h1 element with your name in it, and then write a list that contains 3 facts about you. Perform this activity using functional components.
Solution: We cannot have two parents elements. Let’s use a div and then insert an h1 element followed by a list(ul) .
And then it will be rendered.
The output of the code is as follows:
In real-life projects, it is common practice to put your functional components within separate files as it makes your program more modular.
Move Functional Components Into Separate Modules
Let’s say your functional component is too complex. As a developer, you want to move your component into another file so that it can be used in your main file. Thus, this makes your program modular. Furthermore, modularity also makes your code look neater.
Core Idea
First, create a functional component in a separate file. Then, we will export it as follows:
export default ComponentNameComponentName is the name of your functional component.
Basic Example
Let’s rewrite the above exercise.
Create a new file, called MyApp.js and write your code as follows:

Line 1: Import thereactmodule to use JSX tags within our codeLines 2–12: Our functional componentLine 13: Export ourMyAppfunction so that it could be used within ourindex.jsfile.
Now we can use it in our index.js file like so:
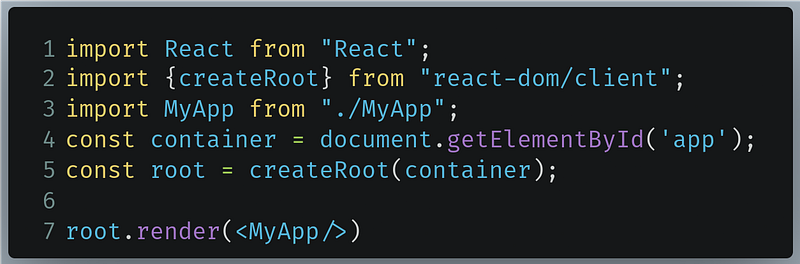
Line 3: We will use theimportkeyword to use theMyAppcomponent. Always remember to use relative paths to specify your module. First-party modules likereactdon’t need relative paths.Line 7: Render theMyAppcomponent.
The output of the code is as follows:

Parent/Child Components
Sometimes, even when writing HTML tags within functions becomes too complex. You cannot write so many lines of code within a function as it seems unreadable.
You can nest your functional components as much as you want
Core Idea
Define basic functional components
function MyFirstComponent() {
    return(
     <component> </component>
   )
 }
Use it in a second functional component
function MySecondComponent() {
  return (
    <div>
      <MyFirstComponent/>
      <!--further code here -->
    </div>
  )
}
And then render it
root.render(<MySecondComponent/>); Basic Example
As an example, let’s define a footer element in a separate file and then use it.
In a file Footer.js
And then to use it in App.js :
Notice that our Footer element was used in Line 13
Now let’s render App element within index.js
root.render(<App/>);Recap
Hello World App
import React from "react"
import ReactDOM from "react-dom"root.render(<h1> Hello World </h1>);Functional Components
function MyComponent() {
  return(
    <component>
    </component>
    )
}
Functional Components in Another File
- Define a component,
MyComponent.jsand export
function MyComponent() {
  return(
    <component> </component>
    )
}
export default MyComponent- Use in another file
index.js,
import React from "react"
import ReactDOM from "react-dom"
import MyComponent from "./MyComponent"
Nested Components
- Define the first component,
MyComponent.jsand export
function MyComponent() {
  return(
   <component> </component>
    )
}
export default MyComponent- Define the second component,
App.jsand export
And then use in index.js
import React from "react"
import ReactDOM from "react-dom"
import App from "./App";
External Resources:
Conclusion
One thing to remember is that the syntax in React is definitely different than the normal JavaScript syntax. One thing that has worked for me is to play with the code to grasp the topic properly. My advice to you is to do the same — don’t give up!
Stay home, stay safe.
Previous post: Build A Simple Notes App With Node.Js And Mongoose Next post: The Basics Of Styling And Writing CSS In React


