avatarHussain Arif

Free AI web copilot to create summaries, insights and extended knowledge, download it at here

6589

Abstract

developer, code modularity should be treated as an important stage of your program. In many projects, the CSS Styles are located within another file.</p><p id="a2fb">To implement such behavior, create a new file, <code>myStyle.css</code> , and write this code:</p><div id="c7cb"><pre><span class="hljs-selector-tag">body</span> { <span class="hljs-attribute">background-color</span>: <span class="hljs-number">#282c34</span>; <span class="hljs-attribute">color</span>: white; <span class="hljs-attribute">padding</span>: <span class="hljs-number">40px</span>; <span class="hljs-attribute">font-family</span>: Arial; <span class="hljs-attribute">text-align</span>: center; }</pre></div><p id="0d43"><i>Note: Since this is a CSS file and not React code, we won’t be using </i><code>camelCase</code><i> anymore.</i></p><p id="30e3">Now let’s import it into our React file, using the following syntax:</p><div id="6715"><pre><span class="hljs-keyword">import</span> <span class="hljs-string">"./filename.css"</span></pre></div><p id="b18c"><code>filename.css</code> is the name of your CSS file. <i>Note that relative file paths need to be specified.</i></p><p id="b4b6">Using it in React code:</p> <figure id="9d6e"> <div> <div>

            <iframe class="gist-iframe" src="/gist/HussainArif12/c8254f25aacc61500a5ea8f9cc29e05d.js" allowfullscreen="" frameborder="0" height="undefined" width="undefined">
          </div>
        </div>
    </figure></iframe></div></div></figure><p id="563e">This is the output:</p><figure id="9ee8"><img src="https://cdn-images-1.readmedium.com/v2/resize:fit:800/1*kM-4ZUuDfQAVvNyy7bFr8g.png"><figcaption>Output of the code</figcaption></figure><h2 id="e670">3. Module CSS</h2><p id="6af6">This method is convenient for HTML elements placed in separate files.</p><p id="89fa">It’s similar to the CSS Stylesheet method, but this time the CSS file should contain the <code>.module.css</code> extension.</p><p id="a023">As an example, create a file named <code>myFile.module.css</code>:</p><div id="181a"><pre>.<span class="hljs-built_in">error</span> {</pre></div><div id="e5b4"><pre><span class="hljs-built_in">background</span>-<span class="hljs-type">color</span>: <span class="hljs-built_in">red</span>;</pre></div><div id="a52a"><pre>}</pre></div><p id="6544">Now within th eReact app, write the following code:</p><div id="19cf"><pre><span class="hljs-keyword">import</span> React, { Component } <span class="hljs-keyword">from</span> <span class="hljs-string">'react'</span>;</pre></div><div id="f259"><pre><span class="hljs-keyword">import</span> styles <span class="hljs-keyword">from</span> <span class="hljs-string">'./myFile.module.css'</span>; <span class="hljs-comment">// Import css modules stylesheet as styles</span></pre></div><div id="8ec2"><pre><span class="hljs-keyword">function</span> <span class="hljs-title function_">Error</span><span class="hljs-params">()</span> {</pre></div><div id="3db2"><pre><span class="hljs-keyword">return</span>(

<span class="language-xml"><span class="hljs-tag"><<span class="hljs-name">h1</span> <span class="hljs-attr">className</span>=<span class="hljs-string">{styles.error}</span>></span>Error Occurred!<span class="hljs-tag"></<span class="hljs-name">h1</span>></span></span>; ) }</pre></div><p id="c838">This will be the output:</p><figure id="2ecc"><img src="https://cdn-images-1.readmedium.com/v2/resize:fit:800/1*CIdW_vlQsQzmO1ucW_aOfQ.png"><figcaption>Output of the code</figcaption></figure><p id="0c58">Say that we want to run JavaScript expressions within our HTML. Now let’s move on to JavaScript within JSX.</p><h1 id="ea37">JavaScript Within JSX</h1><p id="97b8">In React, it’s possible to run JavaScript code in between JSX tags — by using curly braces(<code>{}</code>) in the tag. These curly braces contain the JavaScript code.</p><h2 id="a051">Embed expressions within JSX</h2><p id="60fc">As an example, let’s store a name inside a variable,<code>myName</code> and then print its value in HTML.</p><p id="2052">First, declare a variable,<code> myName</code>:</p><div id="f311"><pre><span class="hljs-function">function <span class="hljs-title">App</span>()</span> { <span class="hljs-keyword">let</span> myName = <span class="hljs-string">'Hussain'</span> ...</pre></div><p id="6c11">Now, display its value in a <code>p</code> tag:</p><div id="de54"><pre><span class="hljs-built_in">return</span> ( <p> Hello, {myName}, <span class="hljs-built_in">nice</span> to meet you! </p> ); }</pre></div><p id="70b1">Note that the JavaScript code within JSX tags is executed within the curly braces.</p><p id="b18b">Ultimately, the code looks like this:</p><div id="7e0d"><pre><span class="hljs-keyword">function</span> <span class="hljs-title function_">App</span>(<span class="hljs-params"></span>) { <span class="hljs-keyword">let</span> myName= <span class="hljs-string">'Hussain'</span> <span class="hljs-keyword">return</span>( <span class="language-xml"><span class="hljs-tag"><<span class="hljs-name">p</span>></span> My name is {myName} <span class="hljs-tag"></<span class="hljs-name">p</span>></span></span> ); } <span class="hljs-title class_">ReactDOM</span>.<span class="hljs-title function_">render</span>(<span class="language-xml"><span class="hljs-tag"><<span class="hljs-name">App</span>/></span></span>, <span class="hljs-variable language_">document</span>.<span class="hljs-title function_">getElementById</span>(<span class="hljs-string">'root'</span>));</pre></div><p id="a832">The compiler initially executes the code as HTML. Later, when it encounters a set of curly braces, it switches to JavaScript.</p><p id="8714">The output is as follows:</p><figure id="bfeb"><img src="https://cdn-images-1.readmedium.com/v2/resize:fit:800/1*IuGeZhYdUO58msK1D72zgA.png"><figcaption>Output of the code</figcaption></figure><p id="6a90">Note that we don’t need the <code>span</code> elements any longer. This makes development easier.</p><p id="68f4">You can even execute functions in JavaScript in JSX:</p> <figure id="6055"> <div> <div>

            <iframe class="gist-iframe" src="/gist/HussainArif12/03cbaff6716be34a93c548da91f37c26.js" allowfullscreen="" frameborder="0" height="undefined" width="undefined">
          </div>
        </div>
    </figure></iframe></div></div></figure><p id="2ebd">This will be the output of the code above:</p><figure id="f7a3"><img src="http

Options

s://cdn-images-1.readmedium.com/v2/resize:fit:800/1*tgLbTkxQC5_X5akauOuxlg.png"><figcaption>Output of the code</figcaption></figure><h2 id="c7e0">JSX is also an expression</h2><p id="c945">After compilation, JSX expressions become normal JavaScript function calls and also evaluate to JavaScript objects.</p><p id="b7a1">This means that you can use JSX inside of <code>if</code> statements and <code>for</code> loops, assign it to variables, accept it as arguments, and return it from functions.</p><p id="37e8">Let’s define a function to greet the user, depending on function parameters:</p><div id="78e8"><pre><span class="hljs-keyword">function</span> <span class="hljs-title function_">getGreeting</span>(<span class="hljs-params">user</span>) { <span class="hljs-keyword">if</span> (user) { <span class="hljs-keyword">return</span> <span class="language-xml"><span class="hljs-tag"><<span class="hljs-name">h1</span>></span>Hello, {user} !<span class="hljs-tag"></<span class="hljs-name">h1</span>></span></span>; } <span class="hljs-keyword">return</span> <span class="language-xml"><span class="hljs-tag"><<span class="hljs-name">h1</span>></span>Hello, Stranger.<span class="hljs-tag"></<span class="hljs-name">h1</span>></span></span>; }</pre></div><p id="21b6">To use it within JSX:</p><div id="edcb"><pre><<span class="hljs-keyword">div</span>> <span class="hljs-keyword">With</span> parameter: {getGreeting(<span class="hljs-string">'Hussain'</span>)} {getGreeting()} <<span class="hljs-keyword">div</span>></pre></div><p id="40e8">The output of the code will be as follows:</p><figure id="7596"><img src="https://cdn-images-1.readmedium.com/v2/resize:fit:800/1*LwkrY7cJR0tJ2lkzdHspEw.png"><figcaption>Output of the code</figcaption></figure><h2 id="c8a0">Specify element properties with JSX</h2><p id="4e1f">We can even specify element properties using JavaScript. For example, let’s specify an <code>src</code> property of an <code>img</code> tag through JSX. A simple snippet can be like this:</p><div id="df23"><pre><span class="hljs-comment">//..</span> <span class="hljs-keyword">const</span> src= <span class="hljs-string">'image.jpg'</span> <span class="hljs-keyword">return</span>( <span class="language-xml"><span class="hljs-tag"><<span class="hljs-name">img</span> <span class="hljs-attr">src</span>=<span class="hljs-string">{src}</span> /></span></span> ) <span class="hljs-comment">//..</span></pre></div><p id="d443">Ultimately, we can use it in our code like this:</p> <figure id="e47e"> <div> <div>

            <iframe class="gist-iframe" src="/gist/HussainArif12/17b165adc404df8e372215759598f013.js" allowfullscreen="" frameborder="0" height="undefined" width="undefined">
          </div>
        </div>
    </figure></iframe></div></div></figure><p id="08f5">The output will be as expected:</p><figure id="8020"><img src="https://cdn-images-1.readmedium.com/v2/resize:fit:800/1*XMCxJt1f2zGVTOQfcz3pOQ.png"><figcaption>Code output</figcaption></figure><h1 id="ef9c">Recap</h1><h2 id="d767">CSS</h2><p id="f5e1"><b>Inline styles: </b>Use double curly braces to use CSS styles in React</p><p id="5291">Follow <code>camelCase</code> notation.</p><div id="041b"><pre><span class="language-xml">return(

<span class="hljs-tag"><<span class="hljs-name">h1</span> <span class="hljs-attr">style</span>=</span></span><span class="hljs-template-variable">{{<span class="hljs-name">color:</span><span class="hljs-string">'white'</span>,backgroundColor:<span class="hljs-string">'black'</span>}}</span><span class="language-xml"><span class="hljs-tag">></span> Text <span class="hljs-tag"></<span class="hljs-name">h1</span>></span> ) //... other code </span></pre></div><p id="53b7"><b>External Stylesheets: </b>Use <code>import</code> keyword and then name of your CSS file.</p><div id="cce0"><pre><span class="hljs-keyword">import</span> <span class="hljs-string">"./myFile.css"</span> <span class="hljs-comment">//.. other code</span></pre></div><p id="c167"><b>CSS modules:</b></p><p id="144c"><code>myFile.module.css</code></p><div id="b01d"><pre>.<span class="hljs-keyword">error</span> { <span class="hljs-comment">//styles</span> }</pre></div><p id="183a">Your React file:</p><div id="c665"><pre><span class="hljs-keyword">import</span> myStyle <span class="hljs-keyword">from</span> <span class="hljs-string">"./myFile.module.css"</span> <span class="hljs-keyword">function</span> <span class="hljs-title function_">App</span>(<span class="hljs-params"></span>) { <span class="hljs-keyword">return</span> ( <span class="language-xml"><span class="hljs-tag"><<span class="hljs-name">h1</span> <span class="hljs-attr">style</span>=<span class="hljs-string">{myStyle.error}</span>></span> Text <span class="hljs-tag"></<span class="hljs-name">h1</span>></span></span> ) }</pre></div><h2 id="65cb">JavaScript within JSX</h2><p id="4bf0">Use curly braces to use JavaScript.</p><div id="eb43"><pre><span class="hljs-keyword">const</span> myNumber = <span class="hljs-number">9</span> <span class="hljs-keyword">return</span>( <span class="language-xml"><span class="hljs-tag"><<span class="hljs-name">p</span>></span> My lucky number : {myNumber} <span class="hljs-tag"></<span class="hljs-name">p</span>></span></span> )</pre></div><h1 id="eb9b">Conclusion</h1><p id="1ae0">If you find any of this confusing, my advice to you is to play with the code and deconstruct the example programs above. It will help you to wrap your head around the concepts. Don’t give up!</p><p id="4511">Thank you for making it to the end! I hope you learned a lot from this topic. Have a great day!</p><p id="8773">Previous Article : <a href="http://medium.com/easyread/how-to-get-started-with-react-js-805bf57826ad">How to Get Started With React</a> Next Article : <a href="https://readmedium.com/a-guide-to-props-in-react-d6980f947ea9">A Guide To Props In React</a></p><h1 id="4106">Further Reading</h1><ul><li><a href="https://blog.bitsrc.io/5-ways-to-style-react-components-in-2019-30f1ccc2b5b">5 Ways to Style React Components</a></li><li><a href="https://create-react-app.dev/docs/adding-a-css-modules-stylesheet/">Adding a CSS Modules StyleSheet</a></li><li><a href="https://www.w3schools.com/react/react_css.asp">React CSS</a></li><li><a href="https://reactjs.org/docs/introducing-jsx.html">Introducing JSX</a></li><li><a href="https://reactjs.org/docs/jsx-in-depth.html">JSX in Depth</a></li></ul></article></body>

The Basics of Styling and Writing CSS in React

How to style React components with JavaScript

Source: Marc Olivier at Unsplash.com

In plain HTML, we style our components and use JavaScript like this:

<p style='color:blue;'>Hello, my name is <span id='name'> </span> </p>
<script>
let s = document.getElementById('name')
s.innerText= 'Hussain'
</script>

However in React, we do it like this:

function App() {
  let myName= 'Hussain'
  return(
    <p style={{color:'blue'}}> My name is {myName} </p>
    );
}
ReactDOM.render(<App/>, document.getElementById('root'));

In React, we perform this task differently — in such a way that it becomes easier on the eyes. In this tutorial, we’ll discuss how to use CSS properties in React and how to run JavaScript code within JSX tags.

Styling and CSS

There are three ways to style components: inline styling, CSS style sheets, and module CSS

1. Inline Styling

Single inline styles: In normal HTML, we use inline styling in your apps like this:

<p style="color:blue;"> This is a text </p>

However, this concept is different in React. When using styles in React, we enclose them with double curly braces.

As an example, let’s render a p element in blue:

function App() {
  return(
    <p style={{color:'blue'}}> This is a text </p>
    )
}
ReactDOM.render(<App/>, document.getElementById('root'))

Note that the styles are enclosed with double curly braces ({{}} ).

This is the result:

Output of the code

Multiple inline styling

Using multiple styles in inline CSS is also easy.

<p style={{color:'white',backgroundColor:'gray'> This is a text </p>

Bear in mind that React uses the camelCase notation for CSS style properties. For example, the background-color property in CSS is equivalent to backgroundColor.

Use an object variable

It isn’t practically feasible to use multiple inline styles, so you need a variable to store all of your styles:

const mystyles = {
      color: "white",
      backgroundColor: "DodgerBlue",
      padding: "10px",
      fontFamily: "Arial"
    };
//..further code
<p style={myStyles}> My style! </p>

Here, mystyles is an object that contains all of the relevant CSS styles. Later, this object is passed on in the style property.

This will be the output:

Output of the code

2. Stylesheet

As a developer, code modularity should be treated as an important stage of your program. In many projects, the CSS Styles are located within another file.

To implement such behavior, create a new file, myStyle.css , and write this code:

body {
  background-color: #282c34;
  color: white;
  padding: 40px;
  font-family: Arial;
  text-align: center;
}

Note: Since this is a CSS file and not React code, we won’t be using camelCase anymore.

Now let’s import it into our React file, using the following syntax:

import "./filename.css"

filename.css is the name of your CSS file. Note that relative file paths need to be specified.

Using it in React code:

This is the output:

Output of the code

3. Module CSS

This method is convenient for HTML elements placed in separate files.

It’s similar to the CSS Stylesheet method, but this time the CSS file should contain the .module.css extension.

As an example, create a file named myFile.module.css:

.error {
background-color: red;
}

Now within th eReact app, write the following code:

import React, { Component } from 'react';
import styles from './myFile.module.css'; // Import css modules stylesheet as styles
function Error() {
return(
 <h1 className={styles.error}>Error Occurred!</h1>;
)
}

This will be the output:

Output of the code

Say that we want to run JavaScript expressions within our HTML. Now let’s move on to JavaScript within JSX.

JavaScript Within JSX

In React, it’s possible to run JavaScript code in between JSX tags — by using curly braces({}) in the tag. These curly braces contain the JavaScript code.

Embed expressions within JSX

As an example, let’s store a name inside a variable,myName and then print its value in HTML.

First, declare a variable, myName:

function App() {
let myName = 'Hussain'
...

Now, display its value in a p tag:

return (
 <p> Hello, {myName}, nice to meet you! </p>
);
}

Note that the JavaScript code within JSX tags is executed within the curly braces.

Ultimately, the code looks like this:

function App() {
  let myName= 'Hussain'
  return(
    <p> My name is {myName} </p>
    );
}
ReactDOM.render(<App/>, document.getElementById('root'));

The compiler initially executes the code as HTML. Later, when it encounters a set of curly braces, it switches to JavaScript.

The output is as follows:

Output of the code

Note that we don’t need the span elements any longer. This makes development easier.

You can even execute functions in JavaScript in JSX:

This will be the output of the code above:

Output of the code

JSX is also an expression

After compilation, JSX expressions become normal JavaScript function calls and also evaluate to JavaScript objects.

This means that you can use JSX inside of if statements and for loops, assign it to variables, accept it as arguments, and return it from functions.

Let’s define a function to greet the user, depending on function parameters:

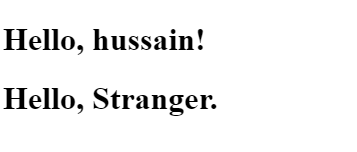
function getGreeting(user) {
  if (user) {
    return <h1>Hello, {user} !</h1>; 
 }
  return <h1>Hello, Stranger.</h1>;
}

To use it within JSX:

<div>
 With parameter: {getGreeting('Hussain')} 
 {getGreeting()}
<div>

The output of the code will be as follows:

Output of the code

Specify element properties with JSX

We can even specify element properties using JavaScript. For example, let’s specify an src property of an img tag through JSX. A simple snippet can be like this:

//..
const src= 'image.jpg'
return(
<img src={src} />
)
//..

Ultimately, we can use it in our code like this:

The output will be as expected:

Code output

Recap

CSS

Inline styles: Use double curly braces to use CSS styles in React

Follow camelCase notation.

return(
<h1 style={{color:'white',backgroundColor:'black'}}> Text </h1>
)
//... other code

External Stylesheets: Use import keyword and then name of your CSS file.

import "./myFile.css"
//.. other code

CSS modules:

myFile.module.css

.error {
//styles
}

Your React file:

import myStyle from "./myFile.module.css"
function App() {
return (
  <h1 style={myStyle.error}> Text </h1>
  )
}

JavaScript within JSX

Use curly braces to use JavaScript.

const myNumber = 9
return(
  <p> My lucky number : {myNumber} </p>
)

Conclusion

If you find any of this confusing, my advice to you is to play with the code and deconstruct the example programs above. It will help you to wrap your head around the concepts. Don’t give up!

Thank you for making it to the end! I hope you learned a lot from this topic. Have a great day!

Previous Article : How to Get Started With React Next Article : A Guide To Props In React

Further Reading

Programming
JavaScript
React
Reactjs
Nodejs
Recommended from ReadMedium