
Medium Partner Program | Payoneer
How to Get Paid on Medium for Writers From India
Step-by-step guide to register in the Medium Partner Program from countries where Stripe is not available.

[Update: 29.July.2023]
Note: Medium Partner Program is now available in 12 more countries. According to a post from Medium, here is the list of newly supported countries.
We’re opening up the Partner Program to 12 more countries, with more to come. We want to be as open as possible because everyone has a story to tell. Expanding to more countries has been, by far, the biggest requested change to the Partner Program and we’re very excited to finally be doing this. As of today, we currently support applicants in 33 countries. On August 1st, we will expand the Partner Program to accept applications for these additional 12 countries: Brazil, Bulgaria, Croatia, Cyprus, Gibraltar, Hungary, India, Liechtenstein, Malaysia, Malta, Thailand, and the United Arab Emirates. By the end of the year, we plan to open up to another 50 or so.
I recommend reading the Medium blog post to learn more about the changes in detail if you reside in one of these newly included countries.
[Older Updates]
Note: Many writers are reporting now that the MPP page no longer works for registration with the steps given below. With latest update from Medium, the given steps below might not work for MPP registration in some countries. The Payoneer registration steps given in this article still works fine.
[Step-by-step Guide]
I have recently started writing on Medium. I enjoy the whole process of writing, publishing, getting claps, and interacting with like-minded people in the comments section.
Yesterday I successfully joined the Medium Partner Program (MPP) from India.
While scanning through the internet to find out any workaround to join the Medium Partner Program (MPP) from non-stripe-supported countries, I stumbled upon articles by fellow writers from Pakistan and Indonesia. These articles provided excellent guidance in helping me navigate through various processes for joining the MPP.
The process of joining the MPP from India is somewhat similar to any other non-stripe-supported country, with a few extra steps.
If you are a writer from India and want to make money by writing on Medium — please follow along the below step-by-step guide, and you will be all set in no time.
If you are not from India, you can still follow along with the steps. I will try my best to mark the steps that non-Indian writers can skip without any issue while setting up their accounts.
First and foremost, you need to get a Payoneer account approved before registering for the MPP. Let’s get started with registering for a Payoneer account.
Note: I used the Chrome browser while registering in Payoneer and MPP. In case you face issue with form submissions in any other browsers, then please try using Chrome.
Register for Payoneer
- Open the following link to the Payoneer site in a new browser. Click on the ‘Sign Up & Earn $25’ button.

Note: The link is a referral share and hence you and me both will be able to earn 25$ after meeting the referal criteria. It is toally alright for you to choose to directly register in Payoneer and forego the referral money.
2. Once you click on the sign-up link, the site will load the below page. Fill in, as shown in the screenshot.
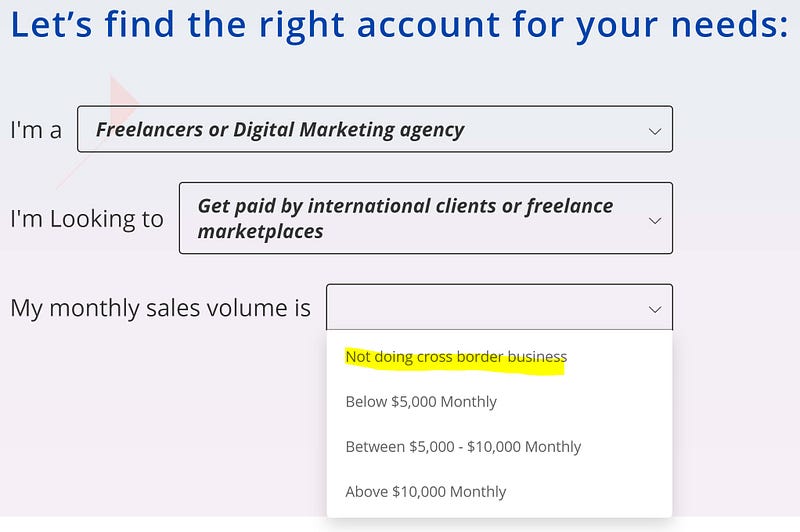
3. Once you fill in all the three questions on the previous page, the page will automatically slide to the next form. Click on the ‘Register’ button.

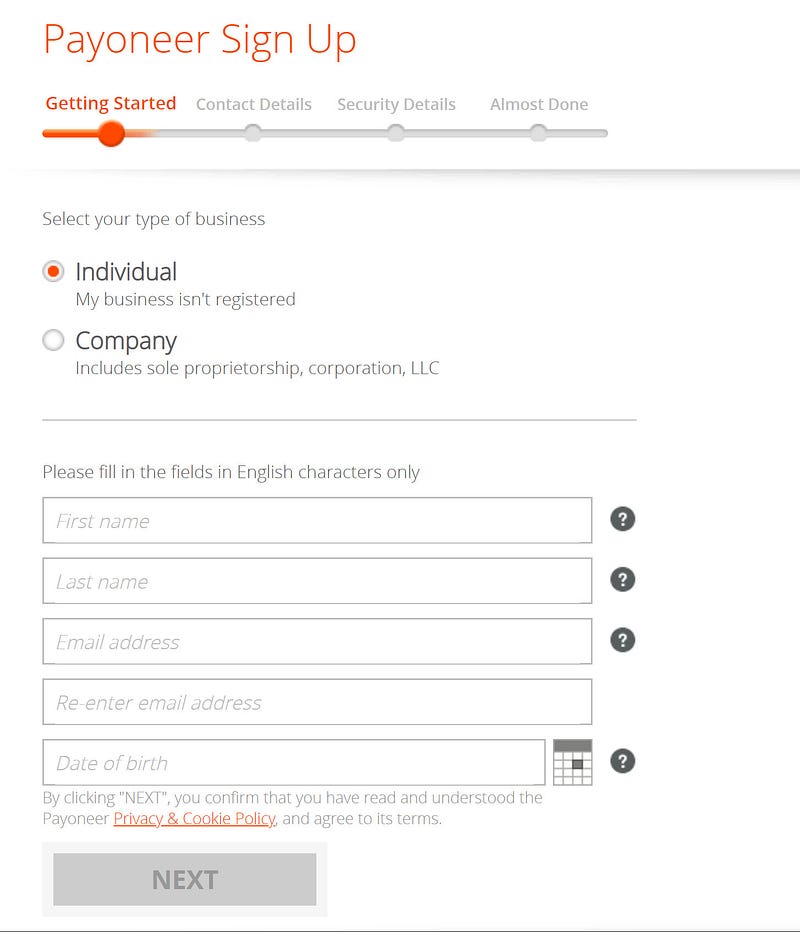
4. The Payoneer Sign Up form will appear. Fill in all the details as required.
- Select your type of business: Individual
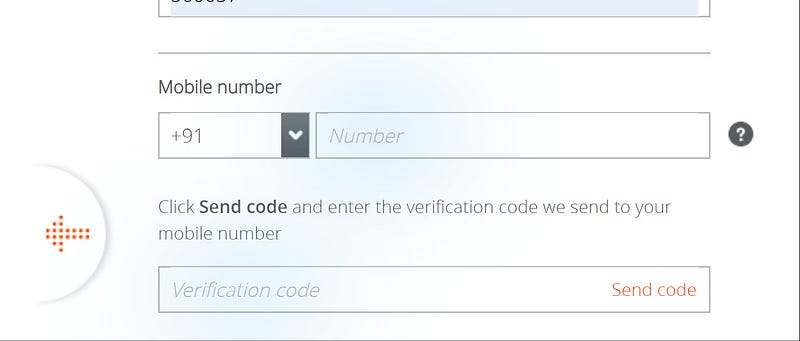
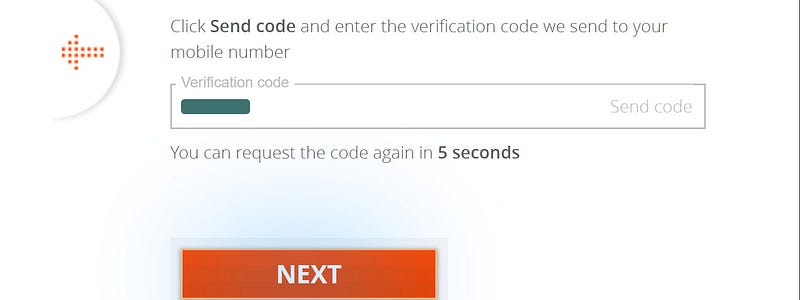
5. Click on the ‘NEXT’ button in the previous step. A new form slides in for Mobile number verification.
Choose your country code for cell numbers.
Fill in the mobile number (without the leading zeros) in the ‘Number’ text box and click the ‘Send Code’ link in the ‘Verification Code’ box.
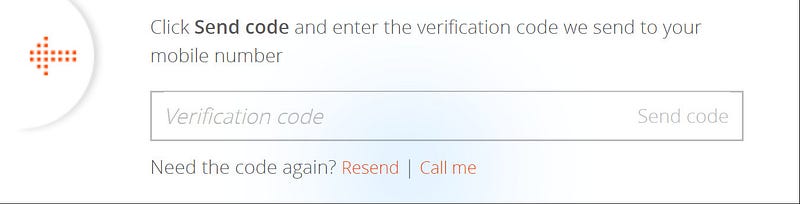
6. Don’t worry if the SMS with the verification code does not come to your mobile within 30 seconds. It will next give you the ‘Resend’ or ‘Call me’ option to select.
I used the ‘Call Me’ option and got an automated voice call in a couple of seconds in my mobile number.
7. Enter the verification code that you received through SMS or voice call in the required text box. If the code is correct, the page will show the ‘NEXT’ button on the screen.
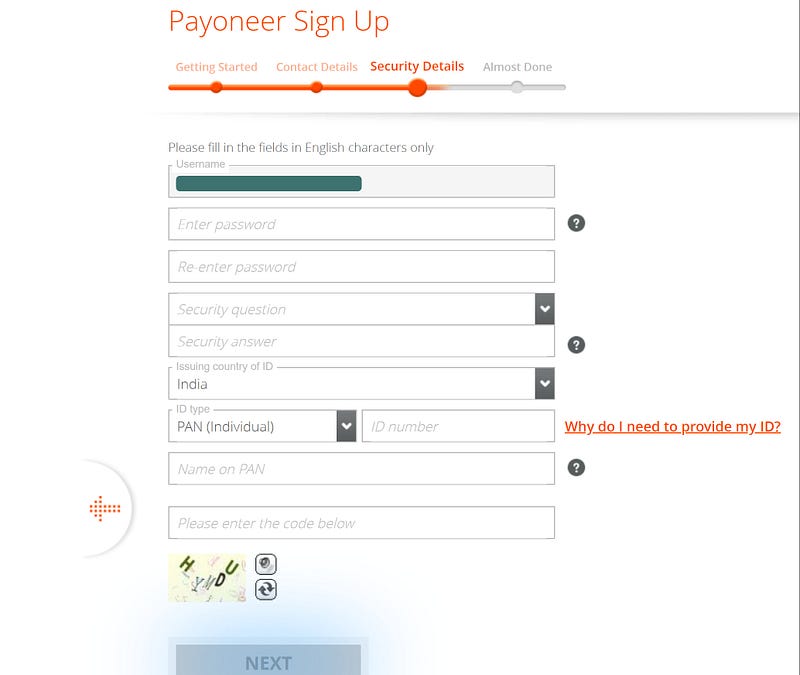
8. Clicking on the ‘NEXT’ button in the previous step will take you to the ‘Security Details’ form. Fill in all the required details and click on the ‘NEXT’ button.
- Specific for Indian users — the PAN card details are mandatory.
- Note down the password along with the security question/answer and keep it safe for future use.
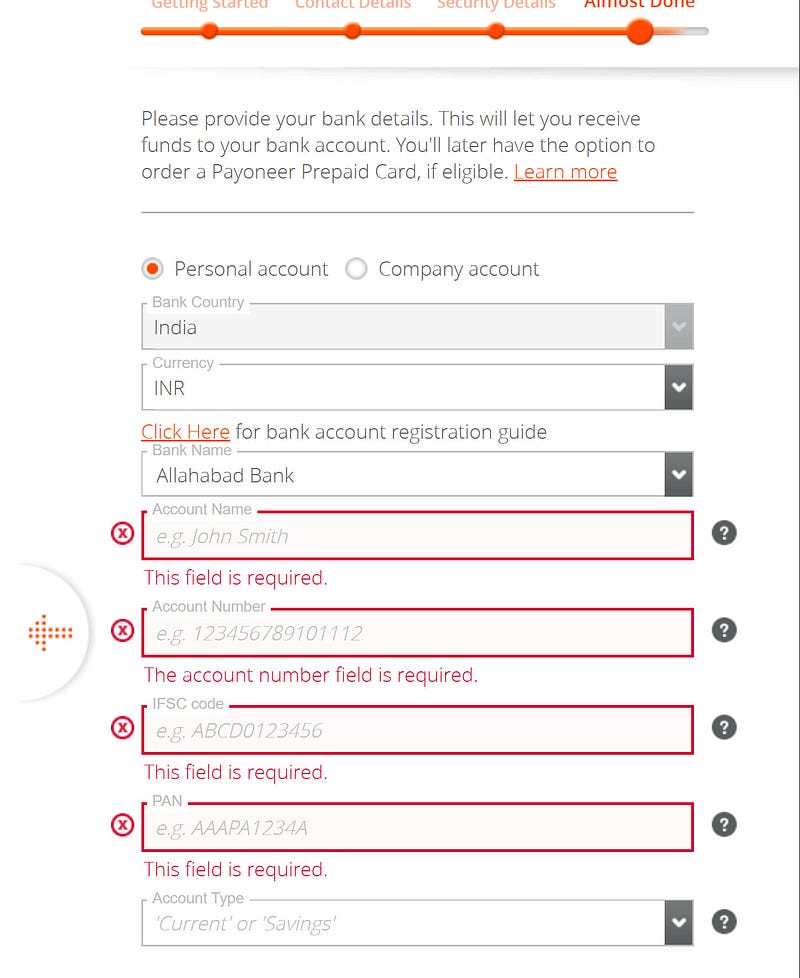
9. The following form will request for the bank account details. The form will be different based on your current country banking standards.
Fill in the details of your Personal/Company bank account. I provided my personal bank account details in this form.
Chose the ‘Currency’ in which your bank account operates.
Note: The account name given in the below form should be exactly same as the user who is registering for the Payoneer account. Keep the name consistent across the accounts.
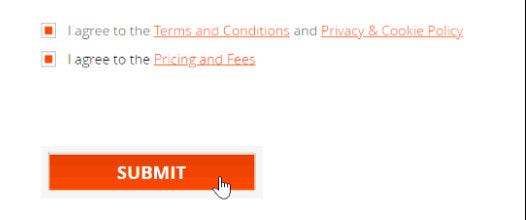
10. Once you fill in the previous form, tick the two checkboxes shown at the bottom of the form and then click on the ‘SUBMIT’ button.
11. The page will slide to a ‘Congratulation’ form and then auto redirect to ‘Payoneer’ main page.
\o/ You have now successfully created your Payoneer account.
Meanwhile, you will receive emails from the Payoneer team in your mailbox. There are few more formalities needed to be completed to get a successful approval for the account.
Note: You should also receive a mail for verifying your email address. Check your spam folder if you don’t receive it.
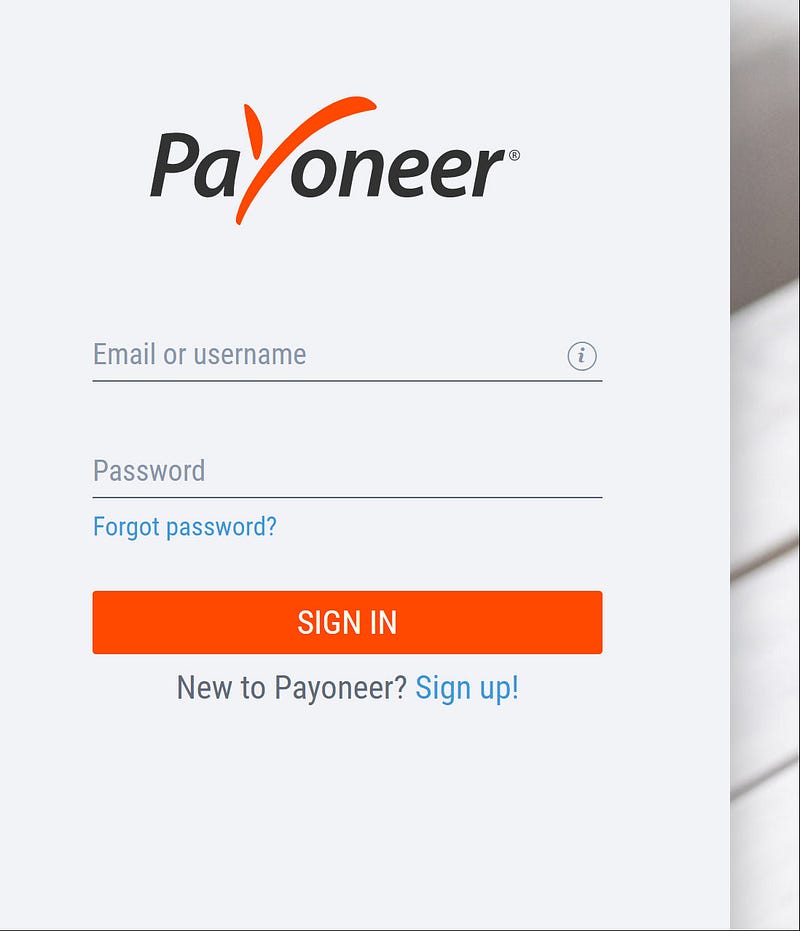
12. Next, go back to the Payoneer main page and select the ‘Sign In’ option. This will load the login page, as shown below.
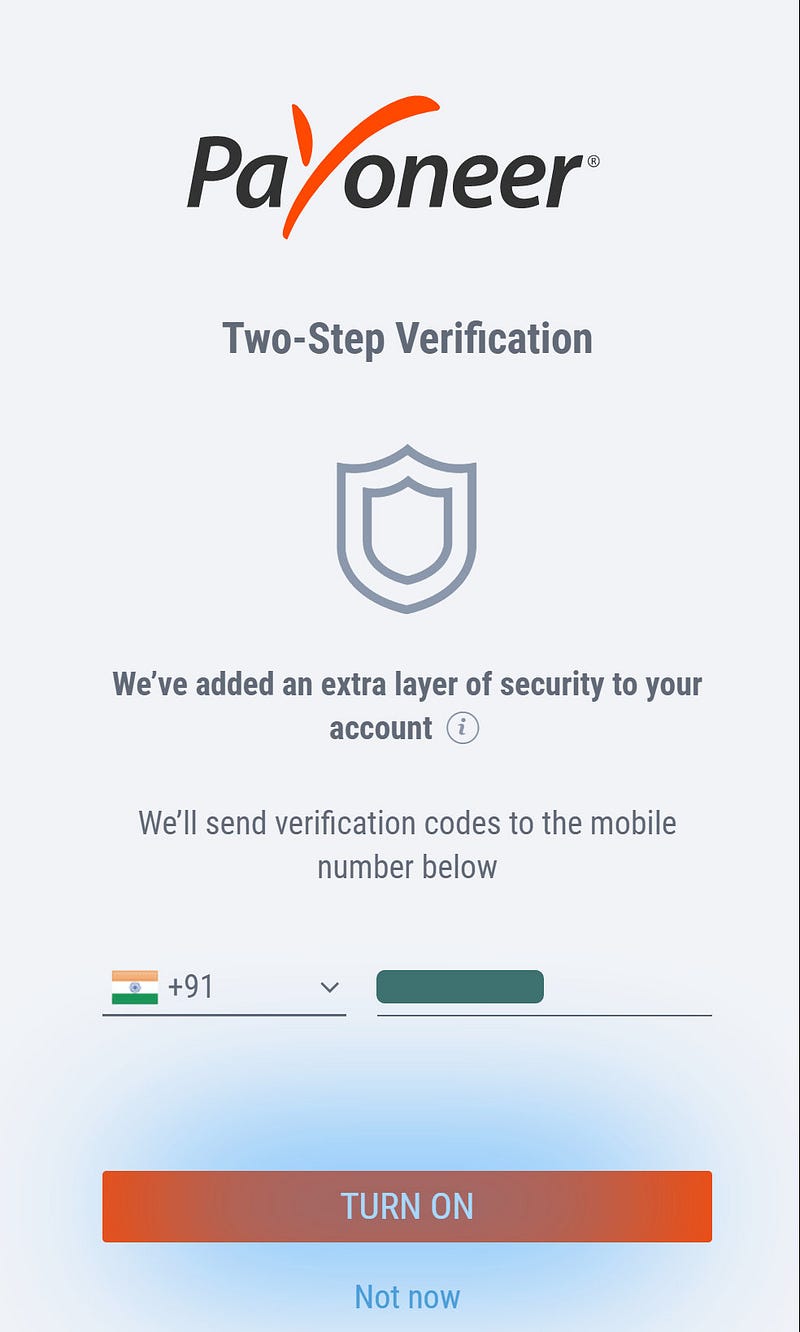
13. After you log in for the first time, the page will ask you to register for the two-step verification.
- This step might be specific for Indian users only. If you don’t see the page or do not want to register for two-step verification, then jump to step 16 directly.
Note: Though optional, I will strongly suggest Indian users to register for the two-step verification process for the security of your account.
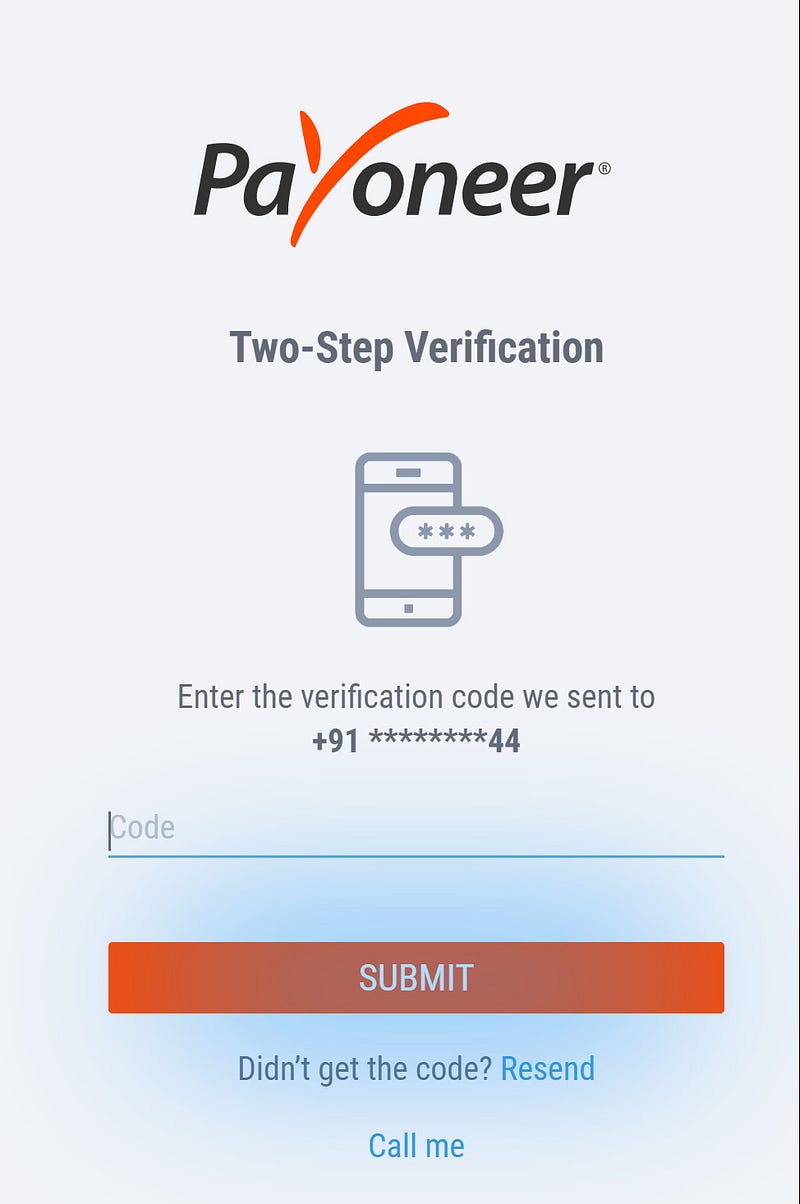
14. If you registered for the two-step verification process, then you will see the below form to enter the OTP that you will receive in your SMS.
Enter the code and click on the ‘SUBMIT’ button.
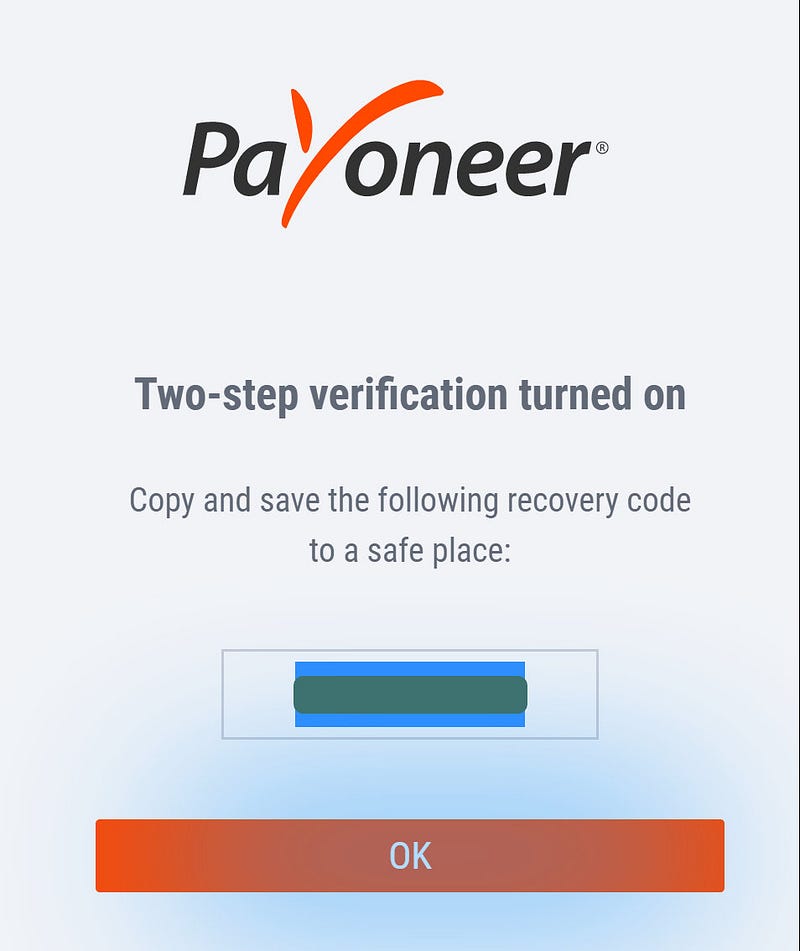
15. The page will refresh and will provide your recovery code. Please copy the code to a safe place for future reference.
Click on the ‘OK’ button.
16. First-time users need to fill in the security question. This helps in recovering the account if you lose the login password.
Please choose the questions you like and provide the answers to them. Keep the question/answer in a safe place for future reference.

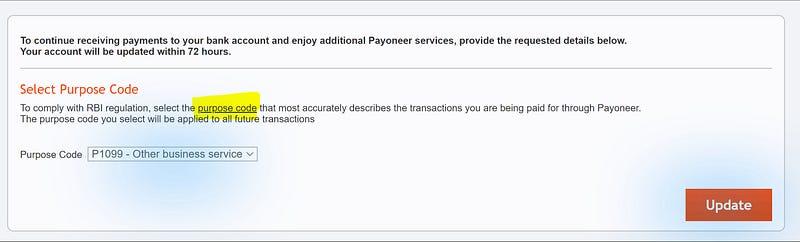
17. The following step is specific to Indian users only.
Chose the required purpose code for the transactions you are being paid for through Payoneer.
- Purpose Code: P1099 — Other business services
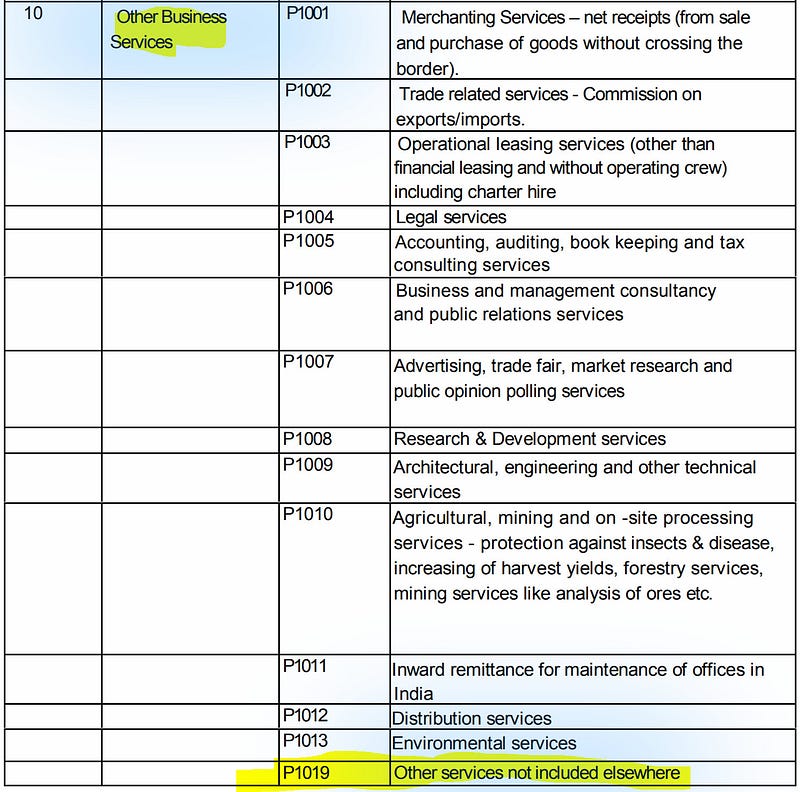
18. The following step is specific to Indian users only.
Below is an illustration of what it means by ‘Other Business Services’ option.
19. Now you have successfully logged into your Payoneer account.
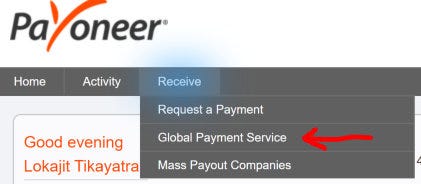
Click on the ‘Receive’ menu on the page. Are you able to see the ‘Global Payment Service’ sub-menu? If yes, you are all set. Jump to step 29 to start registering for the Medium Partner Program.
For Indian users, you still have a few more verification processes to complete before the account can be approved. Proceed with the rest of the steps in this article.
20. For Indian users, most likely, you will see the ‘Global Payment Service’ missing from the sub-menu. This is due to the pending verification steps that you need to complete.
Proceed to the next step to complete the verifications.

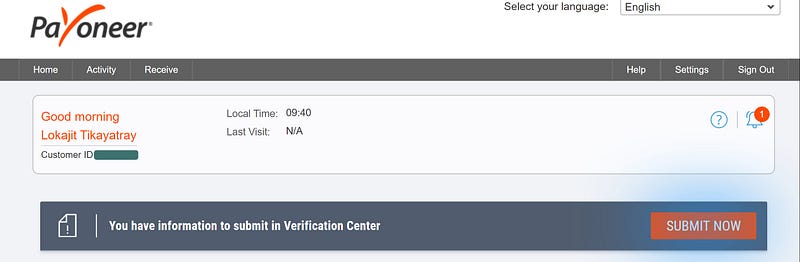
21. If there are any verification pending, then you can see the below message on your home page.
Click on the ‘SUBMIT NOW’ button.
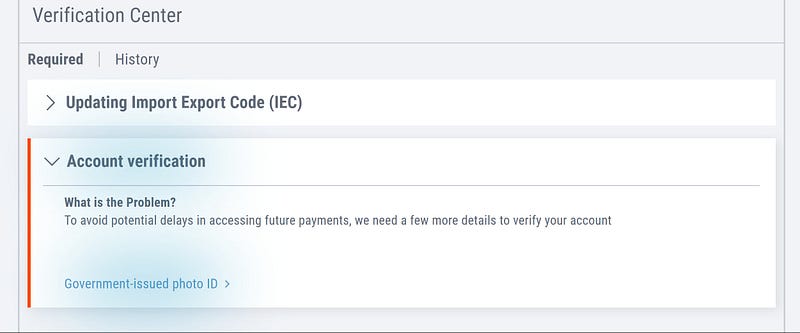
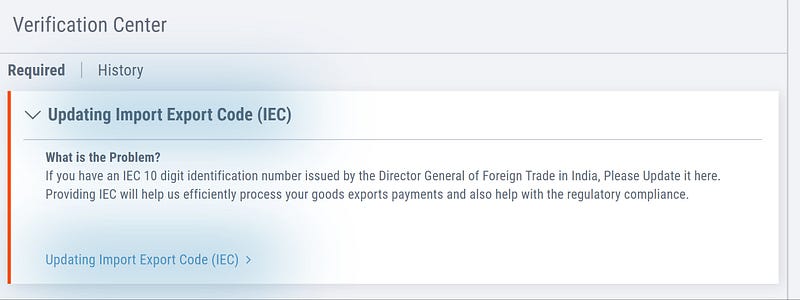
22. You will be able to see two required verifications pending.
Choose the ‘Account Verification’ row and then click on the ‘Government-issued photo ID’ link. (let’s do the easy one first :). We will get back to IEC in a while)
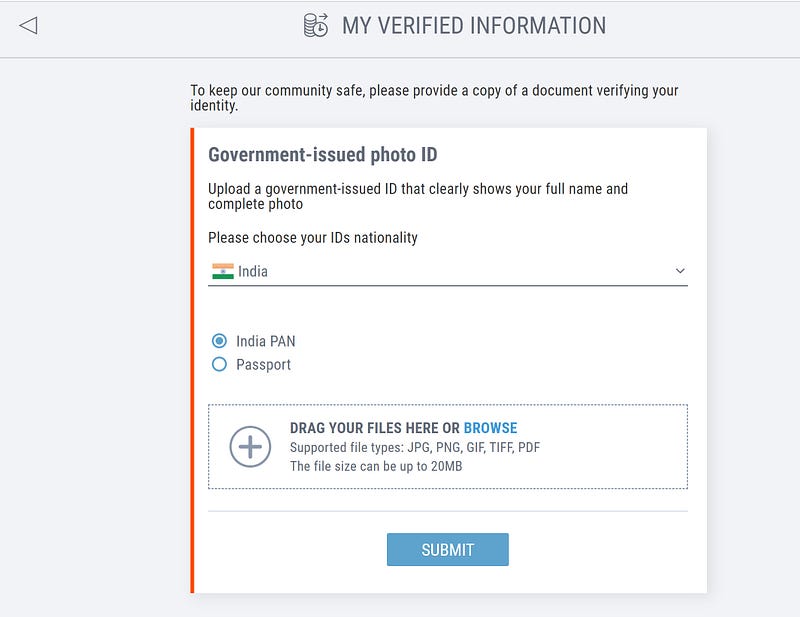
23. There will be a new form where you need to choose your nationality and then choose one of the options provided for the ID.
Don’t forget to drag and drop a scanned copy of the selected ID onto the designated box.
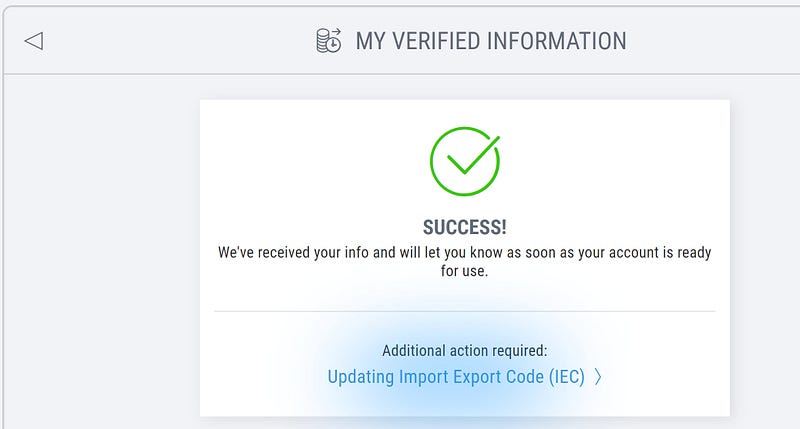
24. Click on the ‘SUBMIT’ button in the previous step. Your form will be submitted successfully, and you will receive a message, as shown below.
25. You are almost there. The only step pending to complete your Payoneer account is to get an ‘Import Export Code’ from the Director-General of Foreign Trade (DGFT)under Govt. of India.
IEC is required for regulatory compliance while getting payment from foreign countries.
No worries — It is really simple to get an IEC from DGFT.
Here is a step by step guide to get your IEC without having to leave your home.
It will take less than two hours to follow the steps in the above article. You will receive your IEC certificate as soon as you complete the steps successfully in the article.
Once you have the IEC with you, proceed with the next steps here.
26. Log in back into your Payoneer account. Go to the ‘Verification Center’ and chose the ‘Updating Import Export Code (IEC)’ row.
Click on the ‘Updating Import Export Code (IEC)’ link at the bottom of the section.
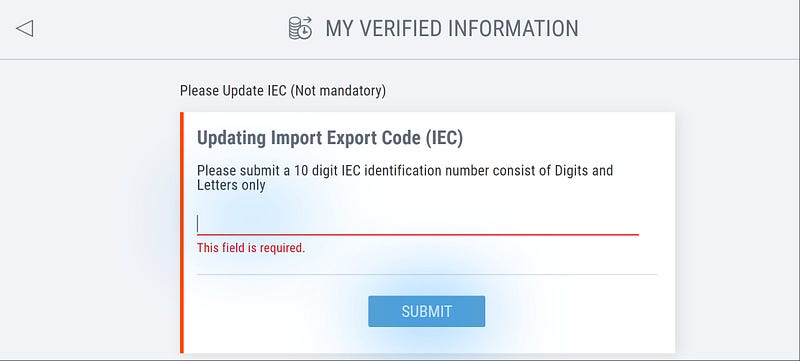
27. Fill in the ten-digit IEC code in the required field and click on the ‘SUBMIT’ button.
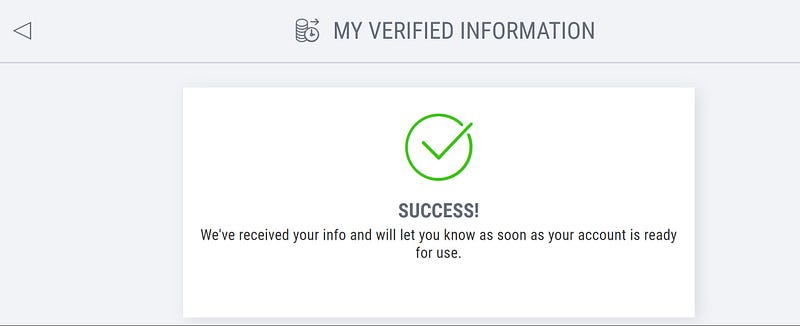
28. The page will redirect to a successful submission page.
There is no more verification pending for your account to be activated. Now it is on the Payoneer team to verify your account details and approve it.
Tell me that was not an easy process to follow ;).
Now that you have completed your formalities and provided all required details to Payoneer — sit back and relax while Payoneer approves your account.
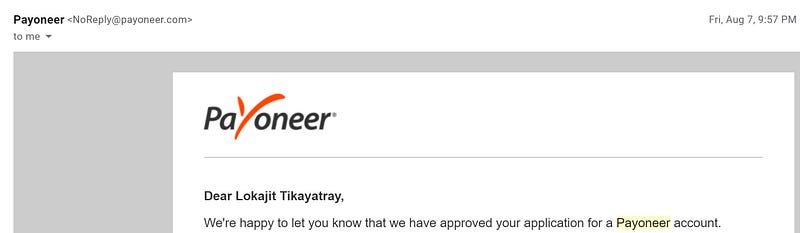
Depending on the country where you applied for the Payoneer account, it might take a few days to get the approval. It seems there are certain countries where the Payoneer account is approved minutes after the form submissions.
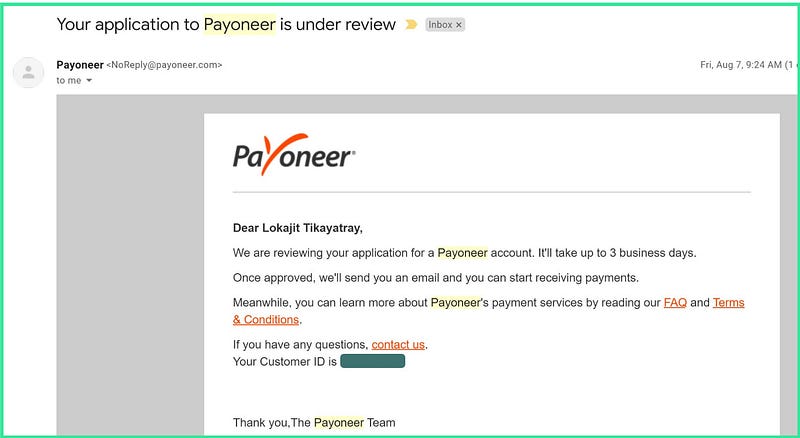
For India, the site says it might take up to three working days. I got my account approval email within twelve hours of completing all the verification steps.
Here is a screenshot of the email from Payoneer.
Once your account is approved, you can log in to the Payoneer account and verify the step 19 again. You should be able to see the ‘Global Payment Service’ option under the ‘Receive’ menu.
You are now all set to register for the Medium Partner Program (MPP). Please follow the rest of the steps in the article to join the MPP.
Register for Medium Partner Program
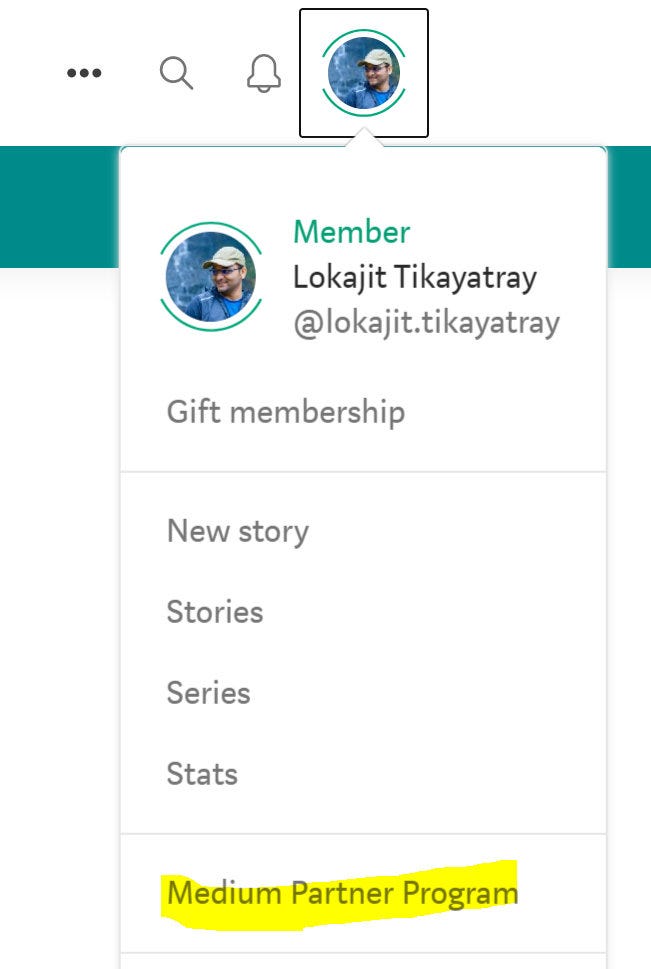
29. Log in to your Medium account. Click on your profile photo and select the ‘Medium Partner Program’ option.
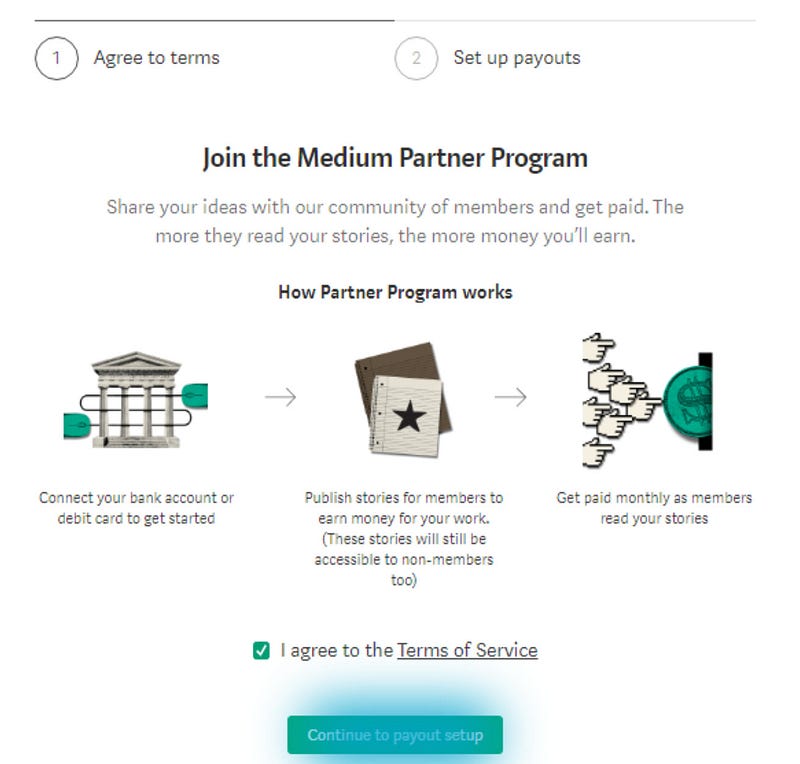
30. Agree to the terms of the service and click on the ‘Continue to payout setup’ button.
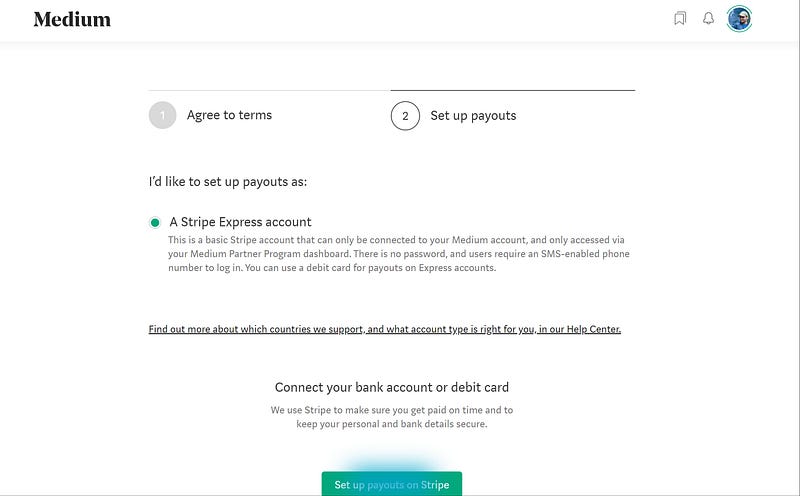
31. Select the ‘A Stripe Express account’ radio option and then click on the ‘Set up payouts on Stripe’ button.
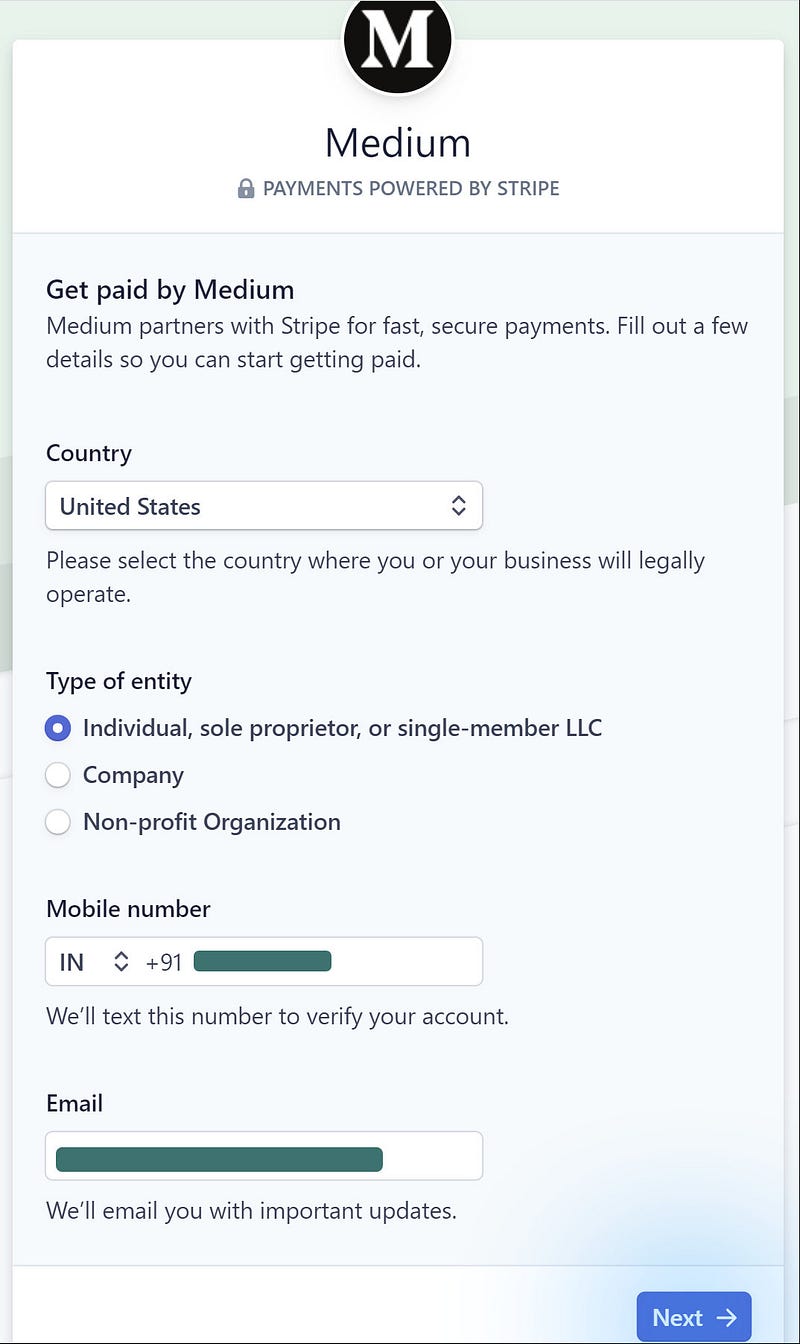
32. In the following form, fill in the below details:
- Country: United States (the bank account information you will receive from Payoneer needs to be from this country)
- Type of entity: Individual
- Mobile Number: Give the same number that you gave in Payoneer
- Email: Give the same email address that you provided in Payoneer
Click on the ‘Next’ button.
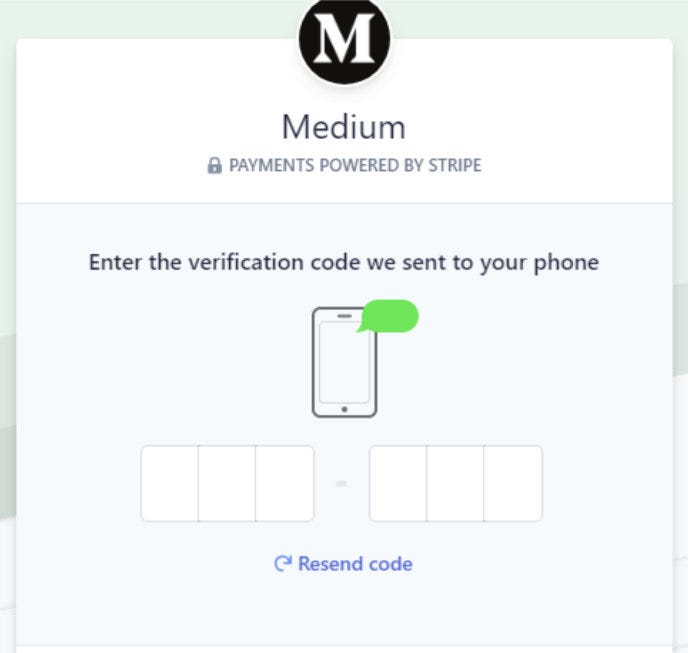
33. You will receive SMS in the mobile number provided in the previous step.
Enter the received code into the below page. The page will auto redirect to the Stripe page if the verification code is correct.
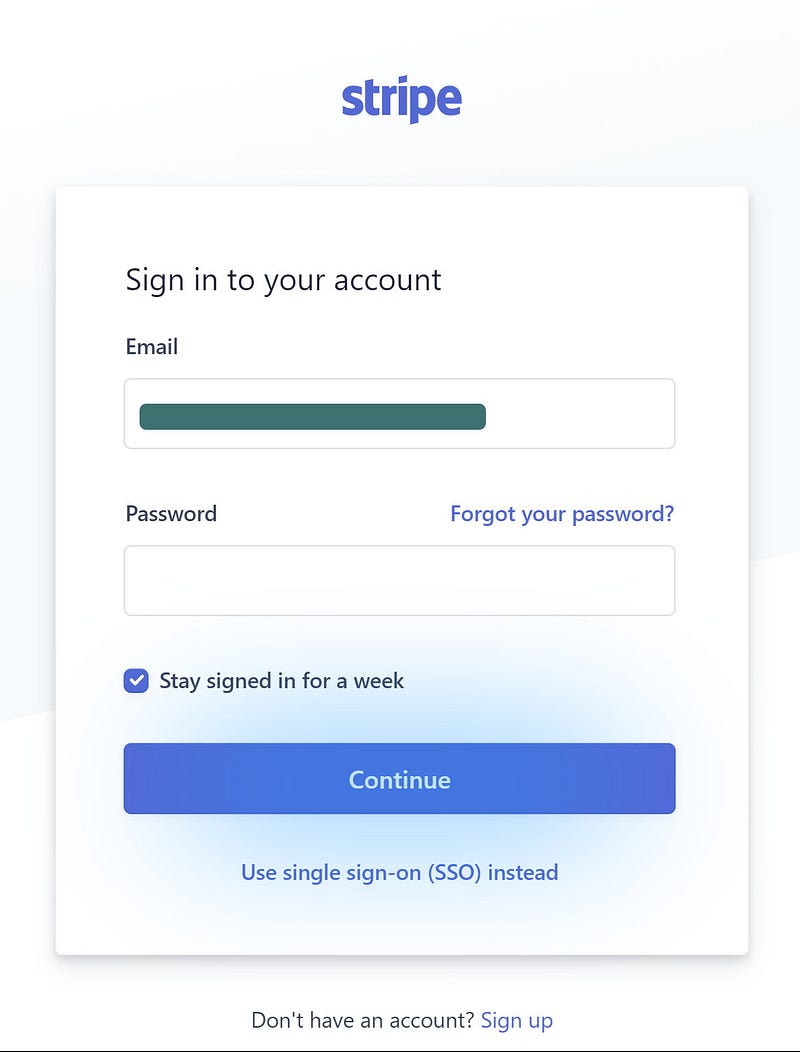
34. If you get the Stripe login page, use your credentials to log in.
If you don’t have a Stripe account, you can create one by using the ‘Sign Up’ option at the bottom of the page.
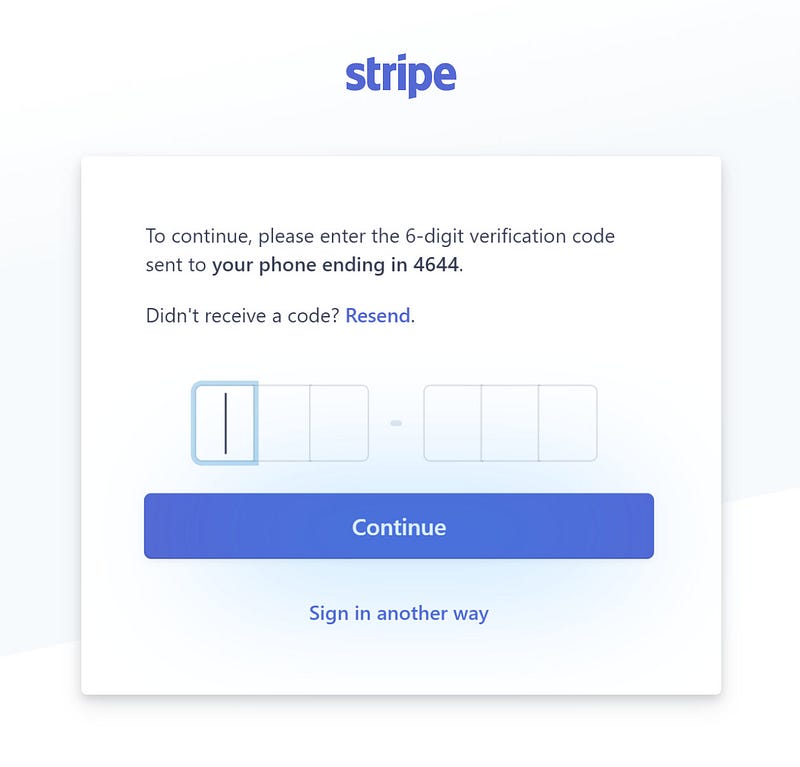
35. Further, you might receive a six-digit verification code as SMS in your mobile number. Enter the code on the following page.
Click on the ‘Continue’ button.
36. You will now have to fill in your details in the below form, along with your website address.
I don’t have a website. Hence, I clicked on the ‘add a product description instead’ link and filled out something similar to ‘I am a freelance writer. Medium pays monthly.’ as the description.
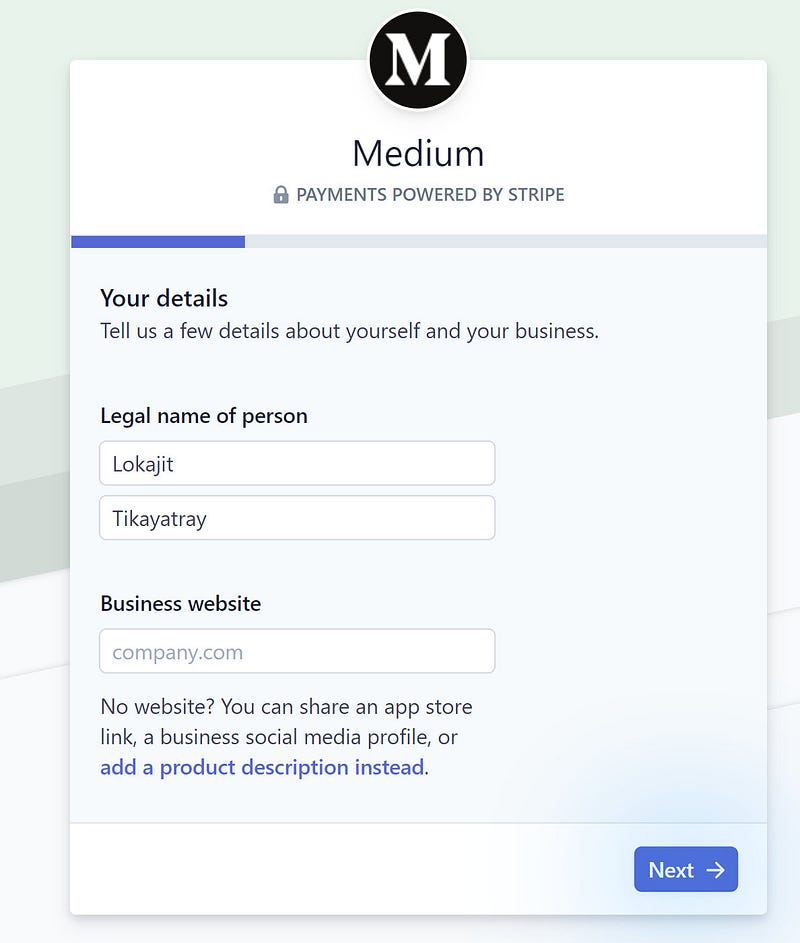
Click on the ‘Next’ button.
37. The new form will ask about the payout details. To fill the bank details, you need to log in back into the Payoneer account.
Check the next steps below to fetch the required details for the above form.
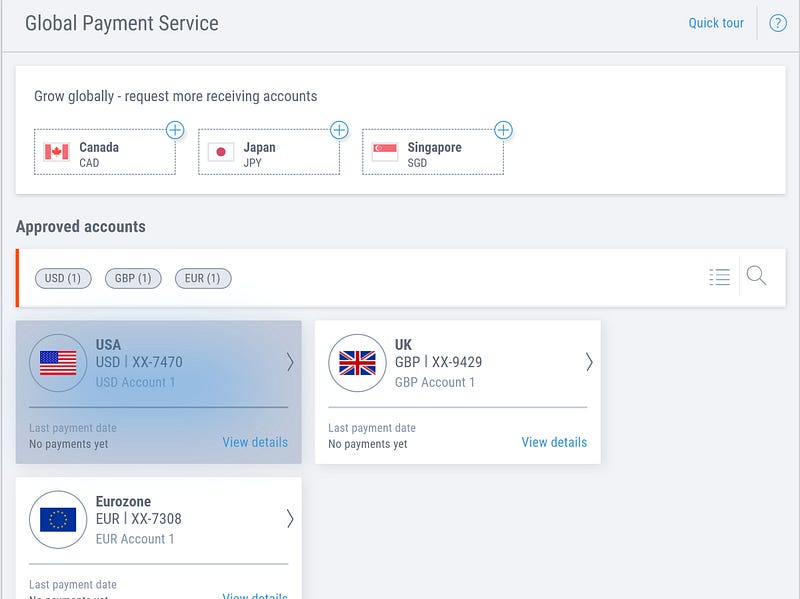
38. Log in to your approved Payoneer account.
Go to the ‘Receive’ menu and then click on the ‘Global Payment Service’ sub-menu.
39. In the ‘Global Payment Service’ page, select the USA / USD box.
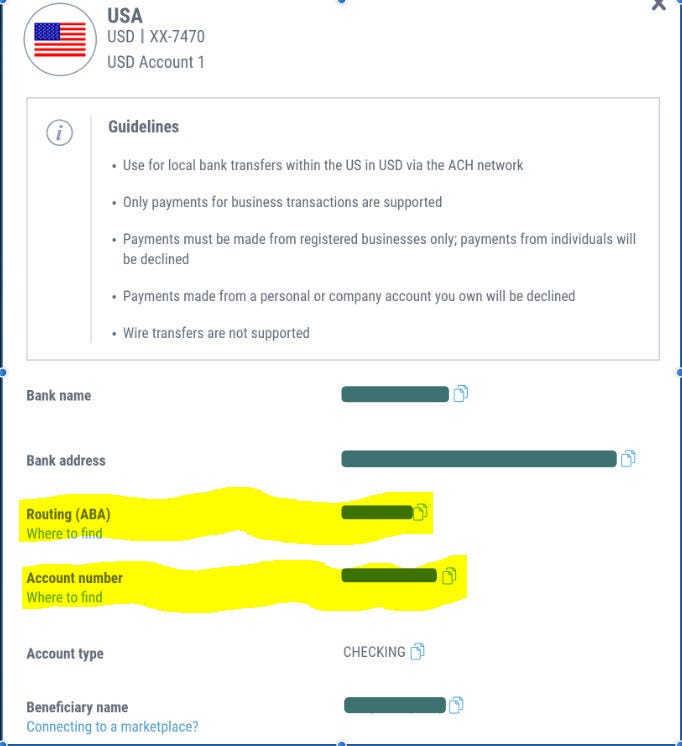
40. Copy the Routing (ABA) and Account Number from the resulting page.
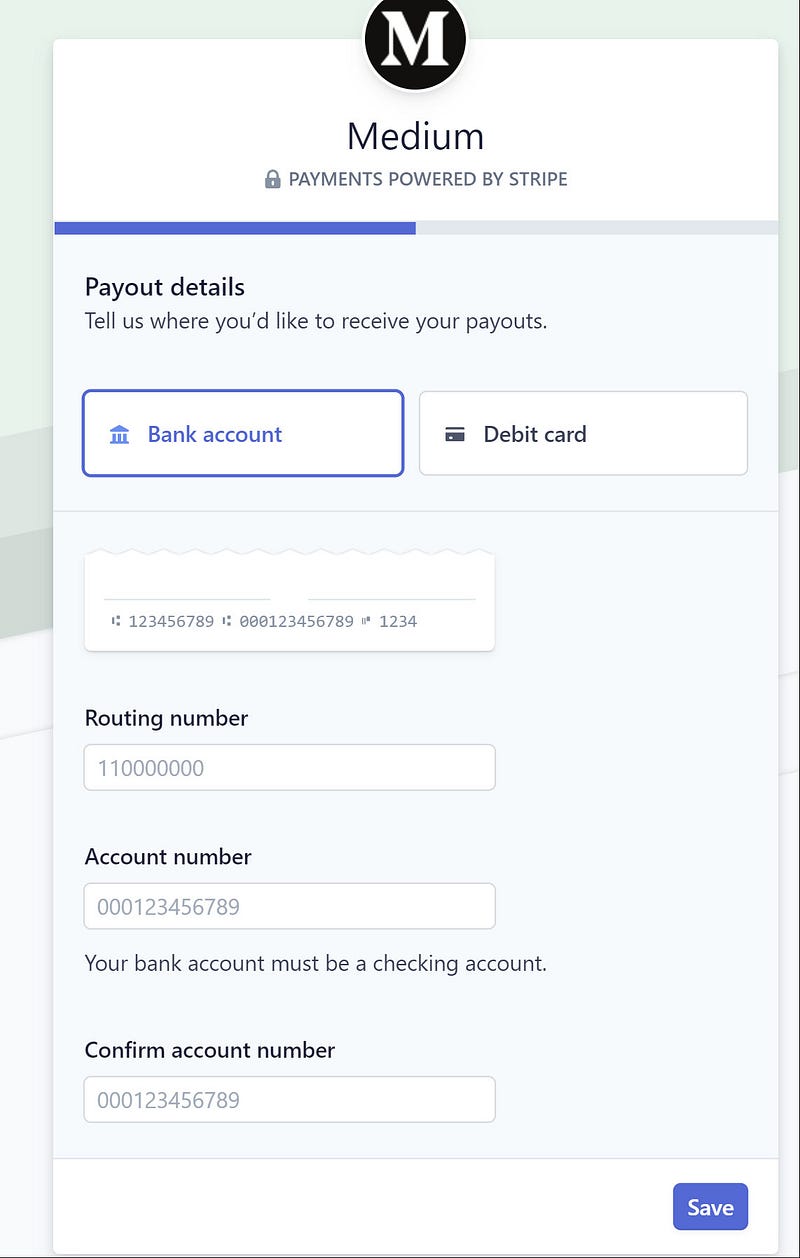
41. Select the box labeled ‘Bank account’ on the page. Paste the Routing Number and Account Number in their respective fields.
Click on the ‘Save’ button.
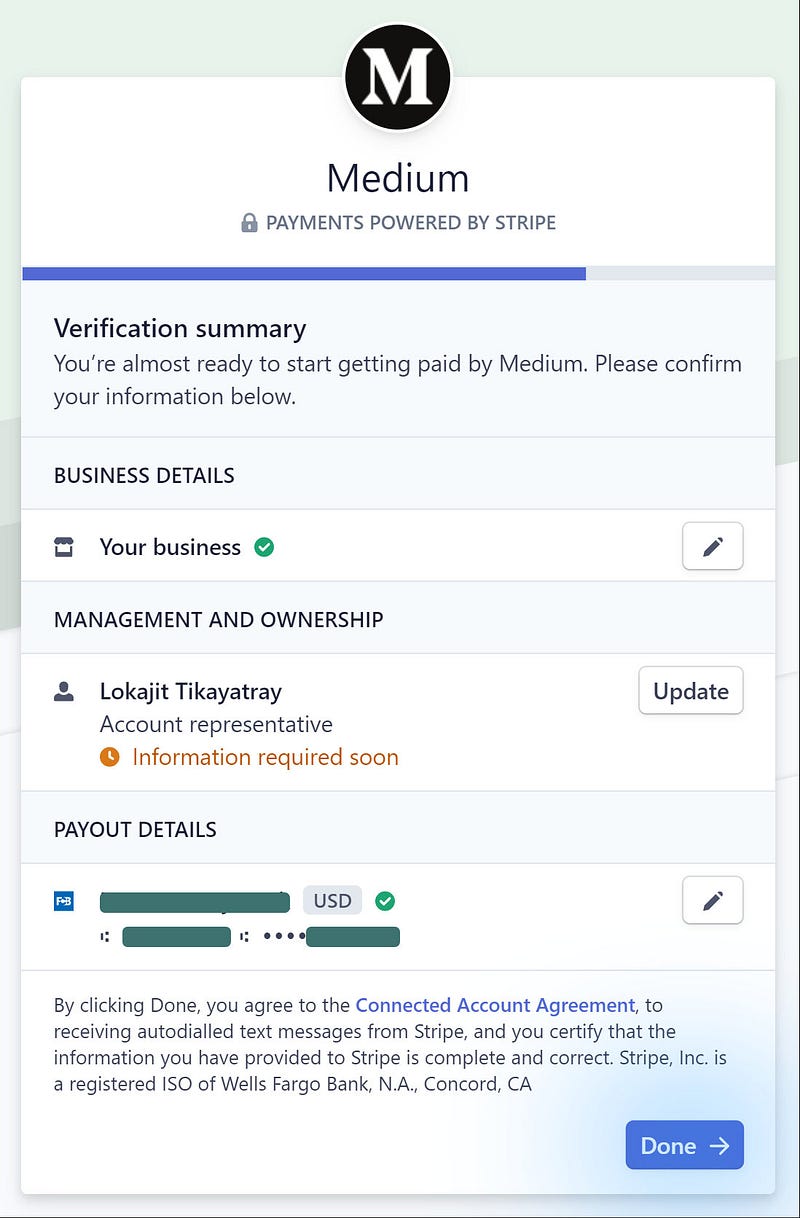
42. On the following page, I clicked on the ‘Done’ button.
The ‘Information required soon’ is going to ask about your ‘Date of Birth’ and ‘Last four digits of your SSN’ for the form. I skipped the details as I don’t have SSN.
43. You will see a confirmation page with the message about your enrollment in the Partner Program.
YaY — finally, you made it. You are now officially enrolled in the Medium Partner Program.
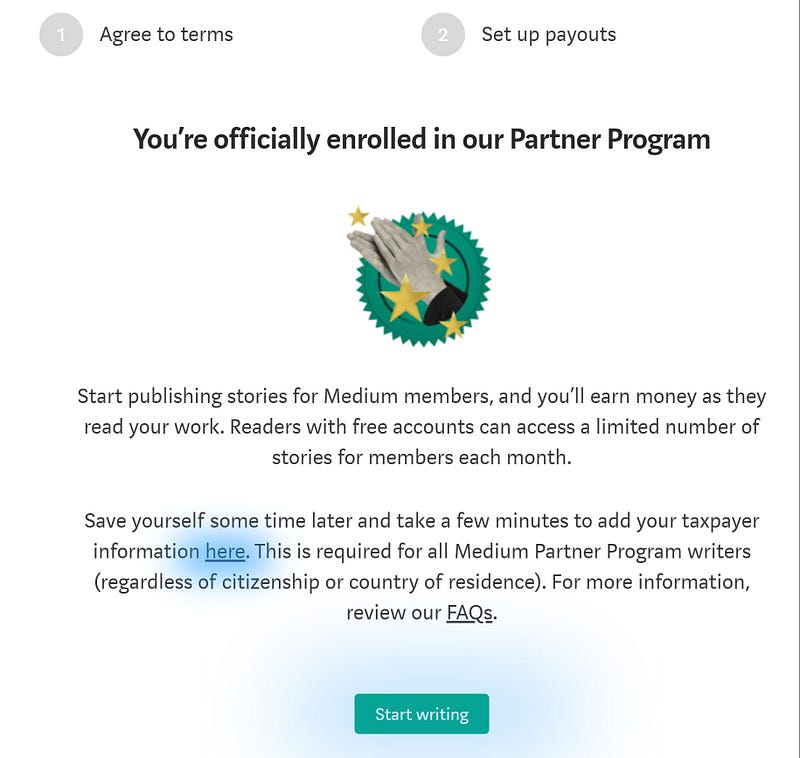
Well, there are still a few more steps to follow before we can call it ‘Done Done’ ultimately. :)
Click on the ‘here’ link on the above page to add your taxpayer information.
44. Fill in the page with your address details. I provided my current India address — the same as what I provided during Payoneer account creation.
- Type: Individual
- Contact Email: Same as given in the Payoneer account
- Phone Number: Same as given in the Payoneer account
- Middle Name: Left Blank
- Company: Left Blank
- Country: India
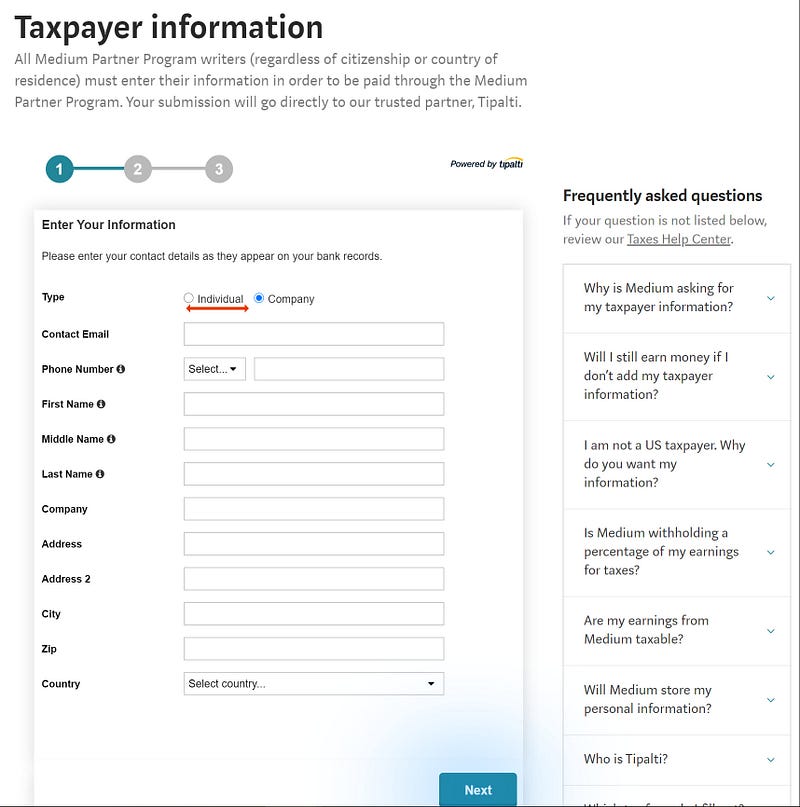
Click on the ‘Next’ button.
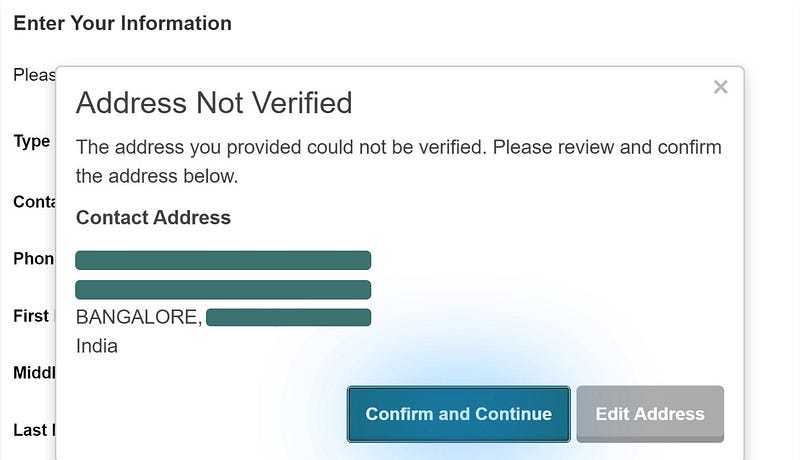
45. Depending on the address, it may or may not be verifiable. Just click on the ‘Confirm and Continue’ button — no need to edit your address further.
46. You will now see the ‘Select Your Tax Form’ page.
I selected the ‘W-8BEN’ option for the tax form.
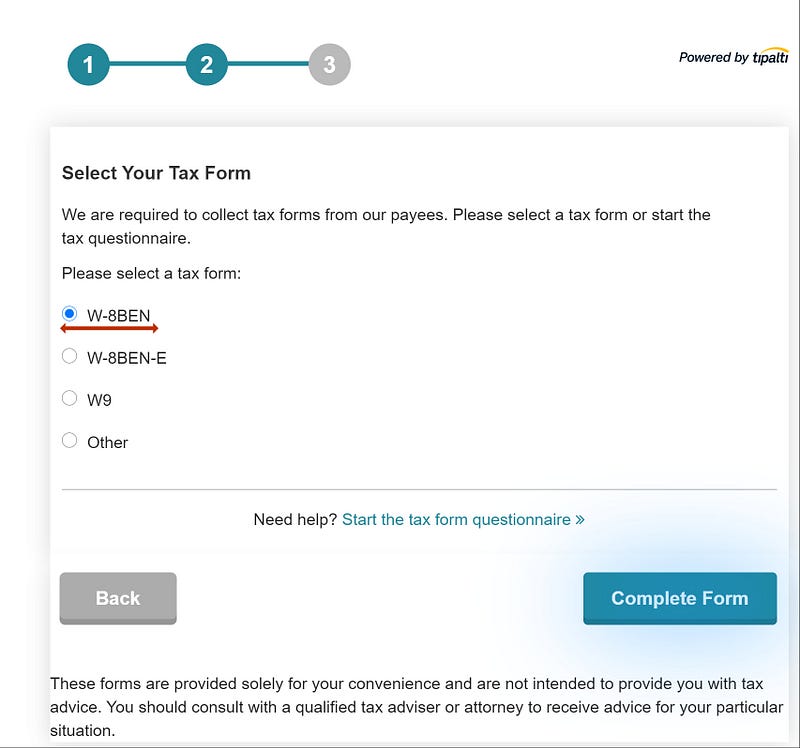
Click on the ‘Complete Form’ button.
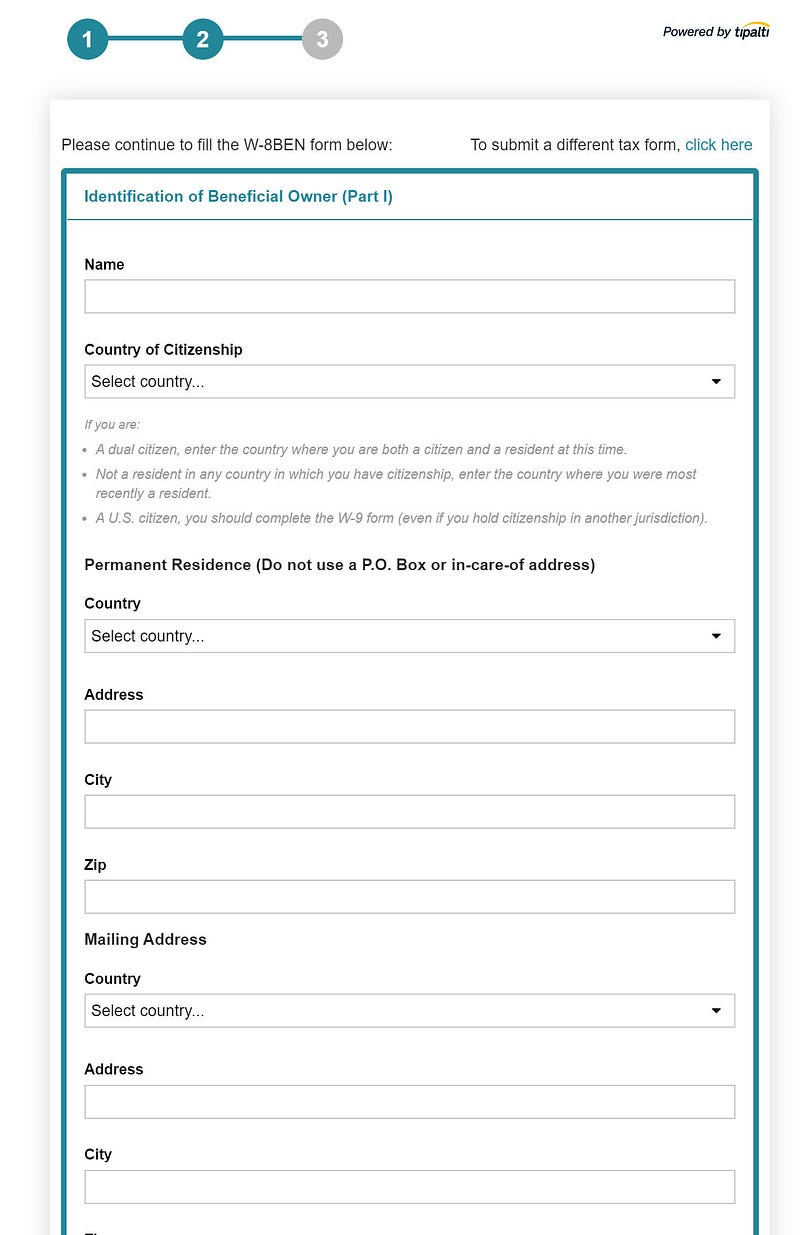
47. The next page will show you the form to fill in your details. Fill in the same addresses as you have provided before.
I provided my India address details on this page.
48. In the next section, you need to provide your Tax identification number.
I provided my Indian PAN card number.
Please make sure you provide the tax identification number correctly, based on your country of residence.
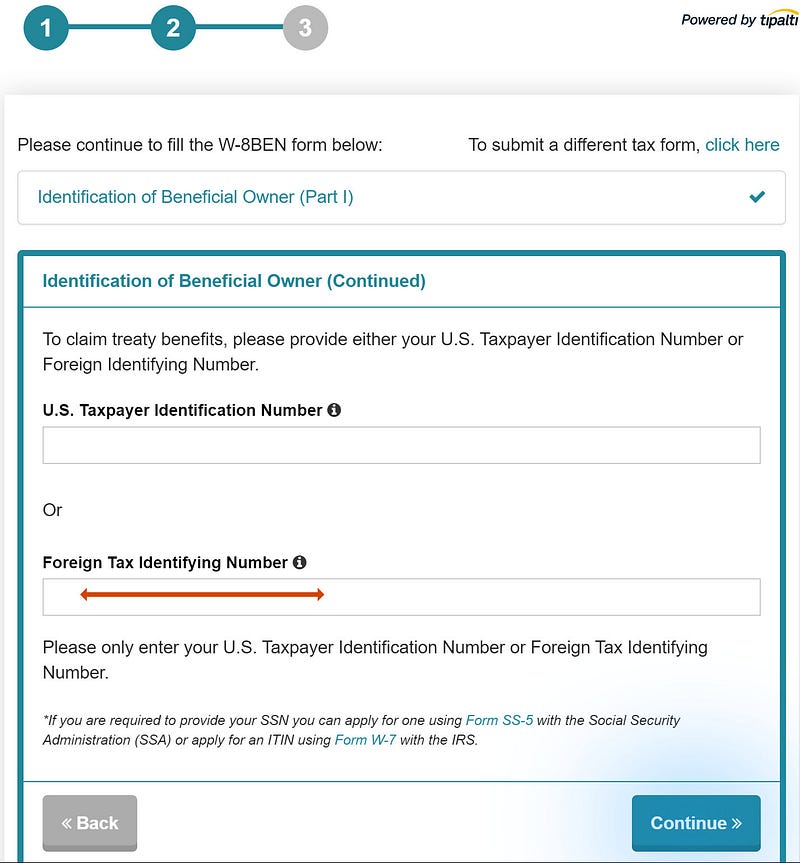
Click on the ‘Continue’ button.
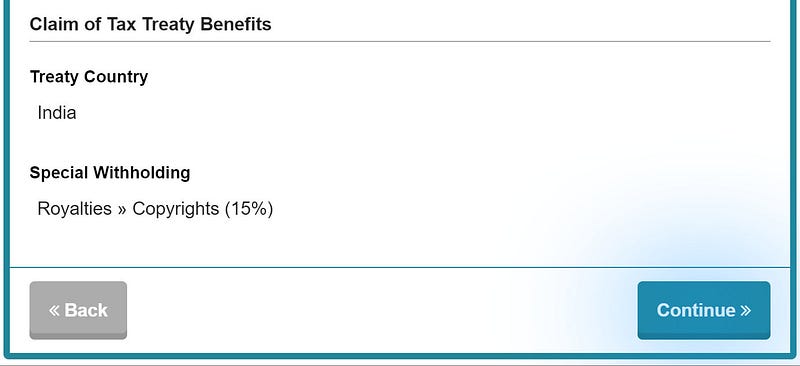
49. This page is vital for tax liability purposes. Make sure to choose the appropriate option based on your country.
I chose ‘India’ and then ticked both the checkboxes on the screen.
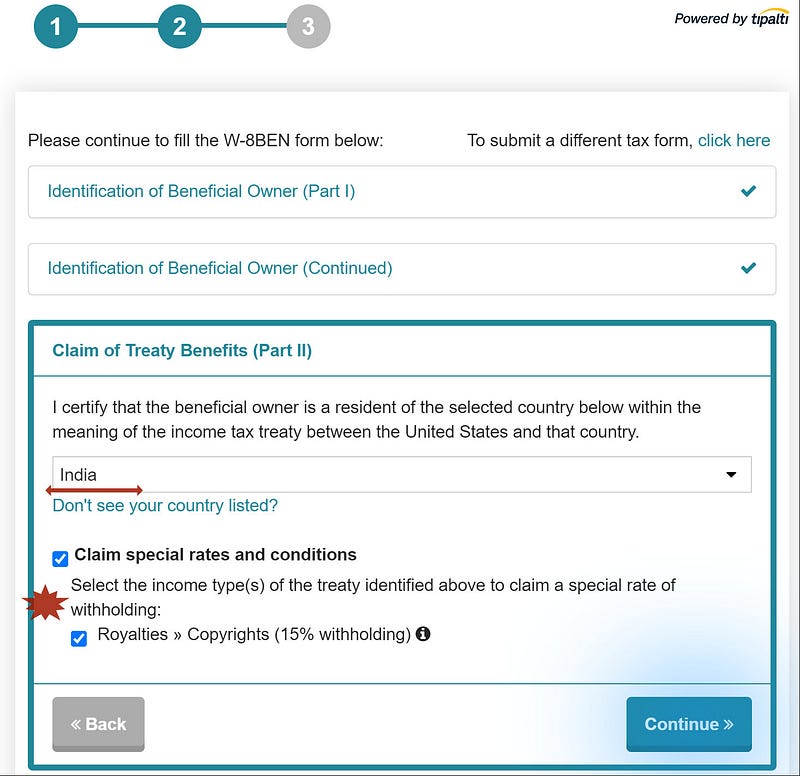
Click on the ‘Continue’ button.
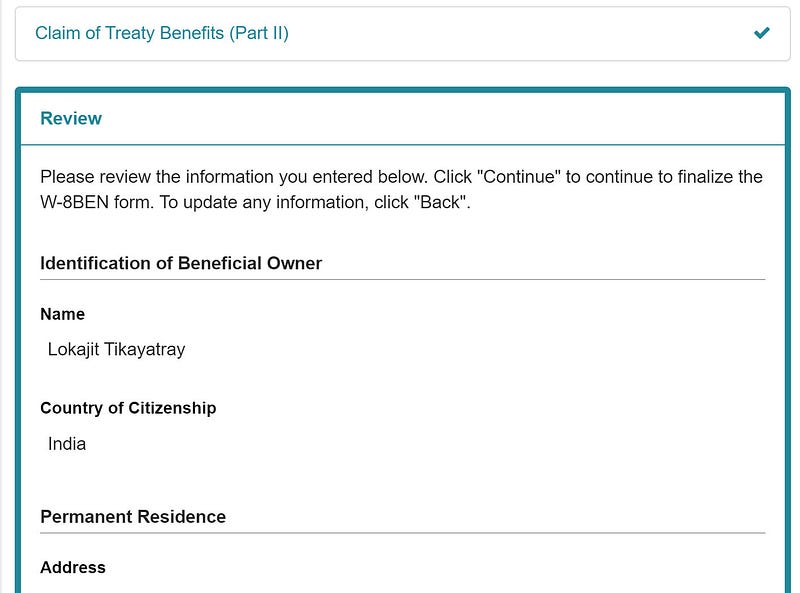
50. The site will redirect to the ‘Review’ page with all your details populated on it.
Read through the form and verify your entries carefully.
51. Once you complete your review and you are satisfied with the details you have entered in the forms, click on the ‘Continue’ button.
52. This is the last step in the whole process. Finally — :)
You will be presented with a form to self declare and certify the information you have provided.
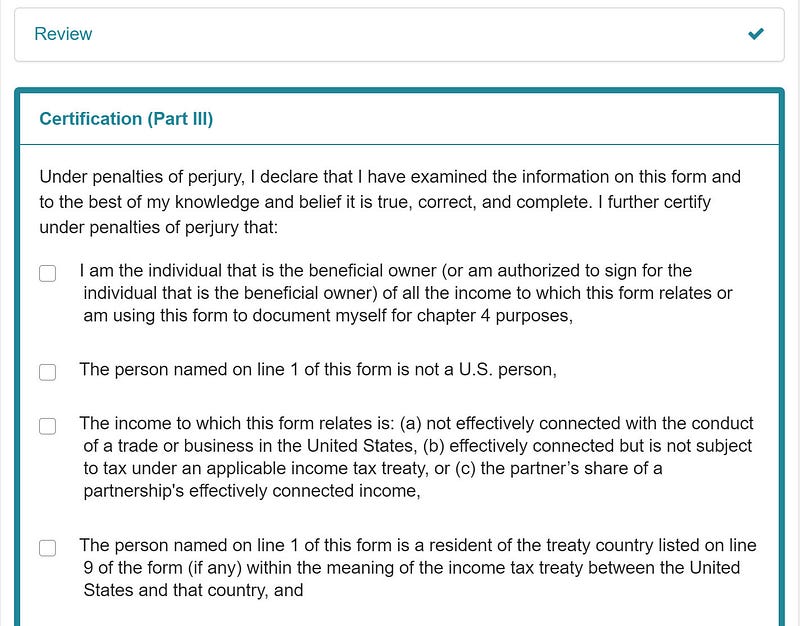
53. Read through the points and tick on all the corresponding checkboxes.
Enter your name and email address at the end of the page.

Click on the ‘Submit Form’ button.
54. You will see a confirmation page stating you are all set.
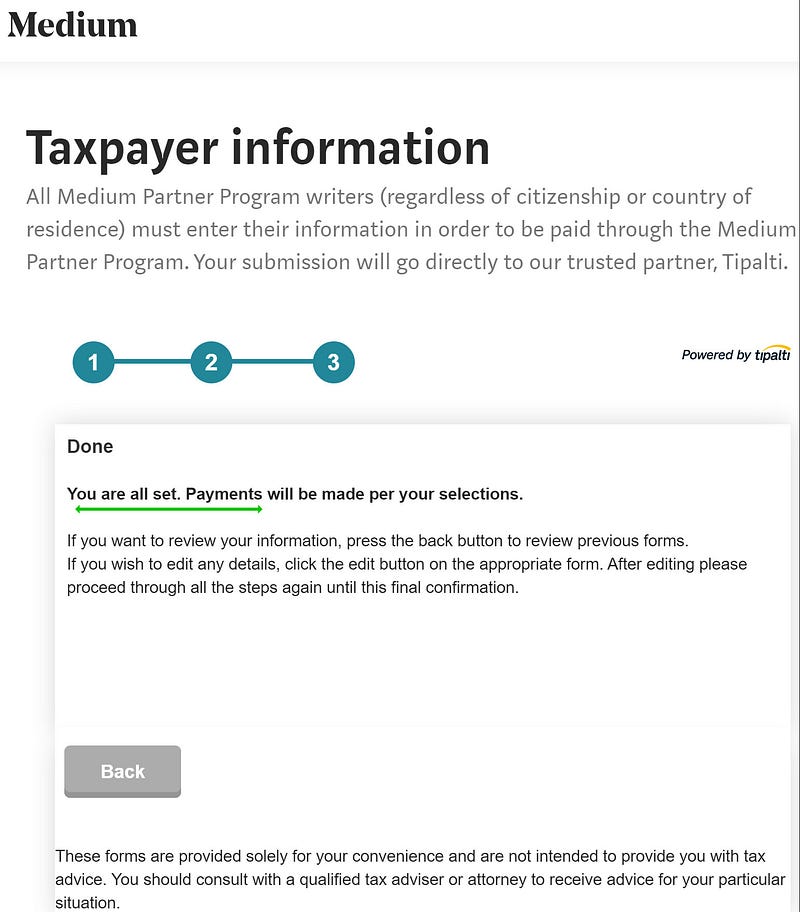
You are now ‘Done & Done’ with the process — finally. Give a pat on your back to have gone through all the steps correctly and successfully registered yourself to the Medium Partner Program.
You are all set up to earn money by writing on the Medium platform.
Congratulations!!!
Thanks for reading the article. If you would like, you can support my writing by becoming a Medium member using this link.
Oh! Wait — you still need to write quality articles consistently and reach out to your readers, which will help you in turn to earn money.
But most likely, you already knew about this last point :).
Please let me know in the comment section if you face any challenges in following the above steps. I will try to help to the best of my knowledge.
I wish you all the very best in your writing endeavors.
October was a good month for me. I made over $500 just from one article and that too all within one week. Here is a list of items that worked for me to earn $500 from the article.
[Payment Update — 9.Sep.2020]
I have got my first earning from Medium into my bank account in India.
My earning was $18.45 for the month of August. Following is a screenshot from the MPP page on Medium.
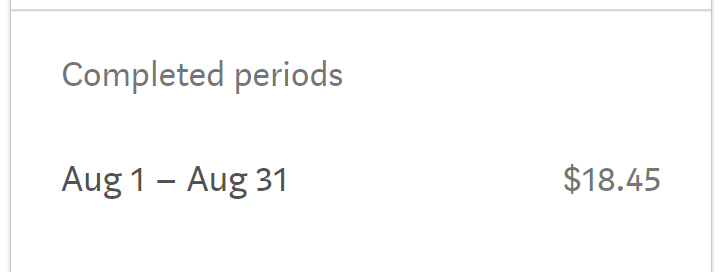
I received an email from Payoneer on 4.September informing me about the credit of the earnings from Medium/Stripe into my Payoneer account.
There was a difference of $2.77 between the actual earnings ($18.45) and the amount ($15.68) credited to my Payoneer account. The difference is about 15% of the actual earning. The difference seems to be the amount deducted by Medium for the tax withholding purpose.

I received another email from Payoneer on 8.September confirming me that the money has been transferred from the Payoneer account to my Indian bank account. The email also gives the exchange rate used for converting USD to INR.
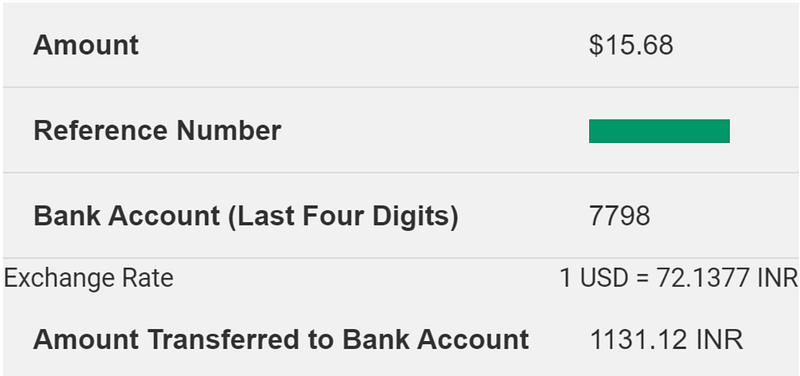
The money transferred by Payoneer got credited to my bank account on 9.September.
