
iOS App Development
How to Create Your Own Framework for Your iOS App
In this tutorial we’ll create a framework for your app. It’s a good way to divide your app into independent modules and allow to reuse your code in different apps.

In this tutorial, we use the latest version of Xcode (11.3.1) and macOS Catalina (10.15.4) for the moment of writing.
Usually, it’s a good idea to divide your app into separate parts. It allows you to make your modules even more independent, test them separately, reuse code and even create independent frameworks and deliver them into your app using Swift Package Manager (SPM), CocoaPods or Carthage supporting different versions for different apps.
Sounds awesome, right? But even if it doesn’t, let’s create a new framework and we’ll see how good it is.
You can use this tutorial on its own, yet it uses SwiftUI and Combine, frameworks introduced by Apple in 2019, so if you have no prior experience working with these frameworks, I recommend to take a look at the previous parts where we created the app we’re going to use in this tutorial. After all, these frameworks look promising and awesome.
To check the other parts, use the following links:
- Getting Started with SwiftUI and Combine Using MVVM and Protocols for iOS.
- Creating an iOS App With SwiftUI and Combine Using MVVM and Protocols.
- Creating an iOS App With SwiftUI, Combine, MVVM, and Protocols [Part 3].
- How to Create Your Own Framework for Your iOS App (this tutorial).
- Using Core Data in Your SwiftUI App with Combine, MVVM and Protocols.
If you don’t want to check the previous parts and prefer to start from here, download the complete code for the app we’re going to improve with our new frameworks here.
What we will learn
As source code, we have an app written with SwiftUI and Combine. It uses Protocols and MVVM. The issue is that the app doesn’t have a persistent storage for its data. But, fortunately, we created a protocol for our DataManager there that stores all the data in an array, so we can replace it with another one and implement a persistent storage touching no other parts of the project. We’re going to do it in the next tutorial but now, let’s do some preparations.
By the end of this tutorial we will learn:
- How to create frameworks inside of the project;
- How to add other frameworks as a dependency into an app or into another framework;
- How to use one framework for iOS, watchOS, macOS, tvOS.
We’ll prepare everything to add a Core Data storage into the app and use it instead of just an array that’s not persistent for sure.
Getting Started
Open the project developed in the previous parts (or download the app here and open it in Xcode). Your app is a To-do list app, you can build and run it and add new tasks there and mark them as completed. Also, you can toggle between showing or hiding completed tasks.
How to Create a Framework
Now, we’re going to create a new framework. This framework will contain only a protocol that’ll describe how our database helpers should work. After a while, we’ll create another framework specifically for Core Data and make it conform to the protocol. In the future, should we change the database, we’ll replace Core Data with Realm, SQL or whatever we want changing only the helper.
I know it might be too much to create two frameworks for just a tiny database, but it eventually pays off when you decide to start a new project, migrate this to a new database or when your project grows.
Create a Workspace
Let’s start by creating a workspace where we put our project and all the modules we’re going to create. Actually, when your app grows, it’s better to import your frameworks into the project using CocoaPods, Carthage or Swift Package Manager, but we won’t cover how to do that in this tutorial, so we’ll go a simpler way.
Choose File — New — Workspace. Find the root folder for your project and select it, call your workspace as your project (DemoToDoList.xcworkspace) and click Save.
After that, close your project if it’s open, then find DemoToDoList.xcodeproj in Finder, drag & drop it into the workspace. Now, try to run your project. Everything should work as it did before.
Create a framework
It’s time to create a new framework. Choose File — New — Project in the menu. Select Framework in the Framework & Library section on the iOS tab, then click Next. Type DBHelper in the Product Name, unselect Include Unit Tests, make sure the language is Swift, then click Next. In the next window find the root folder of your project, select it, click New Folder, type Modules, click Create. Now you have your new folder Modules selected.
In the bottom of the window, find Add to and select your workspace there (in my case it’s DemoToDoList). In the Group choose the workspace too. Make sure you see something like this:
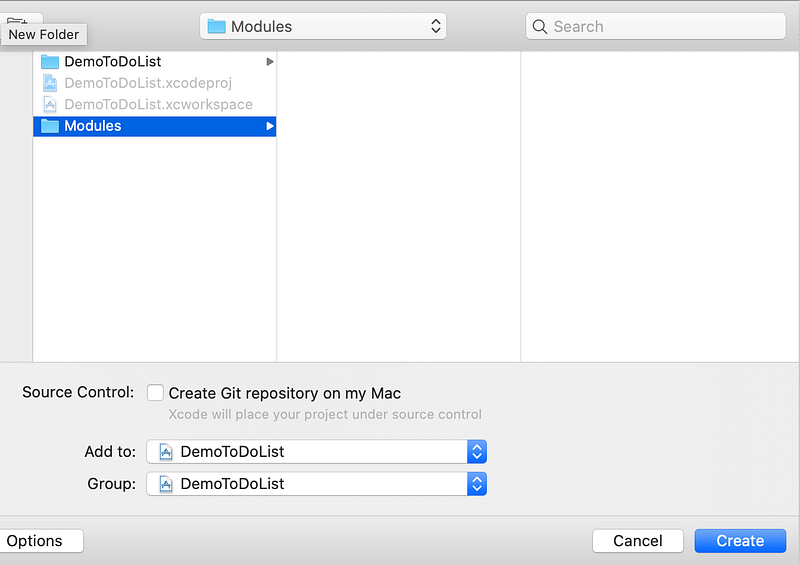
Click Create.
Now you can see your new framework near your project in the Project Navigator. You can choose its scheme and build it.
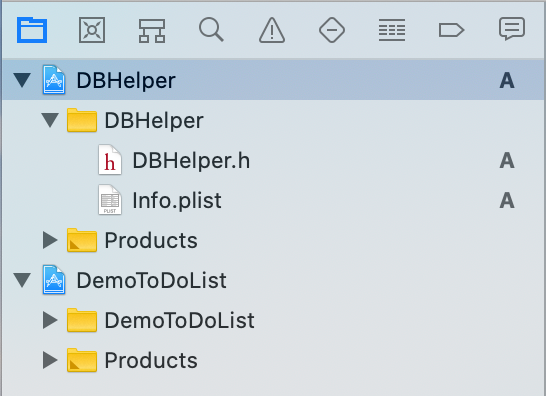
It should look as on the screenshot.
Now you have an empty (almost) project. You will create new files here and make public only those classes and functions you want your app to use. That scheme makes it easier to avoid tight coupling between classes and allows you to store all the code related to one particular feature in a separate place.
Now, let’s switch to the DBHelper scheme, click the name of the current scheme (probably DemoToDoList) on the right of the Stop button and choose the new one.
First, we’ll set the minimum iOS version to 13 (we’re using SwiftUI and Combine, no need to support earlier versions, but we could do that if we decided to use this framework in other projects.
Choose your framework in the Project Navigator, select DBHelper in Targets, in Deployment Info set Target to 13.0. After that, choose DBHelper under Project and set iOS Deployment Target to 13.0 too.
Now, expand DBHelper in the Project Navigator then expand the DBHelper folder. You should see DBHelper.h and Info.plist files. Create a new group by using right-click on the DBHelper folder, name it Sources. We’ll store all the files in that folder.
DBHelperProtocol
Create a new Swift file (Cmd+N), name it DBHelper. Now, let’s create a protocol for our future database helpers. It should look as follows:
- We make our protocol
publicbecause it should be visible outside of the framework; - We create
associatedType ObjectTypeandPredicateTypebecause these types are different depending on a particular database (for Core Data it’sNSManagedObjectandNSPredicate. We need to specify this generic types so we can use thisDBHelperProtocoluniversally; - The methods
create,updateanddeleteare straightforward, we just pass an object andcreate,updateordeleteit in our database; - Method
fetchgetspredicateandlimitas parameters. It should be enough, but we may change it in the future if we need a more complicated fetch method. It returnsResult, a really convenient enumeration that represents either success or failure and includes an associated value in each case; - We want our database helpers to support
fetchFirstmethod, even though it most likely will just usefetchand return the first value. Anyway, it’s convenient to have this method, so we create it; - Finally, we use the power of extensions, creating the
fetchmethod with defaultnilvalues forpredicateandlimit. In some cases, we need to fetch all the objects we have and these default values will come in handy.
You can try to build the framework (Cmd+B) to make sure everything’s correct.
That’s pretty much it for that framework. Not much of code, huh? But the point is to have DBHelperProtocol so all our database helpers will conform to them and the whole app won’t know about any changes, should we change database storage.
watchOS support
One of the most interesting parts of iOS development nowadays is an opportunity to implement an app for Apple Watch. I can’t live a day without my Watch and it feels it’s good to have an Apple Watch app so your users can get quick access to their tasks in the app. Also with SwiftUI, it’s way simpler to create a watchOS app when you have source code for an iOS app. We’ll cover that in the future parts, but for now, let’s add watchOS support to our framework.
Choose the DBHelper framework in the Project Navigator. Click File — New — Target, select the watchOS tab, find the Framework & Library section and choose Framework there, then click Next. Name it as DBHelper watchOS, make sure DBHelper is chosen as Project, then click Finish.
Now, choose DBHelper.h in the DBHelper folder, choose the File Inspector in the right panel, and select DBHelper watchOS in the Target Membership field. Then do the same for DBHelper.swift. Make sure you set public for the DBHelper.h Target Membership.
Then, delete the DBHelper watchOS folder with moving all the files to Trash.
Almost done! Choose the DBHelper framework in the Project Navigator, then choose the DBHelper watchOS scheme, go into Build Settings, find there Packaging — Info.plist file, and change it to DBHelper/Info.plist. Also, change Product Name to $(PROJECT_NAME).
Now, if you choose the watchOS scheme, it should build without errors. Great job! We can use this module if we decide to develop a watchOS app (and I’m sure we will).
You can add support for macOS and tvOS in the same way. You may do it as an exercise, as this thing is not really obvious.
The last thing is to add the framework to the project. Choose the project in the Project Navigator (DemoToDoList or the name of your app), choose the target there, find the Frameworks, Libraries, and Embedded Content section there and add the framework using the plus button (make sure you add the iOS framework, not the watchOS one).
Now, you can choose the project’s scheme and try to build the app. Everything should work fine. But what have we done and how are we going to use that framework?
What’s Next
Great job with adding your own framework into the app. We haven’t used our app code much, but we will in the next part of the tutorial. The hard and boring part is almost done. Next time we’ll create another framework specifically for Core Data. And migrate our app to that database. The next part is being written now, so stay tuned.
The complete code of the app is available here.
This tutorial is the 4th part of the series of the creation of a To-do list app. To check the other parts, use the following links:
- Getting Started with SwiftUI and Combine Using MVVM and Protocols for iOS.
- Creating an iOS App With SwiftUI and Combine Using MVVM and Protocols.
- Creating an iOS App With SwiftUI, Combine, MVVM, and Protocols [Part 3].
- How to Create Your Own Framework for Your iOS App (this tutorial).
- Using Core Data in Your SwiftUI App with Combine, MVVM and Protocols.


