
How to Create Motion Graphics Using Photoshop
Only by resorting to Position, Opacity, and Transform transitions, you have plenty of options for a plain motion graphics project
In 2021, motion graphics are trending more than ever. They’re used in advertisements, all over social media, for educational infographics, for YouTube intros, in TV commercials… The applications are immense. They are a very effective way to display visual information in a highly engaging and dynamic way.
If you are a graphic or UI designer you certainly understand the importance of motion graphics and know that you would benefit to learn how to do it. While motion graphics are a very specific skill and it takes years to become an expert on the matter, simple animations and transitions are easy to learn and you don’t even need dedicated software: they can be done in Adobe Photoshop!
This article will guide you on how to do a very simple motion graphics project only using Photoshop. Here is what the final project will look like:

Excited? Let’s get into it!
Note: This tutorial is targeted at someone who already has basic knowledge of Photoshop. Therefore, I won’t be addressing things like how to create a new layer or rotate a shape.
Initial Setup
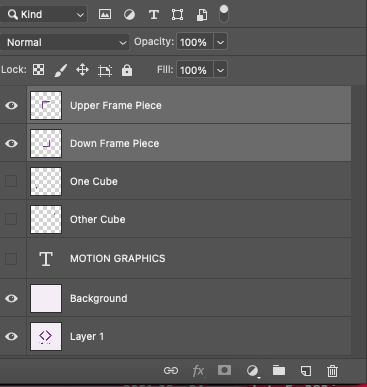
The initial setup for your motion graphics project is having every element you want to do independently animate in a separate layer.
Note: I used created my graphics using this project by vectores_gratis, available on Freepik
Timeline is the Photoshop functionality that allows the creation of animations and motion graphics. To make it visible, you just have to select the menu option Window > Timeline.
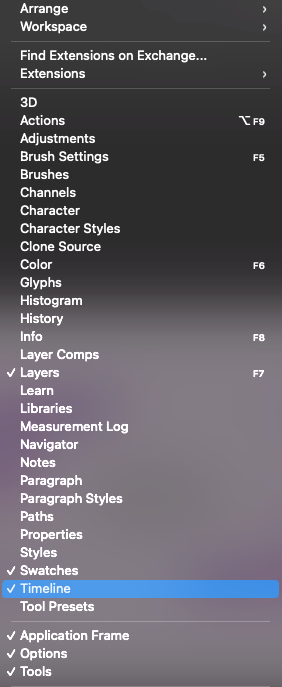
This makes the Timeline appear at the bottom of Photoshop’s workspace. Initially, it is empty. Click the Create Video Timeline button and you’ll see the Timeline panel filled with the project’s layers.
Planning the Motion Graphics Story
Motion graphics is about storytelling. This means we don’t want multiple events to be happening at the same time. The animation must have a logical sequence and tell a narrative.
A simple way of planning a motion graphics project is to think of it as a sequence of moments. Each of these moments is composed of a transition in the properties of the involved layers, defined by two keyframes: one for the transition start, another one for the transition end.
A Keyframe is a location on a timeline which marks the beginning or end of a transition. It holds special information that defines where a transition should start or stop. The intermediate frames are interpolated over time between those definitions to create the illusion of motion. — Computer Hope Definition
For example, a transition of opacity from 0% in the first keyframe to 100% in the last keyframe will make the layer appear on the canvas.
This being said, I defined the story of this animation in three moments:
- A small square rotating
- The square divides into two pieces that move in opposite directions
- Typography appears in the center of the split square
First Moment: A small square rotating
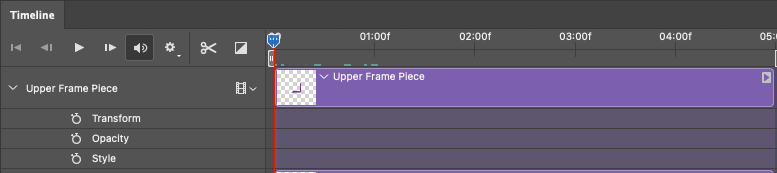
On the left side of the Timeline, there is a vertical red line. That is the current-time indicator.
If you click the arrow next to any layer name, the layer’s properties — Position, Opacity, and Style — are displayed altogether with a stopwatch symbol.

Clicking the stopwatch of a layer property will set the properties in the first keyframe.
To animate the first keyframe, start by placing the elements in the desired position on the canvas. In this case, it would be something like this:

Click the Position stopwatch of every layer to set the current position of every element in the first keyframe. You’ll notice that a yellow diamond shape appears on the stopwatch left and under the current-time indicator, which indicates the presence of a Linear Keyframe. I won’t go into detail on what a Linear Keyframe is, or mention other keyframe types because that is not necessary for this tutorial. If you want to go deeper into this subject, Photoshop’s documentation has everything you need to know.
Important: Make sure the current-time indicator is in the beggining of the Timeframe panel (00 instant)!
Maybe you have noticed that the first keyframe should not include the small squares and the typography. Therefore, we need to set up another property for the corresponding layers: the Opacity. This is accomplished by:
- Set up the opacity of these three elements (Both squares and the typography) to zero;
2. Click the Opacity stopwatch of the corresponding layers to set the opacity of the first keyframe.
And that’s it for the first keyframe!
The first animation transition we want to create is making the two visible elements rotating in the same position.
You may have already noticed that we don’t have a property to set up for this. So, here is the first essential trick you are about to learn: to animate transformations like resizing or rotations, you have to convert the respective layers to smart objects.
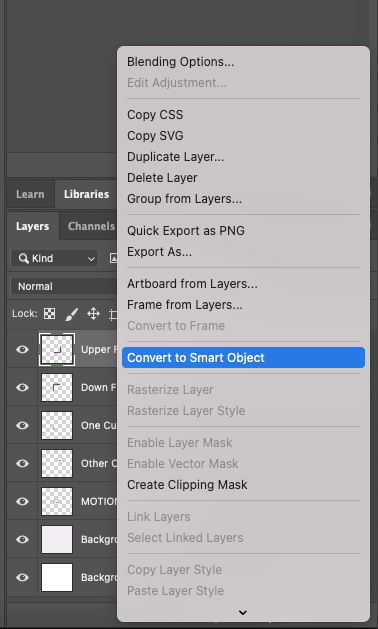
For our project, we need to convert two layers to smart objects (In my example they are named Upper Frame Piece and Down Frame Piece). After this, you’ll notice that the Position property was replaced by the Transform property on the layer’s property list, inside the timeline panel.
A rule of thumb in motion graphics is to never start an animation from the beginning (i.e., the 00s instant). Instead, move the current-time indicator to the 05f instant. You may need to adjust the timeline zoom to accomplish this. Once you have the indicator properly located, click on the stopwatch symbol to set up the Transform property in this instant. Do this process for both of the shapes currently visible on the canvas.
Prepared for your first animation?
Now, follow these steps for both of the layers:
- Move the current-time indicator to the time or frame where the layer should be rotated. Let’s say 10 frames later.
- Click the keyframe control (diamond symbol by the left of the Transform stopwatch) to add a new keyframe layer
- Transform the layer directly in the canvas, either using the free transform tool or accessing the menu Edit > Transform > Rotate 180º
At this moment, you can see how your motion graphics project is going by moving the current-time indicator across the timeline or using the player controls in the timeline.
Second Moment: The square divides into two pieces that move in opposite directions
After the square rotation, we want the two pieces of it to separate, by moving in opposite directions. To accomplish this, you just have to use the same procedures we have been applying until now.
- Move the current-time indicator to the desired instant in the timeline to be the initial keyframe (I put 5 frames after)
- Click the Transform keyframe control (diamond symbol on the left of the property stopwatch) to add a new linear keyframe
- Move the current-time indicator to the desired instant in the timeline to be the final keyframe (I put 10 frames after)
- Click the Transform keyframe control to add another linear keyframe
5. Transform the layers directly in the canvas, this time by moving them
Don’t worry if you don’t know exactly where you want to position the shapes at this moment. You can always fix it afterward.
At this time, we need to manipulate the small squares again, to make them appear and move at the same moment. Since at this moment the squares have opacity set to 0, I suggest we animate it backward, i.e., setting up the final keyframe first. Let’s think — in the last keyframe, we want the squares to have Opacity set to 100% and to be placed alongside the other shapes in the canvas.
Follow these steps:
- Maintain the current-time indicator in the final keyframe (01:00f, if you are following my example)
- Click the Opacity keyframe control (diamond symbol on the left of the property stopwatch) to add a new linear keyframe
- Set each layer where the squares are figured to have an Opacity level of 100%
- Click the Position keyframe control in the two layers
- Move the squares in the canvas to the desired position
If you move the current-time indicator across the timeline, you’ll see that the squares already have the motion we were looking for. However, the timing is not correct.
This is happening because, at this moment, the first keyframe of the squares transition is defined in the first instant of the timeline. This is evident by the yellow symbols displayed in the layers’ timeline. Select those symbols (by pressing ctrl/cmd and click over them) and drag them in the first keyframe of the second moment. Like this:
Fourth Moment: Typography appears in the center of the divided square
There is only one moment left to do in our motion graphics project. And it is a very easy one.
Just as in the case of the small squares, we defined the first keyframe of the Typography animation in the first moment of the timeline. However, the typography animation corresponds to the third moment of our motion graphics narrative, which means, its first keyframe should overlap the last keyframe of the second moment.
To accomplish this, you only have to:
- Open the Typography layer properties, in the Timeline Panel
- Select both of the Linear keyframe symbols (ctrl/cmd + click)
- Drag them to the 01:00f instant
Finally:
- Move the current-time indicator for the final keyframe (I put 5 frames after)
- Click the Opacity keyframe control to add a new linear keyframe
- Set the layer opacity to 100%
And that’s it! You just made your first motion graphics project only using Photoshop!
Now you can opt to render as a video or export as a .gif, as I did.
The Takeaway
Motion Graphics is one of the biggest visual design trends in 2021 and it is expected to continue like this in the following years.
This tutorial is a guide to create a plain motion graphics project. Despite its simplicity, it already gives you many options to consider for your designs. Only by resorting to Position, Opacity, and Transform transitions, you already have the basic knowledge you need to design your own motion graphics. And all this using software you are already familiar with: Adobe Photoshop.
But that’s not all: if you find a new passion for motion graphics and decide to explore the go-to software for this purpose — Adobe After Effects — you’ll find a very similar timeline, where you can apply the knowledge you got with this tutorial.
Did you find this guide helpful? What is your motivation to create motion graphics?
Happy Design!


