avatarHussain Arif

Free AI web copilot to create summaries, insights and extended knowledge, download it at here

5070

Abstract

do that:</p><div id="2e8b"><pre>eventHandler<span class="hljs-selector-class">.Handle</span>(event1, <span class="hljs-built_in">ExampleMiddlewareFoo</span>(<span class="hljs-built_in">ExampleMiddlewareBar</span>(handle)))</pre></div><h1 id="a8a5">Managing Events with Handlers and Middleware</h1><p id="f869">Most articles I read explain how to use this design pattern; this one deals with implementing the internal logic. So let's start coding.</p><p id="35c4">The full code for this article can be found <a href="https://github.com/xNok/slack-go-demo-socketmode/blob/main/examples/middleware/main.go">here</a> to help you follow along.</p><h2 id="0f88">Designing events</h2><p id="b622">First, we are going to enumerate the list of events that our system can handle. The way we create enumeration in Go is a bit different than in other programming languages. In Go, we are going to use a set of constants sharing the same <code>type</code>. Here I define a type <code>EventType</code>that represents a string with the event's name.</p><div id="b181"><pre>// <span class="hljs-keyword">type</span> <span class="hljs-type">used </span>to enumerate events <span class="hljs-keyword">type</span> <span class="hljs-type">EventType </span>string</pre></div><div id="4817"><pre>const ( event1 EventType <span class="hljs-operator">=</span> <span class="hljs-string">"event1"</span> event2 EventType <span class="hljs-operator">=</span> <span class="hljs-string">"event2"</span> )</pre></div><p id="e041">Next, we define the event itself. In our example, the<code>Event</code> as a type which can be selected among the list of <code>EventType</code> created above.</p><div id="2bc9"><pre><span class="hljs-keyword">type</span> <span class="hljs-type">Event</span> struct { <span class="hljs-type">Type</span> <span class="hljs-type">EventType</span> <span class="hljs-type">Data</span> interface{} }</pre></div><h2 id="df6c">Create an event sender (for test purpose)</h2><p id="60aa">To test our system, we will need to create a small function to send events every 2s. Each<code>Event</code> is transmitted via a <a href="https://tour.golang.org/concurrency/2">channel</a> and, the <code>eventSender</code> below sends a random <code>Event</code> of type <code>event1</code> or <code>event2</code> to a channel.</p><blockquote id="53f3"><p><i>Channels are a type which you can send and receive values, they are great for communication among goroutines. In other words, there are perfect for sending and receive event through your application.</i></p></blockquote><div id="ffd1"><pre><span class="hljs-function"><span class="hljs-keyword">func</span> <span class="hljs-title">eventSender</span><span class="hljs-params">(c <span class="hljs-keyword">chan</span> EventType)</span></span> {</pre></div><div id="7f57"><pre> for { // Send <span class="hljs-selector-tag">a</span> random event <span class="hljs-selector-tag">to</span> the channel rand<span class="hljs-selector-class">.Seed</span>(<span class="hljs-selector-tag">time</span><span class="hljs-selector-class">.Now</span>()<span class="hljs-selector-class">.Unix</span>()) events := []EventType{ event1, event2, } n := rand.<span class="hljs-built_in">Int</span>() % <span class="hljs-built_in">len</span>(events)</pre></div><div id="6101"><pre> c <- events[n] <span class="hljs-comment">// send event to channel</span></pre></div><div id="5285"><pre> // <span class="hljs-keyword">wait</span> a <span class="hljs-built_in">bit</span> <span class="hljs-built_in">time</span>.Sleep(<span class="hljs-number">2</span> * <span class="hljs-built_in">time</span>.Second) } }</pre></div><h2 id="000c">Handler and dispatcher</h2><p id="e562">We first need a struct to hold the list of events we want to listen to and which function to call whenever that event is transmitted. This struct also contains the channel used for communicating events.</p><div id="280d"><pre><span class="hljs-comment">// Create a struct to hold config</span> <span class="hljs-comment">// And simplify dependency injections</span> <span class="hljs-keyword">type</span> EventHandler <span class="hljs-keyword">struct</span> { <span class="hljs-comment">// Event channel</span> Events <span class="hljs-keyword">chan</span> Event <span class="hljs-comment">// hold the registedred event functionss</span> EventMap <span class="hljs-keyword">map</span>[EventType][]<span class="hljs-function"><span class="hljs-keyword">func</span><span class="hljs-params">(Event)</span></span> }</pre></div><p id="aa6c">Next, we need to provide an initializing constructor for our <code>EventHandler</code>.</p><div id="a4ed"><pre><span class="hljs-function"><span class="hljs-keyword">func</span> <span class="hljs-title">NewEventHandler</span><span class="hljs-params">()</span></span> *EventHandler { eventMap := <span class="hljs-built_in">make</span>(<span class="hljs-keyword">map</span>[EventType][]<span class="hljs-function"><span class="hljs-keyword">func</span><span class="hljs-params">(Event)</span></span>) event

Options

s := <span class="hljs-built_in">make</span>(<span class="hljs-keyword">chan</span> Event)</pre></div><div id="78bb"><pre> return <span class="hljs-variable">&</span>EventHandler<span class="hljs-punctuation">{</span> <span class="hljs-symbol"> Events:</span> events, <span class="hljs-symbol"> EventMap:</span> eventMap, <span class="hljs-punctuation">}</span> <span class="hljs-punctuation">}</span></pre></div><p id="98fe">Then, we can create our <code>Handle</code> function that associates the event with a callback function.</p><div id="308c"><pre><span class="hljs-comment">// register the handler function to handle an event type</span> func (h *EventHandler) <span class="hljs-built_in">Handle</span>(e EventType, f <span class="hljs-built_in">func</span>(Event)) { h<span class="hljs-selector-class">.EventMap</span><span class="hljs-selector-attr">[e]</span> = <span class="hljs-built_in">append</span>(h<span class="hljs-selector-class">.EventMap</span><span class="hljs-selector-attr">[e]</span>, f) }</pre></div><p id="e42a">Finally, we create the <code>EventDispatcher</code> function, the core of this mechanism. The <code>EventDispatcher</code>process any event sent to a channel, check its type, and if any function has been registering for that type, we call all registered functions.</p><div id="6597"><pre><span class="hljs-function"><span class="hljs-keyword">func</span> <span class="hljs-params">(h *EventHandler)</span></span> EventDispatcher() { <span class="hljs-keyword">for</span> evt := <span class="hljs-keyword">range</span> h.Events { log.Printf(<span class="hljs-string">"event recieved: %v"</span>, evt) <span class="hljs-keyword">if</span> handlers, ok := h.EventMap[evt.Type]; ok { <span class="hljs-comment">// If we registered an event</span> <span class="hljs-keyword">for</span> _, f := <span class="hljs-keyword">range</span> handlers { <span class="hljs-comment">// exacute function as goroutine</span> <span class="hljs-keyword">go</span> f(evt) } } } }</pre></div><h1 id="13e4">Using our system</h1><p id="4d4e">Everything is ready; we can start using our event handling system.</p><ol><li>Instantiate our event Handler</li><li>Register which event to listen to and what function to callback</li><li>Start the event sender</li><li>Start the event dispatcher</li></ol><div id="62ab"><pre><span class="hljs-keyword">func</span> <span class="hljs-title function_">main</span><span class="hljs-params">()</span> {</pre></div><div id="5b09"><pre> <span class="hljs-variable">eventHandler</span> := <span class="hljs-function"><span class="hljs-title">NewEventHandler</span>()</span></pre></div><div id="d244"><pre> eventHandler.Handle(event1, <span class="hljs-keyword">func</span><span class="hljs-params">()</span> { <span class="hljs-built_in">log</span>.Printf(<span class="hljs-string">"event Handled: %v"</span>, event1) })</pre></div><div id="5c56"><pre> <span class="hljs-variable">go</span> <span class="hljs-function"><span class="hljs-title">eventSender</span>(<span class="hljs-variable">eventHandler.Events</span>)</span></pre></div><div id="30f2"><pre> eventHandler<span class="hljs-selector-class">.EventDispatcher</span>()</pre></div><div id="9bf2"><pre>}</pre></div><p id="e590">The result should be along those lines:</p><figure id="5ee7"><img src="https://cdn-images-1.readmedium.com/v2/resize:fit:800/1*_D-GCRSu3K8CgTBXewJjJQ.gif"><figcaption></figcaption></figure><p id="19d6">Since we only handle an event of type <code>event1</code>, only <code>event1</code> shows as <code>Hansled</code>. All is good!</p><p id="d48a">The full code for this article can be found <a href="https://github.com/xNok/slack-go-demo-socketmode/blob/main/examples/middleware/main.go">here</a>.</p><h1 id="6f5e">Interesting Articles tackling the same topic</h1><ul><li><a href="https://drstearns.github.io/tutorials/gomiddleware/">Middleware Patterns in Go</a></li><li><a href="https://sathishvj.medium.com/web-handlers-and-middleware-in-golang-2706c2ecfb75">Web Handlers and Middleware in GoLang</a></li><li><a href="https://readmedium.com/lightweight-event-management-implemented-by-go-a654d59ac65">Lightweight event management implemented by Go</a></li><li><a href="https://readmedium.com/the-7-most-important-software-design-patterns-d60e546afb0e">The 7 Most Important Software Design Patterns</a></li></ul><p id="13e7"><i>Do you want <b>unlimited access</b> to all my content and many other writers’ content on Medium? Consider using my affiliate link to <a href="https://couedeloalexandre.medium.com/membership">become a Medium member today</a></i></p><h2 id="853a">Further reads</h2> <figure id="81d2"> <div> <div> <img class="ratio" src="http://placehold.it/16x9"> <iframe class="" src="https://couedeloalexandre.medium.com/embed/list/3f9d03f2cb8f" allowfullscreen="" frameborder="0" height="184" width="undefined"> </div> </div> </figure></iframe></div></div></figure></article></body>

How To Create Forms in React.Js

All You Need to Know to Create Forms in React

Source: Karl Lee At Unsplash.com

React.Js gives us full capability on using forms on our web page. Before diving in deep to this concept, there are a few prerequisites to learn before reading this lesson.

  • States, or hooks. As React moves towards functional components, we will be using hooks in this post.
  • Event handling.

By the end of this post, you will be fully apt to create an app that does the following function,

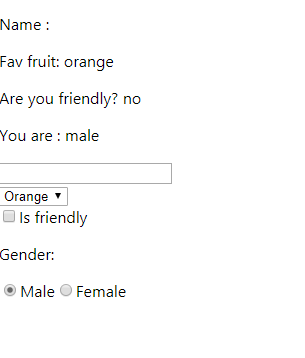
As you can notice, the values of the texts change dynamically depending on the user input. This allows for better visual display of the outputs.

Getting Started

Declaring Hooks

We will be using hooks to change our values according to user input. Here, we will be creating several hooks like so:

Code to declare hooks In React

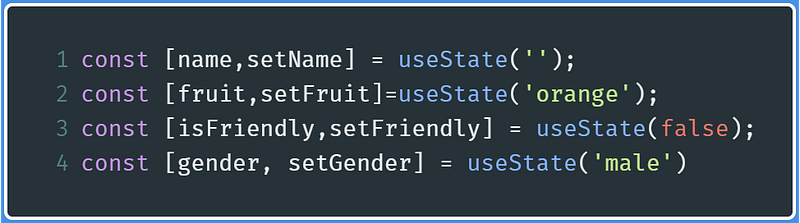
As these variable names suggest, name hook changes the name text field, fruit changes the fruit value of the drop-down menu, and so on and so forth.

Function to Change Hooks

Now let’s create a function to change the corresponding hooks. This function will be invoked whenever the value of an element is changed in the form. Note that this function is incomplete, for now, we are just fetching information about the triggered HTML element.

Write the code for the function changeValues() .

Code to get information about the triggered element
  • Line 1 : Whenever an element is triggered, the event parameter contains the information about the element, for example, if the type is a checkbox, textfield, and so on.
  • Line 2 : Get the name and the type of the triggered HTML element, and then assign them to their named variables respectively.
  • line 3 : If the type of the element is a checkbox, then value should be a boolean indicating whether the checkbox is checked. If it’s not a checkbox, then value is the value of the HTML element.

Handling Inputs

Textfield

In this example, we will be changing the name hook.

To use a text field in your forms, write the following code:
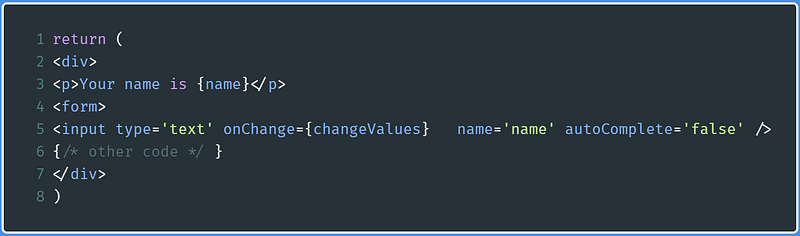
Code to use text field in forms in React, and then displaying it
  • line 3 : Display the value of the name hook
  • line 5 : Create a text field with its respective name. If at anytime the value of the field changes( onChange event), then invoke the changeValues function that we defined earlier, thus altering the value of the name hook.

To change the value of name , we now need to modify our changeValues function, like so:

Changes reflected on line 4
  • Line 4 : If the name(event.target.name) of the triggered HTML element is name , then we will change the value of the name hook. In return, this will re-render the component to display the value of name as defined above.

If you’re only concerned with the text field, this code is the final version:

Drop Down Menus

First create the drop-down menu within your form parent element, and then use a p tag to display the value of the hook associated with this drop-down menu. In my example, it will be the fruit hook.

Code to create a drop down menu in React and displaying the ‘fruit’ hook

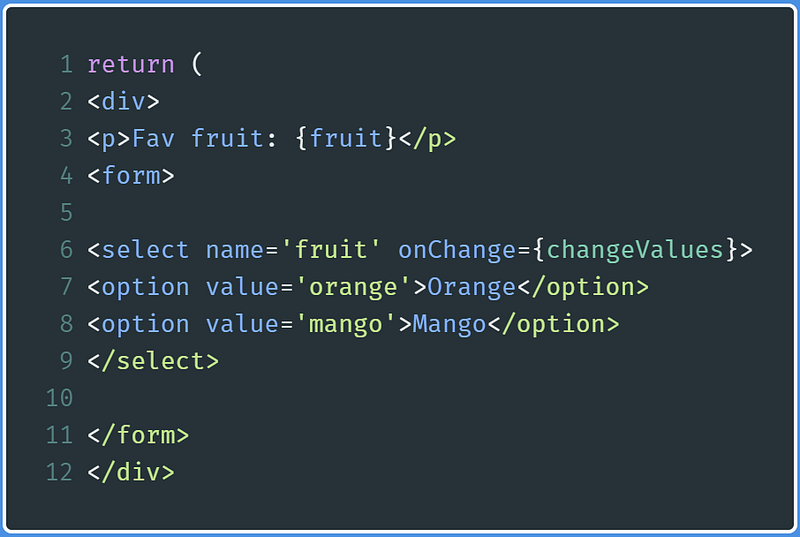
This code says that whenever the input of the drop down method is changed ( onChange event), then invoke our changeValues function. This in turn changes the value of the fruit hook.

Now, we need to set a condition in our changeValues function. It will first check if the name of the element is fruit . If it is, then we will invoke the setFruit function.
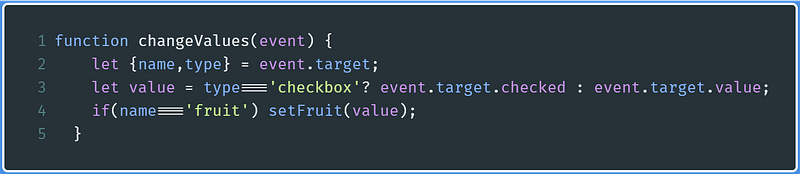
Code to change value of the ‘fruit’ hook.
  • Line 4 : If the name(event.target.name) of the triggered HTML element is fruit, then we will change the value of the fruit hook. In return, this will re-render the component to display the value of fruit as defined above.

In the end, the code concerned to the drop down menu is shown below:

Radio Buttons

This is extremely similar to the drop down menu example. In this section, we will be using the gender hook.

As you can notice, according to line 7 and line 11 , whenever the input is changed, the changeValues function is invoked. If the hook value is the same as any of these radio button values, then the respective radio button is checked.

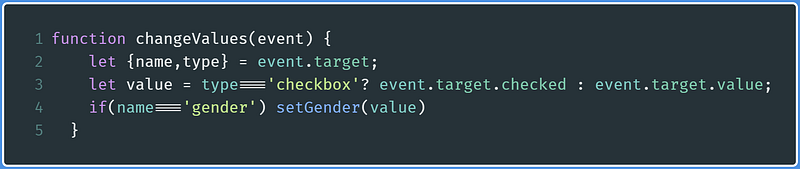
Now let’s alter the changeValue function to change the gender hook to its respective value

Code to change the `gender’ hook in React.Js

The code related to this HTML element is in this embed:

Checkbox

This input method has a bit of a learning curve. It has no value, but it has a single boolean property, whether it has been checked or not.

In this example, we will be displaying and changing an isFriendly hook with the checkbox

First, create a checkbox in your forms element, and a p element to display the isFriendly hook

Code to create checkbox in React and displaying the value of ‘isFriendly’ hook

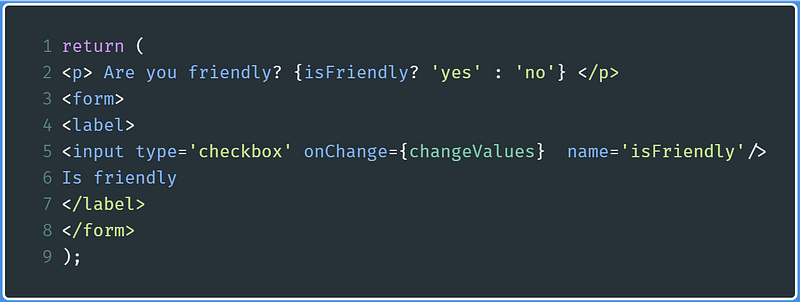
Here, according to this code:

  • Line 2 : Perform a check, if isFriendly hook equates to true , then display a yes , otherwise the code displays a no .
  • Line 5 : Show a checkbox. Whenever the user input is changed( an onChange event is triggered), then invoke the changeValues function. This, in turn, will help us to change the isFriendly hook.

Now alter the changeValues function like so:
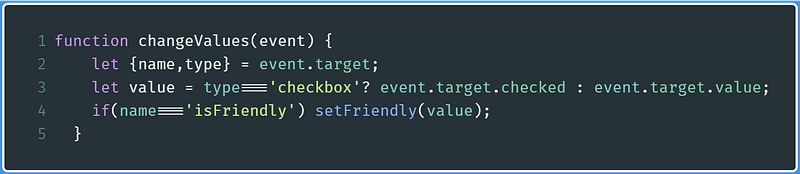
Code to change the ‘isFriendly’ hook in React
  • Line 3 : If the type of the triggered element is a checkbox, then let value be the boolean value that determines whether the element is checked
  • Line 4 : Pass this value to the setFriendly function so that the isFriendly hook is changed appropriately.

The final code for the checkbox and its associated hook is the following :

Recap

If you want all of the examples in one file, here is the embed:

Further Reading

Conclusion

This concept might have been a tricky one. My advice to you is to play with the code, destructure the programs and research if you are confused on any of the lines or functions for minimal confusion. Just don’t give up!

Next post : How To Build A Weather App In React Previous post : Class Based Components in React

Programming
Technology
Education
JavaScript
React
Recommended from ReadMedium