
How to Create a Virtual Environment in Python
an environment with a particular python version and some additional packages

What is a virtual environment?
A virtual environment is a self-contained directory tree that contains a particular Python version and some additional packages.
In other words, a virtual environment is a tool that helps us to create different python environments for various python projects to keep their dependencies separated. This is one of the most important tools preferred by Python programmers.
Why do we need a virtual environment?
Say, for example, we have multiple projects that depend on a single package like Django or Flask. Each of these projects might be using a different version of Django or flask.
Now, if you upgrade any of these packages and the global site packages, it would break a few of your websites.
If each of those projects had an isolated environment; where they only have specific versions, packages, and dependencies, it would be much more efficient. This is how we know a virtual environment is necessary if, at a time, you are working on multiple projects, as it allows us to create different python environments.
Looks like a good idea? Let us see how these environments get created.
Creating Python virtual environment (Windows version)
Prerequisites:
Make sure you install all the versions of Python you will be working with or planning to work with and a virtual environment.
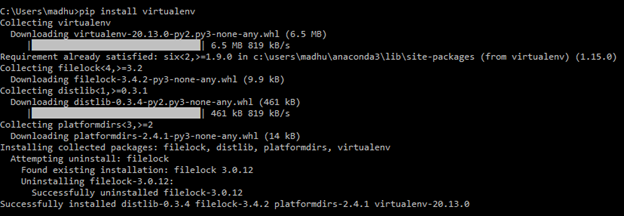
Step 1: To install a virtual environment.
Open your command prompt, type the following command and click enter.
pip install virtualenvIf the command gets executed, it means you have successfully installed the virtualenv
Step 2: Checking the list of global site packages available
Before creating a separate virtual environment, we should know the different versions of global site-packages available in the system. All these packages shown were present in the system before creating the virtual environment.
For example: If you install Python version 2.6 and 3.0, both of these packages, along with other installed packages, will be visible in the list when you enter the below command:
pip listStep 3: Creating a directory for Environments
Creating a separate directory for your environments is the best way to store all your new environments in one place; it makes your work much more organized.
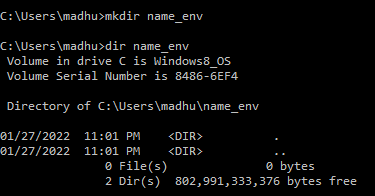
Enter the command below to create a directory exclusive for environments:
mkdir Name_envdir
You can now explore your created directory using the command below:
To open and see the list of items in the directory:
dir Name_envdirNote: Initially, your directory will be empty.
Step 4: Creating your 1st virtual environment
Use the command below to create your first virtual environment.
Note: Make sure you have the virtual environment installed, as stated in the prerequisites.
virtualenv env_nameOnce the command gets executed, the ‘setup tools’ and ‘pip’ of the ‘venv’ would get installed. You have now successfully created your very first virtual environment.

But, it is not possible to access as it is not activated.
Let’s now activate the venv
Step 5: Activating the created Environment
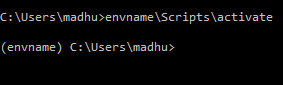
Use the command below to activate the virtual environment.
env_name\Scripts\activateNow, we are ready to use the Environment.
How do we know whether you have activated the Virtual Environment?
- You can know we have activated the ‘venv’ when the name of the ‘venv’ appears as a prompt in the terminal.
2. Another method is by finding the path of the Python we are using. In the image below, you can see that the Python program is within our environment.
This command will help you find the stored path of the Python you are using.
where python
3. You can also apply the same step to find the path for pip. If ‘pip’ is within the environment, you can confirm the activation of the virtual environment.
where pip
Step 6: Installing packages
Now that you are finally in your virtual environment, let us see how to install some packages. For example, the ‘Flask’ package can be installed using the below command.
pip install flask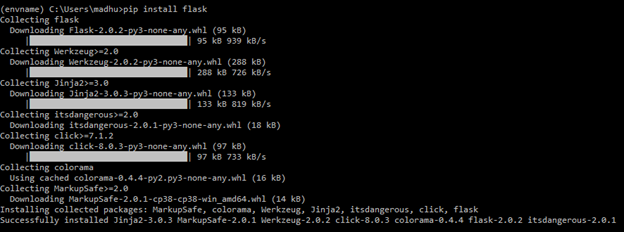
Step 7: To display the packages installed in the environment
Use the below command to get a list of the packages installed in the environment you are using.
pip freeze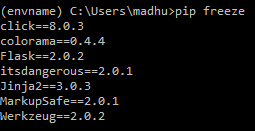
Note: To display all the packages present in the environment
pip list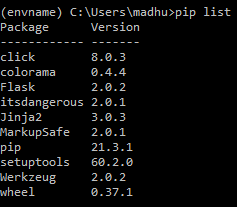
Step 8: To export packages & version numbers in the form of a .txt file
Now, what if you want to store the above-installed packages and their version number separately to use them in other projects? The below command allows you to do that. The environment directory allows you to store all the installed packages/dependencies (along with their version numbers) in the form of a text file.
pip freeze > requirements.txtOnce this command is executed, the package name (along with their version number), would be added to the requirements.txt file. You can verify this by viewing the contents of the file.
To display contents inside requirements file:
more requirements.txt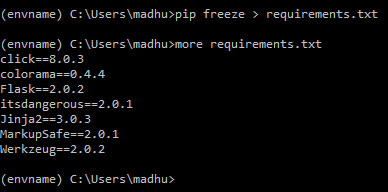
Now, what if you want to create another environment for your project and install all the packages stored in the requirements.txt file?
For this, you have to first come out of the current environment. Let us see how.
Step 9: To come out of the current environment.
deactivateOnce the command gets executed, you will come out of the local environment.
To verify this, enter the below command:
where python
You will see that the python you are using is in the global environment.
Step 10: To delete the environment
Finally, assume that you have completed your project and no longer need the particular environment you created. For this, you can delete the said environment from existence using the below command, or you can go to the location and delete the folder manually.
rmdir env_name /s
Note:
Environments are only supposed to work with specific dependencies, versions, and packages for your project. They are not suitable to store your project files.
In other words, it is not advisable to build your project files within the virtual environments because virtual environments are intended for a short time purpose (example: your projects). If you store your projects in the venv, the project files would also get deleted when you throw away the venv.
Conclusion:
In conclusion, this article has covered the step-by-step creation of a virtual environment, installing packages, and using it efficiently for your projects using the Python program. I strongly recommend reading the mentioned link and other sources as there are more commands that you can experiment with on this topic.
I hope you like the article. Reach me on my LinkedIn and twitter.
Recommended Articles
1. 8 Active Learning Insights of Python Collection Module 2. NumPy: Linear Algebra on Images 3. Exception Handling Concepts in Python 4. Pandas: Dealing with Categorical Data 5. Hyper-parameters: RandomSeachCV and GridSearchCV in Machine Learning 6. Fully Explained Linear Regression with Python 7. Fully Explained Logistic Regression with Python 8. Data Distribution using Numpy with Python 9. Decision Trees vs. Random Forests in Machine Learning 10. Standardization in Data Preprocessing with Python


