
How to create a real-time web application using FastAPI, Angular and MongoDB
Part 4: Local deployment — Docker
Hi there! My name is Job and in this series I’m going to guide you through my journey of creating a real-time web application. In this multipart guide I tackle all aspects and learnings of creating a real-time web application. In this fourth part I set up the local deployment of our API created in Part 1, the MongoDB database from Part 2, and the Angular frontend from Part 3 using Docker (and just one command!).
Getting setup⚙️
In Part 2 we created the MongoDB database using Docker so this time we don’t have to install anything to get started. Let’s open the API project in PyCharm and create a new folder docker/ with the following files.
api/
|-- docker/
|       |-- docker-entrypoint.sh
|       |-- Dockerfile
|       |-- gunicorn_conf.py
|
|-- src/...
|
|-- pyproject.toml
|-- poetry.lock
Next, let’s open the frontend project in VSCode and create a folder docker/ with a Dockerfile and nginx.conf file.
frontend/
|-- docker/
|       |-- Dockerfile
|       |-- nginx.conf
|
|-- node_modules/...
|-- src/...
|-- ...
Getting started🚀
API
I always start with a default docker-entrypoint.sh which is going to serve as a mechanism for passing optional parameters to the Docker container. It will also start the Python environment managed by Poetry.
Then we need a Dockerfile that defines our container's image (a blueprint if you will). After looking around for the use case of getting a poetry-based environment running in a Docker container serving FastAPI, I stumbled upon this Github discussion. I found the proposed Dockerfile quite interesting as it uses multi-stage builds for different parts of the Docker container. This enables you to maintain different parts separately. I decided to use it and adjust it according to my needs, so full credit goes to Michael Oliverx.
Pay attention to the lines shown below. The first ENV statements set some environment variables for use later in our API to determine what debug level to use, for example. Next, you see the COPY statement for copying the Gunicorn configuration file. The following ENV statements are used for defining which port the API is going to be listening to and to determine if we’re running in Docker which will come in handy later on.
...
ENV APP_ENV="DOCKER"
ENV TZ=Europe/Amsterdam

ENV PYTHONPATH "/app"

ENV LOG_LEVEL "debug"
...
COPY ./docker/gunicorn_conf.py /gunicorn_conf.py
...
ENV PORT=8000The gunicorn_conf.py file holds the configuration for Gunicorn, telling it how to run. Mostly, it sets parameters that determine network, resource (like CPU count), and logging settings. The print(json.dumps(log_data)) statement logs the settings at startup to the console so we can check it if we need to.
Frontend
For the frontend we’re going to use a Dockerfile and a configuration file for NGINX which is going to host our application. There’s a predefined node image available on Docker Hub which we can use as a build-step for our image. We then copy the package.json and package-lock.json after changing to the /app directory. These files are used by the npm ci command to install the project. After this, we copy the project files into the image and run npm run build --prod to build the production environment of our Angular frontend. As the last step, we use the nginx:alpine image from Docker Hub that is going to host our application and replace its default configuration file with ours by overwriting it with the COPY statement. We then remove the default HTML and copy our newly built project from the build-step into the html folder.
The nginx.conf file tells NGINX to configure the server so it listens to port 80 and defines the path /usr/share/nginx/html as the root folder of the source. The index attribute sets the main source file to point to index.thml. This is the file that’s loaded when you visit a website using its root, for example http://localhost:8080/.
Now the fun part😁
So how can we deploy our database, API, and frontend all together using one command? This is where docker-compose comes into play. In Part 2 we used docker-compose to create the MongoDB database for us. We can expand this setup to deploy the API and frontend as well.
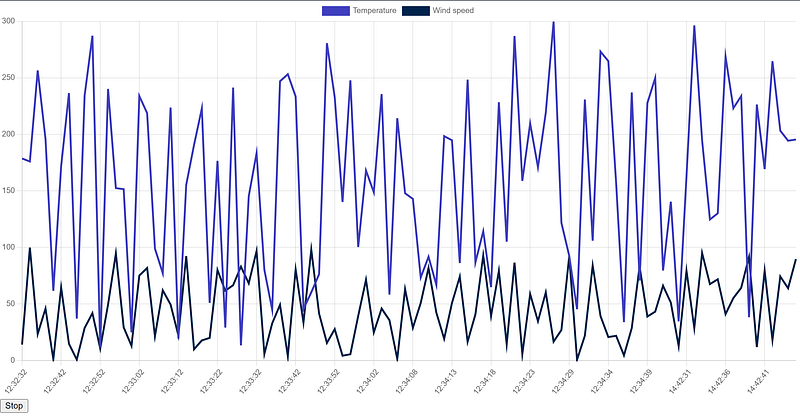
We add the API and frontend by creating a new entry in the docker-compose.yaml file and defining the container_name. The restart: always tells Docker to restart the service in case it crashes. Next, we define where it can find the build configuration. The context defines the folder to use as a context, pretty much how the WORKDIR statement in a Dockerfile sets the current working directory at that stage of the code. The depends_on attribute lets us tell Docker if the container depends on another container so it can determine the order in which to deploy all services. The ports attribute tells Docker to bind an external port to an internal port. For instance, the frontend’s external port (host port) 8080 is bound to internal port (container port) 80. We can now deploy our services at once by running docker-compose up --build -d in the terminal at the main folder containing the docker-compose.yaml file. We use the -d flag to tell Docker to run in detached mode so we don’t have to keep our terminal open to keep the services running. We can now go to http://localhost:8080/ to be redirected to /dashboard and visit our page, and see our line chart update live!
Congratulations🎉
Congratulations! You’ve just deployed the database, API, and frontend using just one command! We started out by defining the Docker image using a Dockerfile for the API and the frontend. We then extended the existing docker-compose file with the API and frontend services. We used docker-compose up --build -d to deploy all the services at once and saw our line chart update live.
In the next part, I show you how to set up authentication using AWS Cognito and secure our API and frontend.
Checkout the source code on my GitHub


