
How to Create a Jumpy Row Layout in Jetpack Compose
Welcome 👋
In this article, we’ll create an engaging Jumpy Row Layout using Jetpack Compose. This layout allows its components to jump smoothly with a wave-like effect 🎢
Excited? 🤩 Let’s dive in 🚀👇
Defining the Function
Let’s start by defining the function. Below is the signature of the JumpyRow composable function:
@Composable
fun JumpyRow(
    modifier: Modifier = Modifier,
    waveWidth: Dp = 200.dp,
    waveHeight: Dp = 25.dp,
    animationSpec: InfiniteRepeatableSpec<Float> = infiniteRepeatable(
        animation = tween(2000, easing = LinearEasing),
        repeatMode = RepeatMode.Restart
    ),
    content: @Composable () -> Unit
)
Parameters
🌀 modifier 👉 The Modifier to be applied to the layout;
🌀 waveWidth 👉 The width of the wave effect, measured in Dp;
🌀 waveHeight 👉 The height of the wave effect, measured in Dp;
🌀 animationSpec 👉 Defines the animation specifications that control the animation behavior;
🌀 content 👉 The content to be displayed inside the row.
Implementing the Function
Let’s implement this exciting effect ✨
Utility Functions
Before we dive into the function’s code, let’s define a couple of utility functions:
● normalizeX ➜ This function maps an x-coordinate from one range to another:
fun normalizeX(x: Float, originalMin: Float, originalMax: Float, targetMin: Float, targetMax: Float): Float {
return targetMin + ((x - originalMin) / (originalMax - originalMin)) * (targetMax - targetMin)
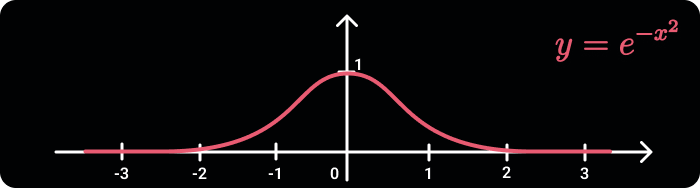
}● waveCurve ➜ This function calculates the y-coordinate of a wave based on its x-coordinate:
fun waveCurve(x: Float): Float {
    return exp(-x.pow(2))
}
Defining Animation
Next, we create an infinite transition that drives the wave’s animation:
val infiniteTransition = rememberInfiniteTransition("Wave Transition")
val waveProgress by infiniteTransition.animateFloat(
    initialValue = 0f,
    targetValue = 1f,
    animationSpec = animationSpec,
    label = "Wave Progress"
)
Building the Layout 🛠️
To achieve this custom layout, we use the Layout composable:
Layout(
modifier = modifier,
content = content
) { measurables, constraints ->
// Convert wave dimensions to pixels
val waveWidthPx = waveWidth.roundToPx()
val waveHeightPx = waveHeight.roundToPx()
// Measure items
val placeables = measurables.map { measurable ->
measurable.measure(constraints)
}
// Calculate row dimensions
val rowWidth = placeables.sumOf { it.width }
val maxHeight = placeables.maxOf { it.height }
val rowHeight = maxHeight + waveHeightPx
// Define layout
layout(width = rowWidth, height = rowHeight) {
// Track x position for placing items
var xPosition = 0
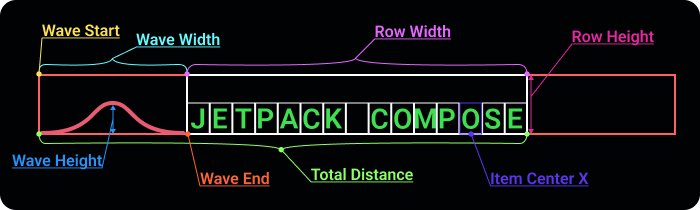
// Calculate wave effect bounds
val totalDistance = rowWidth + waveWidthPx
val waveStart = -waveWidthPx + (totalDistance * waveProgress)
val waveEnd = waveStart + waveWidthPx
// Place items
placeables.forEach { placeable ->
// Calculate item's center X
val itemCenterX = xPosition + (placeable.width / 2f)
// Calculate Y position without wave effect
val baseYPosition = rowHeight - placeable.height
// Apply wave effect if within bounds
val yPosition = if (itemCenterX in waveStart..waveEnd) {
// Normilize x position
val normalizedX = normalizeX(itemCenterX, waveStart, waveEnd, -2f, 2f)
// Calculate wave effect
val waveEffect = waveCurve(normalizedX)
// Apply wave effect to Y position
(baseYPosition - waveHeightPx * waveEffect).toInt()
} else {
baseYPosition
}
// Place the item
placeable.place(x = xPosition, y = yPosition)
xPosition += placeable.width
}
}
}
Congratulations 🥳! We’ve successfully built it 👏. You can find the full code on GitHub Gist. Let’s explore the usage 👇

Practical Example 💁♂️
Let’s explore how to use this layout in action 💥
Jumpy Text
Create a playful Jumpy Text effect:
JumpyRow(
    waveWidth = 160.dp,
    waveHeight = 20.dp,
) {
    for (s in "JETPACK COMPOSE") {
        Text(
            text = s.toString(),
            color = Color.Black,
            fontWeight = FontWeight.Bold,
            fontSize = 32.sp
        )
    }
}
Two-Directional Jumpy Text
Play the animation in both directions:
JumpyRow(
    /* Parametes... */
    animationSpec = infiniteRepeatable(
        tween(1800, easing = LinearEasing),
        repeatMode = RepeatMode.Reverse
    )
) {
    /* Content... */
}
Jumpy Lines
Create some animated lines:
JumpyRow {
    repeat(60) {
        Box(
            modifier = Modifier
                .padding(horizontal = 1.dp)
                .size(4.dp, 50.dp)
                .background(Color.Blue, CircleShape)
        )
    }
}
Mirrored Dots
Create a mirrored dots layout by flipping the vertical scale:
Column {
    JumpyRow(
        waveHeight = 35.dp
    ) {
        repeat(15) {
            Box(
                modifier = Modifier
                    .padding(horizontal = 2.dp)
                    .size(20.dp)
                    .background(Color.Magenta, CircleShape)
            )
        }
    }
    JumpyRow(
        waveHeight = 35.dp,
        modifier = Modifier.scale(scaleY = -1f, scaleX = 1f)
    ) {
        repeat(15) {
            Box(
                modifier = Modifier
                    .padding(horizontal = 2.dp)
                    .size(20.dp)
                    .background(Color.Yellow, CircleShape)
            )
        }
    }
}

Thank you for reading this article! ❤️ If you found it enjoyable and valuable, show your appreciation by clapping 👏 and following Kappdev for more exciting articles 😊


