
How to Build, Test, and Deploy a Laravel Application
GitHub Actions provides a powerful platform for automating the software development lifecycle, including building, testing, and deploying applications. For Laravel developers, this offers a streamlined approach to Continuous Integration/Continuous Deployment (CI/CD).
In this article, we’ll explore how to set up a CI/CD pipeline for a Laravel application using GitHub Actions.

Prerequisites:
- Basic knowledge of Laravel
- Access to a GitHub account
- Access to an AWS account
What Are GiHub Actions?
GitHub Actions is a feature of GitHub that allows you to automate workflows directly from your GitHub repository. You can think of it as a continuous integration/continuous deployment (CI/CD) system built directly into GitHub. With GitHub Actions, you can build, test, and deploy your code right from GitHub.
Here’s a brief overview:
- Workflows: These are the automated procedures that you can set up with GitHub Actions. They are defined in
.ymlor.yamlfiles which reside in a.github/workflows/directory of your repository. - Event Triggers: Actions can be triggered by various GitHub events such as a push, a pull request, creating a release, and more. This allows developers to automate workflows based on specific events in their repository.
- Jobs and Steps: Within a workflow, you can define one or more jobs. Each job runs in its own runner (a virtual machine). Within jobs, you can further break down processes into individual steps. Each step can run commands or use specific actions.
- Actions: While steps can run any arbitrary command, GitHub Actions also supports the use of shared pieces of code called actions. These can be written by the community or by you. They encapsulate frequently-used procedures, making it easier to reuse code across projects and workflows.
- Runners: GitHub Actions runs jobs on virtual machines called “runners.” GitHub provides hosted runners with various OS options (Windows, macOS, and Linux). If you have specific requirements, you can also set up self-hosted runners.
- Environment Variables and Secrets: Actions often require sensitive information, like deployment keys. GitHub Actions lets you set secrets, which are environment variables that are encrypted and can only be accessed by workflows running in the same repository.
- Marketplace: GitHub has a marketplace for actions where the community shares reusable actions. This means you often don’t have to start from scratch; there might be an action already available that fits your needs.
Some use cases for GitHub Actions include:
- Running tests on different platforms and configurations.
- Building and pushing Docker images.
- Deploying applications to cloud platforms.
- Automating the creation of releases and changelogs.
- Linting and code formatting.
To use GitHub Actions, you’ll typically define your workflow in a YAML file and specify when the workflow should run, what jobs it should execute, and the steps for each job. This makes GitHub Actions very versatile and customisable, allowing for a wide range of automation possibilities. Now we know what we are working with with, let’s get started.
Step 1: Creating an AWS EC2 Instance
The first step is to create a live server, for this I am using EC2. Amazon Web Services (AWS) Elastic Compute Cloud (EC2) offers a scalable environment for deploying applications in the cloud. If you’re just getting started with AWS, setting up an EC2 instance might seem a bit daunting. Don’t worry — this guide will walk you through the process step by step. If you don’t have one, sign up at the AWS Management Console.
Step-by-step Guide to Create an AWS EC2 Instance
- Log in to the AWS Management Console: - Navigate to https://aws.amazon.com/ and sign in to your account.
- Access the EC2 Dashboard: - In the AWS Management Console, find the “Services” dropdown and select “EC2” or search for “EC2” in the AWS services search bar.
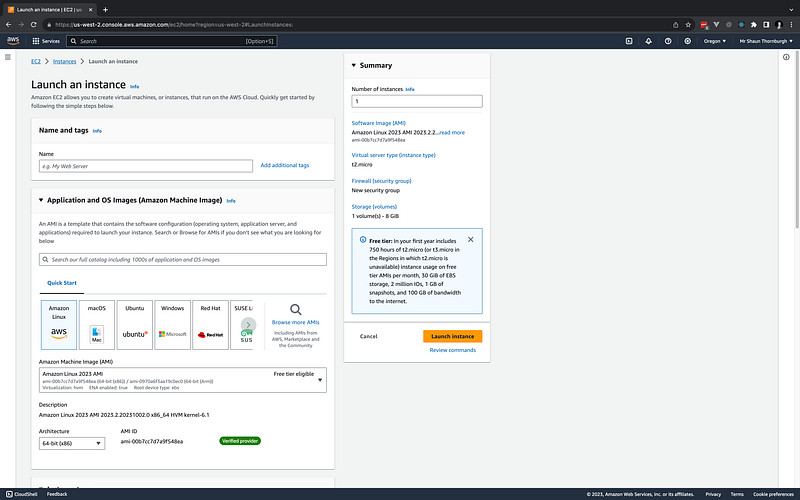
- Launch a New Instance: - In the EC2 Dashboard, click on the “Launch Instance” button.
- Name and tags: - Choose a suitable name i.e. Laravel Application Server - Tags allow you to organise and identify resources within your AWS environment. Click “Add additionals tags” and provide a key-value pair (e.g., Name: MyFirstInstance).
- Choose an Amazon Machine Image (AMI): - AMIs are pre-configured templates for instances. AWS offers several default AMIs. You can also find many community and marketplace AMIs with specific software configurations. - For beginners, you might want to start with a basic AMI like Ubuntu Server.
- Choose an Instance Type: - EC2 offers various instance types optimised for different use cases. For testing purposes, ‘t2.micro’ is a good choice since it falls under the AWS free tier.
- Select a Key Pair - This allows you to connect to your instance, you can create a new pair here if needed.
- Network Settings - Security Groups function as virtual firewalls to control inbound and outbound traffic. - You can create a new security group or use an existing one. Ensure that at the very least, you allow SSH (port 22), and HTTP (port 80). - It’s crucial to limit SSH access only to known IP addresses to prevent unauthorised access.
- Configure Storage: - By default, your instance comes with an 8GB root volume. You can add additional storage or modify the default volume here.
- Review and Launch: - Review all the configurations. Once satisfied, click on the “Launch instance” button. - A pop-up will ask you to select a key pair. If you don’t have a key pair, choose “Create a new key pair”, give it a name, and download it. This key pair will be used to connect to the instance. - After selecting your key pair, click “Launch Instances.”
- Connect to Your Instance: - Once the instance is running, select it in the EC2 dashboard. - Click on the “Connect” button, and you’ll be provided with instructions to SSH into your instance using the key pair you downloaded earlier.
Congratulations! You’ve successfully created and launched an EC2 instance in the AWS cloud. Ensure you stop or terminate the instance when not in use to avoid incurring unnecessary costs.
You will need to install php, nginx, mysql and composer on your instance. Additionally create a database and user in mysql. I’ve written a seperate guide on how to do this here:
As you become more familiar with EC2, you can explore more advanced features and configurations, but for now let’s move on and set up a Laravel project on our local machine.
Step 2: Create a New Laravel Project
I’m using a mac with Docker installed so I am going using the following to install a fresh Laravel application:
curl -s "https://laravel.build/laravel-github-actions-example" | bashOnce the installation has finished, create a repository on Github, initialise a git repository for your newly created application and push it to GitHub.
git init
git add .
git commit -m "Install Laravel"
git branch -M main
git remote add origin --your repository
git push -u origin main
Login to your EC2 instance and clone the repository into /var/www/html. Copy env.example to .env and update the database credentials.
Step 3: Setting up GitHub Actions Workflow and a Test Job
We can now set up our actions in Github. Go to your repository and click on the Actions tab. You should see Laravel starter workflow.
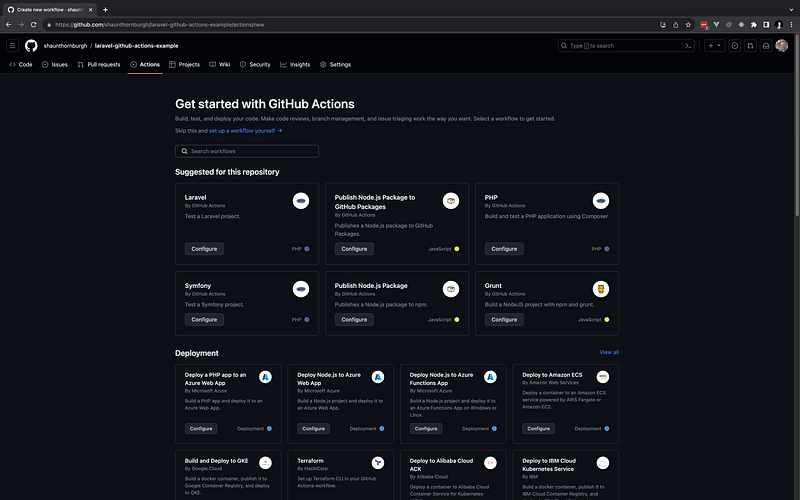
Select it and you will be presented with the workflow contents. Note: I had to make a change to this file as the php version was not correct. Here is the file contents:
name: Laravel

on:
  push:
    branches: [ "main" ]
  pull_request:
    branches: [ "main" ]

jobs:
  laravel-tests:

    runs-on: ubuntu-latest

    steps:
    - uses: shivammathur/[email protected]
      with:
        php-version: '8.1'
    - uses: actions/checkout@v3
    - name: Copy .env
      run: php -r "file_exists('.env') || copy('.env.example', '.env');"
    - name: Install Dependencies
      run: composer install -q --no-ansi --no-interaction --no-scripts --no-progress --prefer-dist
    - name: Generate key
      run: php artisan key:generate
    - name: Directory Permissions
      run: chmod -R 777 storage bootstrap/cache
    - name: Create Database
      run: |
        mkdir -p database
        touch database/database.sqlite
    - name: Execute tests (Unit and Feature tests) via PHPUnit
      env:
        DB_CONNECTION: sqlite
        DB_DATABASE: database/database.sqlite
      run: vendor/bin/phpunit
Click the “Commit changes” button to add the workflow file to the repository.

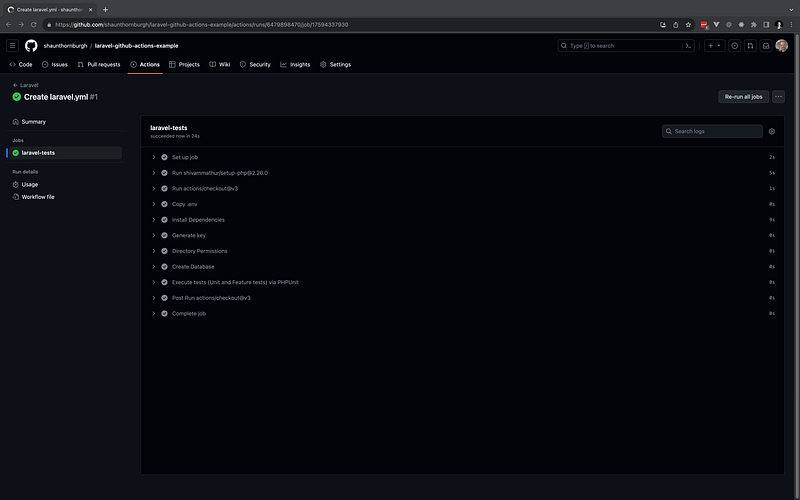
Let’s have a look at what this file does. The first section defines the events that will trigger the workflow, in our case this will be when a push or pull request is made on the master brach. The next section defines the jobs in the workflow that will be processed. This workflow is going to run our tests for us to ensure nothing has been broken in this pull request.
Committing this file will have triggered the action so you can head over to view the job and you should see that all the job has completed successfully.
Step 4: Create a Build Job
The next step is to build our application to compile the assets for production. Add the following job to your action file:
build:
runs-on: ubuntu-latest
steps:
- name: Checkout
uses: actions/checkout@v3
- name: Setup Node.js
uses: actions/setup-node@v3
with:
node-version: '16'
check-latest: true
- name: Install NPM dependencies
run: npm install
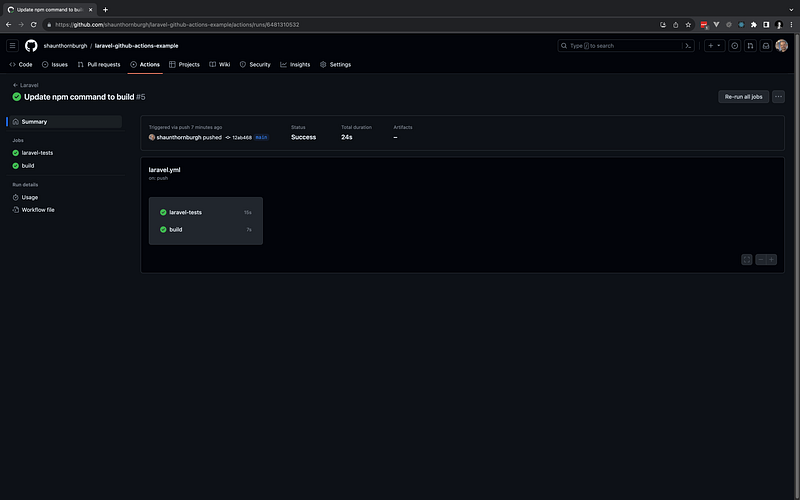
- name: Compile assets for production
run: npm run buildCommit your changes and head back over to GitHub. Check the workflow run and you should now see two successfully completed jobs.
Step 5: Set Up GitHub Repository Secrets
Before we can deploy our application we need to create some secrets on GitHub to enable to deploy the latest changes to our EC2 instance.
GitHub Secrets is a feature provided by GitHub to allow you to store sensitive information securely within your GitHub repository. This feature is particularly useful for cases where you need to store sensitive information, like API keys or database credentials, or access credentials that your code needs to access, but which you don’t want to be publicly visible in your repository.
Head over to the GitHub repository and click on Settings > Secrets and variables > Actions. Add the following secrets:

Step 6: Create a Deployment job
Add the following job to the workflow:
  deploy:

    runs-on: ubuntu-latest

    steps:
      - name: Checkout repository
        uses: actions/checkout@v3
      - name: Set up PHP
        uses: shivammathur/setup-php@v2
        with:
          php-version: '8.1'
      - name: Install dependencies
        run: composer install --no-dev
      - name: Set up AWS CLI
        uses: aws-actions/configure-aws-credentials@v2
        with:
          aws-access-key-id: ${{ secrets.AWS_ACCESS_KEY }}
          aws-secret-access-key: ${{ secrets.AWS_SECRET_ACCESS_KEY }}
          aws-region: ${{ secrets.AWS_REGION }}
      - name: Print private key
        run: |
          echo "${{ secrets.AWS_PRIVATE_KEY }}" >> /home/runner/work/laravel-github-actions-example/laravel-github-actions-example/id_rsa
          chmod 600 /home/runner/work/laravel-github-actions-example/laravel-github-actions-example/id_rsa
      - name: Deploy to AWS EC2
        run: ssh -o "StrictHostKeyChecking no" -i /home/runner/work/laravel-github-actions-example/laravel-github-actions-example/id_rsa ubuntu@${{ secrets.AWS_INSTANCE_IP }} "cd /var/www/html/laravel-github-actions-example/ && git pull && composer install --no-dev && php artisan migrate --force && php artisan optimize"
This job will login to the EC2, run the commands to pull latest changes and run migrations. You can now navigate to your EC2 instance public url and view your Laravel application.

You now have a fully working deployment pipeline! This is a very basic example and there are many more things you can do with GitHub actions.
Conclusion
I hope you found this useful, if you have any questions or comments please leave them below.
Resources
GitHub: https://github.com/shaunthornburgh/laravel-github-actions-example


