Technology for defense
How to build an Autopilot with Computer Vision and Target Following for FPV Combat Drone
Add an advantage to your army building your own Autopilot for home-born FPV Combat Drone using Microsoft AirSim, ArduCopter SITL, Ardupilot Mission Planner and YOLOv8 from Ultralytics.
Since I began developing FPV Combat Drones and later then, I have received numerous messages from militaries expressing concerns that adversary anti-drone systems sometimes prevent successful combat missions, resulting in the loss of drones. Since then, I have started to think on how to fix the issue.
This article presents a comprehensive guide on how to improve drone usage in severe conditions on the Ukrainian frontline. It includes not only instructions to build your own Autopilot with Computer Vision but also a backlog that you can use to modify home-born FPV drones, making them less vulnerable to anti-drone systems employed by Russian adversaries.
Autopilot
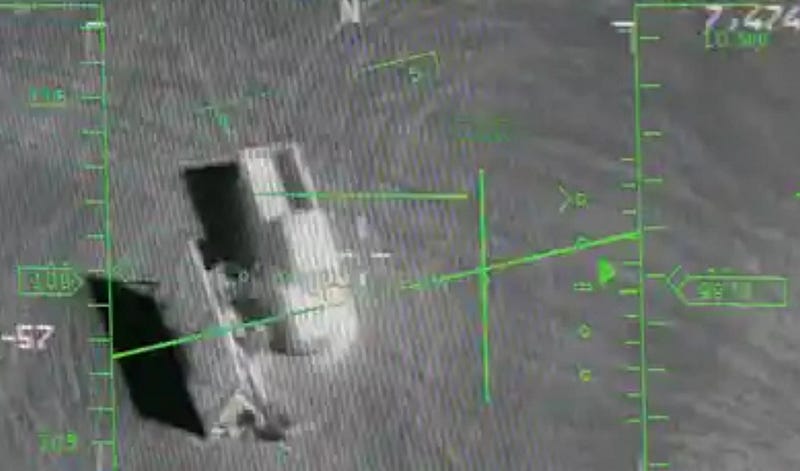
Typically, when anti-drone system is applied by adversaries, the operator loses control of the FPV drone. This concept involves continued operation even when an anti-drone system is applied by the adversary, even if the operator loses control. In such a scenario, the drone should autonomously switch to Autopilot mode, locate the target, follow it, and destroy it without operator involvement. Similarly, the option to switch the drone to Autopilot mode should be available when the target is within the observation display and can be captured for more precise targeting and destroying.
The majority of this article focuses on a virtual environment for developing Autopilot with Computer Vision, including its components, and debugging within Microsoft AirSim.
The concept involves integration the Companion Computer into the FPV Combat Drone with a previously installed Autopilot. The steps required for migration to the real-world FPV Drone are explained in the end or this story.
Environment
Autopilot development and debugging processes require a powerful computer and an appropriate environment, which includes Microsoft AirSim, ArduCopter SITL and Mission Planner.
Microsoft AirSim simulator will be utilized for debugging computer vision models. ArduCopter SITL will execute MAVLink commands, which are used for controlling the drone’s altitude, speed, direction and so on. Mission Planner as the Ground Station software, will manipulate the drone’s motors and switch servos to change Autopilot modes.

During the preparation for publishing this article, I have created a detailed instruction on deploying the environment. You can find it in the README.md file within the GitHub repository. Additionally, you’ll find the remaining Autopilot code there. Feel free to download and utilize it as you wish.
Architecture
Since we are managing only one FPV drone with Autopilot, we should have a single designated point in the Autopilot code responsible for sending MAVLink-commands to the drone and receiving telemetry data such as speed, altitude, and direction. This module is referred to as the Command executor (Router) within the application.
Moreover, the application employs a multi threading structure to handle several processes simultaneously.
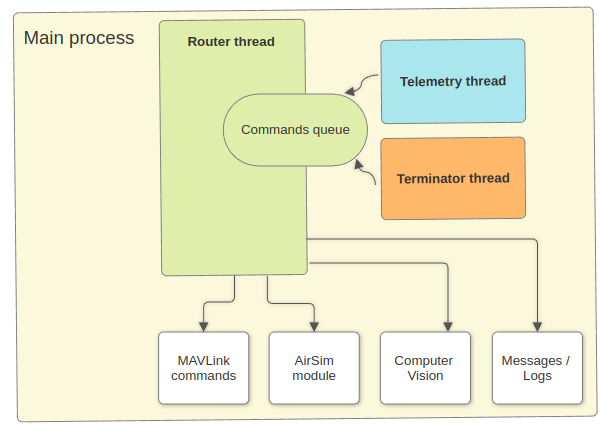
Fundamentally, Autopilot operates on a command queue system with prioritization. This module serves as the central part of the application, executing all aspects of its work. Telemetry and Terminator threads just append commands to the queue, but Router executes them.
For more detailed explanation of the Autopilot’s architecture, its settings and operational state, refer to the README_DEV.md file within the GitHub repository.
Modes
In real-world FPV Combat Drones, modes are controlled using an FPV Radio Controller by toggling predefined switches to different positions. Typically, the A2 (AUX2) switcher has three positions corresponding to one of the positions of the mode SERVO1 in Betaflight configuration.
For simulation purposes, I utilize the SERVO5 value, which can be controlled via the Servo/Relay tab in the Mission Planner software, as shown on the picture below.
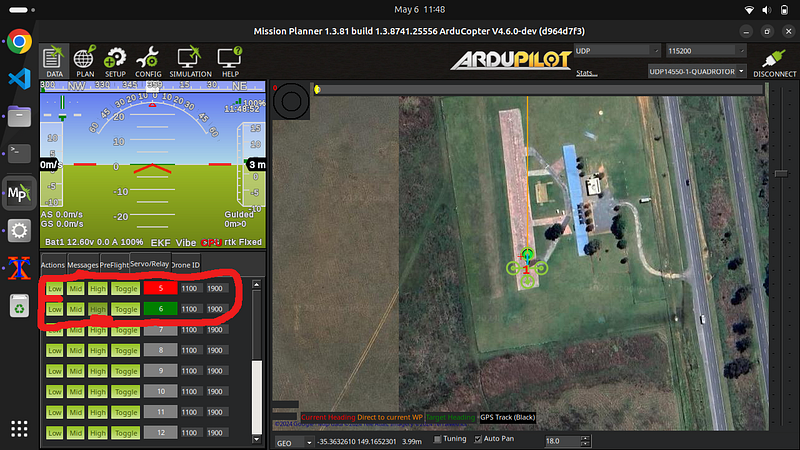
Low — 1100 corresponds to mode OFF, Mid — 1500 corresponds to mode READY and High — 1900 to mode DESTROY respectively. You can toggle modes clicking an appropriate buttons on front of SERVO5. Within the Autopilot application this logic encapsulated in the router.py file.
def command_telemetry_mode_change(telemetry):
    servo5_raw = int(telemetry['servo5_raw'])
    autopilot_mode = autopilot.state['bee_state']
    if servo5_raw == 1100:
        autopilot_mode = 'OFF'
    elif servo5_raw == 1500:
        autopilot_mode = 'READY'
    elif servo5_raw == 1900:
        autopilot_mode = 'DESTROY'
    elif servo5_raw == 0:
        if autopilot.state['bee_state'] == 'READY' and \
            autopilot.state['altitude'] > 1:
                messages.display(
                    messages.anti_drone_system_is_detected)
                time.sleep(2)
                autopilot_mode = 'KILL'
        elif autopilot.state['bee_state'] != 'KILL':
            messages.display(
                    messages.rc_lost_can_not_switch_to_kill_mode)

    if autopilot_mode != autopilot.state['bee_state']:
        autopilot.state['bee_state'] = autopilot_mode
        messages.display(
                    messages.bee_state_changed_to, [autopilot_mode])
        command_queue.queue.clear()
Modes explanation:
- OFF — autopilot is waiting from radio controller to be switched onto any of the modes. No one module work besides listening to modes switch (telemetry) and logging.
- READY — besides all modules listed in the previous mode also included Anti-Drone system work recognition with further switching to mode
KILLand checking the Radio signal remains unestablished. - KILL — switched into this mode automatically because of anti-drone system is detected. Task the same as for
DESTROY. - DESTROY — finds a target and destroys it. In this mode, the autopilot switches on the camera and looks for targets. If the target is detected, it captures the target and follows for destruction.
OFF, READY, DESTROY — are modes which controls by Radio controller.
KILL — automatic mode which is similar to DESTROY but can be canceled automatically when Radio signal is recovered.
Telemetry
The Telemetry thread adds commands for system monitoring and telemetry requests to the queue every 4 seconds. These commands are intended to provide the Autopilot with crucial information on the current altitude and aircraft speed.
...

if not stop_command.is_set():
    messages.display(messages.telemetry_process_connected, [vars.mavlink_url])

while not stop_command.is_set():
    try:
        if int(autopilot.state['altitude']) > 1:
            router.put_command(router.Command(3,'MONITOR',{'target':'SYS_STATUS'}))

        router.put_command(router.Command(2,'TELEMETRY',{'target':'SERVO_OUTPUT_RAW'}))
        router.put_command(router.Command(1,'TELEMETRY',{'target':'LOCAL_POSITION_NED'}))
        time.sleep(4)
    except:
        pass

...
When executing these commands, the Router updates the Autopilot’s state with the current aircraft speed and altitude, along with the remaining battery percentage and the entire Autopilot mode. Timely receipt of telemetry is crucial, particularly when the aircraft is in DESTROY mode, as it can impact its movement and direction.
Terminator
The Terminator thread adds commands designed to locate, track, and eliminate the target. It continually generates and inputs these commands into the system router every second, as long as the current Autopilot mode is set to DESTROY and the bomb hasn’t been released yet (ruined property in Autopilot state equals to False).
As you can see from the listing below, during its execution, the system tries to locate the target by employing the vision module. It verifies if the target remains unclosed, computes NED coordinates based on target’s position in the image from the video camera, and persists in tracking the target until it is within the bombing point.
When it lost the target it goes 2m back to locate the target again and setup aircraft in bombing position.
def command_kill(params):
    ruined = autopilot.state['ruined']
    frame = autopilot.state['frame']
    altitude = autopilot.state['altitude']
    speed = autopilot.state['speed']
    frame = autopilot.state['frame']

    if ruined == False:
        # Don't follow if drone is landed
        if altitude == 0:
            return
        # or on its way
        if frame != {} and speed > 0:
            return

        # Find target and follow
        result = vision.get_camera_image()
        if result != {}:
            d = 0
            boxes = result.boxes.xyxy.tolist()
            if len(boxes) > 0:
                autopilot.state['target_lost'] = 0
                x1, y1, x2, y2 = boxes[0]

                if vision.is_target_close_enough(x1, y1, x2, y2) == False:
                    n, e, d, y = vision.get_ned_target(x1, y1, x2, y2, altitude)
                    autopilot.state['frame'] = (n, e, d, y)
                    messages.display(messages.command_kill_following_target,
                                                        [n, e, d, y])
                    mavs.follow_target(n, e, d, y)
                else:
                    # If close enough for bombing, - take bombing position
                    messages.display(messages.command_kill_preparing_for_attack)
                    mavs.prepare_for_attack(altitude)
                    # Then realize bomb
                    res = mavs.attack()
                    if res == True:
                        messages.display(messages.command_kill_target_attacked)
                        autopilot.state['ruined'] = True
                        # After attack we just fallback
                        messages.display(messages.command_kill_fallback)
                        mavs.fallback()
                        # Mission completed
                        command_queue.queue.clear()
                        messages.display(messages.command_kill_mission_completed)
            else:
                tl_count = int(autopilot.state['target_lost'])
                messages.display(messages.command_kill_target_lost)
                autopilot.state['target_lost'] = int(tl_count + 1)
                D_coord = vision.get_altitude_correction(altitude)
                d = mavs.target_search(tl_count, D_coord)

            # if altitude was changed we have to urgently update state
            if d != 0:
                put_command(
                    Command(0,'TELEMETRY',{'target':'LOCAL_POSITION_NED'}))
Once the aircraft is in position for bombing, the Autopilot prepares for the attack by adjusting its altitude to 5 meters. Then, it launches the attack on the target, releasing the bomb, and executes a fallback maneuver. This involves raising the altitude to 10 meters and guiding the vehicle 10 meters away from the bombing point.
MAVLink commands
All those manipulations are executed by the Commands Router (Command executor), which is the central part of the application and executes all commands that have been added to the command queue.
Another vital component responsible for facilitating communication between the companion computer (autopilot) and the drone is the Commands module, encompassing all MAVLink commands.
import time
import definitions as vars
from pymavlink import mavutil

command_delays =  {
    'disconnect': 0.2,
    'land' : 10,
    'fallback': 3,
    'prepare_for_attack': 1,
    'attack': 1,
    'target_search' : 0.5
}

def wait_for_execution(target, delay=0):
    if delay == 0:
        delay = command_delays.get(target)
    time.sleep(delay)

def connect(system=255):
    master = mavutil.mavlink_connection(vars.mavlink_url,
                                        source_system=system)
    vehicle = master.wait_heartbeat()
    return master, vehicle

def disconnect(master):
    wait_for_execution('disconnect')
    master.close()

def send_message_to_gc(message):
    master, vehicle = connect(1)
    master.mav.statustext_send(
        mavutil.mavlink.MAV_SEVERITY_NOTICE, message.encode())
    disconnect(master)

def copter_init():
    master, vehicle = connect(1)
    master.mav.request_data_stream_send(
    master.target_system,
    master.target_component,
    mavutil.mavlink.MAV_DATA_STREAM_ALL, 1, 1)
    disconnect(master)

def land():
    master, vehicle = connect()
    print("Landing!")
    master.mav.command_long_send(
        master.target_system,
        master.target_component,
        mavutil.mavlink.MAV_CMD_NAV_LAND,
        0,
        0, 0, 0, 0, 0, 0, 0)

    wait_for_execution('land')
    disconnect(master)

def telemetry(target):
    master, vehicle = connect(1)
    msg = master.recv_match(type=target, blocking=False)
    telemetry = {}
    if msg is not None and msg.get_srcSystem() == 1 \
        and msg.get_srcComponent() == 1:
            telemetry = msg.to_dict()
    disconnect(master)
    return telemetry

def fallback():
    master, vehicle = connect()
    print("Fallback (10m back and left, 10m up)!")
    msg = master.mav.set_position_target_local_ned_encode(
        0, 0, 0, 9, 0b110111111000, -10, -10, -10, 0, 0, 0, 0, 0, 0, 0, 0
    )
    master.mav.send(msg)

    wait_for_execution('fallback')
    disconnect(master)

def prepare_for_attack(altitude):
    master, vehicle = connect()
    target_altitude = altitude - 5
    print(f"Preparing for attack, target altitude {target_altitude}m")
    msg = master.mav.set_position_target_local_ned_encode(
        0, 0, 0, 9, 0b110111111000, 0, 0, target_altitude, 0, 0, 0, 0, 0, 0, 0, 0
    )
    master.mav.send(msg)

    wait_for_execution('prepare_for_attack')
    disconnect(master)

def attack():
    master, vehicle = connect()
    msg = master.mav.command_long_encode(
            master.target_system,
            master.target_component,
            mavutil.mavlink.MAV_CMD_DO_SET_SERVO,
            0,
            6,  # Param 1 (AUX channel number)
            1100,  # Param 2,
            0, 0, 0, 0, 0)
    master.mav.send(msg)

    wait_for_execution('attack')
    disconnect(master)
    return True

def follow_target(n_coord, e_coord, d_coord, yaw_angle):
    master, vehicle = connect()
    msg = master.mav.set_position_target_local_ned_encode(
        0, 0, 0, 9, 3576,
        n_coord,
        e_coord,
        d_coord,
        1, 0, 0, 0, 0, 0, yaw_angle, 0)
    master.mav.send(msg)

    # waiting for command to be executed
    delay = int(n_coord / 7 + 1)
    wait_for_execution(None, delay)

    disconnect(master)

def target_search(target_lost_count, D_coord):
    master, vehicle = connect()

    yaw_angle = 0
    d = 0
    if target_lost_count > vars.target_lost_limit:
        yaw_angle = 0.7854 # 15 deg
        d = D_coord

    msg = master.mav.set_position_target_local_ned_encode(
        0, 0, 0, 9, 3576,
        -2,
        0,
        d,
        1, 0, 0, 0, 0, 0, yaw_angle, 0)
    master.mav.send(msg)

    wait_for_execution('target_search')
    disconnect(master)
    return d
These commands perform diverse functions, such as sending notifications to Ground Control station (Ardupilot), initiating drone landing, requesting telemetry data, monitoring system status, and controlling the drone’s altitude and motion.
I want to emphasize that this instruction does not provide a full explanation of the autopilot’s structure and operation. For more detailed explanation for devs, please refer to the comprehensive guide on GitHub.
Computer vision
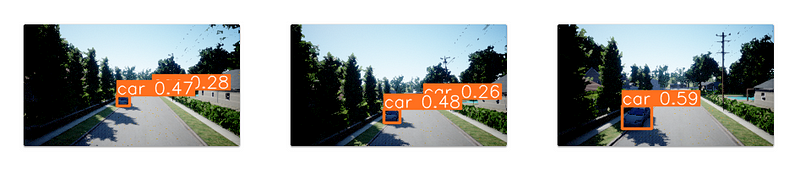
Probably the most crucial part of this software is the Object Detection mechanism, enabling the application to locate and track the target. At the heart of this is YOLOv8 from Ultralytics. For simulation in the Microsoft AirSim we use yolov8n.pt model and 2 - Car object detection class.
import cv2
import airsim
import definitions as vars

from datetime import datetime
from ultralytics import YOLO

model = YOLO(vars.vision_model)
image_width = vars.camera_width
image_height = vars.camera_height
following_altitude = vars.following_altitude
yaw_conversion_factor = 0.002
threshold_percentage=0.03
approach_factor = 0.8

def get_camera_image():
    result = {}
    png_file_name = f'logs/img_{datetime.now().strftime("%Y-%m-%d_%H-%M-%S")}.png'

    if vars.airsim_camera:
        client = airsim.MultirotorClient() # SIM
        png_image = client.simGetImage(vars.video_source, airsim.ImageType.Scene)
        if png_image is not None:
            img = cv2.imdecode(airsim.string_to_uint8_array(png_image), cv2.COLOR_BGR2RGB)

            results = model(img, classes=vars.vision_classes)
            frame = results[0].plot()
            cv2.imwrite(png_file_name, frame)
            result = results[0]
        client.enableApiControl(False)
    else:
        cam = cv2.VideoCapture(vars.video_source)
        if not cam.isOpened():
            return result
        success, frame = cam.read()
        if success:
            results = model(frame, classes=vars.vision_classes)
            anotated_frame = results[0].plot()
            cv2.imwrite(png_file_name, anotated_frame)
            result = results[0]
        cam.release()
        cv2.destroyAllWindows()

    return result

def get_ned_coordinates(x1, y1, x2, y2, altitude):
    target_x = (x1 + x2) / 2
    target_y = (y1 + y2) / 2

    relative_x = (2 * target_x / image_width) - 1
    relative_y = (2 * target_y / image_height) - 1

    N_coord = relative_y * altitude
    E_coord = relative_x * altitude

    D_coord = get_altitude_correction(altitude)

    return N_coord, E_coord, D_coord

def get_yaw_angle(x1, y1, x2, y2):
    target_x = (x1 + x2) / 2
    yaw_angle = (target_x - image_width / 2) * yaw_conversion_factor

    return yaw_angle

def get_target_threshold_area(x1, y1, x2, y2):
    target_area = (x2 - x1) * (y2 - y1)
    threshold_area = \
        image_width * image_height * threshold_percentage

    return target_area, threshold_area

def is_target_close_enough(x1, y1, x2, y2):
    target_area, threshold_area = \
        get_target_threshold_area(x1, y1, x2, y2)

    return target_area > threshold_area

def get_ned_target(x1, y1, x2, y2, altitude):
    N_coord, E_coord, D_coord = get_ned_coordinates(
        x1, y1, x2, y2, altitude)
    yaw_angle = get_yaw_angle(x1, y1, x2, y2)
    target_area, threshold_area = \
        get_target_threshold_area(x1, y1, x2, y2)
    long_factor = threshold_area / target_area

    return round(N_coord * long_factor * approach_factor, 4), \
        round(E_coord, 4), round(D_coord, 4), round(yaw_angle, 4)

def get_altitude_correction(altitude):
    D_coord = 0
    if altitude > 0 and altitude not in [following_altitude, \
                                         following_altitude-1, \
                                         following_altitude+1]:
        D_coord = int(altitude - following_altitude)
        if D_coord > following_altitude:
            D_coord = following_altitude
    return D_coord
As you can see from the listing above, Computer Vision module includes converting the target’s position on the frame from the video camera to Cartesian coordinates (NED), adjusting drone’s altitude as needed, and considering scale and conversion factors to follow target effectively.
For a real-world FPV Combat drone, you might find it necessary to train and compile an additional aerial model capable of identifying soldiers, tanks, military trucks and so on. In this case, read the instructions in DIY for a Spy: Utilizing YOLOv8 Object Detection in Military Operations.
Notifications and Logs
During its work, Autopilot generates and sends messages to different targets including the application console, ground control (FPV Goggles on a real-world drone), AirSim debug console, and stores the entire target-following path to log files.
The Autopilot stores every single image received from the video camera that participates in the target-following process in the Logs folder. This folder comprises all images (PNG files) utilized for object detection, along with a single log-file containing a comprehensive record of all operations during drone’s flight in textual format.
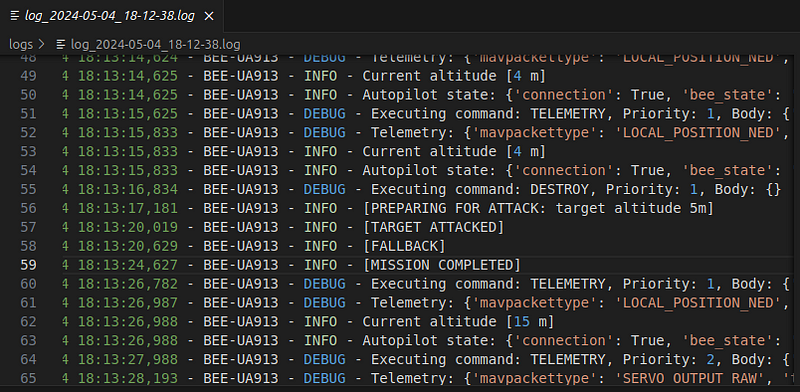
Flight records in the form of logs serve as valuable source for investigating flights and combat operations (missions).
Flight records in the form of logs serve as valuable source for investigating flights and combat operations (missions).
I always recommend having your logger switched to DEBUG mode to maximize learning from these records. Doing so will aid in developing your Autopilot system, continuously enhancing its performance with each flight.
Are you thinking about the real-world FPV Combat Drone?
Once you’ve completed experiments with your custom Autopilot and Image Recognition Model within the AirSim simulator environment, you’ll be ready for the next step of your mission: integrating your Autopilot into a real-world FPV Combat Drone.
Here is the step-by-step guide to help you accomplish this goal.
- Integration and control. Connect the Flight Controller with the companion computer; Explore methods for recognizing commands from the FPV Radio Controller and enabling mode toggling; Investigate mechanisms for releasing the bomb using a
servo/relaymechanism. - Communication and telemetry. Explore the impact of Anti-drone systems on telemetry from the FPV Drone; Research notification mechanisms of FPV Goggles for sending messages to the operator; Investigate communication with the video camera, either connected to the Companion computer or via MAVLink protocol on the FPV Drone.
- Computer vision development. Create an aerial dataset and develop an object recognition model for identifying military targets; Experiment with the computer vision model on the chosen companion computer for speed evaluation; Consider utilizing the Coral Edge TPU for acceleration if necessary.
- Drone assembly and testing. Assemble the FPV drone, installing the companion computer and necessary components; Conduct debugging at the FPV polygon for initial testing and troubleshooting.
- Usage and evaluation. Prepare the initial product version with a
DEBUGmode logger; Deliver the product to the Ukrainian military for testing in combat operations; Obtain flight logs from the military for further analysis and product evaluation afterward.
Feel free to download and utilize the sources of this Autopilot from the repository in GitHub as you wish. You are granted full permissions to use this software without any restrictions.
Support Ukrainian defenders
Hold your own experiments by following the instructions provided in this article. Add an Autopilot system with Target Following capabilities to your Combat Drone and donate the resulting product to the Ukrainian forces to assist them in defending Ukrainian territory.
If you are interested, delve into my earlier article “How to build an FPV Combat Drone for Military purposes” to learn how to build your own DIY Combat Drone from scratch. Once you’ve mastered that, add the latest ‘Target Following’ feature into your drone, send it to your friends on the Ukrainian frontline, and relish the satisfaction.
Get in touch
Don’t hesitate to ask your question on Twitter, if you have one.
Twitter: https://twitter.com/dmytro_sazonov


