DIY for a Spy: Utilizing YOLOv8 Object Detection in Military Operations
Leverage Geospatial Intelligence for counting enemy aircraft using YOLOv8 Object Detection and aerial imagery captured from Reconnaissance drone for planning military operations.
Many of you may read from one of my earlier articles, No Such Agency and ‘The Machine’, in which I described the various components of the global surveillance complex known as “The Machine”. This infrastructure includes diverse means deployed worldwide, facilitating comprehensive surveillance that enables government to monitor individuals, societal behaviors, and even military installations across the globe. Geospatial Intelligence (GEOINT) plays a crucial role in this endeavor.
ADVERTISEMENT: If you or someone you know is interested in collaborating with an expert in Low code, AI and Chatbot development, my friends from cosmith.io offer top-notch services for development and integrations.
In this article, we will delve into Geospatial Intelligence (GEOINT) as a tool for tracking adversary military airbases. By effectively monitoring these locations and their airplanes, it allows for thorough preparation in planning combat operations against them.
YOLOv8 Object Detection
YOLOv8 from Ultralytics is a popular real-time Object Detection system that is widely used in various applications, including military surveillance and reconnaissance. It designed to detect objects within images or video frames in real-time. It is particularly useful in military scenarios where rapid and precise indication of objects, such as vehicles, personnel, or equipment, is crucial for situational awareness and target tracking.
Utilizing PyTorch alongside with deep learning and convolutional neural networks (CNNs), YOLOv8 demonstrates the ability to detect multiple objects within a scene simultaneously, achieving good speed and accuracy. This is why we selected it for use in our mission.
Prerequisites
First of all, I chose to use Python 3 on Google Compute Engine backend with Google Colab for code execution. So, let’s install the dependencies.
!pip install ultralytics
During its installation, it installs opencv-python, torch, pandas, and other necessary dependencies required to be used by this package.
import cv2
import urllib.request

from ultralytics import YOLO, checks, hub
from google.colab.patches import cv2_imshow
As you may notice in the listing above, we import all the necessary libraries that will be utilized during our experiment. Besides the ultralytics modules, there is also cv2_imshow, which is the hotfix for cv2 that works correctly in Google Colab. urllib.request is utilized for downloading imagery examples from the public storage.
YOLOv8 model
Deep learning model YOLOv8 designed for object detection operates by partitioning the input image into a grid. It then predicts bounding boxes and class probabilities for objects within each grid cell. This model’s efficiency stems from its ability to process the entire image in a single feedforward pass through the neural network.
In general, to create the model, we need to properly prepare the DataSet by adding images and labels for each image, which teaches the model to recognize objects. However, there already exists a database containing most datasets needed for initial stages of any project. Today, we will utilize this in our experiment. Let’s go to the Roboflow website.
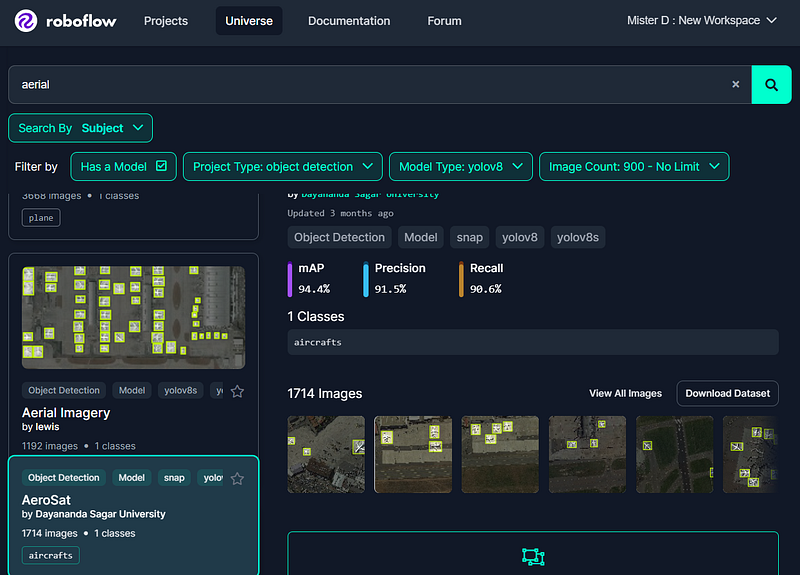
As shown on the picture above, you need to locate a suitable DataSet for the project. In our example, I chose yolov8 as the model type, object detection as the project type, and entered aerial as the search term. The system provided a wide list of datasets, and I selected one that better fit our needs based on the image count: 1192 images and 1 class.
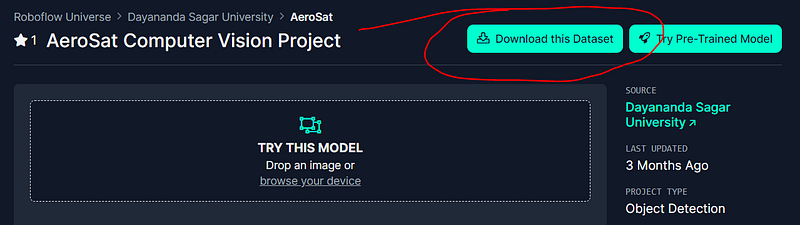
Once you have determined that the dataset suits your mission, you’ll need to download it by selecting the appropriate export format. In our scenario, I opted for YOLOv8 format, as we previously agreed to use it.
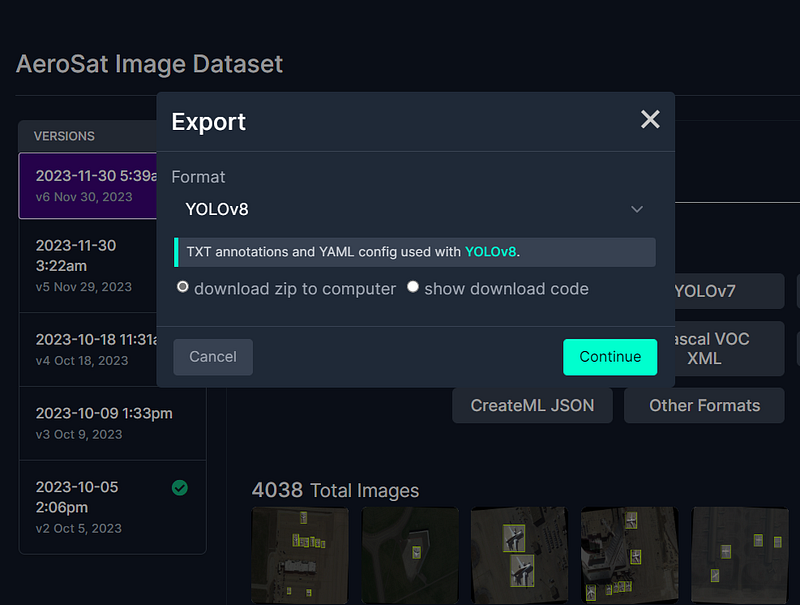
Choose ZIP file as an option to store the suggested dataset, as shown in the picture above, and follow the further instructions to download that.
When you are ready, you can extract files and explore the dataset’s structure and images included, as well as its labels. In most cases, you will see three folders: test, train, valid, and a few files, one of which is data.yaml, describing the data and its classes.
On the next step, as we are going to use YOLOv8, we have to go to the Ultralytics Hub, sign up, create the project, model, and upload the dataset to finally prepare your model for training.
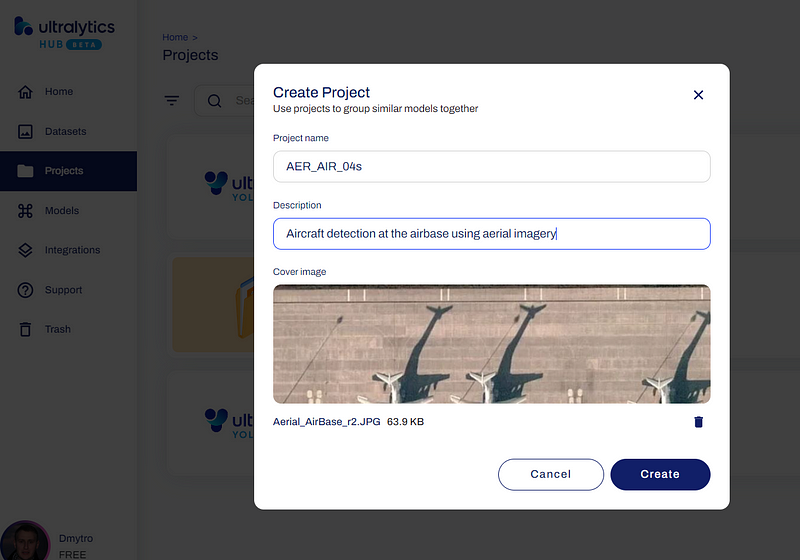
As shown on the picture above, I entered the project name AER_AIR_04s, a short description Aircraft detection at the airbase using aerial imagery, and even a sample image to help identify this project properly among others in my list. You can do the same.
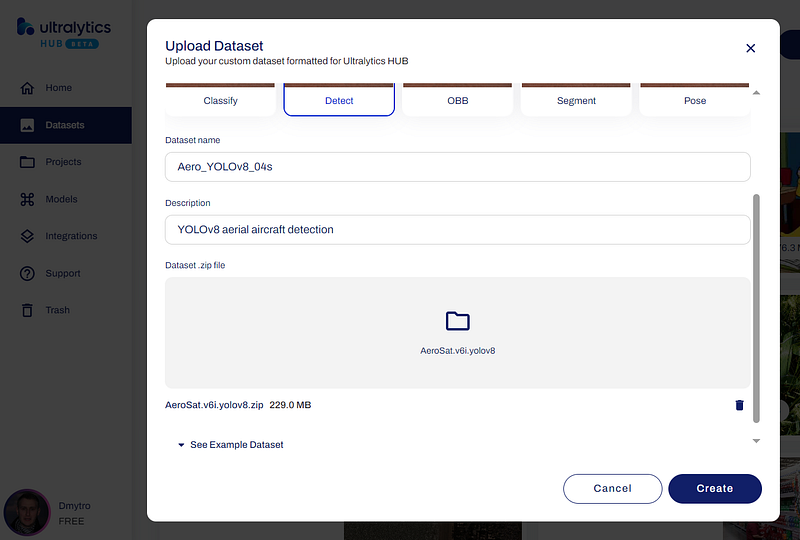
On the next step, you have to go to ‘Datasets’ and upload ZIP file from your Downloads folder, choosing the dataset type Detect, dataset's name, and description as shown below.
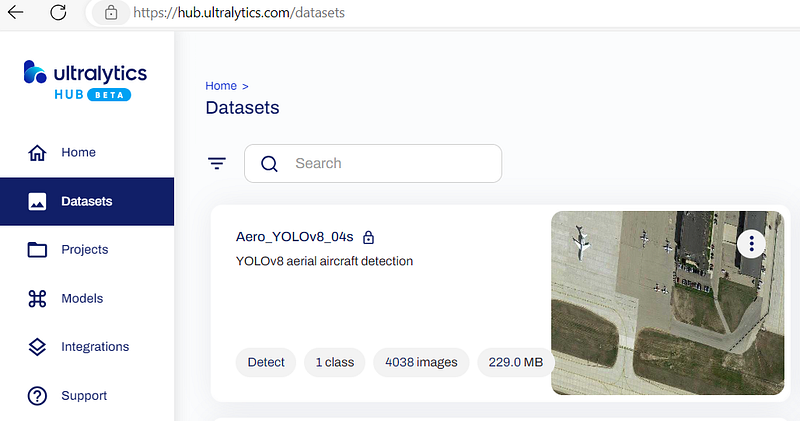
After you click the ‘Create’ button and when the process of uploading is finished, you will see the list of datasets, and your new one among them.
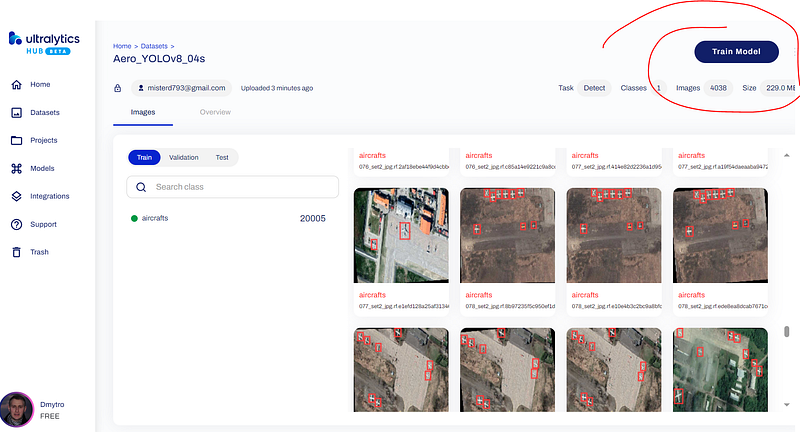
Just drill down, check images and their labels, and press the ‘Train model’ button to continue with YOLOv8 model training.
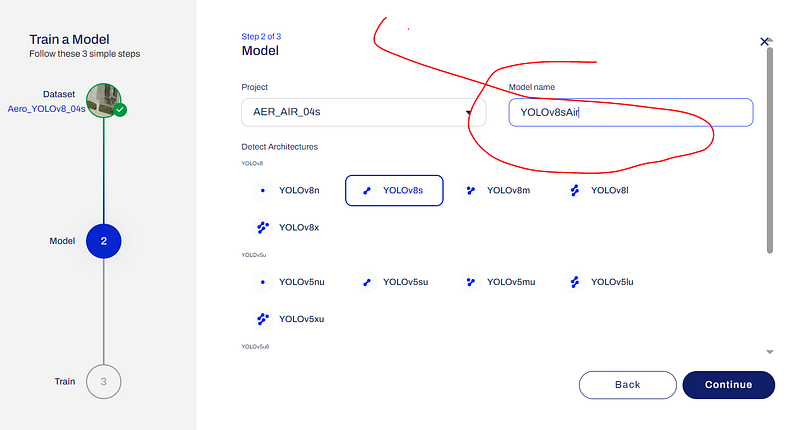
In the next window, you have to choose the project from the list, type the model name YOLOv8sAir in my example, choose the YOLOv8 architecture YOLOv8soptimized for speed, and click the ‘Continue’ button.
Ultralytics Hub has a wide range of options which you can use to train the model, but we are going to utilize the following — ‘Google Colab’.
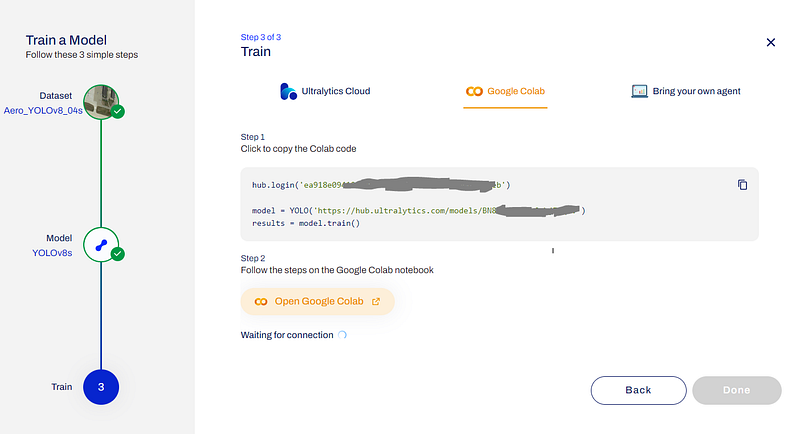
As shown in the picture above, you will have the authentication key and URL (https://hub.ultralytics.com/models/BN8V8tA1pOt6thjZKq6V) similar to this for model training.
Just copy the whole code and past it into your Google Colab.
hub.login('[YOUR_AUTH_KEY]')
model = YOLO('https://hub.ultralytics.com/models/BN8V8tA1pOt6thjZKq6V')
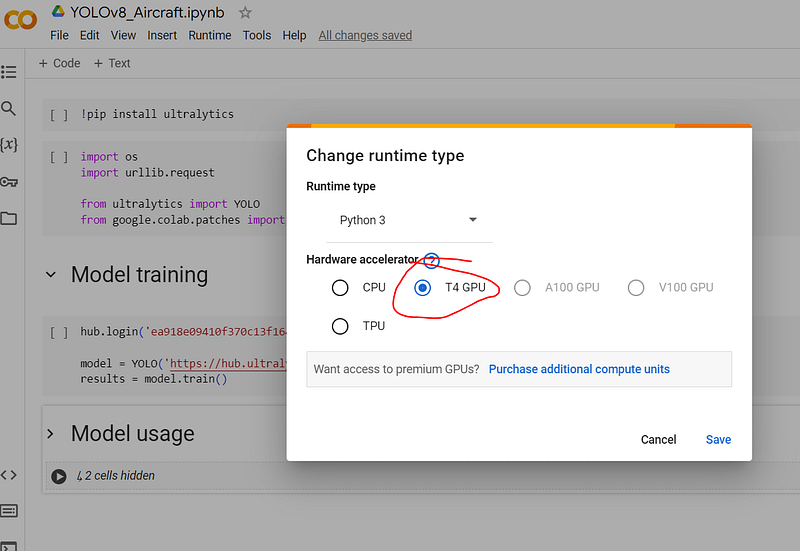
results = model.train()Next, navigate to the ‘Runtime’ menu, select ‘Change runtime type’, and opt for ‘T4 GPU’ to accelerate training with NVIDIA T4 GPU as an accelerator.
As soon as you are done with it, you can initiate the process of YOLOv8 model training, just as you typically do with your Google Colab scripts.

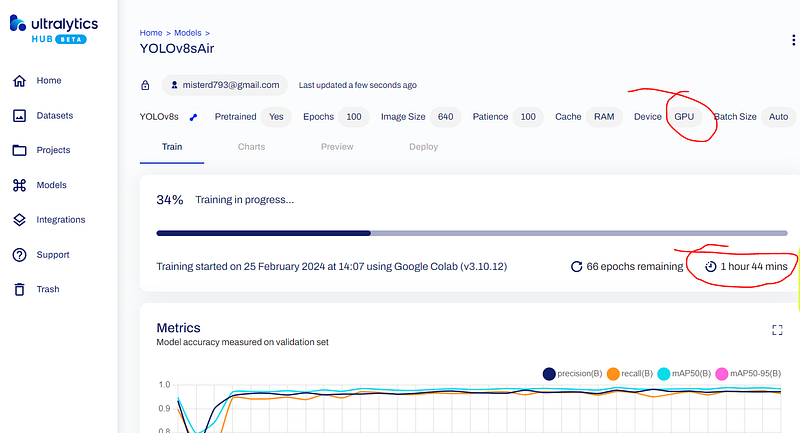
The training process for such a large dataset will take approximately 3–4 hours. However, you can monitor the progress not only in the Google Colab listing, which can be not so suitable, but also using the special progress bar on the YOLOv8 model web-page.
As I mentioned earlier, it can take some time. Once completed, navigate to the ‘Deploy’ tab and download the final model (*.pt) file. You can then utilize this model for object detection using the YOLOv8 package on any device, including Raspberry Pi and in your smart applications, to recognize objects in the airbase or in the field, even on reconnaissance drones for your desired mission.
YOLOv8 usage
Up to this point, you already have your desired PyTorch (*.pt) file with weights for the YOLOv8 model, which is sized at 21.4 MB in our example. This allows us to use it in any application with just a few lines of code.
For your convenience, I have uploaded PT-file, as well as the imagery and video sources which we will utilize during the experiment to persistent blockchain storage Arweave. To download these three files and save them in the working directory of our Google Compute Engine, we need to write and execute the following code.
yolov8sair_url = 'https://6bq43uyscbhniu4kvl6hayy3zosqjnl5x2v2jm7zlfse6nnqrqsa.arweave.net/8GHN0xIQTtRTiqr8cGMby6UEtX2-q6Sz-VlkTzWwjCQ'
urllib.request.urlretrieve(yolov8sair_url, 'yolov8sair.pt')

source_file = 'https://6x77tjsjpqn6ze2k7izx36xgtipzff6yi2jfnp2xxf6lvmtyy7oa.arweave.net/9f_5pkl8G-yTSvozffrmmh-Sl9hGkla_V7l8urJ4x9w'
urllib.request.urlretrieve(source_file, 'Aerial_AirBase.jpg')

source_video = 'https://3tghzdwlhmyajv5eadufzesdo7epc5queknepym6hv2p737mgvxa.arweave.net/3Mx8jss7MATXpADoXJJDd8jxdhQimkfhnj10_-_sNW4'
urllib.request.urlretrieve(source_video, 'airport_video_source.mp4')
As you may have noticed, there are three files: yolov8sair.pt is the model's weights file, Aerial_AirBase.jpg is an example imagery taken from a Reconnaissance Drone which we will use for object detection, and airport_video_source.mp4 is a video source example which will be used for object recognition later on.
model = YOLO('yolov8sair.pt')
results = model.predict('Aerial_AirBase.jpg')
annotated_frame = results[0].plot()
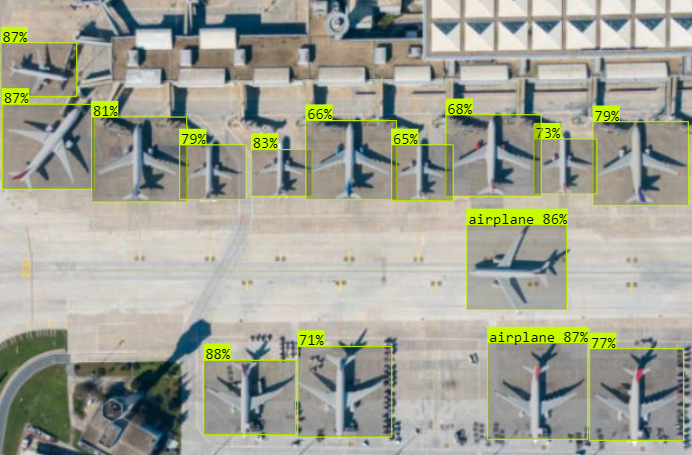
cv2_imshow(annotated_frame)Here we create YOLO object based on our trained model. Then, we attempt to predict and find any objects in the imagery Aerial_AirBase.jpg, and finally, we display the annotated frame from the results with index 0.
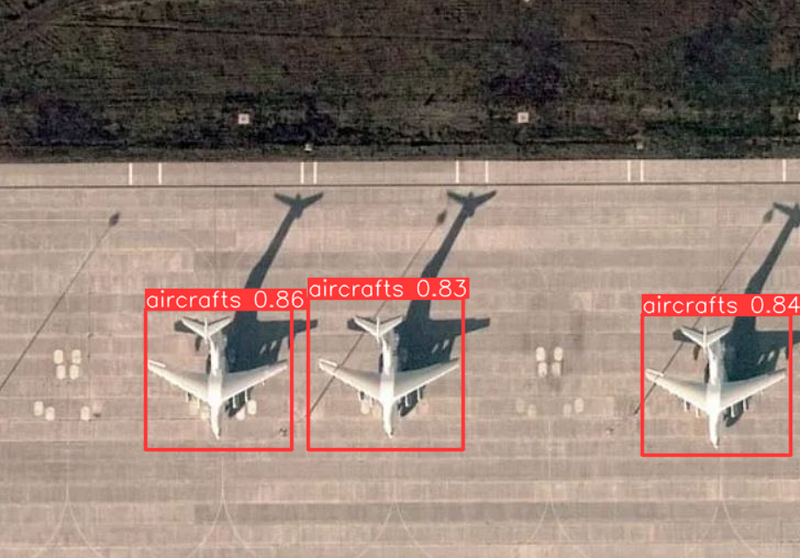
As shown on the image above, three airplanes were detected with varying probabilities, all approximately around 84%, indicating a high level of confidence. In such a scenario, you can easily count them by counting the list of objects in the results[] array automatically.
Confidence and probability levels can vary depending on weather conditions. However, despite explicit disadvantages such as cloudy weather, this reconnaissance method continues to be significant in planning military operations and supporting combat actions.
As you have just seen, its ease of use, requiring just a few lines of code, enables its utilization across a variety of applications, including autonomous drones, encompassing those with small flight controllers.
Just imagine the smart applications you can build by incorporating this object detection mechanism. Think about combat drones equipped with autopilot, target detection and following capabilities until destruction. Let your imagination guide you.
Another good example you can employ for your military solutions:
model = YOLO('yolov8sair.pt')

# Object Detection in Video-stream
cap = cv2.VideoCapture(f"airport_video_source.mp4")
img_array = []

while cap.isOpened():
    success, frame = cap.read()

    if success:
        results = model(frame)
        annotated_frame = results[0].plot()
        img_array.append(annotated_frame)
    else:
        break

cap.release()

# Saving to output video file
size = img_array[0].shape[1], img_array[0].shape[0]  # (384, 640)
writer = cv2.VideoWriter(f"airport_video_output.mp4", cv2.VideoWriter_fourcc(*"mp4v"), 25, size)
for frame in img_array:
    img_n = cv2.resize(frame, size)
    writer.write(img_n)
writer.release()
This involves Object Detection from the video stream, in our case extracted from the airport_video_source.mp4 file. Then, it divides the video into frames, detects aircraft on each frame, and compiles them into the airport_video_output.mp4 file.
You can download this file from the working directory of the Google Compute Engine. I believe you are already familiar with this.
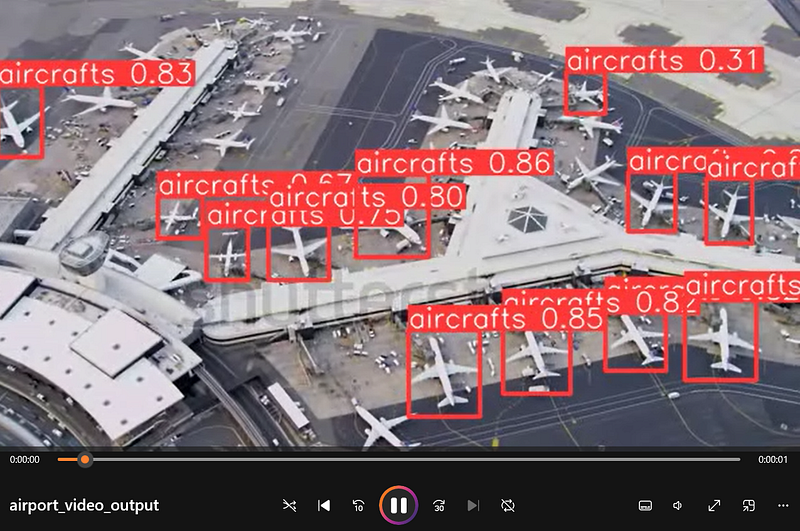
Take a look at the video file above. While most of the airplanes were detected, not all of them were recognized. Consider how you can enhance the accuracy of the model and share your suggestions in the comments if you have any.
X-Files
The full list of files for YOLOv8 Object Detection, which we used for demonstration purposes in this article is listed below.
PyTorch Model: YOLOv8sAir
Drone’s sources:
- Static imagery: Aerial_AirBase.jpg
- Airport video: AirBase_Video.mp4
Source code: Google Research Colab
Harness your imagination to build an incredible solutions!
Get in touch
If you have any questions about anything explained in this article, or any other ideas, — don’t hesitate to ask me on Twitter.
Twitter: https://twitter.com/dmytro_sazonov


