
How to add a Rich Text Editor(WYSIWYG) to your Remix Shopify App
If you’re set to create a Shopify app, your toolkit will involve Shopify Polaris, the designated design system for the Shopify admin. Shopify Polaris equips you with an extensive array of UI components, a boon for backend developers. However, it falls short when it comes to providing a Rich Text editor, a feature frequently requested by app developers. Despite ongoing requests, Shopify seems hesitant to integrate this feature in the near future, as evident in the ongoing discussion found here. At the end of the discussion in Github, They suggest to use TinyMCE as an alternative.
Meanwhile, a notable advancement for Shopify app developers is the recent introduction of the remix template, revolutionizing the ease of developing Shopify Apps. It’s worth noting that the TinyMCE react integration doesn’t seamlessly mesh with the remix template in Shopify apps. Instead of presenting a rich text editor, it merely displays a text are will not work with remix template in Shopify apps. The root cause appears to be the failure to load the necessary styles for the rich text editor. So that I found Quill Rich Text Editor to fulfil this task. This tutorial will give you the understanding on how to use Quill rich text editor in your Shopify app.
First you need to create a Shopify app. Check my previous tutorial on creating the initial Shopify app here.
After creating the app, you need to install react-quill. This will provide you the necessary dependencies to use quill text editor.
npm install react-quill --saveThen you need to install remix-utils. Because you will be using ClientOnly component to render the children element only on the client-side, avoiding rendering it the server-side.
npm install remix-utils
To use remix-utils with latest version, you need to bundle it. Open remix.config.js and add the following in module.exports.
serverDependenciesToBundle: [
    /remix-utils/
  ],
So the above will be like following.
** @type {import('@remix-run/dev').AppConfig} */
module.exports = {
  ignoredRouteFiles: ["**/.*"],
  appDirectory: "app",
  serverModuleFormat: "cjs",
  dev: { port: process.env.HMR_SERVER_PORT || 8002 },
  future: {},
  serverDependenciesToBundle: [
    /remix-utils/
  ],
};
After installing above two dependencies, Start your new project with visual studio code.
Create a new folder in app folder called components. Here you are going to write two components.
First one is, textEditor.client.tsx. This will have the text Editor component. Add the following code block to textEditor.client.tsx file.
import type { ComponentProps } from "react";
import ReactQuill from "react-quill";

type ReactQuillProps = ComponentProps<typeof ReactQuill>;
type Props = Pick<
  ReactQuillProps,
  "name" | "onChange" | "placeholder" | "theme" | "value"
>;

const toolBarOptions = {
  toolbar: [
    [{ header: [1, 2, 3, 4, 5, 6, false] }],
    [{ size: [] }],
    ["bold", "italic", "underline", "strike", "blockquote"],
    [
      { list: "ordered" },
      { list: "bullet" },
      { indent: "-1" },
      { indent: "+1" },
    ],
    ["link", "image", "video"],
    ["clean"],
  ],
};

export function TextEditor(props: Props) {
  return (<ReactQuill {...props} modules={toolBarOptions} >
  </ReactQuill>);
}
The other component is fallback-component.tsx. This is to be used on SSR, and while optional, it’s highly recommended to provide one to avoid content layout shift issues. Add the following code to fallback-component.tsx file.
export function FallbackComponent() {
  return <p>Fallback component ...</p>;
}
There you need to remove some coding arts that is created by shopify template.
Navigate to app=>routes=>app._index.tsx file. There you ca see the Index() function. Remove all the things inside there and you will be writing the code for adding rich text editor.
I will be using few Polaris components to align the text editor. Those will be Page, Grid, Frame and Legacy Card components.
Import the needed things to the type script file as below.
import {
  Page,
  Grid,
  LegacyCard,
  Frame
} from "@shopify/polaris";
import { useState } from "react";
import stylesheetQuill from "react-quill/dist/quill.snow.css";
import { ClientOnly } from "remix-utils/client-only";
import { Form } from "@remix-run/react";
import { FallbackComponent } from "~/components/fallback-component";
import { TextEditor } from "~/components/textEditor.client";


export const links: LinksFunction = () => [
  { rel: "stylesheet", href: stylesheetQuill },
];
Add the following code inside the index function. This will use the Text Editor from the components we created before.
  const [textEditor, setTextEditor] = useState("");
  return (
    <Page>
      <Grid>
        <Grid.Cell columnSpan={{ xs: 6, sm: 3, md: 3, lg: 6, xl: 6 }}>
          <Frame>
            <LegacyCard title="Description" sectioned>
              <Form method="post">
                <ClientOnly fallback={<FallbackComponent />}>
                  {() => (
                    <TextEditor
                      theme="snow"
                      placeholder="Write description"
                      onChange={setTextEditor}
                      value={textEditor}
                    />
                  )}
                </ClientOnly>
                <input type="hidden" name="textEditor" value={textEditor} />
                <br />
                <button type="submit">Submit</button>
              </Form>
            </LegacyCard>
          </Frame>
        </Grid.Cell>
      </Grid>
    </Page>
  );
Then run
npm run dev
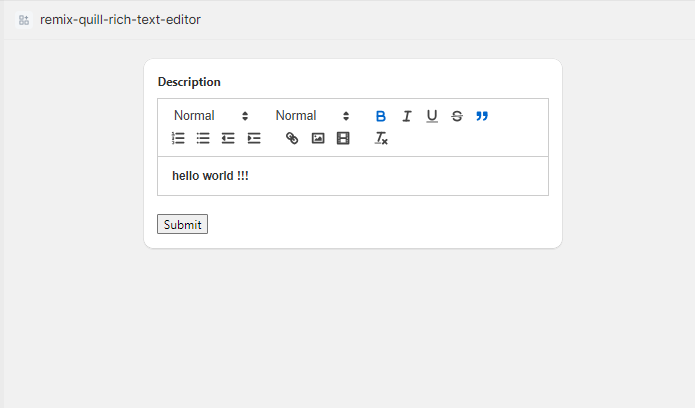
Press p to preview the shopify app. You should be able to see you rich text editor on your UI like below.
Note that you can remove unnecessary imports and loader and action functions as well.
The code base for this tutorial in on GitHub. Here it comes to the end of this tutorial.
Good Luck and Happy Coding !!!


