
How I’m testing my Cubits and little sneaky tips & tricks to speed it up
Based on my last article “How I’m using Cubits from the Bloc library to manage my states” I would like to show you how you can test your code in this approach. Actually, it’s simpler than you probably think and there are almost no excuses why you wouldn’t test your cubits ;)!
In the following article I’m going to tell/show you:
- Why you should even test your code
- Which packages help you to do so
- Which plugins help you to measure your coverage and for sure will motivate you to improve it
- Little sneaky but effective tips & tricks
Ready? Let’s go!
Why should you even test?
I think there are many resources out there on why you should care about testing. You read it and think: “Okay, cool, understood. I will write tests for my code in my next project”.
What normally happens — and of course also happened to me — is, you actually set everything up and try to write tests and after a few minutes you recognize: “Shit, it’s not as easy as in this Hello-World tutorial”.
And that’s when you maybe stop writing tests but because you already did the whole setup your test will eventually look like this to just get rid of the errors and failing pipelines:
expect(true, true);But I promise — there will be this one day when you wish you had written those tests because they may have prevented you from the pain you are in this moment going through. (Think of me, when you are there. Aaaannnd super surprising announcement: I’ve been there. It’s no fun. Trust me xD).
I’m here to tell you it’s not going to be super easy in the beginning and you will have to go through some struggles, but it’s so worth it! Not only for the single lines of code you can protect with tests but also for the health, quality, and maintainability of the projects you are part of and therefore satisfaction of your customers and especially users. In the end, I truly believe the ability to write tests for your code makes you a way better developer.
Apart from my personal experience, here are some reasons:
- Your app got a little bit more complex (spoiler: they always do) and clicking it through manually is frustrating and very (!!!) time-consuming
- You added a new feature and you want to make sure the rest of your app is still working fine
- Testing helps you to write cleaner code and maintain the separation of concerns
- Code coverage is cool and fun
Especially Cubit-Testing:
- it’s a very structured and easy-to-follow approach (and therefore also fun!). Thanks to the bloc_test package!
Cubit Test Setup
I see. You are still here :D! Great, let’s start by adding these packages to your pubspec.yaml within the dev_dependencies section:
// pubspec.yaml
dev_dependencies
  bloc_test: ^9.1.1
  mocktail: ^0.3.0
Plugins
In VSCode there are two plugins I can’t live without when writing tests:
Coverage Gutters Visualizes your code coverage line by line and see where your tests have been through.
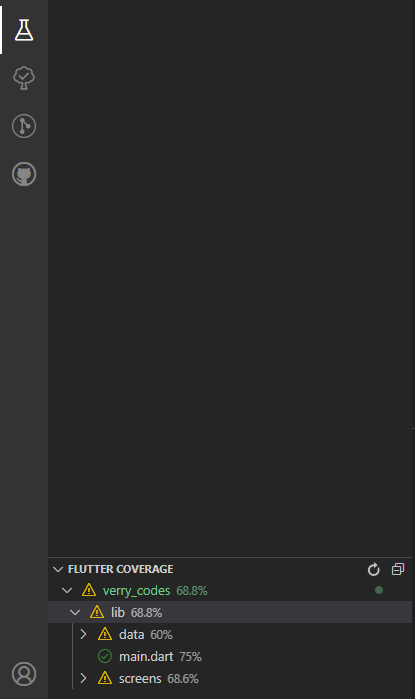
Flutter Coverage Displays coverage for folders and files as well as overall coverage within your test tab. Unfortunately, it only includes files which you created test files for.
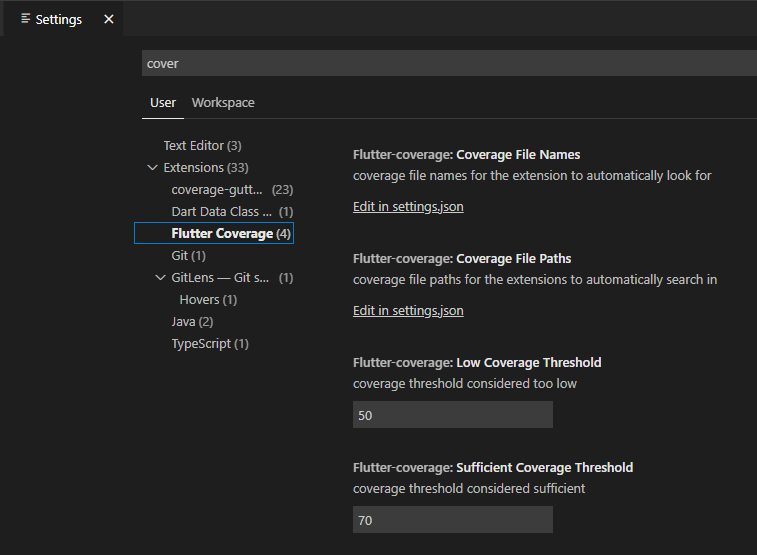
In your VSCode settings, you can adjust the threshold for low and sufficient coverage yourself.
Writing the GoalListCubit Test
Everything is set up now and we can start writing our first test. If you haven’t checked out the example project the tests are based on, make sure to hop to the first part of this article: “How I’m using Cubits from the Bloc library to manage my states”.
Also, you can get the final code in the public repository on GitHub.
Quick Recap
In the last article, we had a GoalListCubit which was responsible for fetching a List<Goal> from the GoalRepository calling the method fetchGoals().
The following three states could be emitted by the Cubit:
// loading state when starting to fetch the goals
GoalListState(status: GoalListStatus.loading);
// success state containing list of goals
GoalListState(status: GoalListStatus.success, goalList: [List of Goals]);// failure state if something went wrong (e.g. no internet connection), holding the exception
GoalListState(status: GoalListStatus.failure, exception: [Exception which occurred]);Create the Test File easily
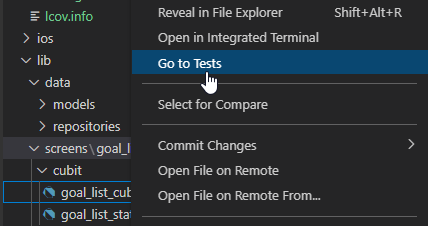
There is a really handy way to create test files, especially if your folder structure gets more complex: Right-click on the file (here: goal_list_cubit.dart) within VSCode and tap Go to Tests . This will create the according folder structure and the file itself.
Setting up the Test File Structure
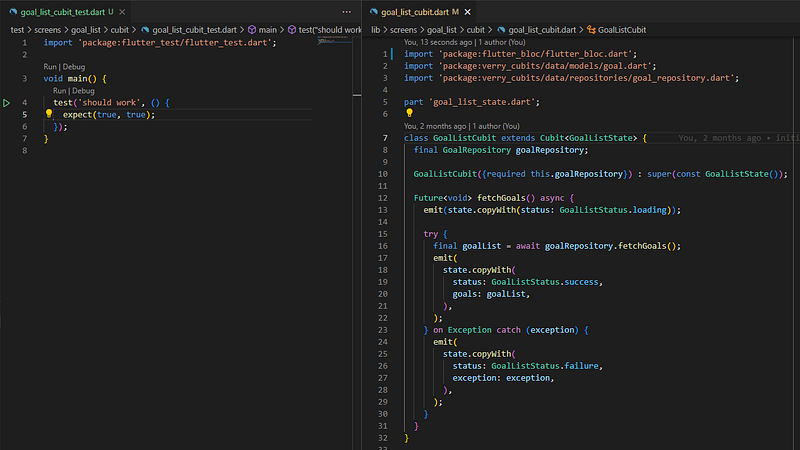
What I’m normally doing after creating the test file is attach it to the left and put the original file on the right:
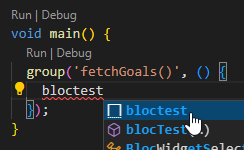
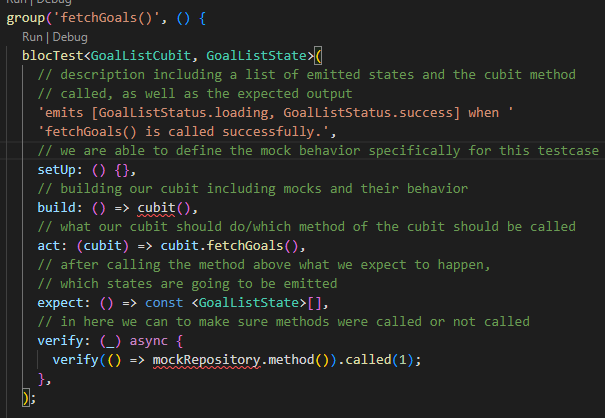
After that, I’m creating a group for every method within the cubit. In this case, there’s only fetchGoals(). Then I’m checking what the method is doing and what kind of tests I have write to make sure all cases are covered. Mostly this depends on what the repository can return. In this method two basic things can happen:
- Fetching of goal list worked
- Fetching of goal list failed
For each, I’m going to create a separate bloc test case within the fetchGoals() group by typing “bloctest”:
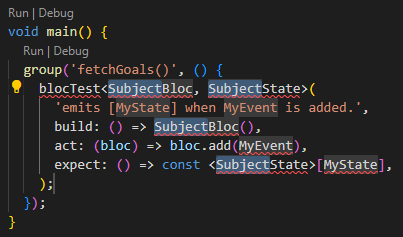
Since bloc tests look a tiny bit different than cubit tests — and I’m super lazy — I added my own snipped for “cubittest” which generates the following output:
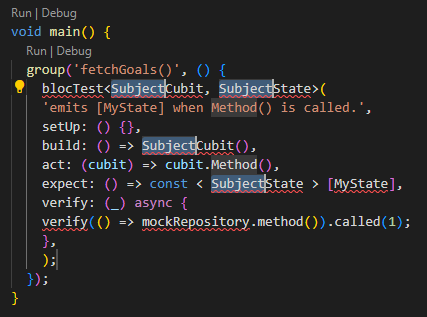
In case you want to use the snippet, here you go:
// you can add it via Preferences: Configure User Snippets
// put it in your snippets/dart.json
"Cubit Test": {
    "prefix": "cubittest",
    "body": [
        "blocTest<${1:Subject}Cubit, ${1:Subject}State>(",
        "'emits [MyState] when ${2:Method}() is called.',",
        "setUp: () {},",
        "build: () => ${1:Subject}Cubit(),",
        "act: (cubit) => cubit.${2:Method}(),",
        "expect: () => const < ${1:Subject}State > [MyState],",
        "verify: (_) async {",
        "verify(() => mockRepository.method()).called(1);",
        "},",
        ");"
    ],
    "description": "Cubit Test"
},
Basic BlocTest Anatomie
After putting our GoalListCubit in the given cubittest generated code we should quickly take a look at the anatomy of the blocTest itself. Don’t worry about the unresolved red code — we’ll get to it ;)!
Controlling Dependency Output or “Mocking”
Since we are here to test our GoalListCubitwe need to separate it from its dependencies and take control over them. Dependencies? What kind of dependencies? Well…in this case the GoalRepositoryis a dependency. Depending on the output of GoalRepository our cubit will emit different states. To take control over it we can mock it away using the added mocktail package and inject it in our GoalListCubit :
import 'package:mocktail/mocktail.dart';
import 'package:verry_cubits/data/repositories/goal_repository.dart';
class MockGoalRepository extends Mock implements GoalRepository {}void main() {
late MockGoalRepository mockGoalRepository;
late GoalListCubit goalListCubit; setUp(() {
mockGoalRepository = MockGoalRepository();
goalListCubit = GoalListCubit(
goalRepository: mockGoalRepository,
);
});... }
When I wrote this for the first time in my programming career I finally really understood the concept of “Dependency Injection” and why it is so important. I hope so do you now ;)!
Whatever you are going to inject in your Cubit — you are able to mock it and therefore take over control and tell it to do whatever you need to cover all your test cases.
The first case we want to cover is if our GoalRepository successfully returns a List<Goal> when calling fetchGoals() .
// 1. async call is mocked with when-thenAnswer
when(() => mockGoalRepository.fetchGoals())
            .thenAnswer((_) async => tGoals);
// Only for completenes: non async call would be mocked with when-thenReturn
when(() => mockGoalRepository.fetchGoals())
.thenReturn(tGoals);The second is if GoalRepository throws an Exception. Those cases can be mocked like this:
// exceptions are mocked with when-thenThrow
when(() => mockGoalRepository.fetchGoals()).thenThrow(tException);
As soon as we added our wanted mock behavior, we need to add our expected list of outputted states like this:
// 1. loading, success - including goal list
expect: () => <GoalListState>[
    const GoalListState(status: GoalListStatus.loading),
    const GoalListState(
        status: GoalListStatus.success,
        goals: tGoals,
    ),
],
// 2. loading, failure - including exception
expect: () => <GoalListState>[
const GoalListState(status: GoalListStatus.loading),
GoalListState(status: GoalListStatus.failure, exception: tException),
],If you put everything together it should look like this:
Let’s run the Tests!
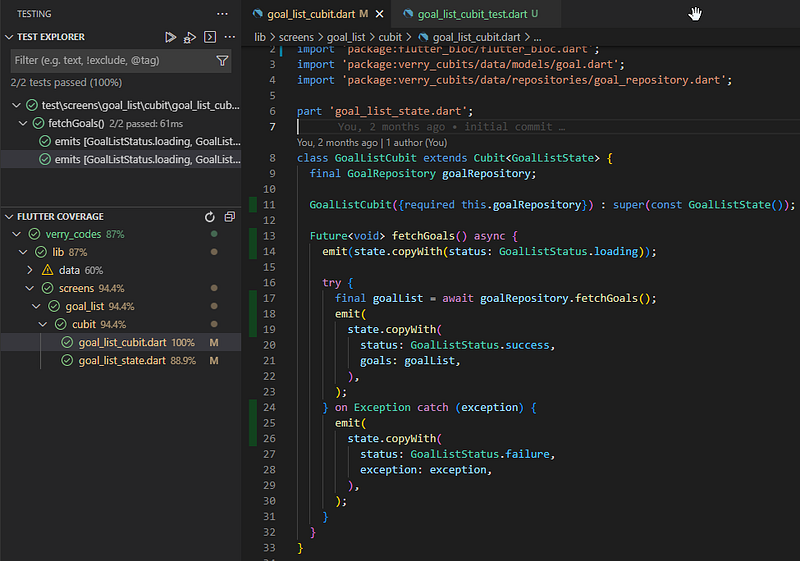
Time to start our first test run and create the coverage as follows:
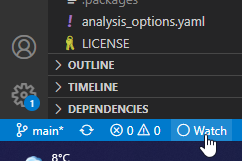
flutter test --coverageA coverage folder including an lcov.info should have been generated for you now. Also, you should be able to see the test coverage in the test tab. By clicking on the “Watch” in the bottom left corner of VSCode you can enable the coverage file watching.
When jumping into your goal_list_cubit.dart file now and opening the test and test coverage tab it should look like this:
YOU MADE IT!
Okay, took a while to explain BUT I really hope it helped you get your (maybe first) test written!
I know it wasn’t the hardest example but you’ve got to start somewhere. Feel free to drop me a comment or message if you have a special case that is not covered and I’ll add them. I’m also planning on another article with more complex testing.
Your support would be awesome 💙
If you’re happy and you know it clap your hands :D! If you have questions feel free to ask them in the comments and if you want to see this approach and me in action, make sure to follow me on:
Twitter: verry_codes Twitch: verry_codes YouTube: verryCodes
Your support is veeeeeeeerry appreciated ❤!


