
How I Increased My Medium Earnings by 1,340% in 30 Days
My 3-phase system for growing my income
My Medium earnings increased by 1,340% in 30 days.
In the past month, my income jumped from $60 in December to $864 in January. Most of that money came from a few articles, but all of my previous articles counted toward the total.
Other than blind luck, I ascribe my earning growth to my continually updated three-phase system. It’s a process I’ve developed over the last few months to choose profitable topics, write them for earning potential, and isolate data points for repeatable success.
My 3-Phase System
- Incubation
- Execution
- Analysis
I’m not going to promise you millions if you follow this formula, but I will promise that you will increase your odds of making more money.
1. Incubation: How I Choose Money-Making Topics
First things first, January was my second full month on Medium. That means I had data from the last part of November and all of December to analyze before choosing topics.
The data definitely helped. Since I started on Medium, I always analyze my previous batch of articles to decide what to write next.
How I mine publications for story ideas
My first step is to study a target publication to see what is already successful. Then I write on the same topics or subtopics.
For example, I might go to the Heart Affairs publication homepage. I look at everything on the homepage, and I might even open a few articles to read or scan them.
Then, I go back to the homepage and search for two specific types of stories:
- Trending
- Latest
Before I tell you how I do it, I must credit Zulie Rayne for these simple but helpful tips.
To find trending topics, I simply add “/trending” to the homepage URL. Here are a few screenshots:
https://medium.com/heart-affairs/trending

Once you add “/trending” and hit enter, Medium will take you to the trending stories page for the publication.
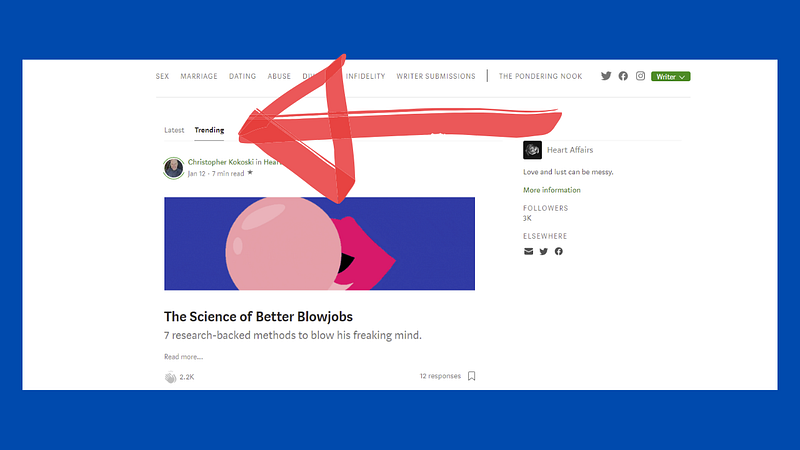
From this page, also note that you can access the “Lastest” articles page. All you need to do is to click your cursor over the word “Latest”.
When I go to these two pages (trending and latest), here’s what I am looking for:
- Trending: This page gives me ideas on the subtopics I might focus on in my new articles.
- Latest: This page lets me know what articles I want to avoid writing for the publication. I don’t want to write about the exact topics that were just published. Either I will change the slant of my article, add a personal touch, or wait a few weeks to submit.
Another Medium “hack” for mining popular topics is to look through the Popular Medium Articles page to see what topics are trending right now.
Where I find money-making ideas for articles
Beyond studying the publication and other popular articles, I also use a few topic-finding tools and sources. I have written other articles about these tools, so I will simply list them here for your reference:
- Ahrefs
- Keywordshitter
- Google Trends
- Exploding Topics
- Answer The Public
- Quora
- Youtube (a Youtube video can be turned into an article — with original writing, ideas, etc.)
- Google search
- My past content (sometimes a subheading, quote, or example can turn into an entire article)
- Articles by other writers (I use these as inspiration to create 100% original work)
How I validate story ideas
After studying the publications and using the tools mentioned above, I validate all of my article ideas.
I validate my articles by asking the following questions:
- Am I excited enough about the topic to stay up late or wake up early to write it?
- Is there evidence of high interest in this topic? (I use keyword tools like Ahrefs to gather data on search volume)
- Is this an original take on the topic?
- What personal connection do I have to the topic? (I typically want a personal story to tell).
The golden trifecta for topics I choose is passion, search volume, and personal connection.
Takeaways: Target publications, then study the homepage, trending, and latest articles. Validate your topic ideas with tools, personal experience, and passion.
2. Execution: How I Write To Earn Clicks, Curation, and Cash
Once I select a topic, I switch to phase two of my system. Phase two is all about executing the story to give it the best odds of earning more money. For me, execution comes down to a good title, proper formatting, and writing techniques to keep attention.
My personal goal is to continuously improve in all three areas.
Good titles get clicked and curated
I always start with the title.
Writing a good title compresses the story into a few words. When I find a good title, I know I understand my story well enough to start writing it. Until then, I keep experimenting with different title formats, words, and punctuation.
Unless a title comes easily to me, I look at my past successful titles. I also study the successful titles of articles from other writers.
My process is pretty straightforward, but it works for me. Here is what I do:
- Shoot for a short title between 40 to 50 characters. I don’t always land there, but I try. If I’m over 50 characters, I try to keep my title under 60 characters (Google cuts off titles over 60 characters).
- Keep my title to one line, if possible.
- Use “How to” “What I Learned” or listicle formats, unless I come up with better options.
- Run possible titles through popular title templates.
- Try to be as clear and straightforward as possible.
- If anything, I underpromise.
- Put high volume keywords in my titles (again, I get these keywords from the tools I mentioned earlier)
- Add power words such as “surprising”, “scientific” or “unconventional”.
- Come up with 10 different titles.
“Write in simple, direct language: aim to be understood, not to impress.” — Better Marketing Columnist, Cynthia Marinakos
My articles in January that made me the most money followed most of these tips. All of my top-rated titles made me over $20.00 and my best-performing title — “The Science of Better Blowjobs” — brought in $581.
Takeaways: Study titles and headlines of popular articles. Then, copy their format (not the title). You can reverse-engineer any title into a template. Finally, come up with 10, 20, 50, or 100 different possible titles.
H.O.T. introductions convert clickers into skimmers
The goal of your introduction is to convince the person who clicked on your article to read it. Most people skim it first.
My secret weapon is writing a H.O.T. introduction.
H.O.T. is an acronym that means:
- Hook
- Overview
- Tease
The Hook
The hook is the first grabby sentence, statistic, quote, or personal anecdote that opens your story.
Here are a few examples from trending stories on Medium.
An introduction by Damon Beres for his article, ‘We traced a phone inside the Capitol to Mr. Vincent’s home in Kentucky’, published in OneZero:
In a new piece for The New York Times, writers Charlie Warzel and Stuart A. Thompson detail — and not for the first time — how our smartphones feed a so-called “surveillance economy” that annihilates personal privacy in real and unexpected ways.
Madison Vanderberg opened her article, “I tried planking for 5 minutes every day for a month and it made my back feel great,” with this hook: “I tried to plank for five minutes each day for a month and it was far from what I expected.”
The Overview
The Overview is a short, concise sentence or paragraph that sums up the entire article.
Yes, sometimes a hook is also an overview — but not always.
Here are two examples:
David Liira, Kin. gives this great intro paragraph for his article, “The Most Frustrating Gym Mistake I See as a Personal Trainer”:
One of the most overlooked components of resistance training is tempo. You can lift all the weight in the world, but if you aren’t paying close attention to your rhythm, you simply won’t be maximizing your muscle growth. I can confidently say that this oversight is one of the biggest mistakes I see in the gym. Period.
Here’s an overview from Tim Denning’s article, “Quiet People in Meetings Are Incredible”:
There are these hidden people that attend meetings. They say nothing. You can attend ten meetings in a row and never hear them say a word. Their words are a privilege reserved for the royal family. You find yourself dying to know what they would say. They act like a fly on the wall. With every meeting, they get smarter, by saying nothing at all.
The overview is a quick summary of the entire article, placed upfront so that your readers know what to expect.
The Tease
The Tease is the promise to the reader of what they will get out of your story. Just like hooks and overviews, the tease comes in innumerable variations. And, yes, your overview can sometimes double as your tease.
The best way to learn about teases is to read lots of them.
Check out these examples:
Jessie London teased (and overviewed) her article “$1000 in My Second Month on Medium — I Spent it on a Tractor!” like this:
In this article, I’ll talk a little bit about my journey, run through my stats, and then list a few of my writing practices in the hope that I can help you to buy your own tractor ;)
I also love this short tease from J.J Pryor: “56 days later I was 6 hours away from being banned on Medium.”
This final example is from one of my articles: “About an hour ago, I thought I was going to be murdered in a Taco Bell bathroom.”
Takeaway: Open your articles on Medium with H.O.T. introductions.
H.O.T. sections convert skimmers into readers
Always give readers a reason to keep reading. The same H.O.T. process you used for your introduction can be repeated throughout your article in every new section.
- Think of each subheading as a new title. Make your subtitles clear and clickable.
- Open each section with a hook.
- Provide a quick overview of the section.
- Write the section.
- Tease the next section.
Another important point is to always fulfill the promise you make for each section. If you tease a benefit or solution, make sure you deliver. Each time you deliver on a promise to your reader, you build credibility and trust.
And, ultimately, trust is the rocket fuel for sustainable income on Medium.
Takeaway: Format each of your sections using the H.O.T. framework.
3. Analysis: How I Learn, Iterate, and Repeat Success Points
Once you write and publish your article, you move to the third — and, arguably, the most critical — phase. Analysis.
After I publish my articles, I always study them. I look at the data related to views, read time, claps, comments, and earnings.
I especially study groups of articles — such as the articles I publish in a week or a month. The context of examining a set of data is exponentially more useful than one-off data from a single story.
When I look at groups of articles, I ask the following questions:
- Which articles are doing well?
- Where were they published?
- When were they published? (What month, day of the week, and time of the day?)
I also analyze each individual story:
- What is the title?
- How is it formatted?
- How long is the story?
- Did it get curated?
- What can I learn?
- Are there any patterns between this article and my other successful articles?
- How can I repeat this success?
Using this information from December’s articles, I focused on relationship, sex, and marketing articles in January. This refocusing paid off.
Here are some of the main “findings” from my January articles that increased my earnings by 1,340%:
- My 3 highest-earning stories were all distributed.
- All of my highest-earning stories were published in publications.
- None of my highest-earning stories were published in “big” publications.
- Three of the 5 top-earning stories focused on relationships or sex.
- One top-earner was about timing (this one also included a celebrity in the title — Jerry Seinfeld).
- 4 out of 5 of the top-earning articles included high-volume keywords I found in topic research.
- Two of the top 5 articles were 7 minutes long. One was 4 minutes, one was 5 minutes, and one was a whopping 18 minutes.
- 5–7 minute articles made me the most money.
Recently, I added the Medium Enhanced stats Chrome extension to my PC. It’s a new addition to the third step in my system. It’s free and you might want to try it.
We’ll see how it goes!
Takeaways
Since this is a longer article, I wanted to include this section as a quick summary of the 3-phase system for easy review:
- Identify high-interest topics by using topic-finding tools and by studying trending and popular Medium articles.
- Come up with ten different titles and subtitles for each article. Choose the best one.
- Write your articles using H.O.T. intros and sections.
- Analyze what is working for you and adapt your approach for your next set of articles.
Final Thoughts
I’ve used this three-phase process over and over again since I’ve started on Medium. I’m not saying it’s fool-proof or perfect. Far from it.
What I like is that the process is customizable and adjustable.
Meaning that you can make the system your own. You can also update it (like I do) as you gain experience and new information. I’m constantly running experiments on Medium (and elsewhere) to see what happens.
If I find something that works, I do more of it. If something doesn’t work after several repetitions, I do less of it or scrap the strategy altogether.
If you want to fill up your Medium piggy bank, I encourage you to try this system. I look forward to reading about your success!


