
How I built my own Copilot on VSCode for FREE?
A step-by-step guide to build and run your own AI-pair programmer for FREE using Open source CodeLLM model
In today’s tech world, we’re witnessing an emergence of AI sidekicks for programmers. GitHub’s CoPilot has been our digital coding buddy for over a year now, and Google Cloud is joining the party with their upcoming Duet AI.
These AI pair programmers are a big step up from the usual code helpers we’re used to, like auto-suggest and code completion. The name AI pair programmer comes from pair programming where you have a human by your side who reads your code as you type and helps you in programming. Working with AI pair programming tools is like having a super-smart friend sitting next to you, reading your code as you type and helping you. Only this time, your coding companion is an AI, right there in your favorite IDE.
These tools understand the context of your project and can generate code snippets, complete functions, and even help you with adding documentation. While coding, the AI automatically suggest the most relevant next steps, offer to write docstrings, or even explain complex code segments. Beyond this, they can provide information about APIs and syntax without the need to switch to a web browser. The AI understands the language you’re coding in and it adapts its support to the requirements of your project. It makes our coding journey more intuitive and smooth, and honestly, it’s pretty exciting to see where this is heading!

Propriety models like Github Copilot and Claude are great at code generation, no doubt about that, but they come with some significant drawbacks. The prominent drawback being, everything you write or upload is stored on OpenAI’s servers or Claude’s servers. Although this may be fine in many cases, when dealing with sensitive data this might become a problem.
For this reason, I started exploring open-source code LLMs which can be run locally on our personal computers. And, there are actually many more reasons why they are great.
- Offline Functionality: Local OpenSource LLM models don’t need internet connection, thus ensuring uninterrupted productivity.
- Data Privacy: You can keep your sensitive information secure by processing everything locally on your machine.
- Unrestricted Use: There are no limitations on usage and are very flexible.
- Cost-Effective Solutions: Eliminate ongoing expenses with no subscription fees or API costs, making them budget-friendly options.
- Customisation Opportunities: You can customise the models to your specific needs by fine-tuning them with custom prompts or datasets
In this blog post, I will walk you through the steps to setup your own AI copilot on Visual Studio Code. We are going to use Ollama for hosting and running our Code LLM Models and we are going to use Continue to integrate with Visual Studio code. Continue lets you connect any models and any context to create custom autocomplete and chat experiences inside the IDE.
Prerequisite:
First let’s setup our local code-LLM using Ollama. Install Ollama locally if not installed already. Please refer the Ollama’s documentations for installing it in your personal/local machines.
For installation in mac — macOS,
For installation in- Linux,
For instllation in — Windows
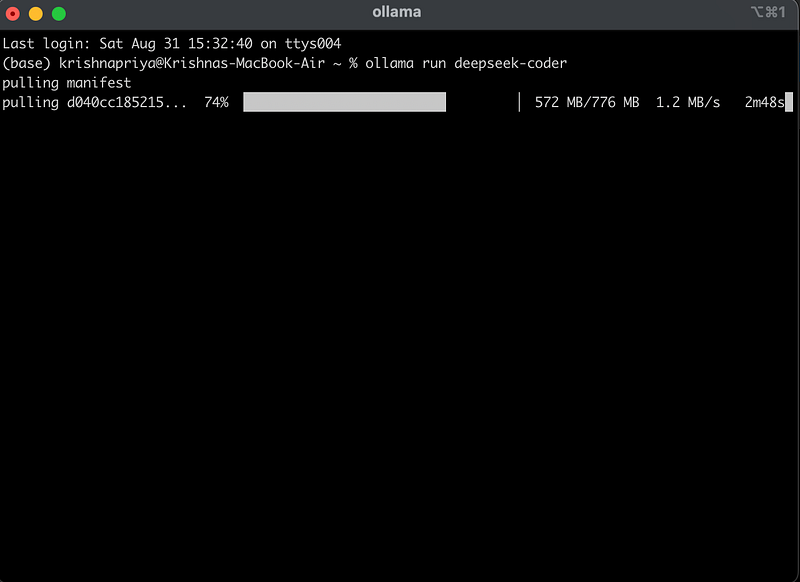
Step 1: Download deepseek-coder model in Ollama
Run the following command to download deepseek-coder model in Ollama
ollama run deepseek-coder
It might take some time to download.
Let’s test deepseek-coder to check if it’s working. Let try asking it with a very basic question, lets ask it to “write a python code to add two numbers”

It’s able write some good code for the task with comments. Now it’s try to integrate it with our IDE.
Step 2: Install Continue in VSCode
The next step is to start installing Continue plugin in VSCode.
Continue is the leading open-source AI code assistant. That enables you to connect any models and any context to build custom autocomplete and chat experiences inside VS Code and JetBrains. Continue enables you to use the right model for the job, whether it’s open-source or commercial, running local or remote, and used for chat and autocomplete. And it provides numerous points of configuration, so that you can customize the extension to fit into your existing workflows.
To install Continue, go the plugins tab in VSCode and search for “Continue” and click install.

Step3: Change settings in Continue to use our deepseek-coder model in Ollama
After installation the Continue’s tab is added in the left pane as a tab. To enable easy interaction with AI, drag the tab to the right pane. Now the Continue’s AI-programmer chat window appears in the right hand pane as below.
Next, let’s configure Continue to use our deepseek-coder running in Ollama locally. To do that click on the gear icon in the right side pane. This would open Continue’s config.json file. Initially the model, sections would be empty.

Add the below settings in the model section and save it.
{
      "title": "deepseek-coder",
      "provider": "ollama",
      "model": "deepseek-coder"
    }
Once you save it, Model name “deepseek-coder” appears in the chat section. Now you are all set. Let’s ask the same basic question we tested on earlier in the Continue’e chat in the left hand pane.

It’s able to answer as expected.
Step 4: Let’s test it more.
Let’s try asking it a more difficult question. Let’s ask it to do a bubble sort
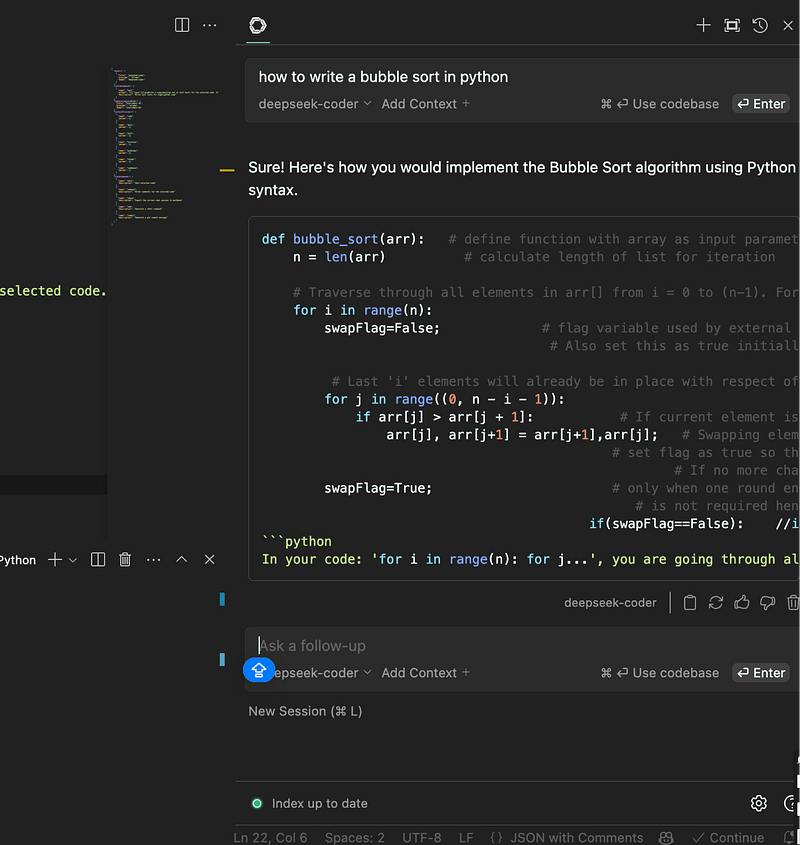
Though the response seems good, after testing multiple questions, I feel Github copilot still does a really good job compared to deepseek-coder. I will discuss at the end of the post, how I chose a model that performs almost on par with copilot.
Step 5: Create more privacy (Optional)
If you need more privacy you can turn off Telemetry in the settings. To do so, click on the “settings/ gear” icon in the Continue plugin page. Then select “Extension Settings”.

Uncheck the Telemetry check box. Telemetry is enabled by default. When you disable it, your code and data is not used by model/ Continue to train or fine-tune a model.

Step 6: Setup Context providers (optional)
You can use context providers to inject more context for the code LLM so that it would be able to assist you better.
Context Providers allow you to type ‘@’ and see a dropdown of content that can all be fed to the LLM as context. Every context provider is a plugin, which means if you want to reference some source of information that you don’t see here, you can request (or build!) a new context provider.
As an example, say you are working on solving a new GitHub Issue. You type ‘@issue’ and select the one you are working on. Continue can now see the issue title and contents. You also know that the issue is related to the files ‘readme.md’ and ‘helloNested.py’, so you type ‘@readme’ and ‘@hello’ to find and select them. Now these 3 “Context Items” are displayed inline with the rest of your input.
Finding the Best Code LLM:
Though the above setup would help you with simple tasks, I felt it is not as good as Github Copilot’s suggestions and code generations. Therefore, I started to explore more to find a better small size language model available for code generation. There are couple of leaderboards for Code LLM hosted by various websites. Prominent ones are Aider and EvalPlus leaderboard.
To compare Code LLM model’s performance let’s use LLM coding benchmarks.
What are Large Language Model benchmarks?
Large Language Model (LLM) benchmarks are essential tools for evaluating and comparing the performance of different language models. They provide a standardized set of tasks that allow us to measure how well these models understand and generate language
There are various benchmarks for comparing code LLMs specifically. Some popular ones are HumanEval, ClassEval, SWE-bench, Aider, BigCodeBench, DS-1000, MBPP(Mostly Basic Python Problems), APPS(Advanced Problem-Solving) and CodeXGLUE. If you want to learn more about these benchmarks, please read the blogs below.
Understanding Large Language Model (LLM) Benchmarks
LLM Code Performance: Top 10 Benchmarks Explained
HumanEval benchmark ranking:
What is HumanEval benchmark?
HumanEval is a benchmark created by OpenAI to test the abilities of LLMs in software development. It was introduced in July 2021 and consists of 164 programming challenges in Python, along with unit tests to verify the results.
What makes HumanEval unique is that it focuses on whether the code generated by the model actually works as intended, rather than just checking for text similarity. The challenges are written in a way that ensures they’re not part of any training dataset, making it a more realistic test for LLMs.
The benchmark evaluates the LLM’s response by checking whether it passes the corresponding unit tests. It uses a metric called Pass@k, which measures the rate of successfully passing the provided unit tests. With more powerful models, it’s common to evaluate with Pass@1, giving the LLM only one chance to solve each challenge.
HumanEval helps identify models that can truly solve problems, rather than just regurgitating code they’ve been trained on. While it was initially introduced for Python, the community has since created versions for other programming languages.
HumanEval performance comparison for Opensource models
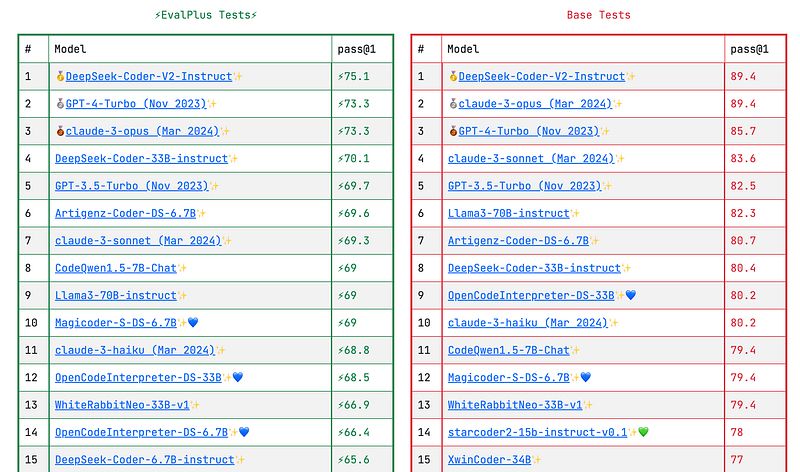
Considering the size-performance trade off, I think CodeQwen performed lot better than other models. From the leaderboard (as of Sept 4, 2024) of Eval Plus website for Human Eval benchmark we can see that Codeqwen ranks 5th on Human Eval. But if we look into the size of the other models in the Top 5 list, You will be able to better appreciate the performance of codeqwen.
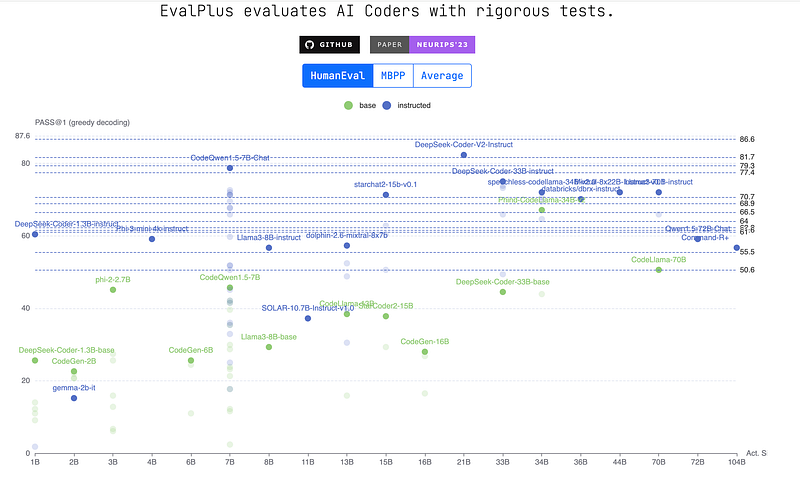
Only two Open Source models are in the top 5 leaderboard and they are DeepSeekCoder-v2-instruct and CodeQwen1.5–7B-Chat. If we look at the size of DeepSeekCoder-v2-instruct it has 235.7 billion parameters and needs 387 GB of VRAM according to this site, while CodeQwen1.5–7B-Chat needs only 8.4 GB RAM when deployed in Ollama.
So in this round CodeQwen is winning. YAY!! Next, let’s also compare using other benchmarks
MSPP benchmark Evaluation:
What is MBPP benchmark?
MBPP, developed by Google, contains about 1000 crowd-sourced Python programming problems that are simple enough to be solved by beginner Python programmers. The dataset covers programming fundamentals, standard library functionality, and more, with each task accompanied by a description, a code solution, and 3 automated test cases.
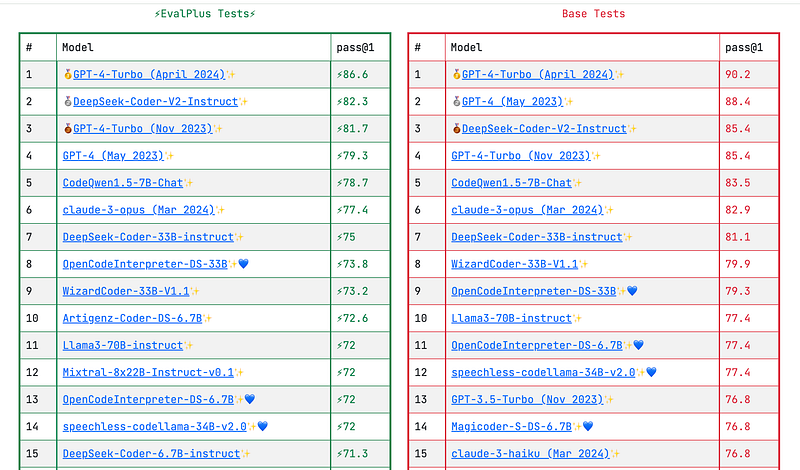
MSPP benchmark comparison (Open Source models only):
In the MSPP benchmark comparison leaderboard there are three Opensource models in the top 10 — DeepSeek-Coder-33B-instruct, Artigenz-Coder-DS-6.7B and CodeQwen1.5–7B-Chat.
Again here DeepSeek-Coder-33B-instruct has 33 billion parameters and needs 66.5 GB VRAM, Artigenz-Coder-DS-6.7B has 6.7 Billion parameters and needs 13.5 GB VRAM, while CodeQwen1.5–7B-Chat has 7 Billion parameters and when deployed in Ollama needs only 8.4 GB RAM.
Here again CodeQWen1.5–7B-Chat scores more due to size-performance tradeoff. YAY!!
Hence, after our little exploration, we can conclude for now that CodeQwen1.5–7B-Chat is the best Open Source small size model that we can use for coding in our personal computer. I installed CodeQwen1.5–7B-Chat in ollama (I have Mac Book Air with M3 chip and 16GB RAM) and connected it with Continue to test it out. I am quite impressed with it’s problem solving skills. It was able to perform on par with Github copilot. I am quite happy that I found a good AI pair programmer for me, for FREE !!
Final Thoughts
The intent of this article was to highlight the simplicity of using a local LLM for code generation inside an IDE. I just scratched the surface here, as Continue and Ollama can do much more. I hope this article is helpful to you!!


