
Tutorial | Python | Discord.py
Hello World! How to Make a Simple Discord Bot Using Discord.py
Get your very own Discord bot running using Python in as little as 30 minutes!

Me and my friends use the app Discord to communicate about when we plan to play our favorite Xbox game, Sea of Thieves. We have a couple bots setup to post news and update information about the game in our server, but there was certain information that we could not find a pre-built bot to deliver for us.
I decided that if the bot we wanted didn’t exist, I would program it myself. This turned out to be a larger task than I imagined, but was a great learning experience. Building a bot that operates in your server is a very fulfilling project, and it can help make your life easier in many ways. The first step is creating a simple bot.
The Hello Word Bot
Now jumping right in to program a sophisticated bot using a new platform isn’t easy. Let’s start with a simple “Hello World” bot using Discord.py. We’ll:
- Create the bot
- Add it to our server
- Program the bot
- Test its functionality
All of the code used will be consolidated at the end if you just want to hit the ground running.
Note: This tutorial assumes that you already have python installed (version 3.5.3 or higher) on a Windows machine and know how to use the command line to run a python script. Any commands that are sent to command prompt will be prefaced by a “$”
Create the Bot
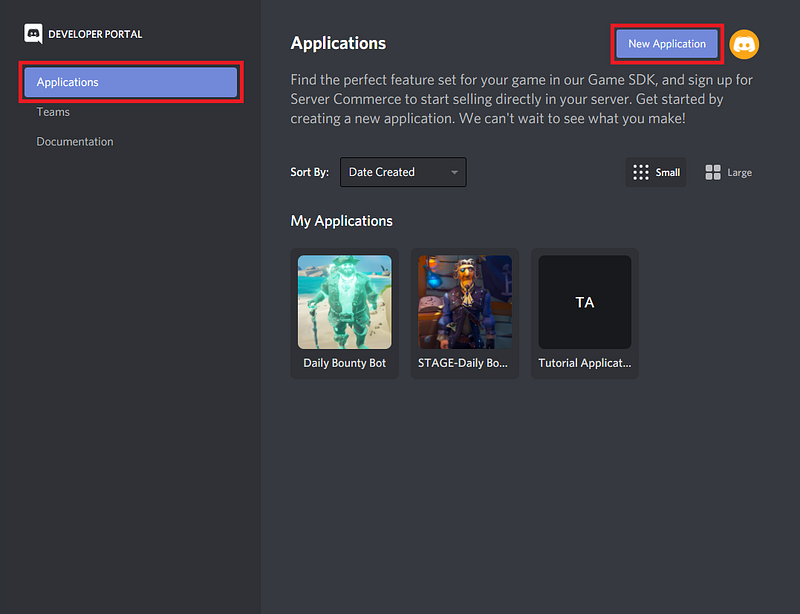
If you don’t already have a Discord account, sign up for one first. Once you have an account, head to the Discord Developer Portal. On the applications tab you’ll click on New Application in the top right corner.
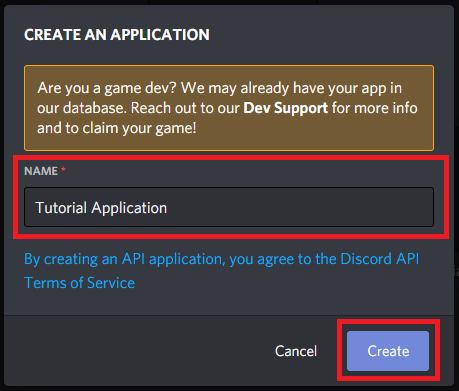
On the Create An Application popup, we’ll give our application a name. Here I’ll be using Tutorial Application. Click Create to create the bot.
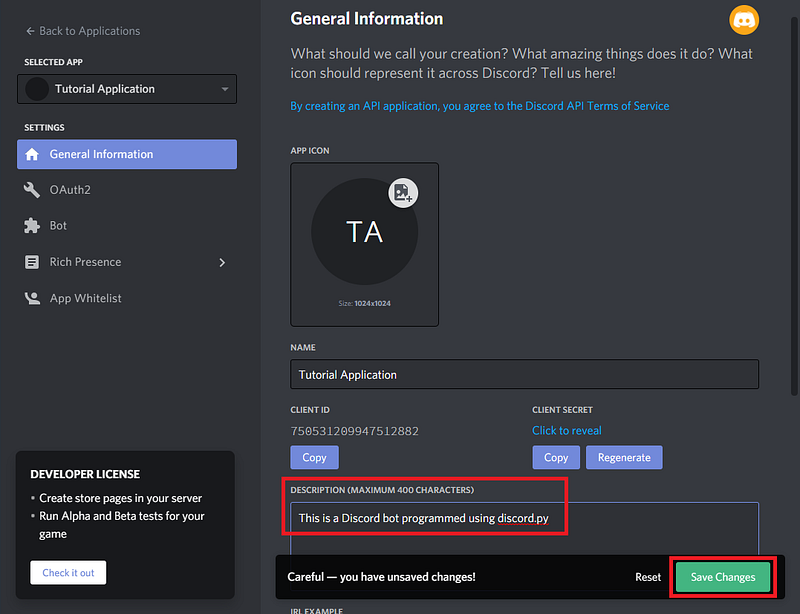
The next page is General Information about the bot you have created. Make sure to add a description to your bot. This isn’t strictly necessary, but will help in identifying it later when you are a Discord.py wizard and have many applications. Be sure to click Save Changes when you are done.
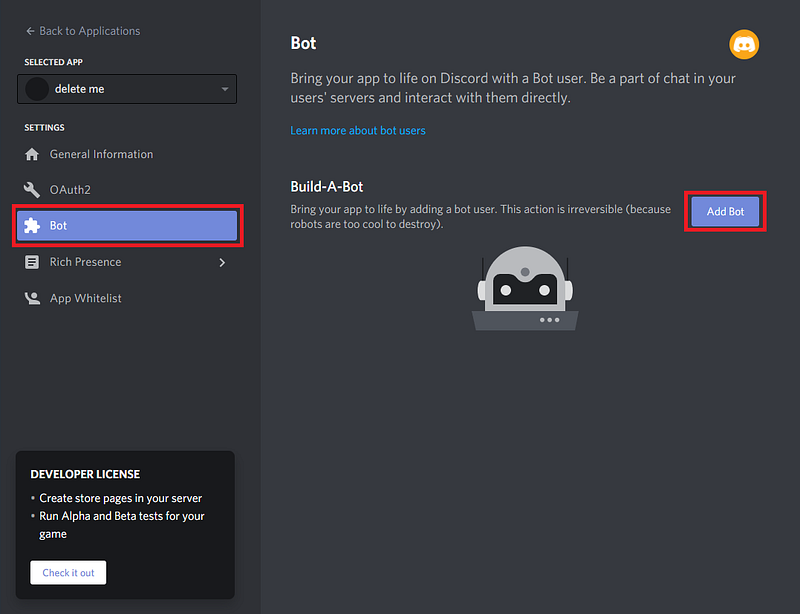
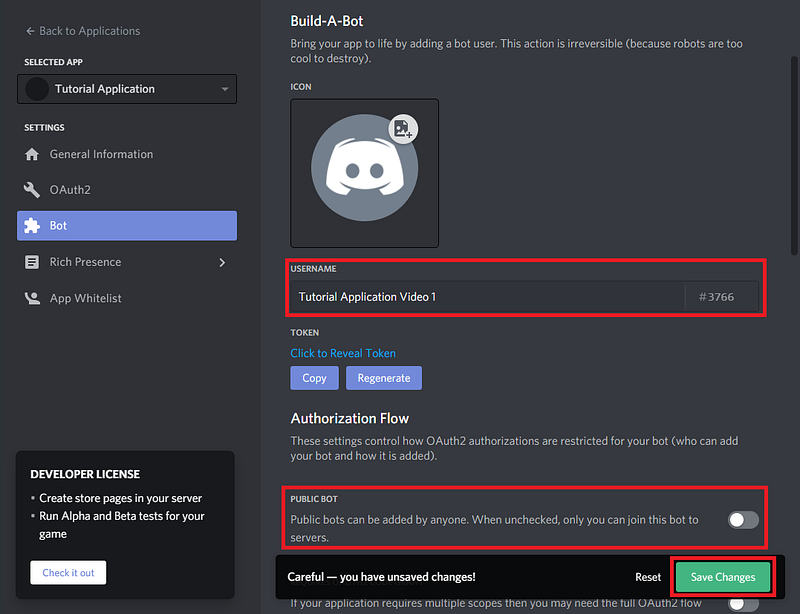
On the bot page, click Add Bot. Bots create a way for your code to interface with your Discord server. Adding a bot will make your app visible in Discord, so just confirm that when asked by clicking Yes, do it!
Let’s give our bot a name, in my case I’ll call it Tutorial Application Video 1. We can also un-check the public bot option. This will make it so that only you can add this bot to servers. We wouldn’t want someone stressing our poor bot out while we are still working out the kinks.
Add the Bot to a Server
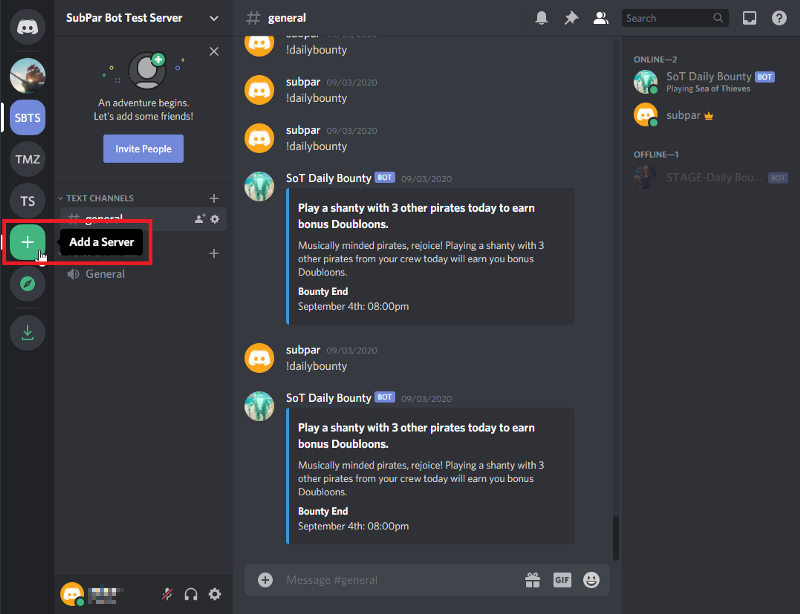
If you don’t already have a server with a channel that you can add the bot to, go ahead and make one. In the Discord app click the plus button on the left side to add a server.
Click the option to Create a server. You will need to give your server a name, in this case Tutorial Server will work. Click Create to finish the process. If it asks you to invite friends to your server, just close that window, we aren’t ready for them quite yet.
To add our bot to the server, we head back over to the developer portal. Open the application for your bot and click on the OAuth2 option in the left pane.
In the Scopes section, we want to give our bot the bot scope.
In the Bot Permissions section, we can just give it the permission to Send Messages for now.
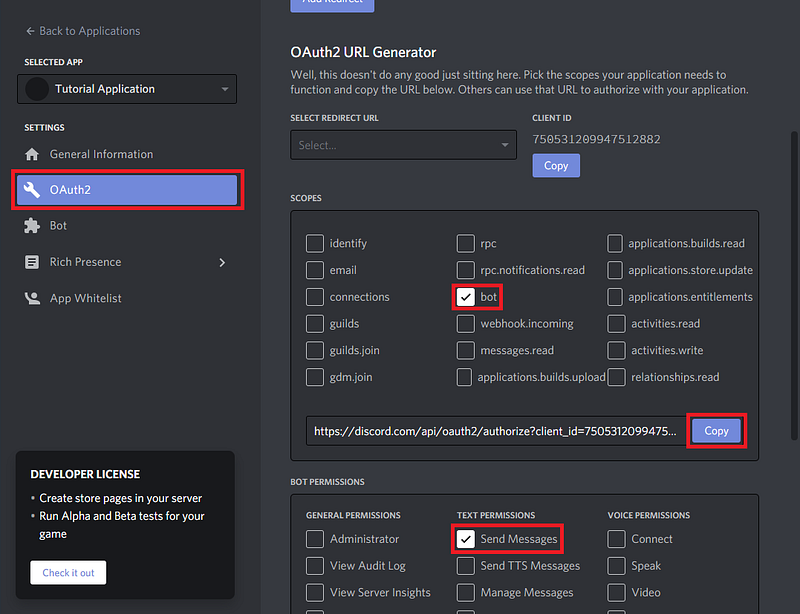
You’ll see a URL has been generated in the Scopes section. Copy this and open it in your browser. You will be asked where you want to add the bot. Select the server you are using for testing from the drop down menu and click continue.
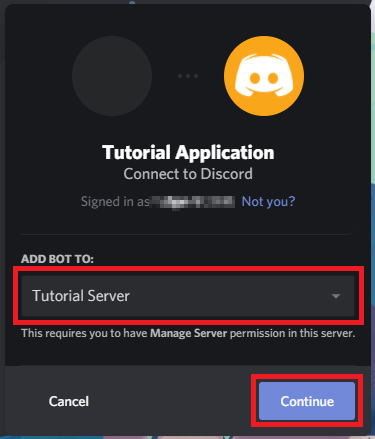
Discord will confirm that you want to give the bot the permissions we defined when creating the URL.
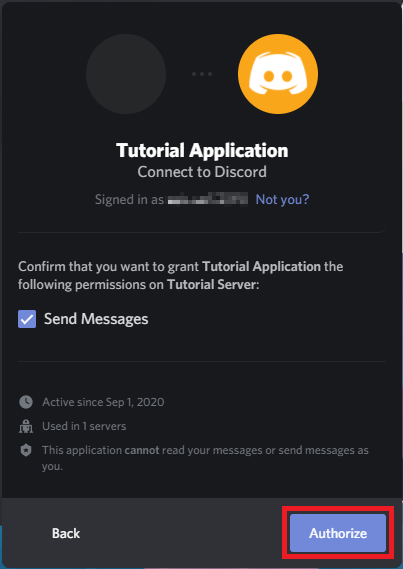
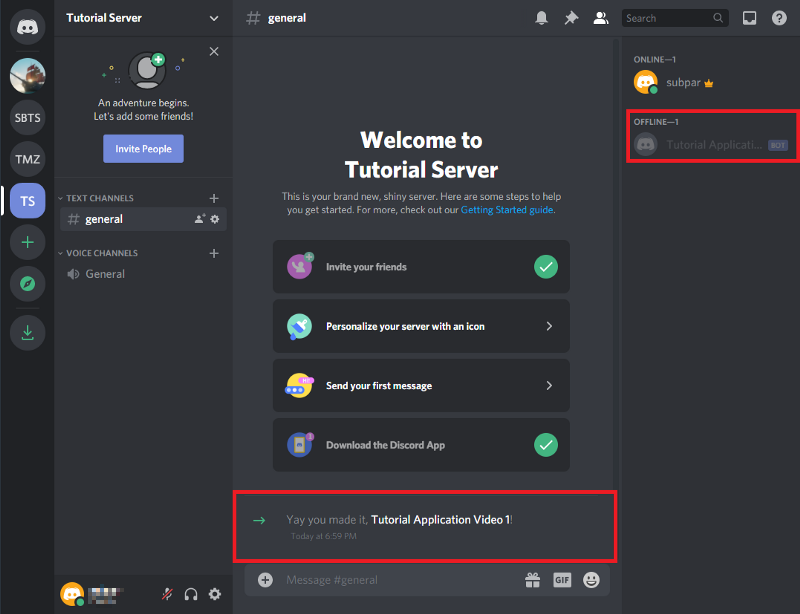
Discord will likely ask you to confirm that you are not a bot and then add the application to your server. Back on your server you will see that our bot has joined the server and we can see that it is offline on the right pane.
Giving the Bot Brains (Program the bot)
Our bot is waiting offline, ready for us to connect and give it life! Let’s go over what we need:
- The
discord.pypython module installed - An editor to write the script
- Somewhere to run our python script
To install the discord module, you can use the package installer for python, more commonly known as pip. The following should be executed from the command line.
$ pip install discord.pyAs for your editor, you can use a integrated development environment or IDE, but I prefer using a text editor like Atom or Notepad++. Anything with syntax highlighting and code completion will work well. Using an IDE is possible but some, specifically Spyder require additional packages to run asynchronous code, like that used in Discord.py.
The first section of code will be our imports. Right now we just need discord and an extension from the discord package, commands
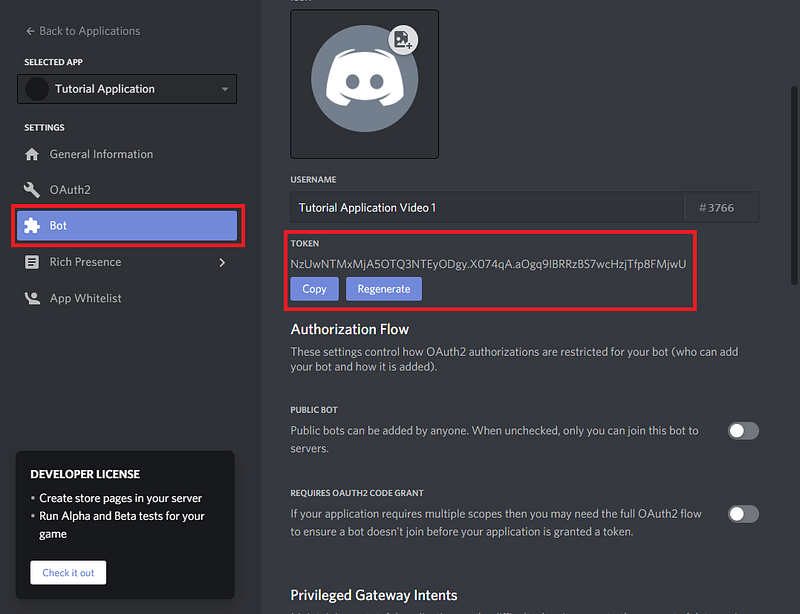
Next we will create a variable TOKEN that contains our token to authorize the code with Discord. This will not only let the code interact with Discord, but also tell Discord which bot we are interacting with. Our token will be found on the Bot page. It is hidden by default. This is sensitive information and sharing it with anyone will allow them full access to your bot until you regenerate your token.
Our next step is to initialize our bot. From commands we will use the Bot method. We add the argument command_prefix='!' to tell our bot that commands will start with an exclamation point (!). Anything will work here, but special characters considered best practice as it is unlikely they are going to mistakenly trigger our bot.
Next we’ll have the script output to the console so that we can verify that the bot is connected correctly. We will write a function that prints out the bot’s name and ID number when it connects. When client is initialized, both name and id become available as part of the user attribute. With some simple text formatting, we can print client.user.name and client.user.id to the console. Don’t worry too much about the code preceding the function, at this point you just need to know that these are required for Discord.py to work.
Now we want the bot to say “Hello World” when we type “!helloworld” in the Discord chat Channel. To do this, we need to create a command function. It will start with the command decorator. Next we define the function helloworld. The name of this function is exactly how we will call the function from discord. The function needs 1 argument: ctx. This will be the context from the command and Discord.py will handle this for us. ctx will contain many things we would want to know about a request, including what Discord channel it came from. In the next line we use the await keyword to wait until the process running our bot is ready. The ctx.send sends the “Hello World!” message back to where the command was send from, as saved in the context of the request.
For the final piece of our script, we need to use the run method, passing it our token to connect and start the bot. With that added we can save and try running it.
To run our bot, open up your command line. Navigate to the directory where your script is saved using the change directory command. Once in the correct directory, run the script.
$ cd "path\to\your\bot"
$ python tutorial_bot.py
If all went well, you should see similar output printed to the console:
Connected to bot: Tutorial Application Video 1
Bot ID: 7505311099577812556
If you see this, your bot is successfully connected!
Testing Your Bot
To test the hello world command we wrote, head on over to the Discord server we added the bot to earlier. On the right panel, you will see that the bot is now in the online status.
To test the command, simply enter !helloworld into the Discord channel. The bot will quickly respond back!

Next Steps
Now that you have the basics down, there are many more things you can do with your Discord bot. In addition to special Discord methods that are provided, you can also add in any traditional python code to perform operations before interacting with the Discord server again. Want to hide your token? Check out my tutorial below:
Full Bot Script
Python In Plain English
Enjoyed this article? If so, get more similar content by subscribing to Decoded, our YouTube channel!


