avatarTeri Radichel

Free AI web copilot to create summaries, insights and extended knowledge, download it at here

6856

Abstract

edFileExtension = selectedFileName.split(‘.’).last; <span class="hljs-keyword">if</span>(allowedFormats != <span class="hljs-literal">null</span> || allowedFormats.isNotEmpty) { <span class="hljs-keyword">if</span>(!allowedFormats.contains(‘selectedFileExtension’)) { print(selectedFileName); message = ‘<span class="hljs-type">Selected</span> file format { selectedFileExtension } isn\’ allowed’; <span class="hljs-keyword">return</span> <span class="hljs-type">FilePickerWrapperFailedResult</span>(errorMessage: message,code: <span class="hljs-number">0</span>); } }

<span class="hljs-keyword">if</span> ( maxFileSizeAllowed < file.lengthSync() / <span class="hljs-number">1024</span>) { message = ‘<span class="hljs-type">File</span> size exceed, maximum file size allowed($maxFileSizeAllowed kB)’; <span class="hljs-keyword">return</span> <span class="hljs-type">FilePickerWrapperFailedResult</span>(errorMessage: message,code: <span class="hljs-number">0</span>); } <span class="hljs-keyword">return</span> <span class="hljs-type">FilePickerWrapperSuccessResult</span>(code: <span class="hljs-number">1</span>,filePath: file.path, fileName: selectedFileName); } }

<span class="hljs-class"><span class="hljs-keyword">class</span> <span class="hljs-title">FilePickerWrapperResult</span> </span>{ int code; <span class="hljs-comment">// 1 means success result, 0 means failed or error result </span> }

<span class="hljs-class"><span class="hljs-keyword">class</span> <span class="hljs-title">FilePickerWrapperSuccessResult</span> <span class="hljs-keyword">extends</span> <span class="hljs-title">FilePickerWrapperResult</span> </span>{ <span class="hljs-type">FilePickerWrapperSuccessResult</span>({<span class="hljs-meta">@required</span> <span class="hljs-keyword">this</span>.filePath, <span class="hljs-meta">@required</span> <span class="hljs-keyword">this</span>.fileName, <span class="hljs-meta">@required</span> int code}) { <span class="hljs-keyword">this</span>.code = code; } <span class="hljs-type">String</span> filePath; <span class="hljs-type">String</span> fileName; }

<span class="hljs-class"><span class="hljs-keyword">class</span> <span class="hljs-title">FilePickerWrapperFailedResult</span> <span class="hljs-keyword">extends</span> <span class="hljs-title">FilePickerWrapperResult</span> </span>{ <span class="hljs-type">FilePickerWrapperFailedResult</span>({<span class="hljs-meta">@required</span> <span class="hljs-keyword">this</span>.errorMessage, <span class="hljs-meta">@required</span> int code}) { <span class="hljs-keyword">this</span>.code = code; } <span class="hljs-type">String</span> errorMessage; }</pre></div><p id="bb4a">In this helper class, we added functionality to select the image from the gallery app on the device. Now create a new file and name it <b>image_picker_wrapper.dart.</b></p><h1 id="c228">Enabling image selection</h1><p id="d038">Add the following code to this file:</p><div id="ef30"><pre>import ‘dart:io’; import ‘package:facerecognition/supporting_files/file_picker_wrapper.dart’; import ‘package:flutter/cupertino.dart’; import ‘package:flutter/material.dart’; import ‘package:image_picker/image_picker.dart’;

typedef ImagePickerResult = <span class="hljs-keyword">void</span> <span class="hljs-title function_ invoke__">Function</span>(FilePickerWrapperResult result);

<span class="hljs-class"><span class="hljs-keyword">class</span> <span class="hljs-title">ImagePickerWrapper</span> </span>{ <span class="hljs-title function_ invoke__">ImagePickerWrapper</span>({ @required ImagePickerResult imagePickerResult, <span class="hljs-keyword">double</span> maxFileSizeAllowed = <span class="hljs-number">2024</span> //size in kb }) { this._imagePickerResult = imagePickerResult; this._maxFileSizeAllowed = maxFileSizeAllowed; } ImagePickerResult _imagePickerResult; <span class="hljs-keyword">double</span> _maxFileSizeAllowed;

<span class="hljs-keyword">void</span> <span class="hljs-title function_ invoke__">openImagePickerActionSheet</span>({@required BuildContext buildContext}) { <span class="hljs-keyword">if</span>(buildContext == <span class="hljs-literal">null</span>) { <span class="hljs-keyword">print</span>(‘build content can’’\’t be <span class="hljs-keyword">empty</span>’); <span class="hljs-keyword">return</span>; } <span class="hljs-keyword">if</span> (Platform.isIOS) { <span class="hljs-title function_ invoke__">_actionSheet</span>(buildContext); } <span class="hljs-keyword">else</span> { <span class="hljs-title function_ invoke__">_androidBottomSheet</span>(buildContext); } }

<span class="hljs-comment">//For ios </span> <span class="hljs-keyword">void</span> <span class="hljs-title function_ invoke__">_actionSheet</span>(BuildContext context) { _containerForSheet<String>( context: context, child: <span class="hljs-title function_ invoke__">CupertinoActionSheet</span>( <span class="hljs-attr">title</span>: <span class="hljs-title function_ invoke__">Text</span>(‘’), <span class="hljs-attr">message</span>: <span class="hljs-title function_ invoke__">Text</span>(‘’), <span class="hljs-attr">actions</span>: <Widget>[ <span class="hljs-title function_ invoke__">CupertinoActionSheetAction</span>( <span class="hljs-attr">child</span>: <span class="hljs-title function_ invoke__">Text</span>(‘Camera’), <span class="hljs-attr">onPressed</span>: () { <span class="hljs-title function_ invoke__">_openCamera</span>(ImageSource.camera); }, ), <span class="hljs-title function_ invoke__">CupertinoActionSheetAction</span>( <span class="hljs-attr">child</span>: <span class="hljs-title function_ invoke__">Text</span>(‘Gallery’), <span class="hljs-attr">onPressed</span>: () async { <span class="hljs-title function_ invoke__">_openFileExplorer</span>(); }, ), ], cancelButton: <span class="hljs-title function_ invoke__">CupertinoActionSheetAction</span>( <span class="hljs-attr">child</span>: <span class="hljs-title function_ invoke__">Text</span>(‘Cancel’), <span class="hljs-attr">isDefaultAction</span>: <span class="hljs-literal">true</span>, <span class="hljs-attr">onPressed</span>: () { Navigator.<span class="hljs-title function_ invoke__">pop</span>(context, ‘Cancel’); }, ))); }

<span class="hljs-keyword">void</span> _containerForSheet<T>({BuildContext context, Widget child}) { showCupertinoModalPopup<T>( context: context, builder: (BuildContext context) => child, ).then<<span class="hljs-keyword">void</span>>((T value) { }); }

<span class="hljs-comment">//For Android </span> <span class="hljs-keyword">void</span> <span class="hljs-title function_ invoke__">_androidBottomSheet</span>(BuildContext context) { show

Options

ModalBottomSheet<<span class="hljs-keyword">void</span>>( context: context, builder: (BuildContext context) { <span class="hljs-keyword">return</span> <span class="hljs-title function_ invoke__">Container</span>( <span class="hljs-attr">margin</span>: <span class="hljs-keyword">const</span> EdgeInsets.<span class="hljs-title function_ invoke__">only</span>(<span class="hljs-attr">left</span>: <span class="hljs-number">20.0</span>, <span class="hljs-attr">right</span>: <span class="hljs-number">20.0</span>), <span class="hljs-attr">child</span>: <span class="hljs-title function_ invoke__">Wrap</span>( <span class="hljs-attr">children</span>: <Widget>[ <span class="hljs-title function_ invoke__">ListTile</span>( <span class="hljs-attr">leading</span>: <span class="hljs-title function_ invoke__">Icon</span>(Icons.camera), <span class="hljs-attr">title</span>: <span class="hljs-title function_ invoke__">Text</span>(‘Camera’), <span class="hljs-attr">onTap</span>: () { <span class="hljs-title function_ invoke__">_openCamera</span>(ImageSource.camera); }), <span class="hljs-title function_ invoke__">ListTile</span>( <span class="hljs-attr">leading</span>: <span class="hljs-keyword">const</span> <span class="hljs-title function_ invoke__">Icon</span>(Icons.landscape), <span class="hljs-attr">title</span>: <span class="hljs-title function_ invoke__">Text</span>(‘Gallery’), <span class="hljs-attr">onTap</span>: () { // <span class="hljs-title function_ invoke__">_openFileExplorer</span>(); <span class="hljs-title function_ invoke__">_openCamera</span>(ImageSource.gallery); }, ), ], ), ); }); }

Future<<span class="hljs-keyword">void</span>> <span class="hljs-title function_ invoke__">_openCamera</span>(ImageSource source) async { File imageSelected = await ImagePicker.<span class="hljs-title function_ invoke__">pickImage</span>( <span class="hljs-attr">source</span>: source, <span class="hljs-attr">maxHeight</span>: <span class="hljs-number">400</span>, <span class="hljs-attr">maxWidth</span>: <span class="hljs-number">400</span>); <span class="hljs-keyword">if</span> (imageSelected != <span class="hljs-literal">null</span>) { <span class="hljs-keyword">final</span> String fileName = imageSelected.path.<span class="hljs-title function_ invoke__">split</span>(‘/’).last; <span class="hljs-keyword">if</span> ( _maxFileSizeAllowed < imageSelected.<span class="hljs-title function_ invoke__">lengthSync</span>() / <span class="hljs-number">1024</span>) { String message = ‘File size exceed, maximum file size <span class="hljs-title function_ invoke__">allowed</span>(<span class="hljs-variable">$_maxFileSizeAllowed</span> kB)’; <span class="hljs-title function_ invoke__">_imagePickerResult</span>(<span class="hljs-title function_ invoke__">FilePickerWrapperFailedResult</span>(<span class="hljs-attr">errorMessage</span>: message,<span class="hljs-attr">code</span>: <span class="hljs-number">0</span>)); } <span class="hljs-title function_ invoke__">_imagePickerResult</span>(<span class="hljs-title function_ invoke__">FilePickerWrapperSuccessResult</span>(<span class="hljs-attr">code</span>: <span class="hljs-number">1</span>,<span class="hljs-attr">filePath</span>: imageSelected.path, <span class="hljs-attr">fileName</span>: fileName)); } <span class="hljs-keyword">else</span> { <span class="hljs-title function_ invoke__">_imagePickerResult</span>(<span class="hljs-title function_ invoke__">FilePickerWrapperFailedResult</span>(<span class="hljs-attr">errorMessage</span>: ‘Failed to get the image’,<span class="hljs-attr">code</span>: <span class="hljs-number">0</span>)); } }

Future<<span class="hljs-keyword">void</span>> <span class="hljs-title function_ invoke__">_openFileExplorer</span>() async { <span class="hljs-keyword">final</span> FilePickerWrapperResult wrapperResult = await <span class="hljs-title function_ invoke__">FilePickerWrapper</span>() .<span class="hljs-title function_ invoke__">openFileExplorer</span>( <span class="hljs-attr">maxFileSizeAllowed</span>: <span class="hljs-number">2048</span>, <span class="hljs-attr">fileFormatsAllowed</span>: [‘jpeg’, ‘png’, ‘jpg’]); <span class="hljs-title function_ invoke__">_imagePickerResult</span>(wrapperResult); } }</pre></div><p id="f671">This helper class will provide the functionality to pick an image from the device’s gallery app or take a new one using the device’s camera. The alerts style will be as per the platform (i.e., on iOS, it will be shown in Cupertino style, and, on the Android platform, it will be displayed using Material style).</p><p id="4867">In this blog, we have examined the steps needed to create a UI in Flutter to allow users to pick images from their phones for use with Amazon Rekognition.</p><p id="2179">Next, we design a UI to allow the user to pick images and implement the functionality to pick image/s either from the camera or mobile storage. In the next part of this blog, we will focus on:</p><ul><li>Initiating the action of comparison.</li><li>Convert the raw result into a model.</li><li>Display the result of the comparison.</li></ul><p id="9c29">Read the next part of the blog on implementing facial recognition where we cover these topics:</p><div id="eb9f" class="link-block"> <a href="https://readmedium.com/implementing-facial-recognition-in-flutter-apps-1e99a23ac9c4"> <div> <div> <h2>Implementing Facial Recognition in Flutter Apps</h2> <div><h3>Read our blog to learn how to implement Facial Recognition in Flutter Apps using Amazon Rekognition.</h3></div> <div><p>DLT Labs on medium.com</p></div> </div> <div> <div style="background-image: url(https://miro.readmedium.com/v2/resize:fit:320/1*aGrAV7khLCz6_oKQmAG29w.png)"></div> </div> </div> </a> </div><p id="ca73"><i>Amazon Rekognition is the intellectual property of Amazon Inc. Flutter is a trademark of Google LLC.</i></p><p id="e5a4"><i>Author — Suhail Shabir, DLT Labs</i></p><p id="0f4a"><b>About the Author: </b><i>Suhail </i>is an application development professional who has worked on different platforms and technologies. He has completed his Bachelors in Computer Application from Kashmir University.</p><p id="e3ea">Disclaimer: This article was originally published on the DLT Labs Blog page: <a href="https://www.dltlabs.com/blog/enabling-facial-recognition-in-flutterapps-764220">https://www.dltlabs.com/blog/enabling-facial-recognition-in-flutterapps-764220</a></p><figure id="2629"><img src="https://cdn-images-1.readmedium.com/v2/resize:fit:800/0*0Rjo1bW8T-fHbjiq.png"><figcaption></figcaption></figure></article></body>

Governance for DNS on AWS

ACM.125: Strategy for protecting domain names and DNS configurations in your AWS Organization

~~~~~~~~~~~~~~~~~~~~~~~~~~~~~~~~~~~~~~~~~~~~~~~~~~~~~~~~~~~

⚙️ Check out my series on Automating Cybersecurity Metrics. The Code.

🔒 Related Stories: IAM | DNS Security| AWS Security

💻 Free Content on Jobs in Cybersecurity | ✉️ Sign up for the Email List

~~~~~~~~~~~~~~~~~~~~~~~~~~~~~~~~~~~~~~~~~~~~~~~~~~~~~~~~~~~

I wrote the importance of securing your domain names in my last post and why it matters. If someone can take over your domain name or DNS configuration they can potentially take over your entire cloud account, depending on which cloud services you use and how they verify you are the owner of the domain used to set up cloud services using that domain.

To prevent unauthorized changes or takeover of your domain name you’ll want to consider who has access to manage and make changes to your domain names or DNS settings. Here is one possible approach to limit access to domain names and DNS changes for domains hosted and managed by Route 53 on AWS in an organization.

  1. Create a new AWS account for domain name management on AWS.

You could try to lock down your IAM controls in a particular account to only allow certain people to access DNS configurations. Alternatively, you can put your domain names in a single account.

If you want to automate account creation, I wrote about how you can do that in the following blog post:

That code is currently not part of the GitHub repo because I ended up creating a account with CloudFormation instead.

Set up one specific account dedicated for domain name management. People who have access to manage domains in that account cannot create compute resources, S3 resources or any other resources that could leverage the domain names. The sole purpose of the account is for domain name administration and activities in that account are limited to that purpose.

Each AWS account you create comes with some overhead in regards to security and logging. To reduce some cost and complexity associated with multiple accounts, you can completely disable regions and services except those you actively need. Monitor changes closely in case someone tries to activate things you have disabled.

Route 53 is primarily a global service with the exceptions noted in this documentation:

For my purposes, a separate account works. If you are trying to use other AWS Route 53 functions than those I use in this blog series, you’ll have to see if this approach works for you.

2. Leverage segregation of duties for different DNS actions.

Allow one group to define the DNS configuration. Give a separate group permission to assign that configuration to an application. In other words, DNS admins set up NS records; Developers use them to configure applications.

For my purposes, in this blog series, I’m going to grant one automation role access to create the NS records for the domains in the DNS account. I’ll give another automation role permission to assign those DNS records to a static website in an S3 bucket.

I’m also going to set up an AWS SSO user as a DNS admin in a separate “domains” account who can log into the AWS console for the DNS account and manage domains and DNS configurations. Ideally we want everything automated but there may be some existing domains to transfer over via the AWS CLI or some other one-off function that doesn’t make a lot of sense to automate.

How organization size affects role assignments

If you work for a large company like Capital One, such as I did, you might have separate teams that each get a single one of role. You may have a team dedicated to DNS who uses the DNS administrator role and only has access to the domains account.

In a smaller organization, you might have a single DevOps team that is allowed to assume multiple roles due to limited resources and a separate developer team that performs application development functions. The DevOps teams may manage the domain names, network, and encryption keys, for example. In this latter scenario, executives might want to register domain names in one account or even using a separate service and use Route 53 to manage hosted zones for that domain name.

To create separation of duties for a very small team, create different credentials for a single person. Use separate MFA devices and credentials for different actions. It’s as if there are two different users even though the same person happens to be using two sets of credentials. The higher level, riskier credentials, shouldn’t need to be used as often so there’s less risk that an attacker gets access to them. You should have additional logging and alerts for risky actions.

Caveat with role assumptions

If you’re using AWS SSO, now AWS IAM Identity Center, beware of granting one person broad permissions through assumption of different roles. If a user can easily login and switch to any account or role, so can an attacker.

AWS IAM is not that much better but you do have to know the account alias or number and role if using the AWS console to switch to a different account.

The way way to emulate forcing MFA when switching accounts or roles would be to use different sets of credentials and/or MFA devices to force re-authentication for certain actions as I have been doing throughout this blog series.

3. Move domains to the central account

Having all your domain names located in a single, central account should make them easier to find and manage.

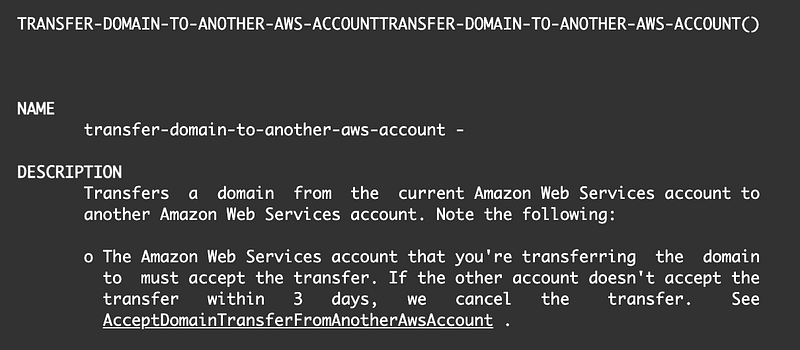
Here are the instructions to transfer the domain to another AWS using the AWS CLI. Do you know who has access to do this in your organization?

The basic syntax is pretty simple, though there are some additional options in the documentation above.

aws route53domains transfer-domain-to-another-aws-account
--domain-name <value>
--account-id <value>

The above command will return a password that is required for the next step. It’s simple to run the command in the AWS cloudshell if someone has access to the AWS console.

To finalize the transfer, the account that is accepting the domain transfer must run the AcceptDomainTransferFromAnotherAwsAccount command. Here’s how to do that from the AWS CLI:

aws route53domains accept-domain-transfer-from-another-aws-account
--domain-name <value>
--password <value>

The password that was returned by the TransferDomainToAnotherAwsAccount request.

In my case, I transferred one of my domains between two AWS accounts in different organizations.

— — — — — — — — — — — — — — — — — — — — — — — — — — — — — — — —

Make sure you restrict access to this Route 53 functionality on AWS! These commands are simple to run, as you can see. Two lines of code can move your domain name to another AWS account. Access to your domain may mean disabling and enabling services, manipulating email accounts, and taking over cloud accounts as explained in the last post.

— — — — — — — — — — — — — — — — — — — — — — — — — — — — — — — —

I just read a blog post about an “attack” that allows someone to transfer an AWS resource between accounts in different organizations. This is not an attack. It is a feature. I actually just needed that feature to move my domain as I just demonstrated above. It is up to the customer to understand what permissions people have in their cloud accounts and limit actions appropriately.

4. Create or move NS records for the domain in the appropriate account

Note that transferring the domain does not transfer the NS record for the domain. Even though I just transferred the domain from one AWS account to another, the functionality of my web site and email was unaffected. The domain got transferred, not the hosted zones.

Warning: It could be that someone takes control of your domain and you don’t even realize it because everything continues to work.

You can use this to your advantage when it comes to governance for domain names. You can register the domains in one account and use the NS records in a completely separate account where you host your applications and websites.

We’ll look more at NS records in upcoming posts.

But first let’s consider using AWS SSO for separation of duties vs. IAM.

Follow for updates.

Teri Radichel | © 2nd Sight Lab 2023

About Teri Radichel:
~~~~~~~~~~~~~~~~~~~~
⭐️ Author: Cybersecurity Books
⭐️ Presentations: Presentations by Teri Radichel
⭐️ Recognition: SANS Award, AWS Security Hero, IANS Faculty
⭐️ Certifications: SANS ~ GSE 240
⭐️ Education: BA Business, Master of Software Engineering, Master of Infosec
⭐️ Company: Penetration Tests, Assessments, Phone Consulting ~ 2nd Sight Lab
Need Help With Cybersecurity, Cloud, or Application Security?
~~~~~~~~~~~~~~~~~~~~~~~~~~~~~~~~~~~~~~~~~~~~~~~~~~~~~~~~~~~~~
🔒 Request a penetration test or security assessment
🔒 Schedule a consulting call
🔒 Cybersecurity Speaker for Presentation
Follow for more stories like this:
~~~~~~~~~~~~~~~~~~~~~~~~~~~~~~~~~~~~~~~~~~~~~~~~~~~~~~~~~~~~~ 
❤️ Sign Up my Medium Email List
❤️ Twitter: @teriradichel
❤️ LinkedIn: https://www.linkedin.com/in/teriradichel
❤️ Mastodon: @teriradichel@infosec.exchange
❤️ Facebook: 2nd Sight Lab
❤️ YouTube: @2ndsightlab
Domain Names
Route 53
AWS
Transfer
Cloud Security
Recommended from ReadMedium