Getting started with YIELD FARMING: Time to EARN and not just HODL. Beginner’s Guide to DeFi.
I.e. Migrating your crypto to the Binance Smart Chain and staking your crypto in a yield farm to earn interest.
If you’re like many crypto investors, you’re holding crypto, maybe on an exchange, or on a hardware wallet (i.e. “Ledger”), and you’re waiting for the markets to recover before you sell, hopefully at a nice profit. Or, maybe you bought at a market peak, and you’re really hoping the markets are going to exceed the previous peak, so you can not take the loss you’re currently holding. This practice of holding is referred as HODLing. And I’m here to tell you, there’s another way.
Holding on an exchange is subject to a certain set of risks. No one thought that FTX was going to collapse. No one expected BlockFi to declare bankruptcy. But, both of those things happened, and it’s time to rethink your HODLing strategy.
In the last couple of years, a new strategy has emerged that allows crypto holders to invest their crypto in yield farms in order to earn interest on their crypto. In this guide, you’ll learn how to move your crypto off of a centralized exchange, into the DeFi space you’ve heard about, and start making money.
This is a long article, so please take your time. Digest it. If you try it, start with small amounts of money.
This guide is broken up into the following parts:
Part 0: Introduction to Yield Farming
Part 1: Setting up a MetaMask Wallet and activating the Binance Smart Chain
Part 2: Moving your crypto to your new MetaMask wallet on the Binance Smart Chain
Part 3: Choosing a yield farm and converting your crypto to the coin(s) necessary to earn interest (called LP Tokens)
Part 4: Staking your converted coins (LP tokens) in a yield farm
Part 5: Developing a plan to claim your interest
Part 0: Introduction to Yield Farming
Yield farming has gained popularity in the cryptocurrency world as a way to earn passive income on your digital assets. But what is yield farming and how does it differ from the traditional strategy of “hodling” cryptocurrency?
Hodling, or holding onto your cryptocurrency for a long period of time, is a well-known strategy among crypto investors. The idea is to buy low and hold onto the assets until their value appreciates, at which point they can be sold for a profit. This strategy is based on the belief that the value of cryptocurrency will increase over time due to market demand and adoption.
On the other hand, yield farming involves actively participating in the cryptocurrency ecosystem by providing liquidity to decentralized finance (DeFi) protocols in exchange for a share of the transaction fees or other rewards. This can be done by staking your assets in a smart contract or by providing liquidity to a liquidity pool.
One way to think of yield farming is as a form of cryptocurrency lending. When you lend out your cryptocurrency through a DeFi protocol, you are essentially allowing other users to borrow it in exchange for a share of the fees generated from the loans. These fees can come in the form of new cryptocurrency tokens or a percentage of the transaction volume.
So, while hodling involves buying and holding onto cryptocurrency as a long-term investment, yield farming involves actively participating in the cryptocurrency ecosystem and earning rewards for providing liquidity. Both strategies carry their own risks and potential rewards, and which one is right for you will depend on your investment goals and risk tolerance.
One important thing to note is that yield farming can be highly volatile and risky, especially with newer and untested protocols. It is important to do your own research and only invest in reputable platforms. As with any investment, it is important to diversify your portfolio and not put all your eggs in one basket.
While hodling involves buying and holding onto cryptocurrency as a long-term investment, yield farming involves actively participating in the cryptocurrency ecosystem and earning rewards for providing liquidity. Both strategies carry their own risks and potential rewards, and which one is right for you will depend on your investment goals and risk tolerance.
Part 1: Setting Up Your MetaMask Wallet and Activating the Binance Smart Chain
Creating a new wallet with MetaMask is a simple and secure way to manage your cryptocurrency assets. MetaMask is a browser extension that acts as a digital wallet and allows you to interact with the Ethereum and Binance Smart Chain blockchain. It will default to the Ethereum network, but is relatively easy to setup the Binance Smart Chain. Here’s a step-by-step guide on how to create a new MetaMask wallet:
- First, visit the MetaMask website and click on the “Get MetaMask for Free” button.
- Select your browser and follow the prompts to install the MetaMask extension.
- Once the extension is installed, click on the MetaMask icon in your browser to open it.
- Click on the “Create a Wallet” button to begin the process of creating a new wallet.
- Read and accept the terms of use, then click “Create”.
- You will now be prompted to create a strong password for your wallet. Choose a password that is unique and not used on any other accounts.
- After creating your password, you will be given a seed phrase. This is a series of words that serves as a backup for your wallet. It is important to write down this seed phrase and store it in a secure location. If you lose access to your wallet, you can use the seed phrase to regain access.
- Once you have written down your seed phrase, click “Next” to proceed.
- You will now be taken to your wallet dashboard, which displays your wallet address and balances for any assets you hold.
- Congratulations, you have successfully created a new MetaMask wallet!
It’s important to keep in mind that the security of your wallet is largely dependent on the security of your password and seed phrase. Make sure to choose a strong password and store your seed phrase in a secure location. Additionally, be careful not to share your wallet address or seed phrase with anyone, as this could potentially compromise the security of your wallet.
Setting up a MetaMask wallet to interact with the Binance Smart Chain (BSC) is a simple process that allows you to access and manage your BSC assets. BSC is a fast and low-cost blockchain that is interoperable with Ethereum, making it an attractive option for DeFi applications and other blockchain use cases. Here’s a step-by-step guide on how to set up a MetaMask wallet for the BSC:
- First, make sure you have the latest version of MetaMask installed on your browser. If you don’t already have MetaMask, visit the MetaMask website and click on the “Get MetaMask for Free” button to install it.
- Once MetaMask is installed, click on the MetaMask icon in your browser to open it. If you don’t already have a MetaMask wallet, follow the prompts to create a new wallet.
- From the MetaMask dashboard, click on the “Settings” icon in the top right corner.
- In the settings menu, click on the “Networks” tab.
- Scroll down to the “Custom RPC” section and click on the “Add Network” button.
- In the “New RPC URL” field, enter the Binance Smart Chain RPC URL: “https://bsc-dataseed.binance.org/".
- Under Chain ID: enter 56.
- Use BNB as the currency symbol.
- Block Explorer URL (Optional) — https://bscscan.com
- Give the network a name, such as “Binance Smart Chain”.
- Click “Save” to add the BSC to your list of networks.
- To switch to the BSC, click on the network dropdown at the top of the MetaMask dashboard and select the “Binance Smart Chain” network.
- Congratulations, you have now set up your MetaMask wallet to interact with the Binance Smart Chain!
It’s important to note that the Binance Smart Chain is a separate network from Ethereum, and assets on one network are not automatically accessible on the other. If you want to interact with BSC assets, you will need to switch to the BSC network in MetaMask and ensure you have the correct BSC wallet address.
One more reminder, write down your seed phrase and keep it in a safe place.
You know have a new wallet address. The Metamask has an Ethereum address, and the Binance Smart Chain will use the same exact address. When you send coins on the Ethereum network, they will show up on the Ethereum part of the wallet. When you send coins on the Binance Smart Chain, they will show up on the Binance Smart Chain part of the wallet.
Ethereum coins and tokens are called ERC-20 coins. Binance Smart Chain coins are called BEP-20 coins. It is very important to be aware of those coin types. Just remember to take it one step at a time, and you’ll be on your way to earning interest on your crypto.
Part 2: Moving Your Crypto to the Binance Smart Chain
Depending on what crypto you own, it will be either very easy to move it to the Binance Smart Chain (often called BSC) or you’ll have to convert it to a BSC-compatible type of crypto coin. There are some coins that exist on both Ethereum and BSC chains. Sometimes a coin will be “wrapped” for use on another network. For example, on BSC (Binance Smart Chain), Ethereum tokens are Wrapped ETH, or “WETH”. A challenge for beginners is that when you’re viewing things on the Binance Smart Chain, it is often just called “ETH”, which can be a little confusing. Just know that often a coin will have a common name and a precise name.
If you’re holding some coins on an exchange, you may be able to simply send the currency you have, and the exchange will automatically convert it to the proper network upon sending. For the purposes of this guide, I am using Binance.US. Binance (non-US) will look very similar.
In the following screenshot, you can see a selection for “Network” for Bitcoin.
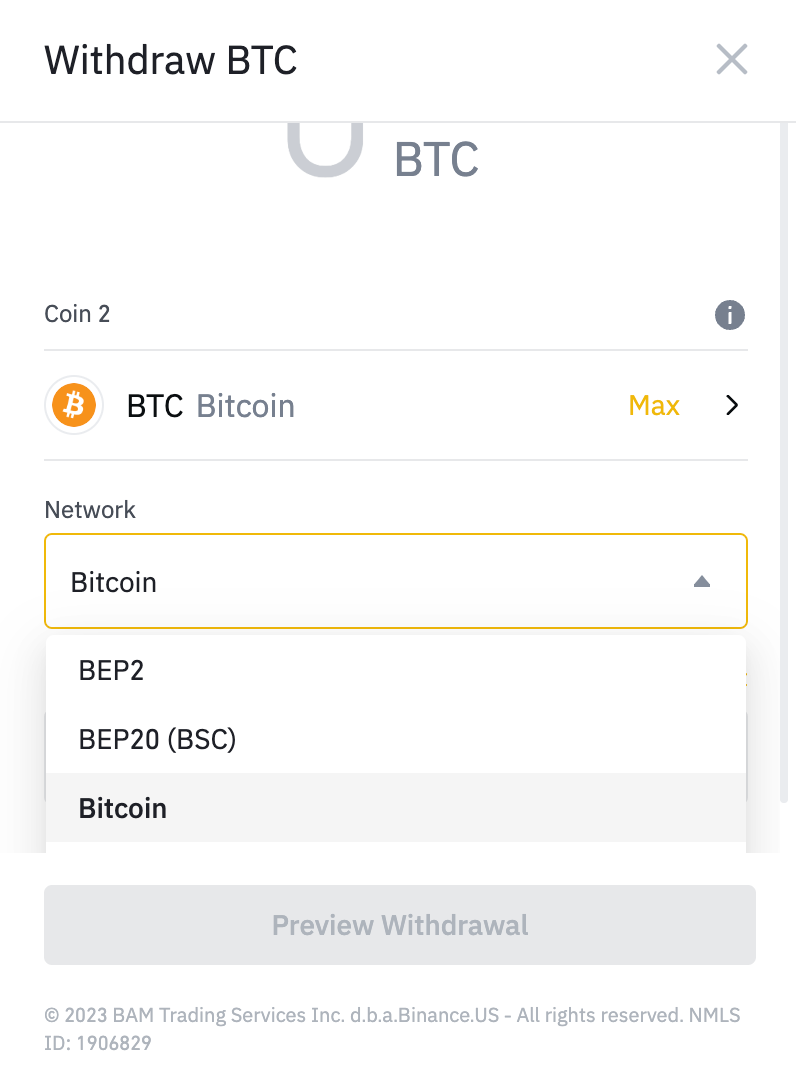
The options are BEP2, BEP20 (BSC), and Bitcoin. BEP2 is the old BNB network, and will not be used. BEP20 (BSC) is the Binance Smart Chain network, and will be the network we use to send. And, the Bitcoin network is the standard network for sending and receiving Bitcoin.
Here is a chart of some common coins and their ease of sending to the Binance Smart Chain:
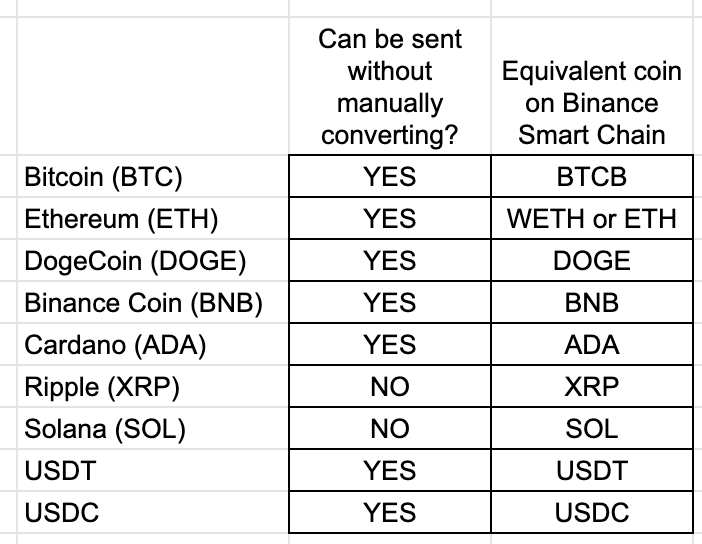
Note that XRP and SOL do have a Binance Smart Chain equivalent, but that you cannot send them directly from Binance to the Binance Smart Chain without converting them to a different crypto.
Also, if you are using a different exchange, it is possible that the exchange will send crypto in BEP20 (BSC) format. When in doubt, only send a small amount and make sure it reaches your wallet. You may wish to create a Binance (or Binance.US) account and use that as the final sending point. Also, you may need to verify your ID if you’re using Binance for the first time. This is standard.
Also, and VERY important. If you’ve never used DeFi before, and only ever worked with crypto on centralized exchanges like Binance and Coinbase, you’ve never had to really worry about fees. Any fees deducted from a transaction were taken from whatever currency you were trading. If you were trading USDC, a small percentage was taken in USDC. However, the Binance Smart Chain (and all DeFi blockchains, like Ethereum) work on a system called gas. Whenever you complete a transaction, you must pay for the transaction in the blockchain’s base currency. The base currency of Binance Smart Chain is Binance Coin, or BNB. So, no matter WHAT you do, always send a little BNB to your MetaMask wallet as a BEP-20 BSC coin. A good rule of thumb that I follow is to always have at least 0.1 BNB in your MetaMask wallet. Heavy DeFi users often have up to 0.5 BNB, but you don’t need that to start. If you’re sending a large amount of crypto, you can always swap for some BNB once you’re on the Binance Smart Chain, so 0.1 BNB is a good, healthy start. Transactions usually only cost 0.001 BNB, or so.
Now, go to your MetaMask wallet. You’ll need to make sure you are in Binance Smart Chain Wallet mode and you’ll need to copy your MetaMask Wallet address to the clipboard. It should start with 0x, followed by numbers and letters. It will be 64 characters long. Ethereum addresses (and thus, BSC addresses) are only comprised of digits 0–9 and characters abdef, which is called Hexidecimal. If your MetaMask address looks anything like bHk455Zkppp, that is NOT the MetaMask address.
With your MetaMask wallet address in your clipboard (or copied to a notepad document, or however you want to copy/paste it for withdrawal), go to Binance. Again, I’m going to be showing Binance.US, but the non-US version is very similar.
Let’s start by sending the 0.1 BNB. If you’re nervous, you can send 0.01 BNB to make sure it arrives. If you don’t have BNB, you’ll have to trade on Binance from one currency to BNB, and I’m going to assume you’re not a total novice, and that you know how to do that.
On Binance, goto Wallet, and search for BNB.

Assuming you have some by now, you’ll see:

On the right side, there are three dots. Click that, and select Withdraw.
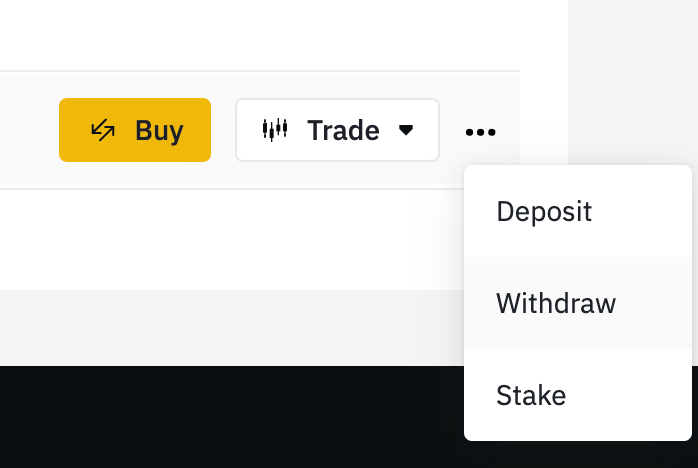
This will take you to the Withdraw dialog box.
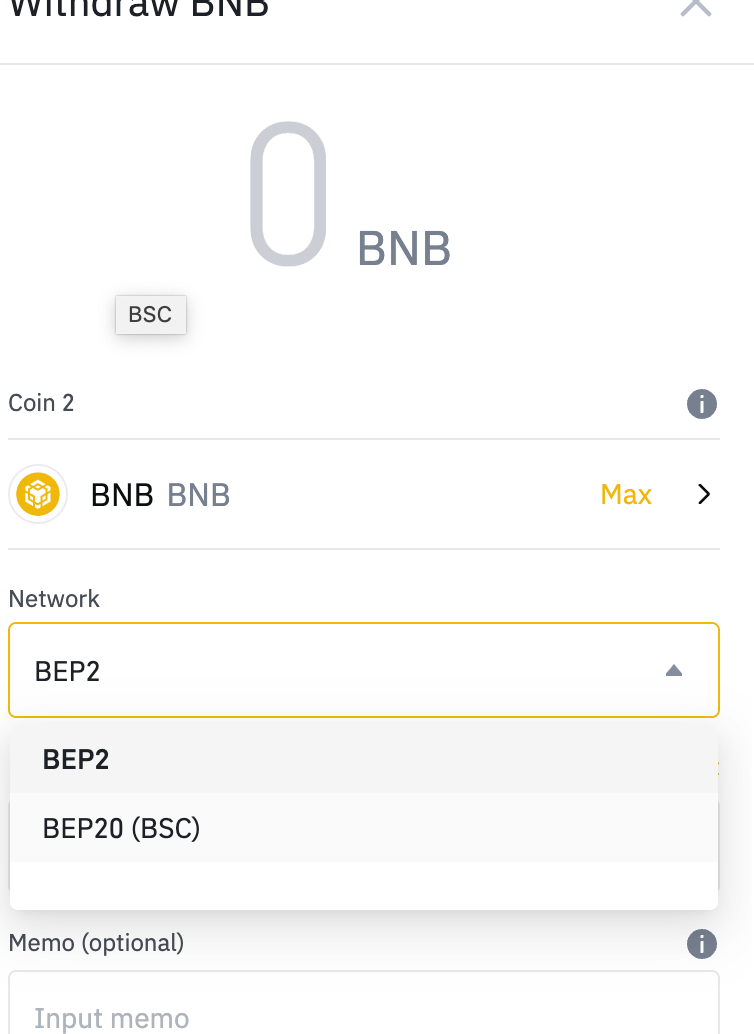
Make certain to select BEP20, then enter your MetaMask address in recepient’s address:
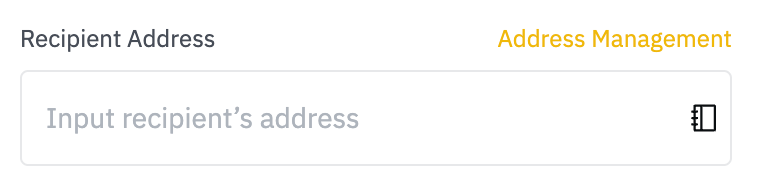
It is a good idea to to go Address Management and enter your MetaMask address in your address book, but that is not required.
With your address entered, enter the amount of BNB you wish to send. Again, if you’re seeking comfort before sending more, send 0.01 BNB and then when it is received in your MetaMask wallet, send the rest of the 0.1 BNB.
I often convert any crypto I wish to send to MetaMask as BNB. It’s very fast, and that way, it’s only one transaction I send. Then, I swap it once it’s in MetaMask for whatever I want it to be.
There will be a withdrawal confirmation. Mine is SMS code followed by email verification. If you don’t have all of this set up in Binance.US, it’ll take a bit of time to set it up, but if you’ve gotten this far, you’re likely comfortable doing that kind of thing.
So, you will now have a completed withdrawal. The Binance Smart Chain takes less than 2 minutes to transfer. Often, it’s 10 seconds or less. That’s a lot quicker than Bitcoin or Ethereum! That’s why it’s so great for DeFi!
Now, it’s time to go to your MetaMask wallet and confirm that it has arrived.
If all has gone according to plan, you should now have new crypto in your MetaMask wallet. If you’re not seeing it, make sure that your MetaMask network is set to Binance Smart Chain, and not Ethereum (which is the default when you first install it).
If your wallet looks like this:
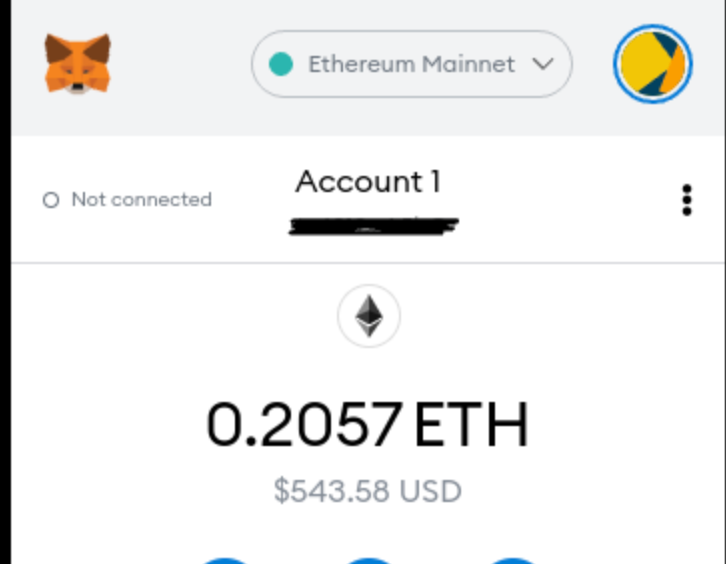
Then you need to change it from Ethereum Mainnet to Binance Smart Chain.
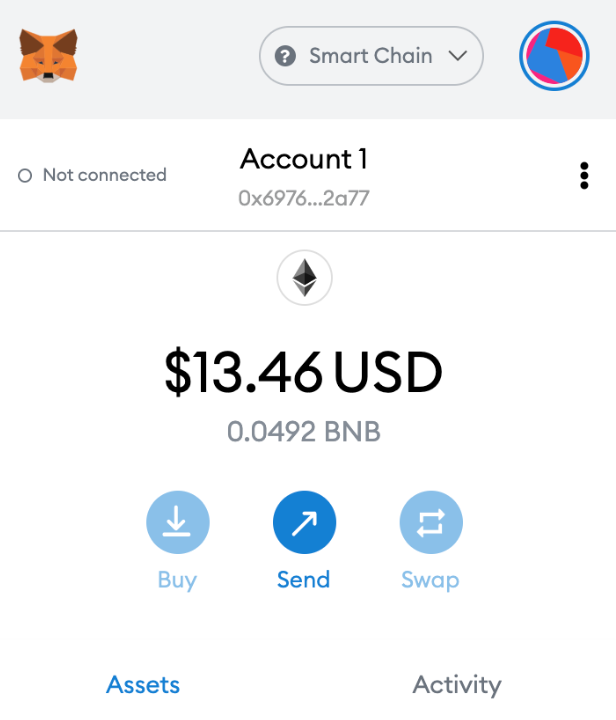
It should look something like this:
Now, if you’ve sent the small test amount, feel free to send the rest of your crypto that you intend to. The whole point of this is to earn interest on your crypto, so send any crypto that you want to generate interest.
Part 3: Choosing a yield farm and converting your crypto to the coin(s) necessary to earn interest (called LP Tokens)
Now, you’re going to choose a yield farm. At this point, you may wish to read another Medium article that I’ve written and come back. It explains a lot about Yield Farming, and will give you a good background. It’s not required in order to continue, but just in case, here it is. Skip past if not interested.
So, you’ve got your crypto on the Binance Smart Chain and you can see it in your wallet. Now, you need to find an attractive yield farm to put your crypto in. If you’ve read the link right above, you know that yield farming is based on staking LP tokens on a platform in order to earn interest. The MOST stable and reliable site on the Binance Smart Chain is Pancakeswap.finance
They have been around since the early days of Binance Smart Chain, and they are the number 1 swap/exchange/yieldfarming site on the network. And, if you’re seeking an easy and safe place to yield farm, it’s the place for you. However, you won’t find the highest APRs available.
For the highest APRs, I can only recommend The Animal Farm. It has higher APRs than anywhere else I’ve seen on the Binance Smart Chain, but it’s a bit more complicated. If you’re interested in the highest APRs and you are willing to do a little more reading to understand how it works, read THIS ARTICLE ON THE ANIMAL FARM. It will explain pretty much everything you need to know. The rest of this article will show you how to stake on Pancakeswap, even though the APRs are considerably lower.
You’re going to go to Pancakeswap.finance. If this is the first site you’re trying to access since you started using the Binance Smart Chain, there’s a tiny learning curve as you learn to connect your wallet to a DeFi platform. Again, make sure your wallet is Binance Smart Chain mode, and click “Connect Wallet” on Pancakeswap (or “PCS”).

When you click CONNECT WALLET, you’ll see a dialog box asking you if Pancakeswap can have access to your wallet. Fear not, as long as the URL is “pancakeswap.finance”, you are only allowing Pancakeswap permission to view your wallet, and see the amounts and types of BSC coins you have. You are not giving any permission to take any crypto. You will do that later, on a coin-by-coin basis, if/when you want.
Now that your wallet is connected, we will use the EARN menu to go to the yield farms. So, select EARN and then FARMS, and you will see this page:
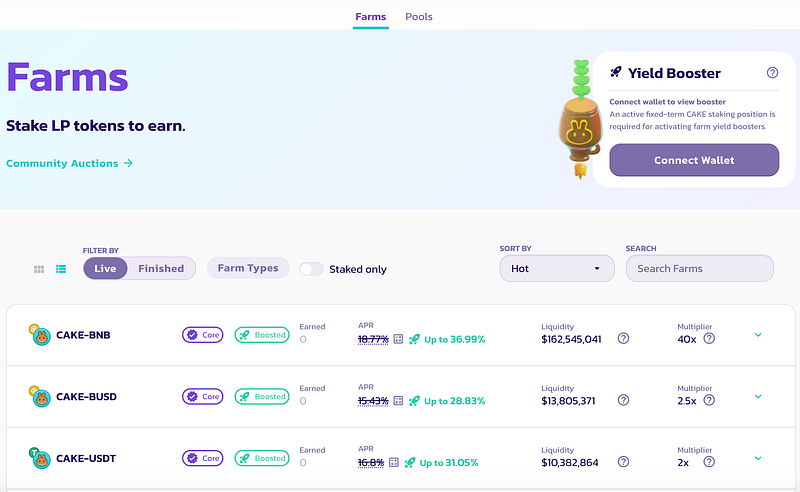
This screenshot shows CAKE-BNB, CAKE-BUSD, and CAKE-USDT. If you scroll down, you will see tons more yield farms. Remember, a yield farm is going to take TWO coins that have been paired into an LP TOKEN. If you’re confused, read that article I posted above about yield farming, also linked here.
You want to think carefully now, because you want to choose crypto pairs that are not likely to lose value outside normal market conditions. You’re looking for coin pairs that have nothing to do with yield farming. Towards that end, I would stay away from “CAKE” pairs, since they’re tied to Pancakeswap. Let’s scroll ALL THE WAY DOWN and see what the lowest APRs are. Set “sort by” to APR, and scroll all the way down. And then keep scrolling down, because the page will continue to load as you scroll. This is what I see today:

DAI-BUSD is a stablecoin pair, with APR 1.33%. That’s about what you’d see in a decent APR savings account, but not what I am personally looking for in DeFI APR. You will be converting your crypto to stablecoins in a bear market, which means that when the market recovers, your value will not recover with it. So, I personally wouldn’t do that. Look up 3 spots, and you’ll see BTCB-ETH. That is the Bitcoin/Ethereum LP pair, with APR 2.71%. That’s twice the APR of the DAI-BUSD pair. If you’re looking for minimal token risk, with “blue chip” cryptos that will rise together when the market recovers, this might be a pairing for you. You will be converting whatever crypto you’ve sent to MetaMask to equal parts Bitcoin and Ethereum (their BSC equivalents, of course, which will always have the SAME value as the tokens on your centralized exchange), and then you’ll be pairing them together. There’s a shortcut way to do that on Pancakeswap (PCS), but that’s the gist of what you’re going to do. Then, you’re going to get “LP TOKENS” which represent that you’ve “added liquidity” to Pancakeswap, and then you’re going to stake those LP tokens and earn 2.71% APR. I’ll talk more about that process and what you’re actually going to get later, but that’s what you’re going to do.
So, in this list, I’m going to share what coin pair *I* would be attracted by. I’m looking for a crypto pair that will rise relatively equally on both sides of the pairing, which is why, in a down market, I’m not going to do anything that has a “USD” half.
Here are some that I find interesting:


Now, in the DO NOT RECOMMEND category. These are CAKE and/or BUSD (Binance US stablecoin) pairs, and the other pair is a coin you’ve likely never heard of, and likely never will outside of this page.
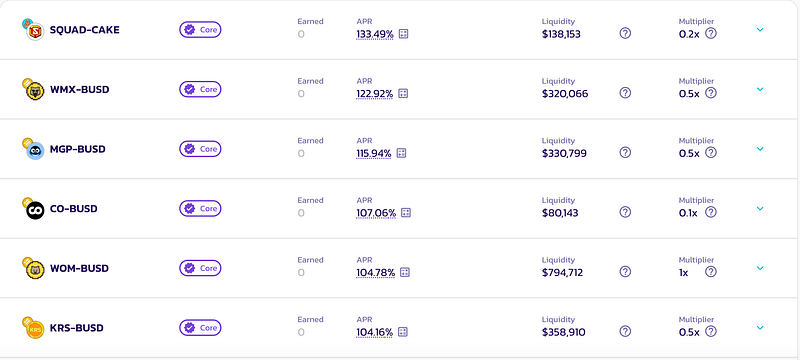
These pairs offer great APRs, but while you’re earning rewards, the value of the LP tokens is going to decrease, likely at faster rate, causing a net loss. It’s a high-risk/reware case, for sure. To learn more about this type of tricky investment, read this article on LPs losing value behind the scenes.
The safe bet is to choose coins that you’ve heard of, and would be likely to invest in, then pair them together. So, for this example, I’m going to choose the ADA-BNB pair on Pancakeswap (PCS).
SWAPPING FOR THE 2 COINS, AND CREATING THE LP TOKEN
In this next section, I’m using ADA and BNB as an example, but you would substitue whatever coins you’re using here. Also, if this part makes you nervous, it would be wise to follow the entire process here using a very small amount of crypto value, just to make sure you’re comfortable with what you’re doing.
We need to convert (or “swap”) whatever your asset in your MetaMask wallet is to equal parts ADA and BNB. Remember, when this is all done, you still need to keep 0.1 BNB in your wallet!
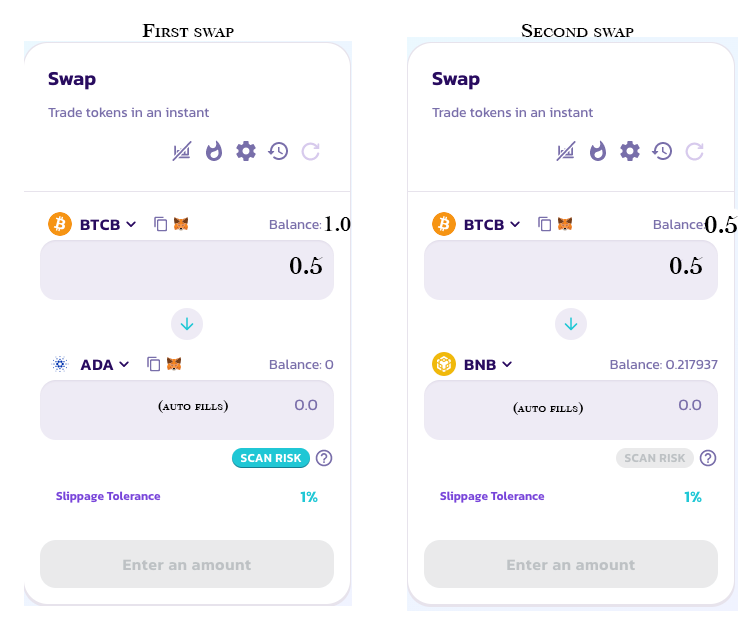
On PCS, go to trade, then Swap. Here, you’ll select the 2 coins you want to exchange. Let’s say you’ve transferred 1 Bitcoin over to your MetaMask wallet, and you want to use the whole Bitcoin in your yield farming. You would swap 0.5 Bitcoin for ADA, and then 0.5 Bitcoin for BNB.
The first swap would be swapping BTCB for ADA, so you’d select those two coins. Then you’d enter 0.5 in the amount field under “BTCB”. The ADA amount would auto-complete based on current exchange rates for BTCB and ADA. Then, it will ask to “approve” BTCB. You only have to do this once, as it give PCS permission to access your BTCB (and only your BTCB). Once you approve, you can click SWAP to complete the swap.
When you select SWAP, you‘re going to get Pancakeswap transaction confirmation dialog, which looks like this:

And then, the MetaMask confirmation:
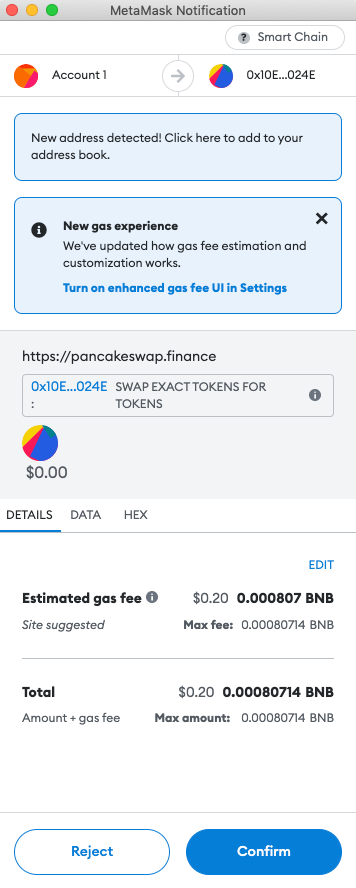
This will tell you the amount of gas the transaction will incur (always in BNB), and ask for a final confirmation.
In a few seconds, a transaction confirmed announcement will show at the top right of your browser (or at the bottom, if you are using mobile).
Time for the second swap. In this case, the second swap would be BTCB to BNB, using the remainder of your BTCB. You won’t have to approve it again, since you already approved BTCB, so you could just select SWAP.
In this example, you would now have equal parts ADA and BNB. Actually, you should have a little more BNB, since you’re saving 0.1 BNB for gas fees.
Next, we’re going to pair the ADA and the BNB together into an LP token called ADA-BNB LP.
On PCS, go to trade, then select Liquidity.

Yield farming is all about loaning your crypto to add to liquidity, and LP tokens are what is lent. So, you are going to “add liquidity”.
Once there, click on:
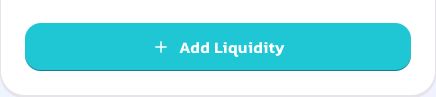
You’ll next choose the two coins you’re going to pair together.
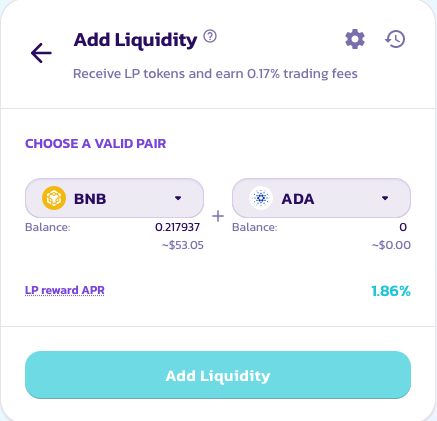
The balance of each coin will appear, but you don’t specify the amount you want to create yet. Once you’ve selected the two coins you want to use, select ADD LIQUIDITY one more time.
This takes you to the final page, where you will specify the precise amounts of each coin you want to use.
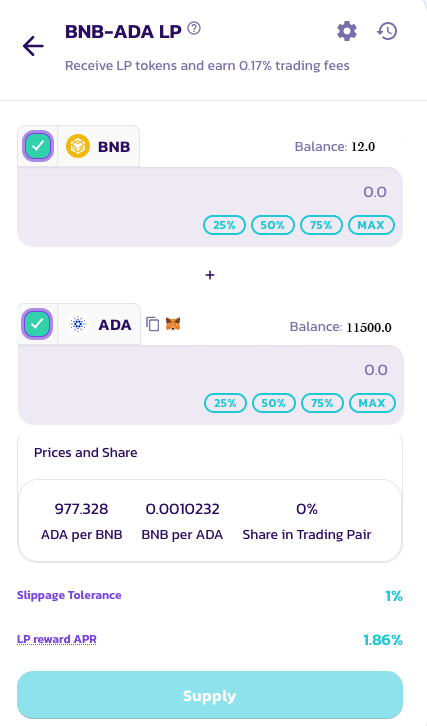
Here, you should look at the amount of BNB you have, and subtract 0.1 BNB. In the above example, it shows the wallet has 12.0 BNB. If you wanted to keep 0.1 BNB (and you do!), type in 11.9 in the amount field underneath BNB. Then, the ADA should autofill.
Next, you’re going to click “Supply”. There may be an additional “approve” button here, but that’s ok. It’s just asking if it can access the tokens you’re going to use.
Again, you’ll get a confirmation from Pancakeswap followed by a confirmation from MetaMask.
For some, this process is a bit unnerving the first time. You’re moving potentially large sums of money, and you don’t want to make a mistake. Again, it would be a good idea to use a small amount the first time.
Part 4: Staking your converted coins (LP tokens) in a yield farm
You now have an LP Token in your wallet called ADA-BNB LP. However, it is highly likely that you will not see it in your wallet. MetaMask is not programmed to see every coin ever in your wallet, and most coins will not show up until you program it in (kind of like an address book). However, you don’t need to do that now, because you’re about to get proof that you have the LP token.
The next step is to go to the yield farm and stake/deposit the LP token into the farm.
Go to the EARN menu again, and select FARMS.
Either by scrolling or searching, find the ADA-BNB farm:
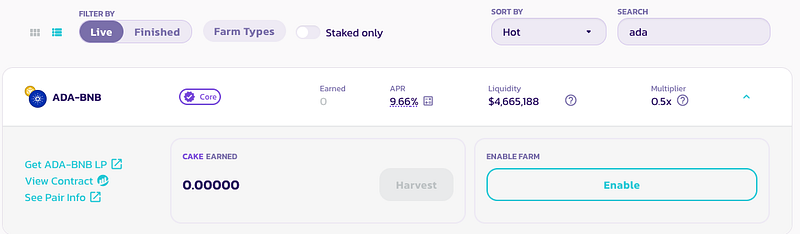
You’re going to need to “Enable” the LP token, so that PCS can see the LP Token in your wallet. After Enabling (with a MetaMask confirmation request), you will see:

Click Stake LP (it’s not going to go through yet, but it will open up the dialog box for you to enter the amount you want to deposit):
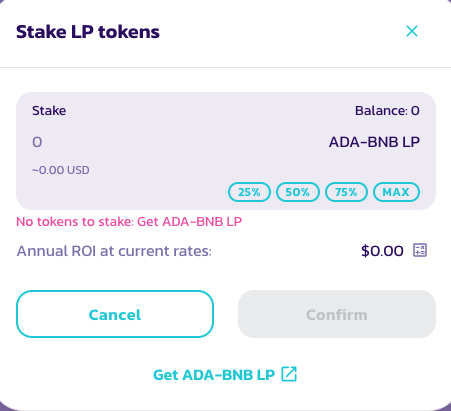
Your view should show the amount of ADA-BNB LP that you have next to “Balance”. Note, it might be a very large number or a very small number. LP tokens have wildly varying USD values, and sometimes an LP token can be worth a lot, even if you only have 0.0003 of it. Conversely, some LP tokens have very small values, and you may only have $100 worth, but you have 45000 LP tokens.
If you want to stake all of your LP tokens, which you probably do, you’ll click “MAX”. It will show you what your expected yearly return would be at the current rates.
If you are ready to stake/deposit, you can click “Confirm” now, and the confirmations will pop up. First, Pancakeswap, then MetaMask.
If you have followed the steps, you have successfully created and staked your first DeFi LP tokens into a yield farm on Pancakeswap.
You will now begin earning CAKE, which is the Pancakeswap reward token!
Part 5: Developing a plan to claim your interest
If you have less than $1000 in USD value in the yield farm, you may wish to set-it-and-forget it. You are earning interest. Make sure you have your MetaMask password written down somewhere safe, and the same with your 12-word “seed password” you were given when you created your MetaMask wallet. Come back in 6 months, or a year, and collect your earnings (how-to below).
If you have more than $1000 staked, it would be beneficial to come back more frequently and “harvest” your rewards.
HARVESTING YOUR REWARDS
To harvest your rewards, return to Pancakeswap.finance, and go to Earn, then Farms. Now, you can select this checkbox:

“Staked only” can be checked now, which will display your ADA-BNB farm. If it doesn’t show up, you may need to re-connect your wallet (and likely re-enter your MetaMask password).
Click on the ADA-BNB farm, and you’ll see the rewards that you have earned. Example:

You can click “Harvest”, and complete a MetaMask confirmation. This will withdraw ONLY THE REWARDS from the farm. Your LP tokens will still be staked. Now, there will CAKE in your wallet, which is the PCS reward token.
What you do with it now is up to you. Here are some common options:
- Swap CAKE for another crypto, like BUSD or BNB
- Goto the EARN>POOLS page and stake your earned CAKE. You can actually earn more CAKE with CAKE, growing your rewards through staked rewards.
- Swap CAKE for more ADA and BNB, and create more LP tokens, depositing them in the same farm. This is a way of “compounding” your interest. Of course, substitute ADA and BNB for whatever LP tokens you actually created.
The key here is that you should have an idea of what you’re going to do with your rewards. I don’t personally recommend that you leave it as CAKE, as CAKE is generally a decreasing asset (that might change in a bull market!). I’d rather compound it for more LP tokens when it’s worth it ($50 — $100 or so). Or, swap it for BNB, BUSD, or even BTCB, depending on if you want your rewards to ride the market fluctuations.
Conclusions:
This is a long article, intended for readers who are considering putting their crypto to work to earn. I believe in this method. If you’re in crypto for the long haul, it doesn’t make sense to me to leave it idle on an exchange. Let it make you something. And, there are so many opportunities in the DeFi space. I prefer the Binance Smart Chain over DeFi on the Ethereum network because Ethereum fees are considerably more pricey than BSC (and the network is slower).
And, I personally put most of my money to work in THE ANIMAL FARM, which has higher APRs, but it, too is designed for the long haul, so you’re not going to be able to sell your rewards for BTCB, BNB, or BUSD in the same way you can on Pancakeswap.
There’s a lot to learn about DeFi, but, please, TAKE IT SLOW. I’d highly recommend starting with $100. Get the hang of the process before you give yourself an ulcer moving $10,000 around to sites you’ve never used or trusted.
I hope you’ve found this helpful! Please leave me comment if you have any questions!
If you liked this article, please follow me on Medium, leave a clap, or leave a comment. Better yet, do all three!


