
Getting Started with the HTML5 Canvas — Part 8
Mouse Interactions

Introduction
If you have read the first seven parts of this series, you should have a solid understanding of how to draw objects on the HTML5 canvas and how to do some simple animations. In this final part of the series, I will show you how you can use the mouse to interact with objects on the canvas.
Before we work with the sailboat picture we have used throughout this series, let’s take a look at how you can interact with objects using your mouse by talking about mouse events.
Mouse Events
It sounds a little scary and a little technical, but it isn’t that bad. The list below describes all the mouse events you can use to interact with the canvas:
When any of these events occur, your JavaScript code can run a function to do something on your canvas. To make this interaction take place, you will add something called an event listener to your script. The event listener will wait for the event, and when it occurs, it will perform the specified function.
Here is an example of an event listener:
document.querySelector(“#myElement”).addEventListener(“click”, functionName, false);
This code looks a little complicated, so let’s deconstruct it.
- document — represents the HTML page.
- querySelector — this is a JavaScript method that allows you to access HTML elements that are on the page.
- #myElement — this is the ID of the element we want to watch. When the specified action occurs on this element, some action will occur.
- addEventListener — this instructs JavaScript that we want it to listen for something to happen.
- click — This is the event we want JavaScript to listen for.
- functionName — This is the name of a function that will execute when the specified event occurs on the specified element.
- false — Specifies the phase in which the function will execute. You can leave this value off or specify “false” as the value.
In summary, when you click the “myObject” HTML element, JavaScript will execute the “functionName” function.
To help you better understand addEventListener, I’ve put together code that draws and clears a rectangle from the canvas. Initially, when the page is loaded, the rectangle is drawn. Click the buttons to the left of the canvas to clear the rectangle from the canvas. The rectangle redraws after a couple of seconds (I’ve included a setTimeout JavaScript command to do this automatically).
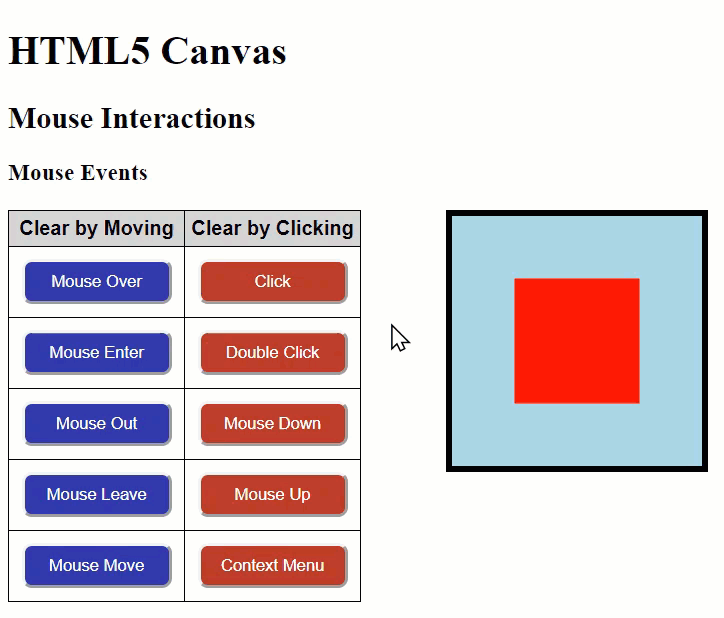
If you try each of the buttons, you will see that the rectangle is cleared by the various events we discussed above. Try each one to get a better idea of what each event is and when the function runs.
Here is the code:
There is quite a bit going on within the code. Here’s an outline of what is in the code:
- Lines 1–6: The standard opening code for our HTML page.
- Lines 7–60: Some CSS styles for elements on the page.
- Lines 61–67: End of section of page and start of including some headings.
- Lines 68–94: A table containing the buttons for testing the various mouse events interacting with our canvas.
- Lines 95–97: Our canvas element.
- Lines 99–137: Our script that will interact with the canvas.
- Lines 138 & 139: Close the and the elements.
We want to focus our attention on the script. Here are the functions included in the code:
- drawRect — Will draw a red rectangle on the screen.
- clearRect — Will clear the canvas and, after 2 seconds, will redraw the rectangle. This function will be called when the appropriate event happens on each of the buttons in the table.
Our event listeners can be found in lines 125–135 of the code. Each line of code is executed when a particular event occurs for a specific element. Here are descriptions of each event listener:
Mouse Click Events
- Line 125 — document.querySelector(“#clearClick”).addEventListener(“click”, clearCanvas, false); — Clears the rectangle when the element with the ID of “clearClick” is clicked (pressed down and released) by the primary mouse button once.
- Line 126 — document.querySelector(“#clearDblClick”).addEventListener(“dblclick”, clearCanvas, false); — Clears the rectangle when the element with the ID of “clearDblClick” is clicked (pressed down and released) by the primary mouse button twice, quickly.
- Line 127 — document.querySelector(“#clearMouseDown”).addEventListener(“mousedown”, clearCanvas, false); — Clears the rectangle when the element with the ID of “clearMouseDown” is pressed down. The “mousedown” event is a little different from the “click” event in that the mouse button just has to be pressed down to cause the event to occur.
- Line 128 — document.querySelector(“#clearMouseUp”).addEventListener(“mouseup”, clearCanvas, false); — Clears the rectangle when the element with the ID of “clearMouseDown” is released.
- Line 129 — document.querySelector(“#clearContextMenu”).addEventListener(“contextmenu”, clearCanvas, false); — Clears the rectangle when the element with the ID of “clearMouseDown” is clicked by the alternate mouse button (this button causes the context menu to pop up on the screen).
Mouse Movement Events
- Line 131 — document.querySelector(“#clearMouseOver”).addEventListener(“mouseover”, clearCanvas, false); — Clears the rectangle when the mouse moves over any portion of the element with the “clearMouseOver” ID.
- Line 132 — document.querySelector(“#clearMouseOut”).addEventListener(“mouseout”, clearCanvas, false); — Clears the rectangle when the mouse moves away from the element with the “clearMouseOut” ID.
- Line 133 — document.querySelector(“#clearMouseEnter”).addEventListener(“mouseenter”, clearCanvas, false); — Clears the rectangle when the mouse moves over any portion of the element with the “clearMouseEnter” ID. If the element had other elements within it, the event would occur again if the mouse moved over any of those elements as well.
- Line 134 — document.querySelector(“#clearMouseLeave”).addEventListener(“mouseleave”, clearCanvas, false); — Clears the rectangle when the mouse moves away from the element with the “clearMouseLeave” ID or any other element within that element.
- Line 135 — document.querySelector(“#clearMouseMove”).addEventListener(“mousemove”, clearCanvas, false); — Clears the rectangle whenever the mouse moves over the element with the “clearMouseMove” ID. The function will execute each time the mouse moves one pixel from its current location.
Now that you have an idea of how mouse events work let’s try some fun interactions with the picture we’ve been working with throughout this series of articles. Here is the template I will start with for our examples:
Let’s try some fun mouse interactions with this code.
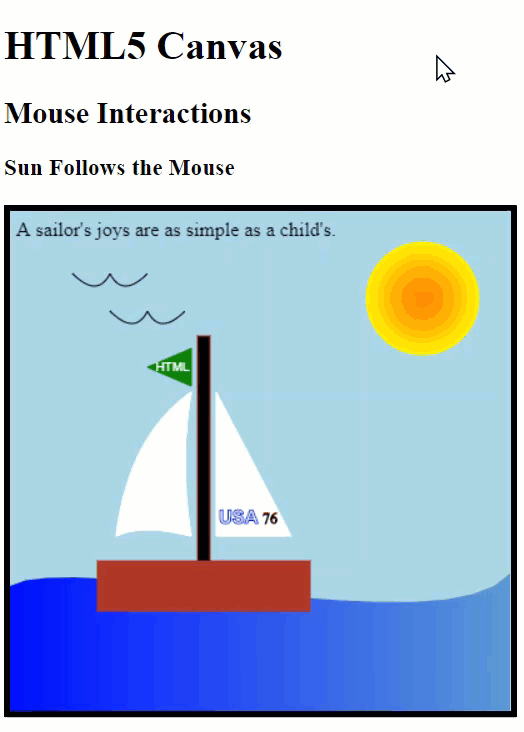
Sun Follows the Mouse
One of the mouse events we can use is the mousemove event. Whenever the mouse is moved, we can cause something to happen on the canvas.
For this example, we’ll have the sun in our picture follow the mouse around the canvas. Doing this will draw the sun object at the location of the mouse. This redraw, in effect, will erase whatever is on the screen and replace it with a drawing of our sun.
To accomplish this, I have updated our code by placing the commands to draw the sun in a function (drawSun). I have also added a function to get the position of the mouse (getPosition) as it moves around the canvas.
Here is the updated code:
Here is a breakdown of the updates I made to the code:
Variables
- Line 121 — var mouseX = 330; — Create mouseX variable and initialize it to the starting x-position (330) of the sun.
- Line 122 — var mouseY = 70; — Create mouseY variable and initialize it to the starting y-position (70) of the sun.
Function drawSun
- Line 124 — function drawSun() { — Start the drawSun function.
- Line 125 — var rGradient = context.createRadialGradient(mouseX, mouseY, 10, mouseX, mouseY, 45); — Create the radial gradient as the fill color for the sun. Replace the x-position and y-position hard-coded values with the x-position and y-position of the mouse’s position using the mouseX and mouseY variables, respectively. These variables are initially set to the default position of the sun but then updated each time the mouse moves by the getPosition function.
- Line 127 — rGradient.addColorStop(0, “#FF8C00”); — Interior radial gradient color.
- Line 128 — rGradient.addColorStop(1, “#FFFF00”); — Exterior radial gradient color.
- Line 130 — context.beginPath(); — Start the drawing of the sun.
- Line 131 — context.arc(mouseX, mouseY, 45, 0, 2 * Math.PI, true); — Draw the sun. Use the mouseX and mouseY variables to place the sun’s x-position and y-position where the mouse is positioned.
- Line 132 — context.fillStyle = rGradient; — Set the sun’s fill colors.
- Line 133 — context.strokeStyle = “yellow”; — Set the sun’s outline color.
- Line 134 — context.fill(); — Draw the sun’s fill.
- Line 135 — context.stroke(); — Draw the sun’s outline.
- Line 136 — } — Close the drawSun function.
Function getPosition
- Line 140 — function getPosition(event) { — Starts the getPosition function. The function gets the position of the mouse. The event, mousemove, is passed into the function so that we can access the event’s properties and methods.
- Line 141 — context.clearRect(mouseX — 50, mouseY — 50, 100, 100); — Clear the current sun from the screen. Use the current values of the mouseX and mouseY variables as part of the equations to determine the x-position and y-position to clear. We also subtract 50 from each variable. Subtracting 50 pixels moves the position of the rectangle to clear a little higher and to the left of the sun. Decreases these values will ensure we have completely encompassed the sun and will clear it properly.
- Line 142 — mouseX = event.clientX — canvas.offsetLeft; — Set the mouseX variable to the current x-position within the canvas. First, we get the x-position of the mouse (event.clientX). Then we subtract the number of pixels from the left where the canvas starts, which ensures we have the proper x-position within the canvas.
- Line 143 — mouseY = event.clientY — canvas.offsetTop; Set the mouseY variable to the current y-position within the canvas. First, we get the y-position of the mouse (event.clientY). Then we subtract the number of pixels from the top where the canvas starts, which ensures we have the proper y-position within the canvas.
- Line 144 — drawSun(); — Run the drawSun function.
- Line 145 — } — Close the getPosition function.
Initial Drawing of Sun
- Line 148 — drawSun(); — Execute the drawSun function. Executing this function places the sun on the drawing when the page is first loaded, using the values we originally set for mouseX and mouseY.
Mouse Event
- Line 151 — canvas.addEventListener(“mousemove”, getPosition, false); — Event listener that executes the getPosition function whenever the mouse moves.
Let’s try one more example of working with the mouse events on the canvas. This next example will use two event listeners.
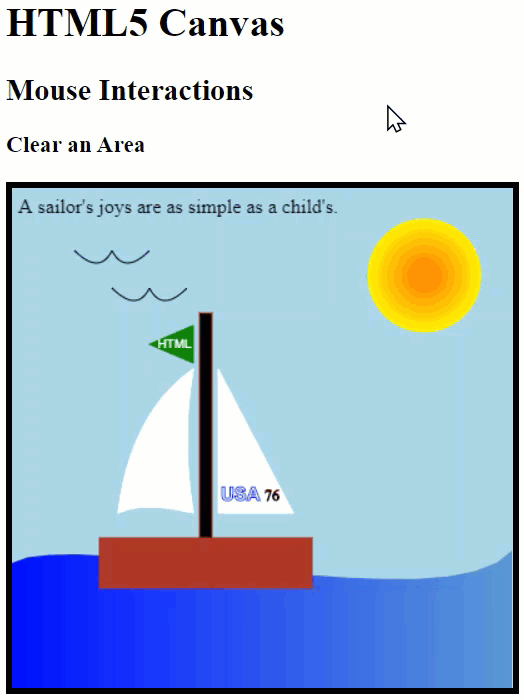
Clear Area
In this example, we will clear a portion of the canvas. We will use the clearRect method along with the mousemove and click events to accomplish this. Each time you click a location on the canvas, a rectangular area around the mouse pointer will be cleared from the drawing.
Here is the updated code to accomplish this:
Here’s what the updated code does:
Variables
- Line 148 — var mouseX = 0; — Create and initialize variable for mouse’s x-position.
- Line 149 — var mouseY = 0; — Create and initialize variable for mouse’s y-position.
Function clearRect
- Line 152 — function clearRect(event) { — Start the clearRect function. Pass in the event that initiated the function, in this case, the click event. Passing in the event gives us access to the click event’s methods and properties.
- Line 153 — getPosition(event); — Execute the getPosition function passing along the click event. The getPosition function will update the mouseX and mouseY variables with the x-position and y-position of the mouse.
- Line 154 — context.clearRect(mouseX — 50, mouseY — 50, 100, 100); — Clear a rectangular portion of the canvas using the mouseX and mouseY variables to determine where to position the area to be cleared.
- Line 155 — } — Close the clearRect function.
Function getPosition
- Line 159 — function getPosition(event) { — Start the getPosition function to get the current mouse position. Pass in the mousemove event, so we have access to the event’s methods and properties.
- Line 160 — mouseX = event.clientX — canvas.offsetLeft; — Update the mouseX variable to the value of the mouse’s x-position on the canvas.
- Line 161 — mouseY = event.clientY — canvas.offsetTop; — Update the mouseY variable to the value of the mouse’s y-position on the canvas.
- Line 162 — } — Close the getPosition function.
Mouse Events
- Line 165 — canvas.addEventListener(“mousemove”, getPosition, false); — Each time the mouse moves anywhere within the canvas, the getPosition function executes.
- Line 168 — canvas.addEventListener(“click”, clearRect, false); Each time the canvas is clicked, the clearRect function executes.
If you try out this code in the browser, you will see that when you click the canvas, a rectangular area around the mouse is cleared. Clearing the canvas this way gives you more control over what you are erasing.
We’re removing a large area of the drawing in this example. Try changing up the code to clear a smaller portion of the canvas with each click by changing the clearRect dimensions.
Conclusion
As you can imagine, there’s a lot more you can do with mouse interactions and the canvas. There are also things you can do to interact with the canvas using the keyboard. But, hopefully, this article gives you enough to get you started. I’d love to hear about ways you have interacted with the canvas. Let me know in the comments below.
This article is the last in this series. This series does not cover everything you can do with the canvas, but the articles should give you enough information to create a masterpiece.
Have fun using the HTML5 canvas!


