
Flutter
Create Your First Flutter App and Learn Flutter Framework
A step-by-step guide to creating your first flutter application
If you’re new to mobile application development, want to learn flutter to develop a cross-platform mobile application, you’re in the right place to start. In this tutorial, I will guide you to create your first flutter application for iOS and Android devices. The best way to learn something is to learn by doing. Here you will see the demo we will build on the way.
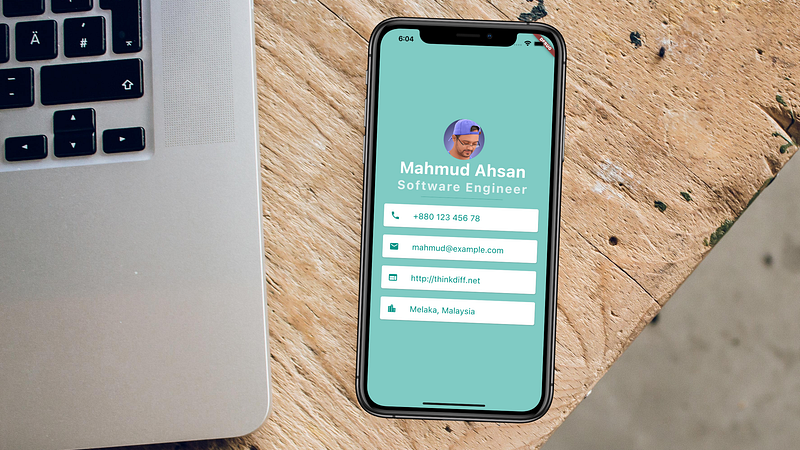
We will create a profile screen application. On the screen there will be:
- A round-shaped photo
- Person name and occupation
- Phone number
- Email address
- URL
- Location
If you tap the phone number, email, or URL some actions will occur. If you test this application in a real device either iPhone or any Android phone, a tapping phone number will show your device’s phone dial screen, a tapping email will open the default mail application, and a tapping URL will open the URL on the browser.
As I recorded this demo in an iPhone simulator on my macOS, so you will see only the URL will work. Tapping a phone number or email will not work on the simulator and will show an alert dialog.
1. Prerequisite:
You must have to know Dart programming language before starting this tutorial. If you don’t know but want to learn quickly, you can follow my quick guide.
2. What You Will Learn:
- How to create a flutter application in android studio
- What is a widget
- What is a stateless widget
- How to include 3rd party libraries
- How to include image
- How to include custom fonts
- How to build and run the app
3. Setup
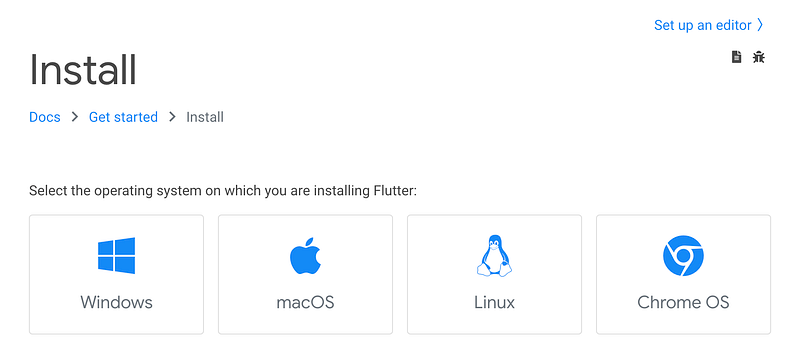
3.1 Install Flutter SDK
Please follow this link and install flutter on your machine.
3.2 Install Android Studio
There are different IDE to develop flutter apps. But I prefer the Android Studio. As it is easy to use also has lots of important features that help to develop flutter apps faster. Please install Android Studio on your machine from the link:
Good we are ready to go 🚀
If you want to build this application by watching a video tutorial you can follow this one:
Source code on GitHub:
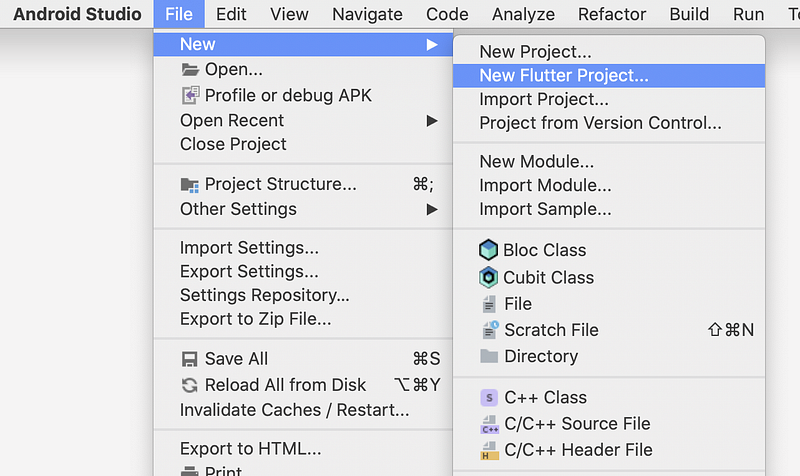
4. Create a New Flutter Project in Android Studio
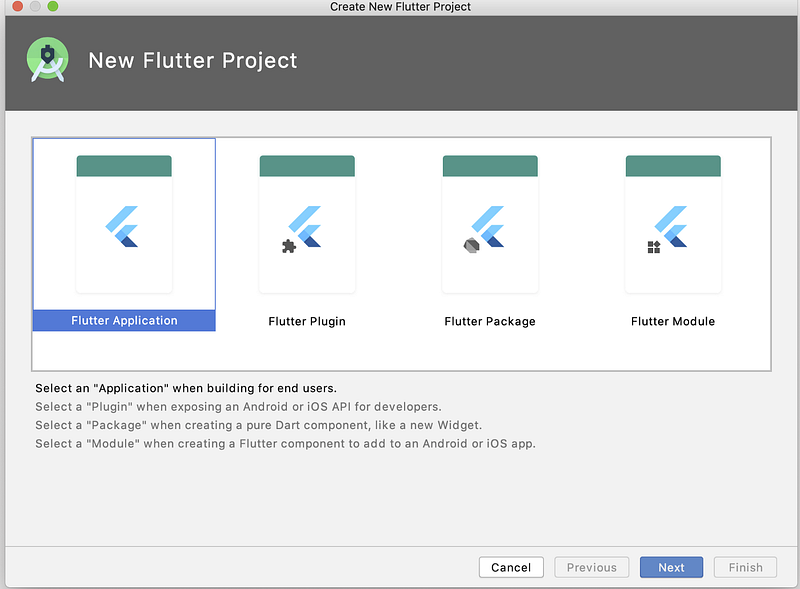
Select New Flutter Project from the File →New menu.
You will see the following screen. Now select Flutter Application and click Next.
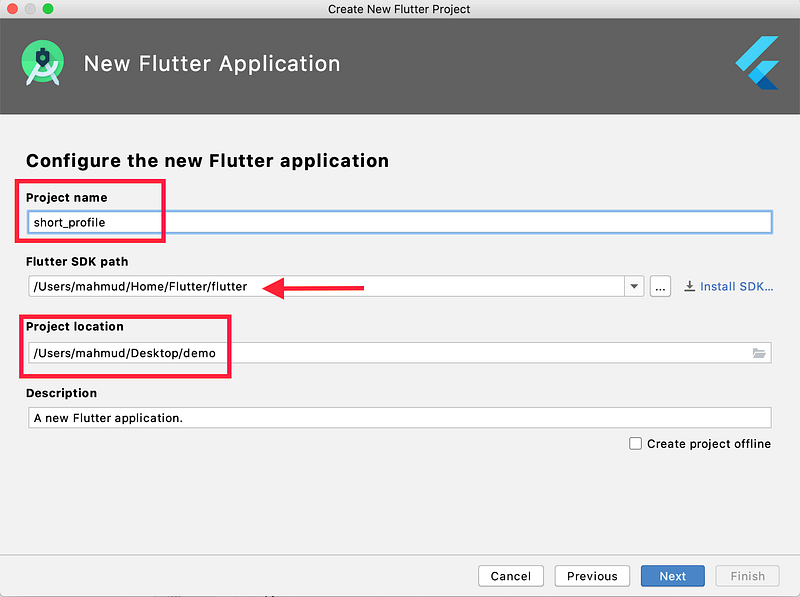
Now write a project name, select the Flutter SDK path, set the project location, and click Next. For the project name, I use “short_profile”
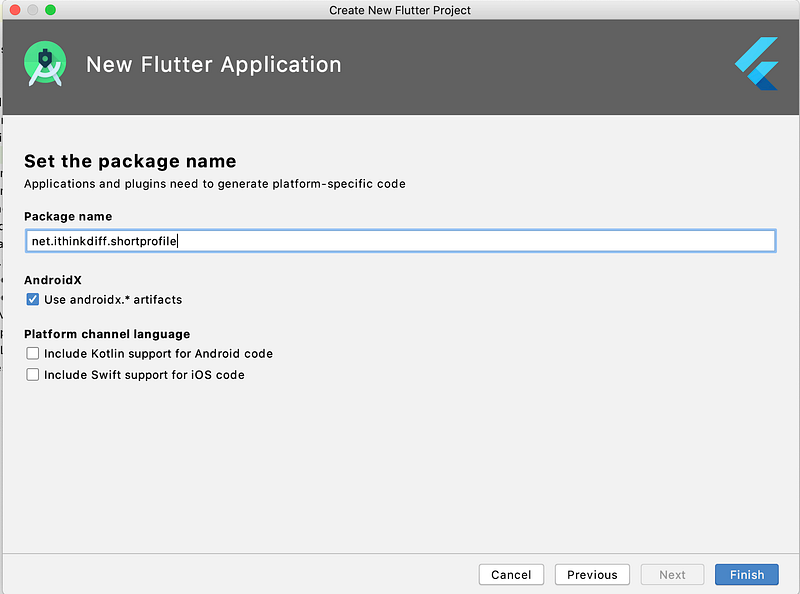
Now write a package name or use the default one suggested and click Finish.
After clicking Finish, you will see the following screen.

5. Understanding Android Studio
If you’re the first time you could watch this video tutorial to understand how to use Android Studio to create the Flutter app. Alternatively, you just follow to read the rest of the article.
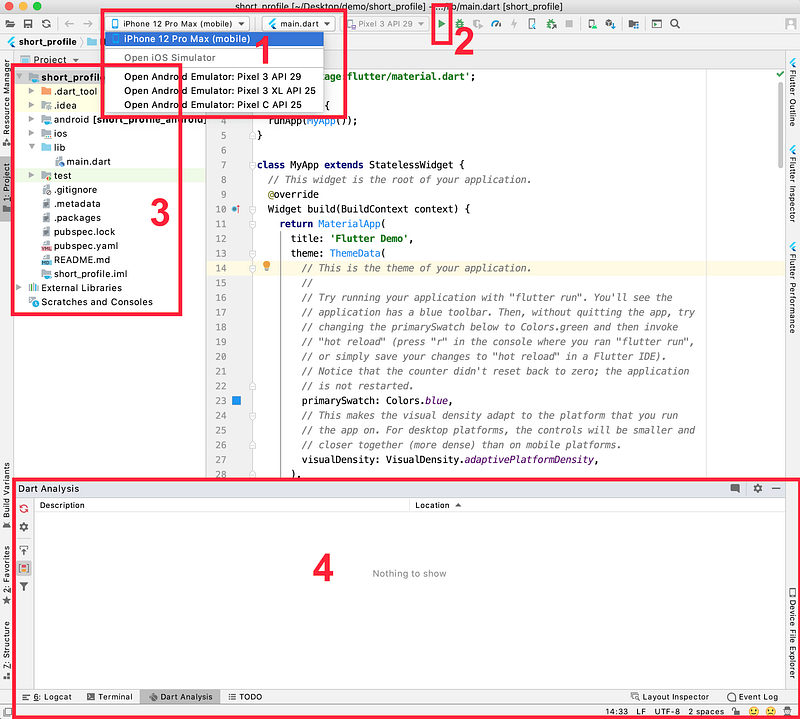
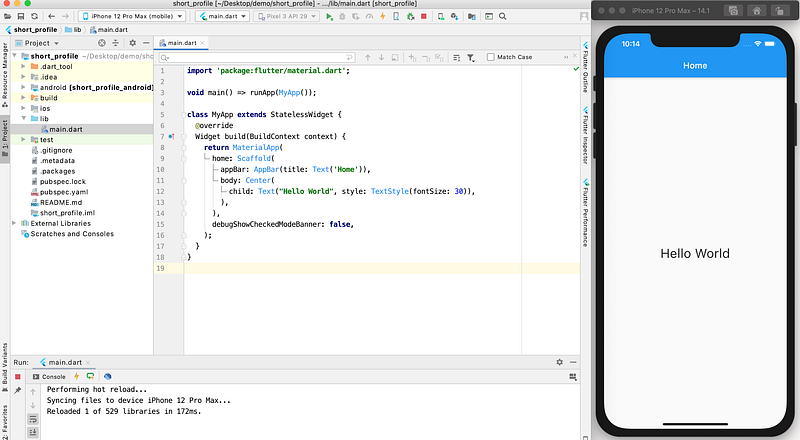
Basically, you will see this screen after creating a flutter app in android studio. Here I marked four numbers:
- You can select any device, iOS simulator, or Android emulator
- You can run the app
- All the resources and source files. You can click the arrow to open any directories
- Console output
5.1 iOS Simulator
If you use macOS, you can install the iOS simulator. Just follow the steps described here below the macOS install.
5.2 Android Emulator
No matter what operating system you use, you can create Android Emulator to run your app on Android devices. To know how to create an android emulator follow the steps mentioned here.
Also on the above source, you will learn how to run a flutter app on real android devices.
6. Main Dart Program
Now double click main.dart file to open the code on the right side screen. And select all the code and remove it.

6.1 Hello World
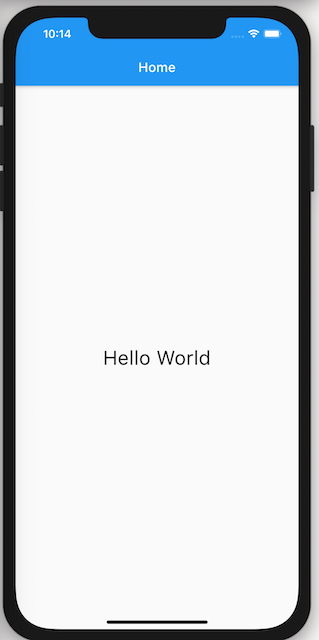
Now write the following code on the main.dart file. Now select Android Emulator or iOS Simulator or real device, and click Run.
You will see the following screen if you run on the iOS simulator.
6.1.1 Understanding the Code
So let me discuss with you the code we’ve written so far.
At the top we wrote:
import 'package:flutter/material.dart';This is how we import other code or libraries in a Flutter app. In this app, we are using material design. Flutter framework has built-in libraries for that and this is how we import the library.
6.1.2 main() Function
The next line is the main function. main() function is the entry point for an app. So the iOS or Android operating system will call this function to run our app.
Here for the main function, we use the arrow or fat arrow function => to define the function body. Where we used another built-in function runApp(). Within the function, we instantiate an instance of MyApp() widget.
void main() => runApp(MyApp());6.1.3 MyApp Widget
MyApp is a stateless widget. That means this widget doesn’t contain any state.
What is a Widget?
According to the flutter dev:
Flutter widgets are built using a modern framework that takes inspiration from React. The central idea is that you build your UI out of widgets. Widgets describe what their view should look like given their current configuration and state.
And What is a State?
State is a kind of data which may change anytime. And when the data change, the view refereing to that state will re-render to show the updated data.
You can also refer to the following link to understand more:
As MyApp is a StatelessWidget, it doesn’t contain any stateful data that may change and trigger to re-render. But a stateless widget may contain a stateful widget.
In a StatelessWidget, you must have to define the build method. So we override the build method and this method returns a MaterialApp widget.
MaterialApp basically follows the material design patterns, and provides some useful widgets to create an app. To know more about it follow the source:
Within the MaterialApp we used a Scaffold widget for the home and for appBar we use AppBar Widget to show a beautiful top bar with a title.
We also used a Center widget as the body of Scaffold widget, and the Center widget has a child widget where we add a Text widget.
We also used debugShowCheckedModeBanner: false as a parameter of MaterialApp. It means to hide the debug text at the right corner.
All of these are built-in widgets, using which we create this beautiful “hello world” application.
So far we used the following widgets:
Tips 1 Formatting: When You write code in Android Studio, if your code doesn’t auto format, just select all the code and use
Cmd+Alt+L(on Mac) orCtrl+Alt+L(on Windows and Linux).
Tips 2 Auto Formatting: Android Studio and IntelliJ also provides a check box named
Format code on saveon the Flutter page in Preferences (on Mac) or Settings (on Windows and Linux) which will format the current file automatically when you save it.
Tips 3 Hot Reload: Flutter supports hot reload. In most cases, if you just save your code and if the app already is in a running state, you will see the updated view. Sometimes you must have to stop the app and re-run to see the changes.
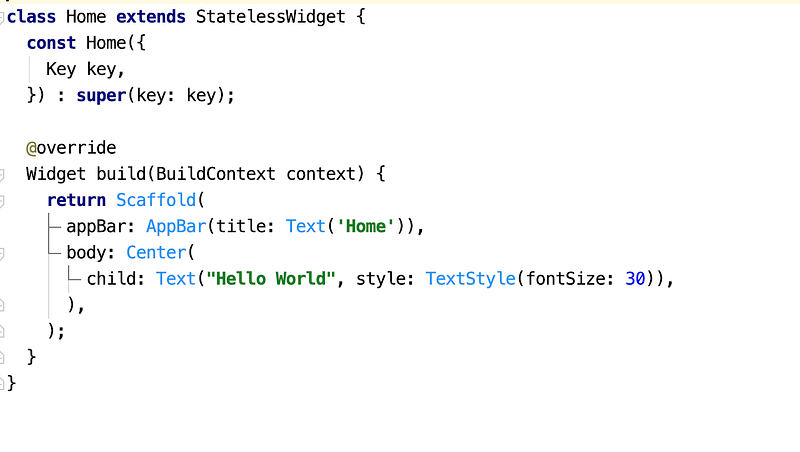
7. Create a New Widget
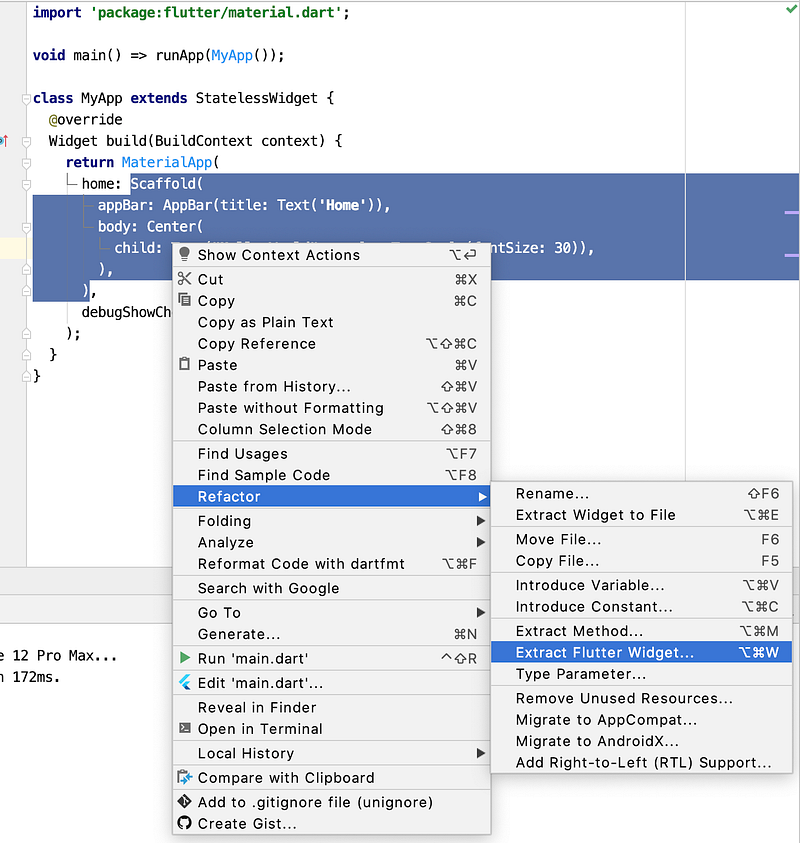
Let’s do a little bit of code organization. Select the Scaffold portion, right-click on the mouse, click Refactor, and Extract Flutter Widget.
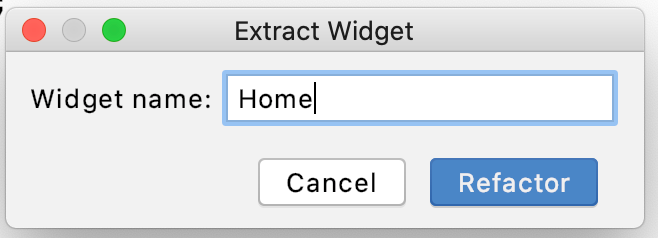
You will see this popup, now give a widget name and click Refactor.
You will see the following screen. A new StatelessWidget Home is created based on existing code. Now if you save and run the app again, you see everything will work as usual.
There is a Const Home defined within this widget. If you remove this portion the code will still work. Basically Key preserves the state when widgets move around within the widget tree. This portion is optional.
8. Create a New Layout
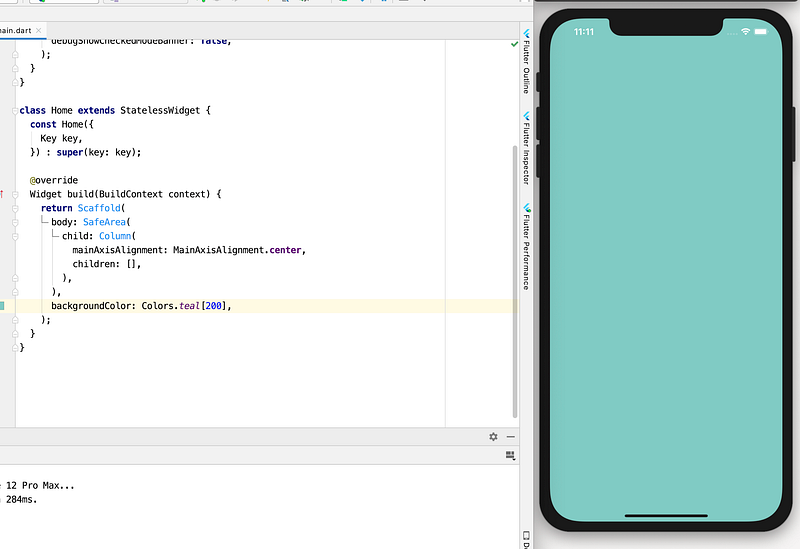
Let’s update the Home widget’s build method by writing the following code:
Here we used a SafeArea widget within the boy of Scaffold, so that any of our widgets doesn’t overlap the top-notch of the device.
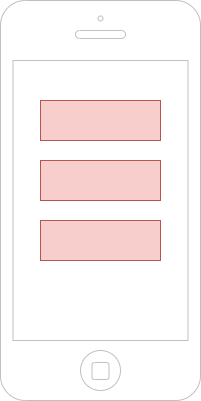
Within it, we used a Column widget, so that we add other widgets as the children[] list of it and all the widgets will add vertically one by one. Also, we usedmainAxisAlignment.center to mention the widgets should be in a central position like the following figure.
We also changed the widget’s background color which is part of the Scaffold widget. Additionally, we removed the app bar.
Now if you save the file or run the app, it will look like this.
9. Adding Image
As the first item in the column, we want to add a round-shaped image. To do that:
- First create an images directory within the root directory, which is short_profile
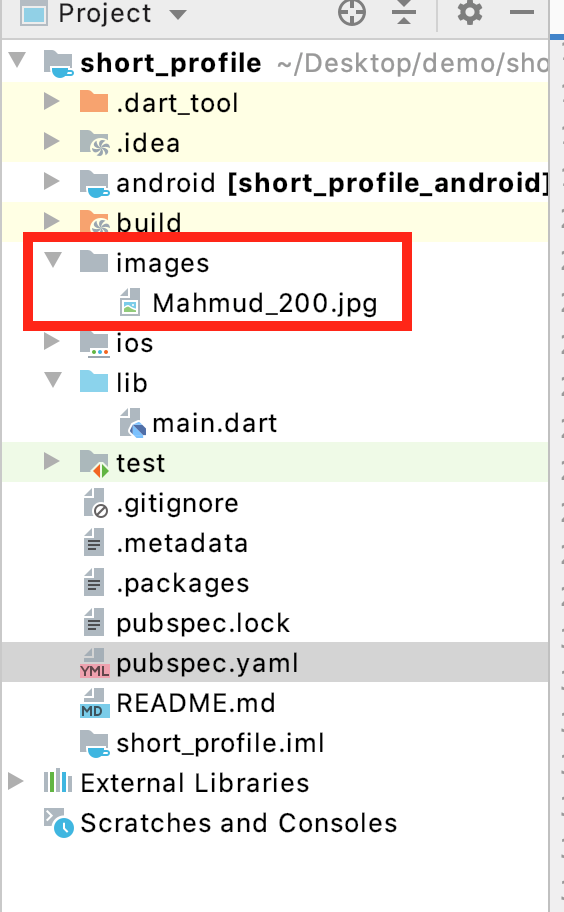
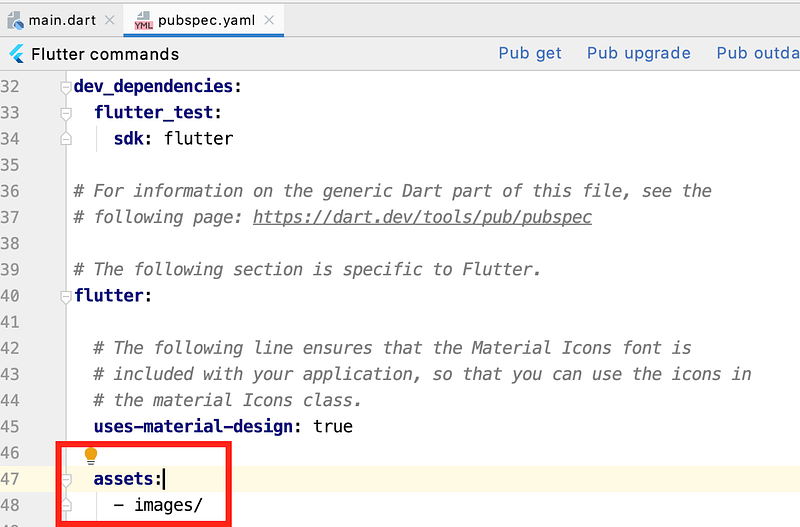
2. Now update the pubspec.yaml to inform Flutter that, we are adding images as an asset directory, and save the file. Be careful about space in .yaml file. Follow exactly what I have shown here.
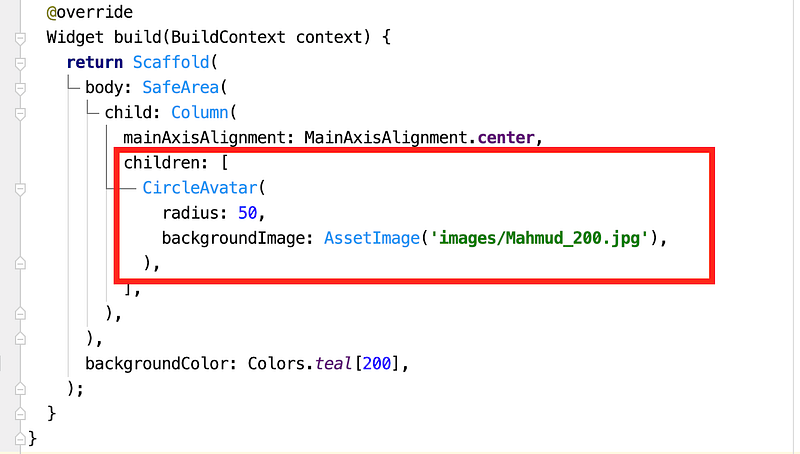
3. Update the code by adding a CircleAvatar within the children of the Column widget.
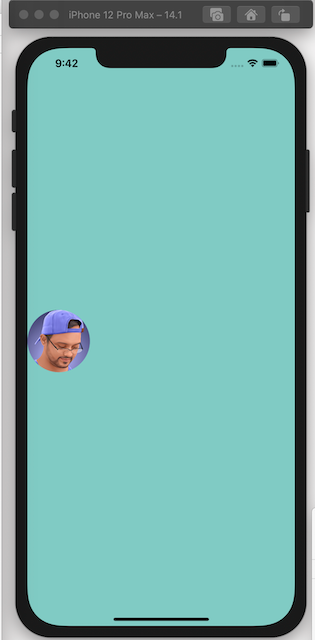
Now if you save the file and hot reload, the screen will look like this. In your case, your image will be shown.
10. Add Google Fonts and Create Two Text Widgets
Now we will add 2 text widgets and we will use Google fonts to style the texts. First, we need to add GoogleFonts library in our project.
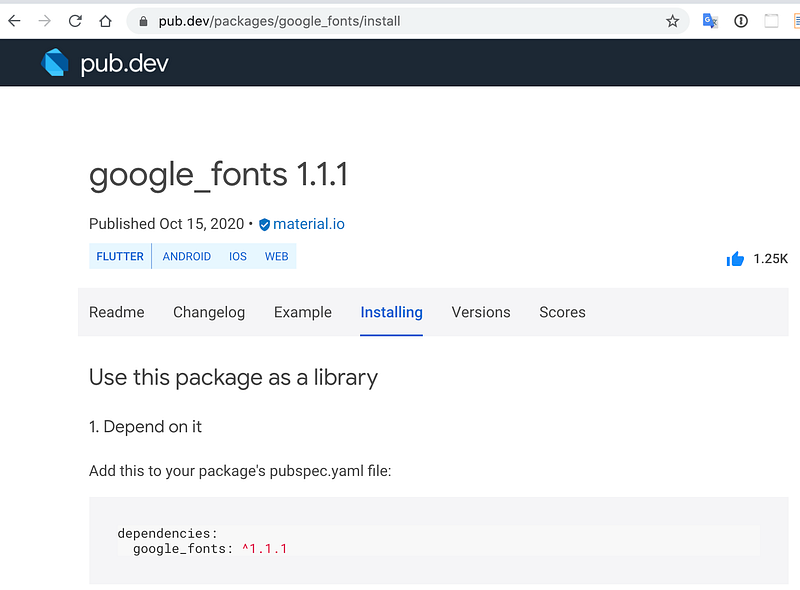
Open your pubspec.yaml file and add google_fonts: ^1.1.1 and click Pub get.
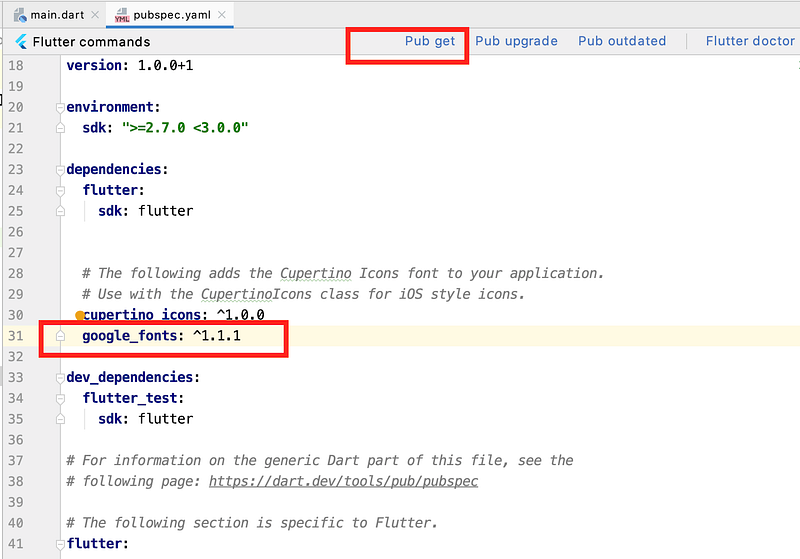
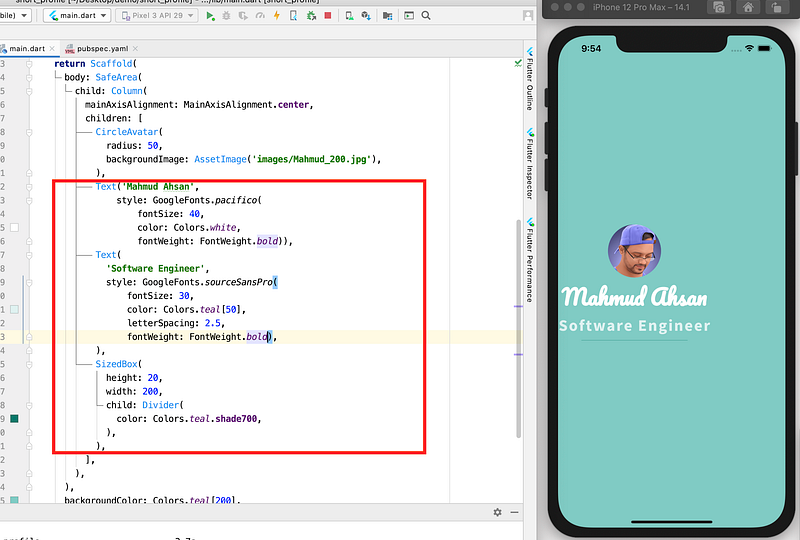
Now import Google fonts library within the project and add 2 Text Widget and 1 divider using a SizedBox and Divider widget.
Now the app will look like this
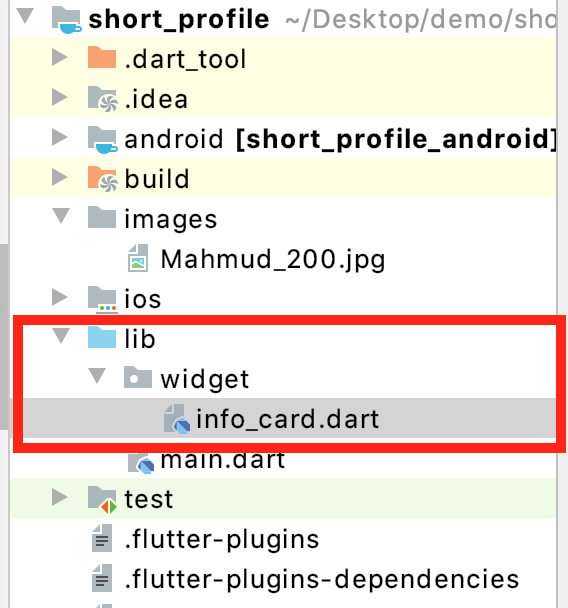
11. Create a New Info Widget
Let’s create a new directory named widget within the lib directory. And create a new file named info_card.dart within this directory.
Now copy the following code and paste there.
We created a custom stateless widget named InfoCard. When we will create an instance of this widget we will pass, a text, an icon, and a callback function named onPressed.
In this widget, we used GestureDetector to track if the user taps the widget or not. There is a onTap parameter within GestureDetector where we assigned the callback function onPressed. So when a user touches the widget, the callback function onPressed will be executed. margin and color used for decoration purposes.ListTile widget is used to decorate icons, text nicely.
12. Add New Widgets
12.1 Adding Constants
Let’s define some constants first in the main.dart file before the main function.
const url = 'http://thinkdiff.net';
const email = '[email protected]';
const phone = '+880 123 456 78';
const location = 'Melaka, Malaysia';
12.2 Import the Custom Widget
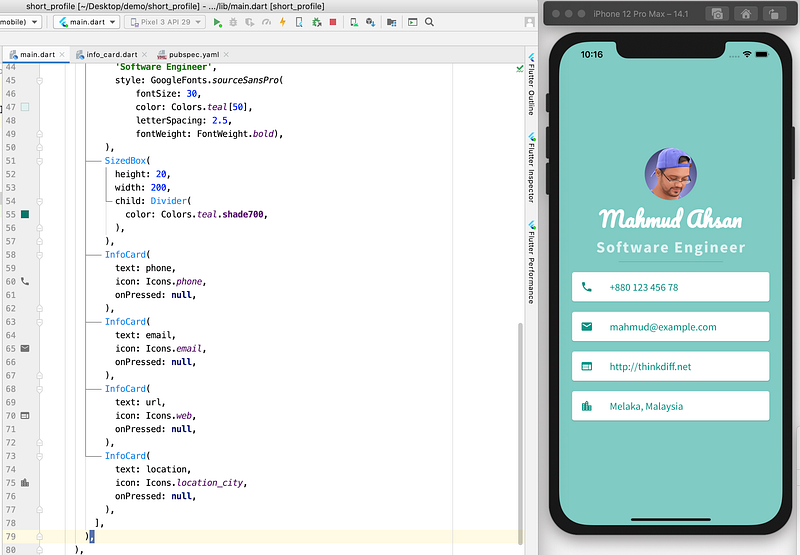
import 'package:short_profile/widget/info_card.dart';12.3 Add New Widgets
Add the following widgets, after the SizedBox widget within the children list.
So far the full code of the main.dart file is here and if you save and run the app it will look like this:
13. Add Some Interaction
Our app UI is ready. Now we want to add some functionalities. What we want is:
- When the user taps the phone number, he can call the person
- When the user taps the email address, he can open the default email app
- When the user taps the URL, he can open the default browser to visit the site
To do that, let’s install another library named “url_launcher”
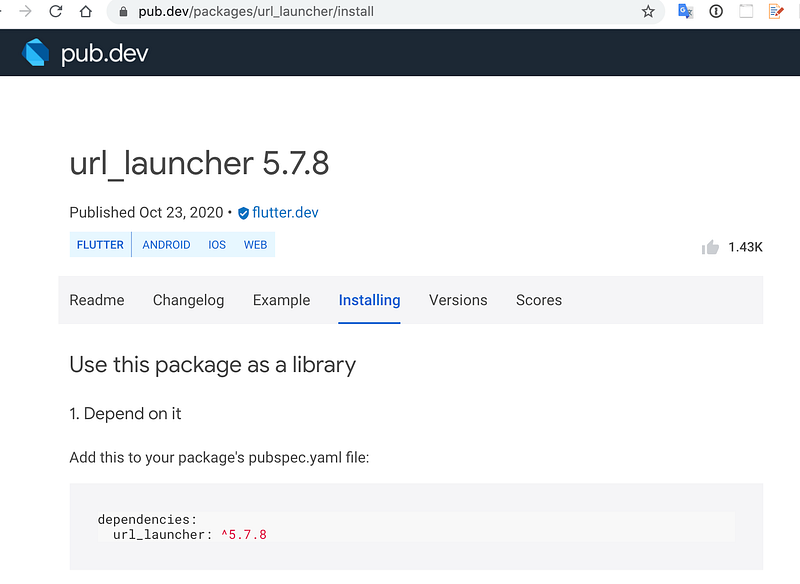
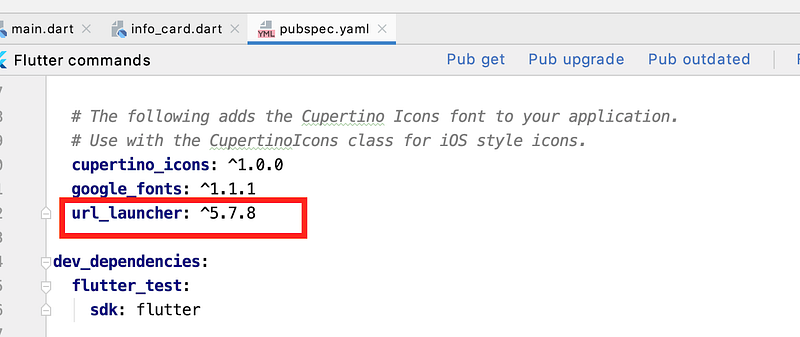
Copy url_launcher: ^5.7.8 within the pubspec.yaml file and click Pub Get.
Now import the library within the main.dart file
import 'package:url_launcher/url_launcher.dart' as launcher;13.1 Add an Alert Dialog Widget
If a user taps any of the interactive cards we discussed, phone and email will not work on the simulator. So we want to show users an alert dialog when something will not possible to alert users. To do that add the following code within the Home widget
This is a private method within the Home widget.
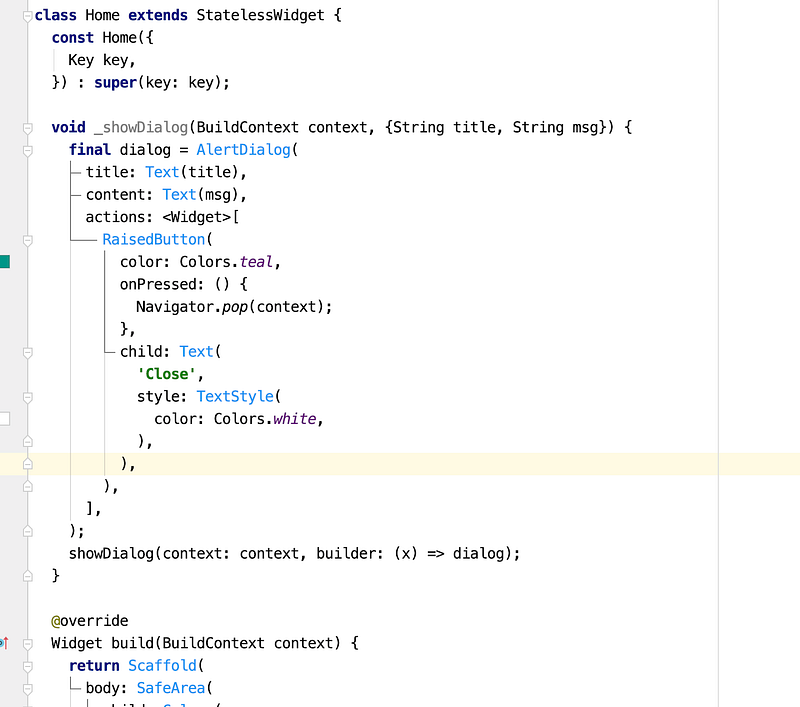
The code is self-explanatory. It will create a dialog using the AlertDialog widget.

13.2 Now Add Callback Function for the Phone Widget
Modify the first InfoCard widget by adding an asynchronous callback function to the onPressed parameter. This function is anonymous.
Now if you save and run the app, tap the phone card on the simulator it will show a dialog, but on a real device, it will work.
In this callback function, we used a regular expression to remove the space within the phone number string. Also, we used a conditional logic using launcher.canLaunch function to find out whether it will work or not. If it not works we show the user with an alert dialog that the functionality is not possible.
url_launchercan understand that this is a phone number as we passedtel:within the string.
13.3 Update Email Info Card
Like the above phone number widget, update the email widget by adding another asynchronousonPressed
url_launchercan understand that this is an email address as we passedmailto:within the string.
13.4 Update URL Info Card
Now we will update the final InfoCard. This code will launch the provided URL within the default browser.
So here is the full source code of the main.dart file.
If we run the app in an iOS Simulator it will look like this:
Conclusion
If you’re first time building this flutter application with me, you may or may not understand some part. The more you work the fluent you will be. But I hope you have understood how to create an interactive cross-platform mobile application using the Flutter framework.
Second Tutorial of This Series:
If you want to see more features or you have any question, let me know in the comments.