
Free and Automatic SSL Certificates in Kubernetes using Cert Manager
Get free and Automatic SSL certificates using Cert manager and Let’s Encrypt
In today's scenario, SSL certificates are the most important part of Deploying an application to the Internet. It is only the most important attributes that determine whether your websites are safe or not.
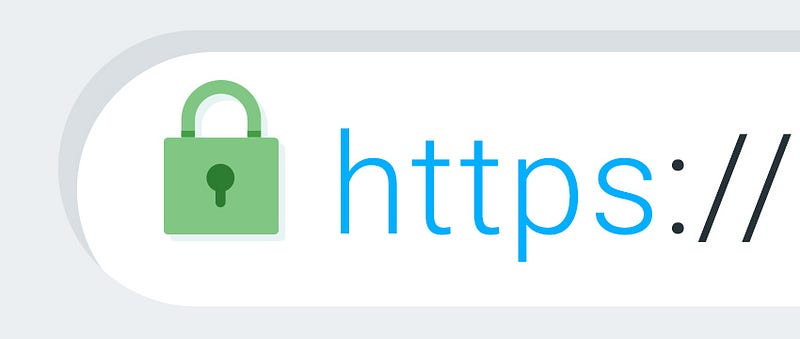
This paddle lock symbol conveys to your customer that the website they are visiting is safe, secured, and verified. So how do you actually achieve HTTPS on your website?
HTTP + SSL = HTTPS.
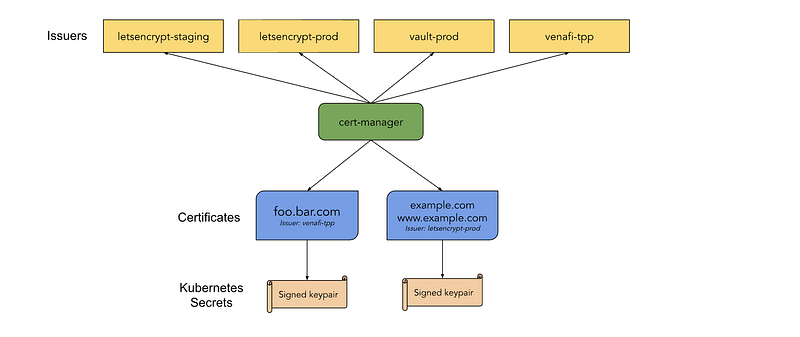
Getting an SSL certificate is not that easy. Moreover, it is expensive too. In today's world where Kubernetes is Predominantly everywhere. And with tonnes of Ingress resources in Kubernetes, it becomes really hard to get such a huge number of certificates, monitor them, and rotate them every time. This would be a nightmare for the DevOps Engineers. What if I tell you that there a tool that could get you free SSL certificates and rotate them automatically when they expire? Here comes Cert-Manager. Cert-manager was created by Jetstack, and a lot of the development is still sponsored by them. As per the cert-manager’s official guide, the cert-manager is a native Kubernetes certificate management controller. It can help with issuing certificates from a variety of sources, such as Let’s Encrypt, HashiCorp Vault, Venafi, a simple signing key pair, or self-signed. It will ensure certificates are valid and up to date, and attempt to renew certificates at a configured time before expiry.
What is the entire story all about? (TLDR)
- Understand the concepts of cert-manager
- Understand various ACME challenges ( DNS01, HTTP01 )
- Create a certificate from Let’s Encrypt Staging and then Finally get the certificate from Let’s Encrypt Production.
Prerequisites
- A GCP account ( To create a GKE Cluster and Cloud DNS hosted zone. You can get a Free tier Account with $300 free credits ).
- A domain. ( You can get a free domain from freenom ).
Story Resources
- GitHub Link: https://github.com/pavan-kumar-99/medium-manifests
- GitHub Branch: cert-manager.
Creating a GKE Cluster
In the scope of this article, we will use gcloud CLI to create the cluster. We can automate the process of creating the GKE cluster using Github actions. You can refer to my article on how to create a GKE cluster using GitHub Actions. You can also clone my GitHub repository to apply it from your cloud shell machine.
gcloud auth login #Create a GKE Clustergcloud container clusters create "production-cluster" \
--num-nodes 3 \
--scopes "https://www.googleapis.com/auth/ndev.clouddns.readwrite" \
--zone us-central1-a \
--node-locations us-central1-a,us-central1-b \
--project <project_name>#Connect to the GKE Clustergcloud container clusters get-credentials production-cluster --zone us-central1-a --project <project_name>Creating Google Cloud DNS and Cloud Domain
You can follow the steps here to register a new Domain or Either Import your existing domain to the GCP and then create a Managed Public Zone. Alternatively, you can use freenom to get a free domain for yourself and create a Public zone in your GCP account.
Installing Cert-Manager Helm chart
Let us know Install the cert-manager’s helm chart on our cluster.
$ helm repo add jetstack https://charts.jetstack.io$ helm repo add jetstack https://charts.jetstack.io$ helm install \
cert-manager jetstack/cert-manager \
--namespace cert-manager \
--version v1.2.0 \
--create-namespace \
--set installCRDs=trueYou should see the following components being installed in the cert-manager’s namespace
$ k get po -n cert-managerNAME READY STATUS RESTARTS AGEcert-manager-7c6df46cf4-k9xnt 1/1 Running 0 39scert-manager-cainjector-794f5cd9d-ppkmv 1/1 Running 0 39scert-manager-webhook-7f97b786f5-7ltnn 1/1 Running 0 39sAnd the following CRD’s
$ k get crd | grep cert-manager | cut -d " " -f1certificaterequests.cert-manager.iocertificates.cert-manager.iochallenges.acme.cert-manager.ioclusterissuers.cert-manager.ioissuers.cert-manager.ioorders.acme.cert-manager.ioInstalling Ingress Controller Helm chart
We will use the helm chart to Install Ingress Controllers in our cluster. However, you can use the other methods to install by referring to this.
$ helm repo add ingress-nginx https://kubernetes.github.io/ingress-nginx $ helm repo update $ helm install ingress-nginx ingress-nginx/ingress-nginxLet us create a sample Nginx application with deployment, a service ( Type: ClusterIP ), and an ingress ( Kind: Ingress ).
$ ip=$(k get ing certmanagerapp-ingress -o jsonpath='{.status.loadBalancer.ingress[0].ip}')$ echo | openssl s_client -connect $ip:443 2>/dev/null | openssl x509 -noout -issuerissuer=O = Acme Co, CN = Kubernetes Ingress Controller Fake CertificateFrom this, it is clearly evident that the certificate is not a valid one, but it is the one that comes by default with Ingress Controllers.
Creating certificate with cert-manager
Cert Manager supports requesting certificates from ACME servers( Automated Certificate Management Environment ). An example of such ACME servers is Let’s Encrypt. Certificates issued by Let’s Encrypt are trusted by most computers. To get this certificate from Let’s Encrypt one must solve an ACME challenge. This provides proof that the client owns the DNS hosts for what he is actually requesting the certificates for. The ACME protocol supports various mechanisms.
- HTTP01
- DNS01 ( Explained in this Article ).
HTTP01 mechanism is relatively easier when compared with the DNS01 mechanism. But DNS01 mechanism is safer than HTTP01.
In the DNS01 challenge, the ownership of your domain is proven when the cert-manager can successfully create a TXT record in your hosted zone.
In HTTP01 the ownership of your domain is proven when the cert-manager can successfully ensure that a file is present at the domain under a given path.
Let’s Encrypt has 2 ACME server URL’s
- Staging:
https://acme-staging-v02.api.letsencrypt.org/directory - Production:
https://acme-v02.api.letsencrypt.org/directory
There are some restrained rate limits on the Production server ( Ex: Certificates per Registered Domain -> 50 per week etc ). So it is always advised to perform any kind of testing on the Staging URL and then proceed to the production environment.
Alright, enough of the talk. Let us now get into action.
Let us now create a secret for our cert-manager so that it can access our clouddns for the DNS01 challenge.
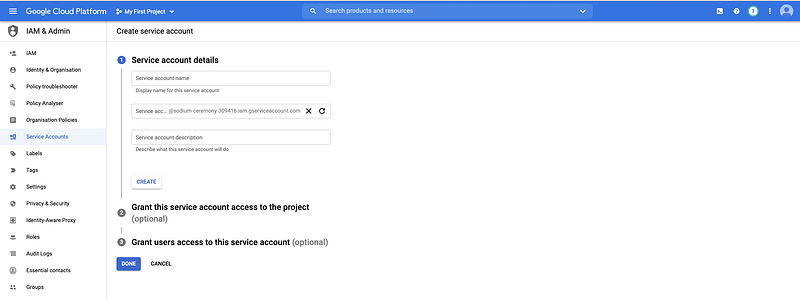
You can create a service account from the GCP console and create a JSON key with the required permissions. Once the key is downloaded let us create the secret in the cert-manager namespace by
$ kubectl create secret generic clouddns --from-file="./clouddns.json" -n cert-manager Let us now create a Cluster Issuer with the staging ACME server to verify that our DNS01 challenge works as expected
$ git clone https://github.com/pavan-kumar-99/medium-manifests.git \
-b cert-manager
$ kubectl apply -f cert-manager-staging.yamlLet us now closely observe the manifests.
- Cluster Issuer: An Issuer represents a certificate authority from which the certificates are being obtained. An Issuer is a namespaced object, whereas a cluster issuer is a non-namespaced object. Hereunder the spec.acme section we give the ACME server be staging URL and the GCP secret that we have created earlier and the dns names to be the names of our websites.
- Certificate: This is the actual certificate resource. So here we ask the cert-manager to create a TLS secret ( with the obtained certificate ) called bettercallpavan. The cluster issuer here is let’s encrypt staging along with our website dns names.
- The ingress has the TLS secret name as the same that was mentioned in the certificate resource.
Let us now access our website to check the certificate.
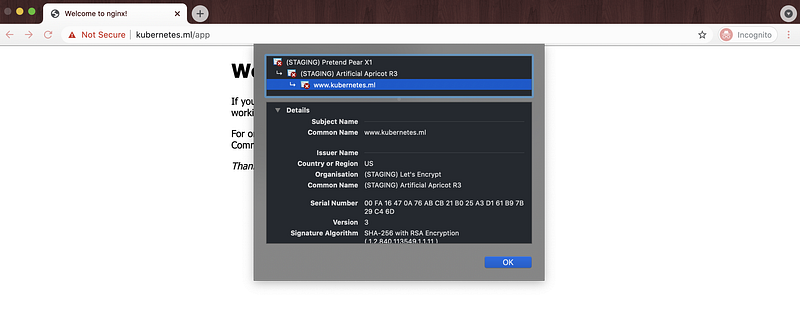
Yaay, our certificate has now changed from the fake ingress controller certificate to the Let’s Encrypt Staging certificate. We are now ready to rollout out this change to the Production Let’s Encrypt ACME server.
$ git clone https://github.com/pavan-kumar-99/medium-manifests.git \
-b cert-manager
$ kubectl apply -f cert-manager-production.yamlLet us now closely observe the manifests.
- Cluster Issuer: An Issuer represents a certificate authority from which the certificates are being obtained. An Issuer is a namespaced object, whereas a cluster issuer is a non-namespaced object. Hereunder the spec.acme section we give the ACME server be Production URL and the GCP secret that we have created earlier and the dns names to be the names of our websites.
- Certificate: This is the actual certificate resource. So here we ask the cert-manager to create a TLS secret ( with the obtained certificate ) called bettercallpavan-production. The cluster issuer here is let’s encrypt production along with our website dns names.
- The ingress has the TLS secret name as the same that was mentioned in the certificate resource.
Let us now access our website to check the certificate.
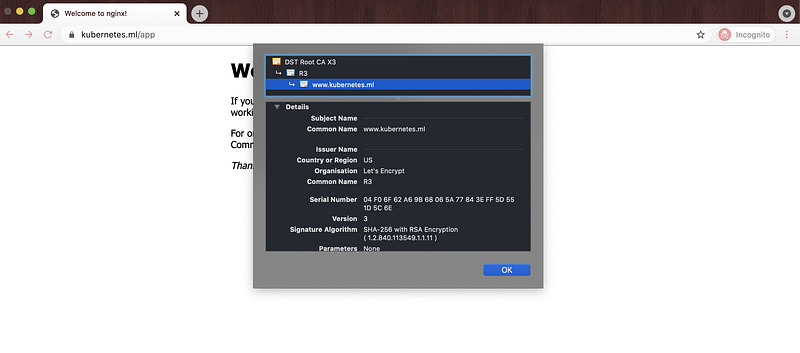
Yaaay, Our website is now secured. The default duration for all certificates is 90 days and the default renewal window is 30 days. This means that certificates are considered valid for 3 months and renewal will be attempted within 1 month of expiration.
Cleanup
$ git clone https://github.com/pavan-kumar-99/medium-manifests.git \
-b cert-manager
$ cd medium-manifests $ kubectl delete -f ./* $ kubectl delete secret clouddns -n cert-manager Conclusion
- Cert-Manager can be used to get free SSL certificates valid for 90 days.
- These certificates can be automatically attempted to be renewed within one month of expiration.
- These certificates can also be obtained from the HashiCorp Vault PKI backend too ( Will publish them in my later articles ).
Thanks for reading my article. Hope you have liked it. Here are some of my other articles that may interest you.
Until next time………..


