
Flutter — CI Workflow
I didn’t expect that this would be the first blog post in the series!
In order to get Flutter accepted and approved at my company, I’ve been asked to demonstrate the end process of testing and deploying a flutter application.
Feel free to come back to this blog post when you’re closer to shipping your shiny new Flutter application.

TL;DR; Code: codemagic.yaml Read From: Setting up the CI workflow
Focus and the amount of Friction are two key things I look at when thinking about design, workflows and changes to them.
There is a tendency to only care about deployment and environments when they don’t work, and to make do for as long as possible.
This can be very costly as they can easily become 80% of your development effort if you make it difficult, overly bespoke or include numerous manual steps.
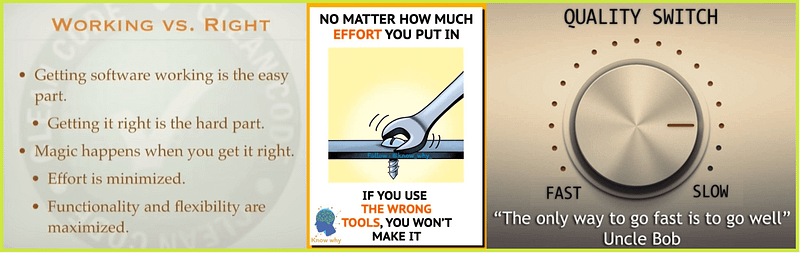
You won’t regret the effort or cost to set up a good CI/CD workflow, using the best available tools, you can then get back to building great Flutter applications.
I started by reviewing the tools recommend by Flutter for continuous integration and delivery.
I choose GitLab, having had some experience of it before, for its powerful yaml configuration, large feature set and great integrations.
It’s an all in one DevOps platform delivered as a single application, you can move really fast with GitLab.
CodeMagic has great built in support for Flutter, is highly configurable and has a set of virtual Mac’s that allows you to build & sign applications for Apple devices and the App store.
It makes the whole process much simpler and integrates well with GitLab.

Git is great, Git is powerful, but it will let you create an indecipherable mess when working with a team on many projects and features.
If it’s just you, check into one branch, usually called master or main and deploy from it. Super simple, on you go.
With a team/s there are many features, projects, people and releases that need coordinated and controlled, you will require a branch structure and a process around it.
Lots of teams are successfully using Gitflow, but it takes a little time to get developers rowing in the same direction, requires lots of merges and makes the history tricky to understand.
I wanted something simple like the single branch that would work for teams and I’ve chosen the Streamline git workflow.

If it causing friction we can adjust and if it morphs back to Gitflow in the end so be it, we have made the leap in understanding.
So now we have the tool chain to build the workflows:
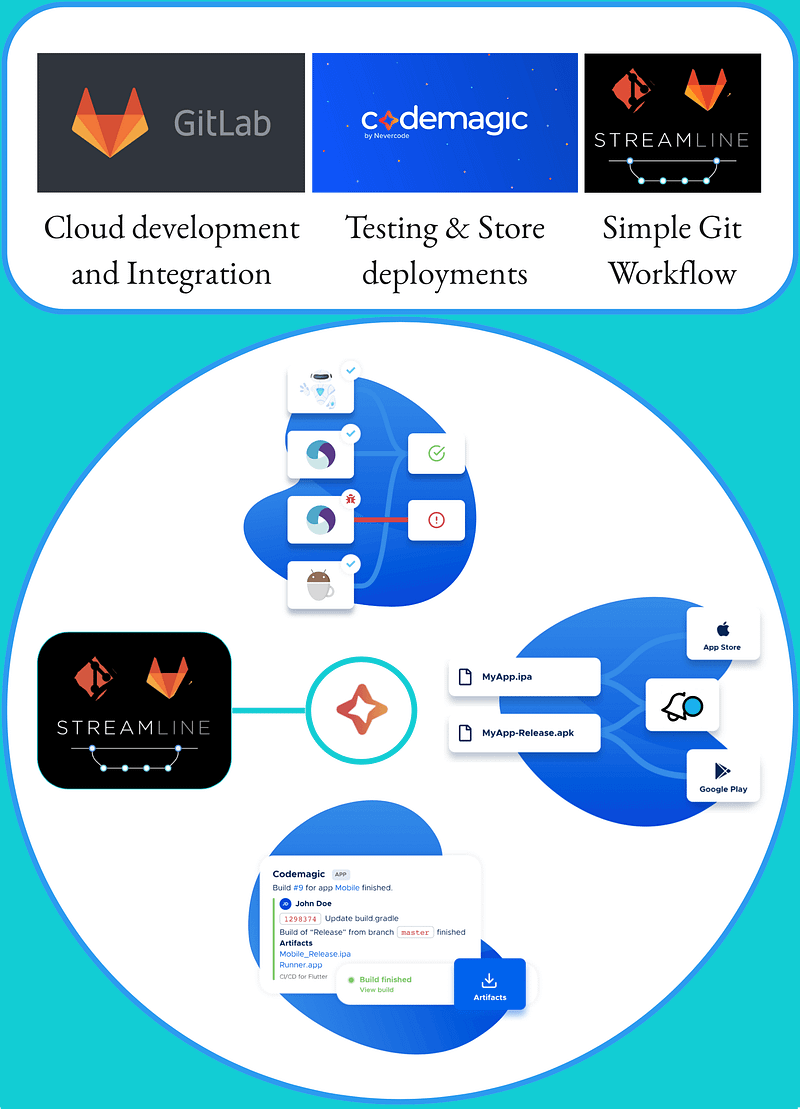
The continuous integration workflow will be triggered when developers check in to any feature branch with a ÏTag beginning “CI”.
Future posts will cover the continuous deployment workflow, automated versioning and integration and deployment for a website version.
Toolset Cost Justification
GitLab & CodeMagic
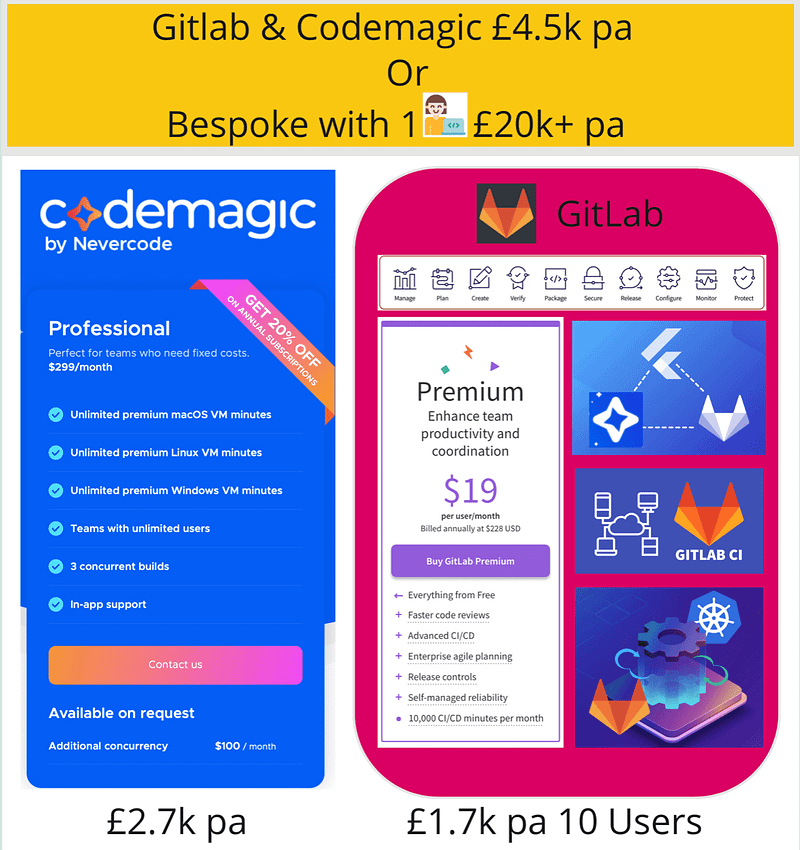
Gitlab is single application that covers the total development and operations cycle and can run advanced security tests on the software you write.
It integrates easily with most other frameworks and services allowing you to move fast and create a fully automated system in no time.
CodeMagic targets mobile integration and deployment and brings some powerful tools and features to the table:
- API’s to communicate with Apple and Google, so you can sign and build apps automatically.
- A farm of Macs to allow you to build for iOS and macOS from any device.
- Strong integration with Google cloud to give you access to the Firestore services.
- GitLab and CodeMagic integrate seamlessly together.
Whilst you could manually create servers and scripts to cover the tasks these services provide and hook them up in other CI/CD services like TFS or Jenkins, you would have to maintain them along with a number of virtual Mac agents and without support.
Even if you managed to find one person to cover this work at a modest salary of £20k per annum that would be a much greater cost.
Setting up the CI workflow
Ok enough talk lets go!
I started out by writing the list of actions I wanted the Integration workflow to carry out:
- Check code quality.
- Run Unit and Widget tests.
- Sign and build an iOS version of the app.
- Sign and build an Android version of the app.
- Run Integration tests using Google’s Firebase TestLab.
- Send an install on device link to testers when a build succeeds.
All of these tasks are setup in the codemagic.yaml file that you add to the root of your flutter process and configured with the Integration and Deployment tasks that you require.
The structure of the file is:
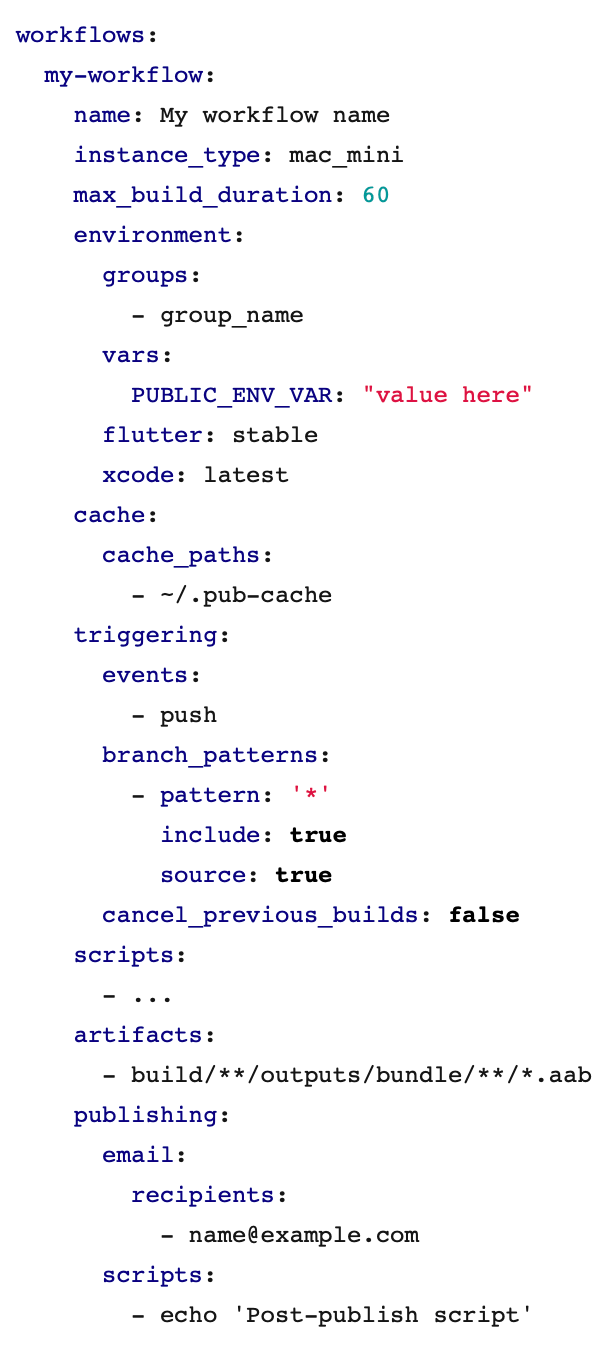
- We will create the CI workflow under my-workflows.
- Use the environment section to import secret values to use API’s to search and control external services including the App Store, Play Store and Firebase.
- Add script tasks under scripts to build and sign the application for each platform required.
- Configure artifacts to make the outputs available when the build completes.
- Add recipients under email to send an email with app install links out to the testers
Setup — Service Access
In order to setup the workflow we will need access to Cloudmagic, the App Store, Play Store and Firebase services so we can use their API’s.
You will need to have or setup the service accounts before continuing, the apple developer account costs £79 per year, the google developer account is a $25 registration fee and Firebase and Cloudmagic have a free tier to get you started.
Follow the instructions in the section Service Access below, and gather the secrets:
appstore_credentials
APP_STORE_CONNECT_ISSUER_ID
APP_STORE_CONNECT_KEY_IDENTIFIER
APP_STORE_CONNECT_PRIVATE_KEY
CERTIFICATE_PRIVATE_KEY
BUNDLE_ID
firebase_credentials
GCLOUD_KEY_FILE
FIREBASE_PROJECT
I stored the secret info and corresponding Environment Vars Names in secure notes in my Apple account Keychain, its up to you but I would recommend you keep them safe and secure.
Setup — Adding secrets as Environment Variables
Use the Codemagic UI to easily create the group and secure environment variables:
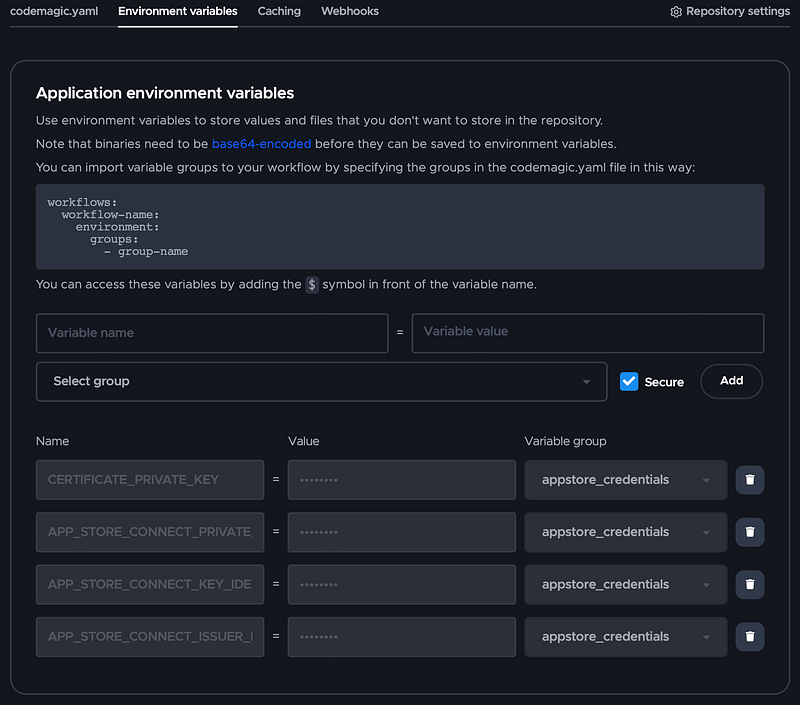
Then include the groups in the environment section of the codemagic.yaml workflow:
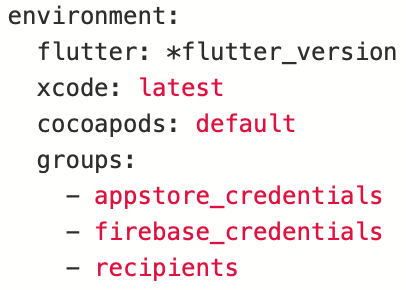
Checkout the documentation for more info on common Environment Variables:
We can now start adding the tasks tasks to our Codemagic integration workflow.
You can access the the workflow code anytime in the DigestableMe project on GitLab in the codemagic.yaml file.
Task — Check Code Quality
This task will run code analysis on the project and highlight code that will be difficult to maintain or puts the codebase at risk.
The task is added to the scripts section in codebase.yaml

The rules are add to the project pubspec.yaml file.
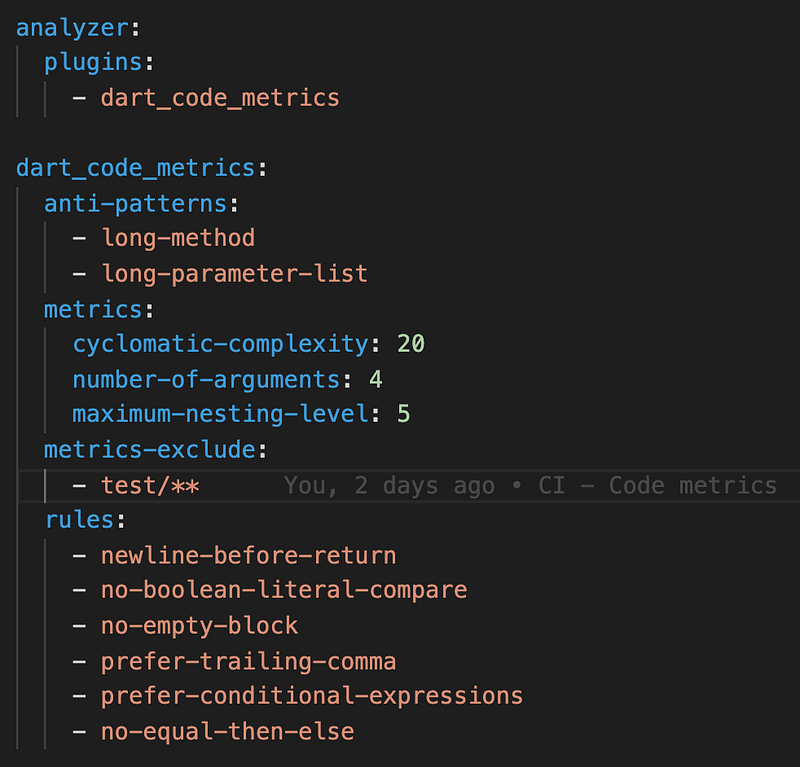
The output is save as a build artifact:

Task — Run local unit and widget tests
This task will pick up any unit or widget tests files under the /test directory of the project that end in _test.dart
Task script:
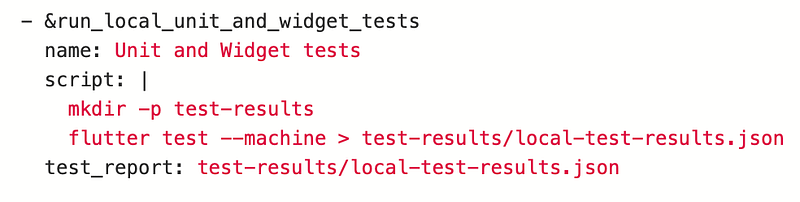
Artifact:

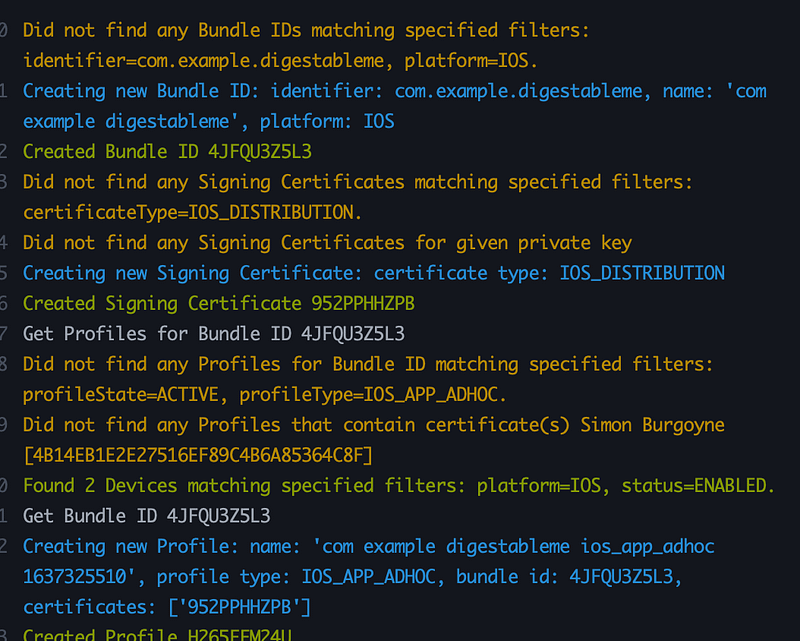
Task — Sign and build an iOS version of the application
Script Tasks:
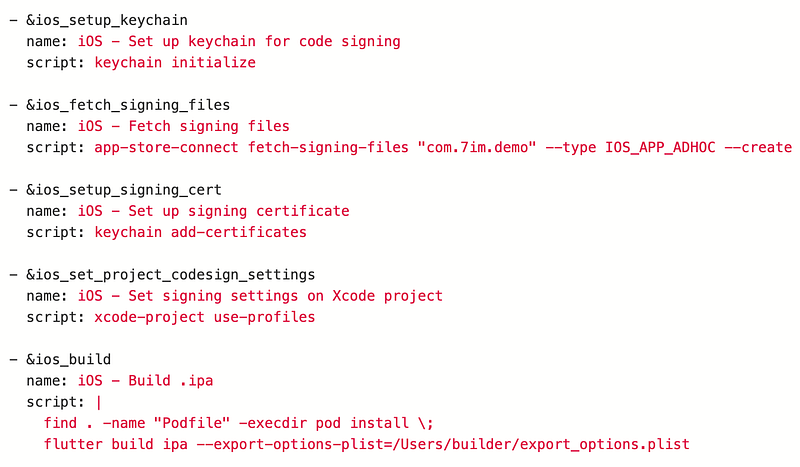
Artifact:

Codemagics API to integrate with Apple really helps you out with the signing process.
It will work out what the app needs and create any certificates to complete the signing, amazing…
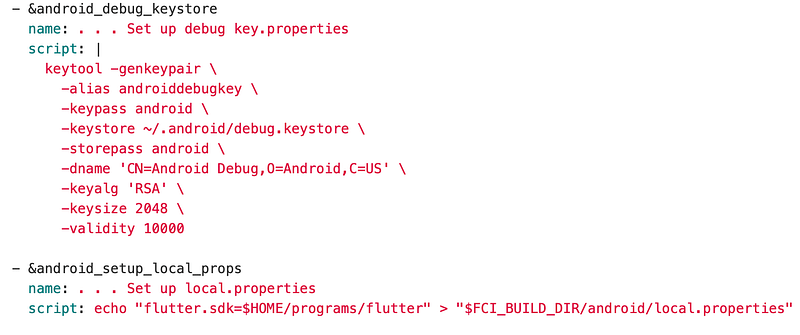
Task — Sign and build an Android version of the application
Script Tasks:

Artifact:

Task — TestLab
With the Google’s Firebase TestLab you can run your coded integration tests on multiple real devices and run a robo test that will discover and run through all the screens in your app, again on multiple devices.
Powerful stuff that will give you confidence that you application can run on devices that you wish to support.
The flip side is these valuable tests take time to run and that comes with a £ cost for using the service.
To setup integrations tests and get your project ready for Firebase TestLab run through the Flutter Integration Test Tutorial.
Once setup add the two scripts to the integration workflow:
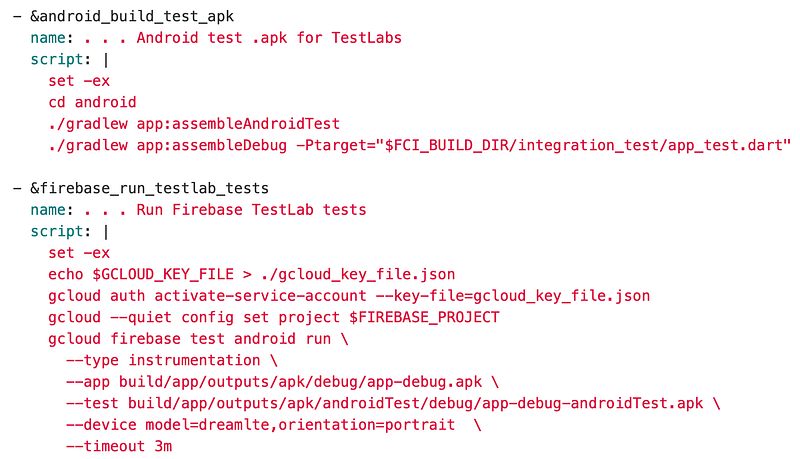
See the sections under XP below for details on how to run TestLab locally.
Ta Da
Built and Regression Tested!
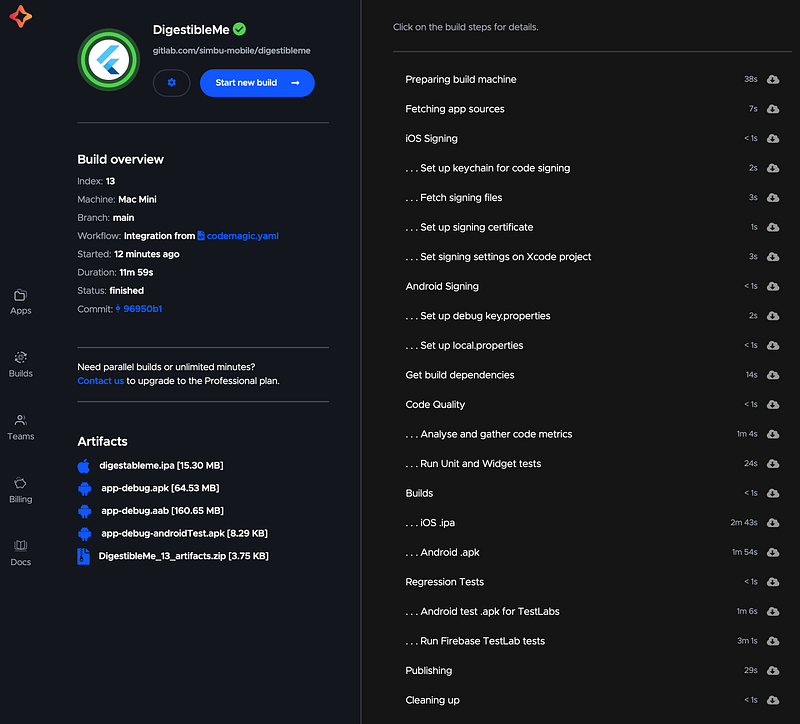
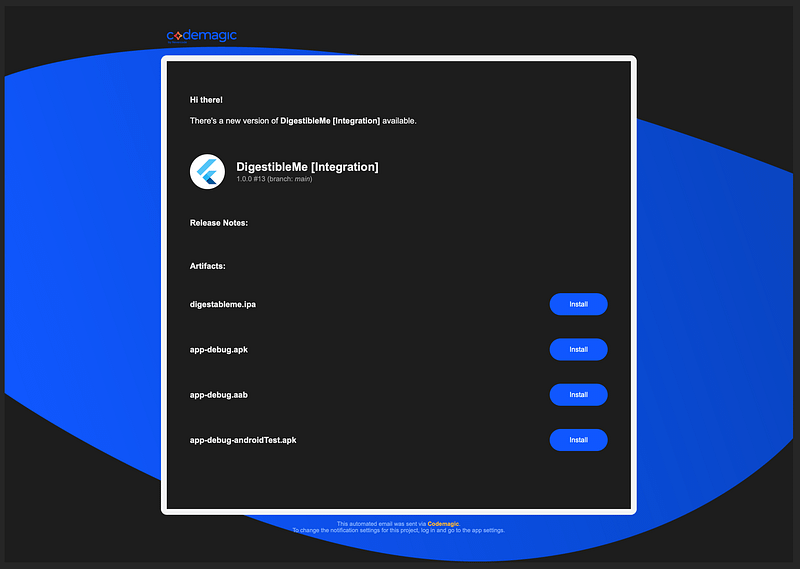
When everything passes and the testers are notified by email with links to install the version locally on their devices!
Service Access
App Store Connect Access
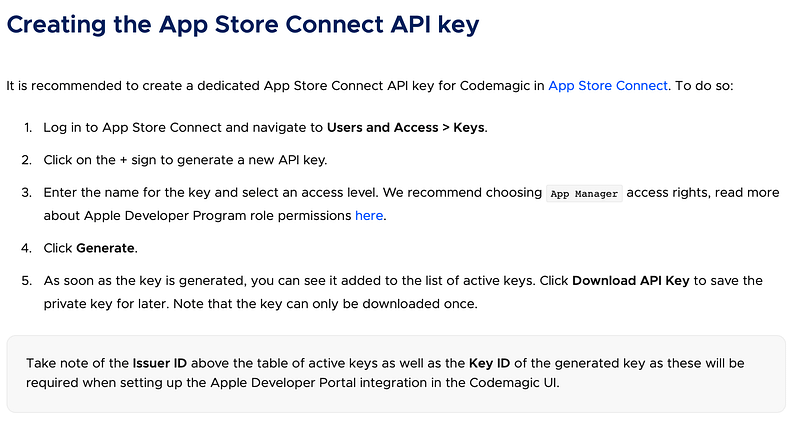
See the Codemagic instructions for more details.
NB: You may need to refresh the page after creation before the download link becomes visible.
Collect the secret values:
APP_STORE_CONNECT_ISSUER_ID
APP_STORE_CONNECT_KEY_IDENTIFIER
APP_STORE_CONNECT_PRIVATE_KEY
CERTIFICATE_PRIVATE_KEY
BUNDLE_ID
The issuer id and key identifier are values you saved during the creation of the API key.
The ‘APP_STORE_CONNECT_PRIVATE_KEY’ is the key you download from the App Store Connect after creating the API key, the
The ‘CERTIFICATE_PRIVATE_KEY’ is an RSA 2048 bit private key to be included in the signing certificate that Codemagic creates. You can use an existing key or create a new 2048 bit RSA key:
ssh-keygen -t rsa -b 2048 -m PEM -f ~/Desktop/codemagic_private_key -q -N ""Copy the all the content from the private key file into the environment variable value.
BUNDLE_ID is the unique id for application and you define it when you create an identity in your Apple developer account.
You can find the iOS bundle id in your apple developer account under identifiers.
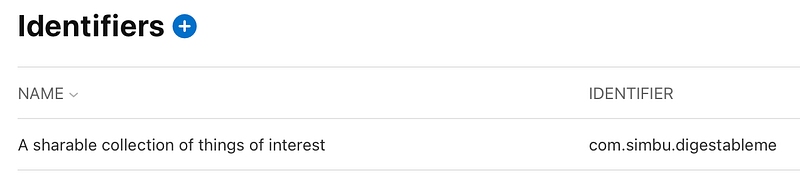
Apple recommend using a reverse-domain name style string i.e.
icom.domainname.appname
It cannot contain an asterisk.
Firebase Access for TestLab
You will need to set up the following in the Firebase console.
- Create a Firebase project.
- Create a service account with Editor permissions and download the JSON key file so you can authenticate with Firebase Test Lab during the build.
- Enable the Cloud Tools Results API.
Collect the secret values:
GCLOUD_KEY_FILE
FIREBASE_PROJECT
Where:
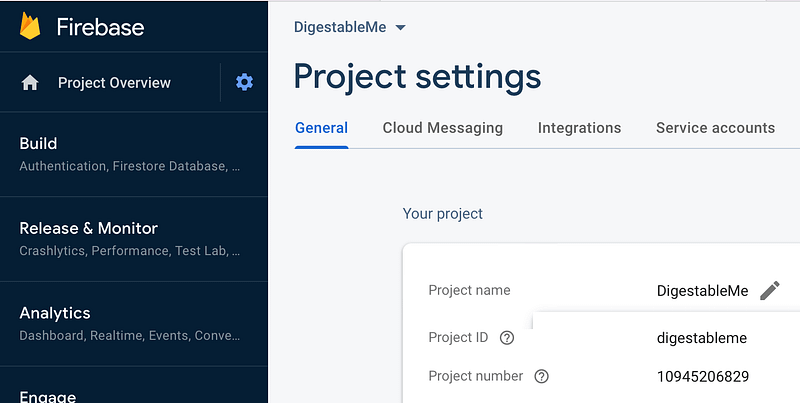
GCLOUD_KEY_FILE — service account JSON key file, FIREBASE_PROJECT — your Firebase Project ID, you can find it under project-settings-general in the Firebase console.
Play Store Access & Signing
Google allows you to manage your signing credentials locally, but it’s better to let Google manage them in the cloud like the Apple App Store does.
For this workflow we will just create a default debug keystore directly in the codebase.yaml file, which will be fine for integration and ad-hoc testing.
When we need to deploy to the Play Store we will setup the keystore in the Google cloud, this will be covered in the continuous deployment post.
XP
Codemagic
I found most difficult thing at first was to understand the sections in codebase.yaml file.
In addition to the official documentation and google, a few of things really helped with this.
Firstly you can setup workflow using the UI and then switch to yaml configuration and export the values from the workflow you have setup.
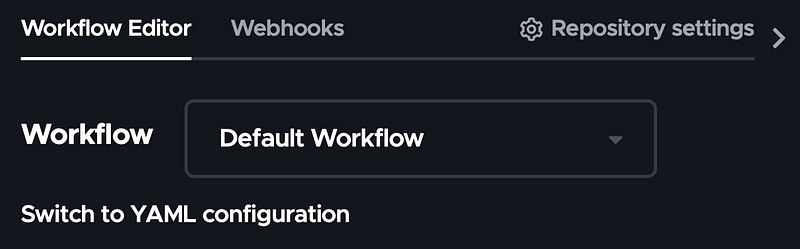
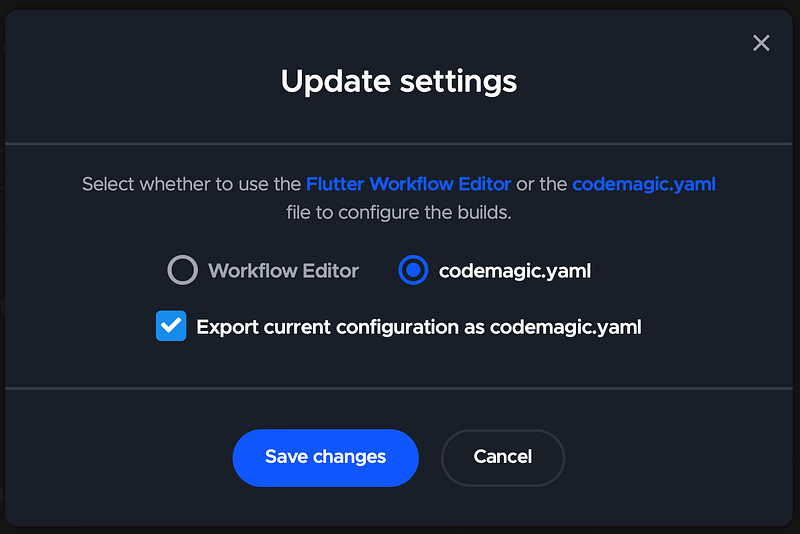
You can use builder mode to give some contextual help.
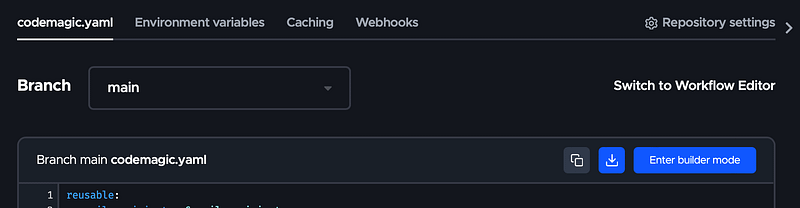
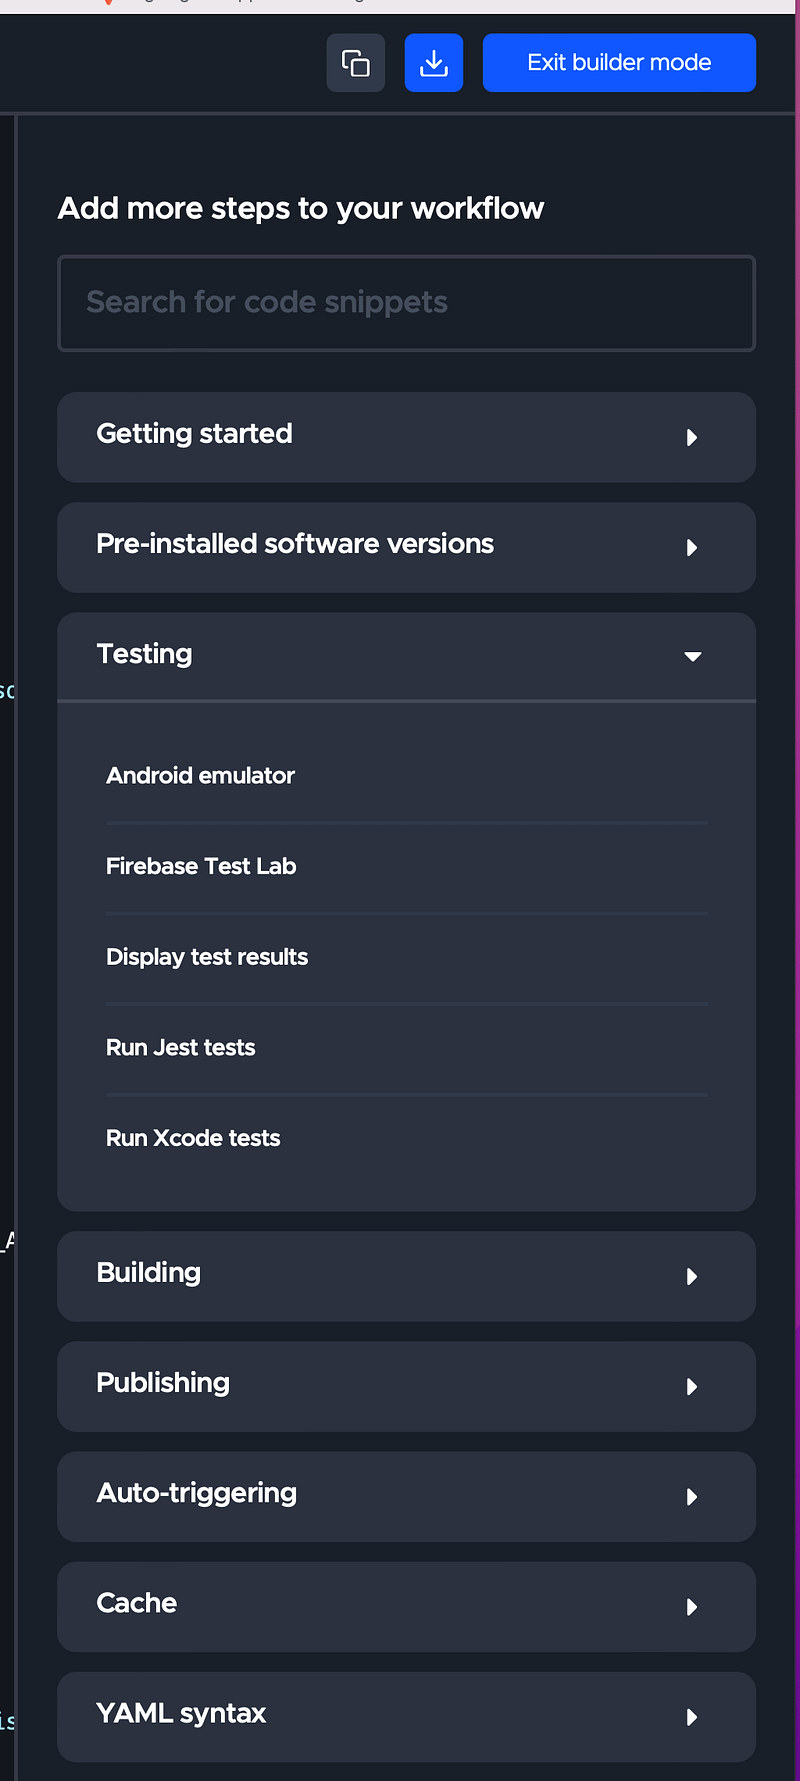
When things go a little tougher like integrating with TestLab I eventually had to download the Firebase CLI and get the script running locally before going back to the workflow and plugging it in.
Firebase
I needed to install the API to list device models for TestLab and run tests without going through CodeMagic that was costing a lot of build minutes.
See Firebase CLI reference for more details. On the Mac you can install it with the this command.
curl -sL https://firebase.tools | bash
Then login with this command.
firebase login
Install gcloud
curl https://sdk.cloud.google.com | bash
Login
gcloud auth login
And list device models with this.
gcloud firebase test android models list
Note you can change the gcloud login account(email) with
gcloud config set account ACCOUNT
Firebase TestLab
On the free spark plan you have the following allowance
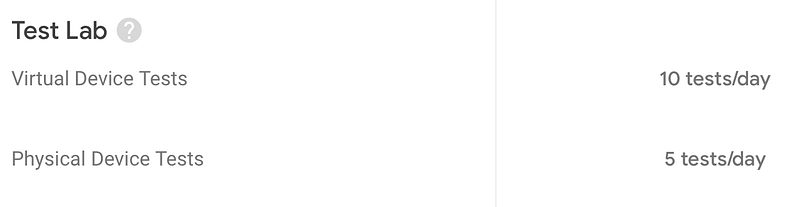
Once you have the firebase and gcloud CLI’s installed you can run TestLab tests directly and plug the commands back into the codemagic.yaml file.
To run the tests you will need to set the project id first:
gcloud config set project PROJECT_ID
You can find the project id by list all projects in your firebase console.
Do this by downloading the Android build artifacts and then modifying the codemagic.yaml command from

To
gcloud firebase test android run \
          --type instrumentation \
          --app app-debug.apk \
          --test app-debug-androidTest.apk \
          --timeout 3m
So that it points at the download build artifacts.
You can specify a device using — device, can be added multiple times for multiple devices.
--device model=redfin,orientation=portrait \Be careful to choose a device that supports your SDK, when devices have multiple then you need to specify one:
--device model=redfin,version=28 \See gcloud firebase test android run command documentation for more command options.
Once you have the tests setup and passing make the changes back to codemagic.yaml and you are good to go.
BackBurner
Local Integration Tests
If you run up an emulator or attach a device then you can run all the integrations tests locally.
I would have liked to run local integration tests before the TestLab tests to catch breaking tests earlier and avoid running breaking tests on multiple devices, which is costly, time and money.
You can run the tests local using this command, but you need a device or emulator running.
flutter drive --driver=test_driver/integration_driver.dart --target=integration_test/app_test.dartWeb Integration
I ran out of time to add the following actions to my CI workflow.
- Build a website version.
- Run integration tests BrowserStack or other test tool.
Google Play Store — Automatic cloud managed signing
Implement automatic cloud managed signing as described in the Flutter documentation to sign an Android app.
For now I’ve just created a debug version of the keystore, directly in the codemagic.yaml file.
Integrate iOS app with Firebase Test Lab.
The official documentation requires a manual step to build the iOS runner for integration and upload to Firebase as a zipped file.
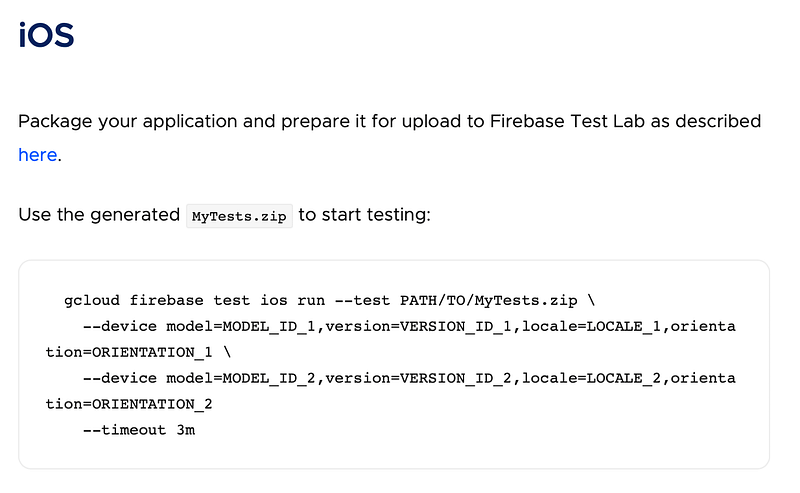
For now I’ve decided to integrate the Android package and come back to this.
Ideally I will be able to create a script to package the iOS application for Firebase TestLab.
One of the options I will consider when returning to this is integrate with FastLane and use the plugin to integrate with Firebase TestLabs
Fastlane plugin — Firebase TestLab
Sound & Vision



Links
- The Gitflow workflow in less than five minutes
- 4 Git branching workflows
- Streamline: A super-efficient branching and CI strategy
- Using Codemagic yaml
- CodeMagic Signing Android Apps
- CodeMagic iOS code signing
- How to set up automatic iOS code signing using App Store Connect API keys
- Integrate Firebase TestLab with Codemagic
- Run tests with Firebase Test Lab for Android
- Flutter Integration Test Tutorial Inc. Firebase & Codemagic
- Firebase Test Lab: using Robo Tests (Firecasts)
- Faster release builds and better integration tests with Flutter
One more thing…
Generally, the best way to learn git is probably to first only do very basic things and not even look at some of the things you can do until you are familiar and confident about the basics.
_Linus Torvalds
Other posts in the series
Development
DevOps: