
Essentials for Working With Firestore in Python
Learn to manage your Firebase app data in Python

Provided by Firebase and Google Cloud, Firestore is a popular NoSQL cloud database for mobile and web applications. Like MongoDB, Firestores store data in documents containing fields mapping to values. The documents are organized into collections that correspond to tables in relational databases.
To manage Firestore data with Python, we need to use the Firebase Admin SDK which is a set of libraries that lets you interact with Firebase from privileged environments. In this post, we will introduce how to manage the data in Firestore with the Admin SDK with some simple examples which cover common CRUD operations.
Install the Firebase Admin SDK
In order to work with Firestore in Python, we need to install the Firebase Admin SDK first, which can be installed in your virtual environment. You can choose your favorite tool to create/manage your virtual environments. Conda is used here because we can install a specific version of Python in a virtual environment, which can be handy if your system's Python version is old and you are reluctant or unable to upgrade it.
# You need to specify a channel if you need to install the latest version of Python.
$ conda create --name firebase python=3.11 -c conda-forge
$ conda activate firebase

$ pip install --upgrade firebase-admin ipython
iPython is installed to run Python code interactively more conveniently.
Initialize the Firebase Admin SDK in GCP
If your Python code runs in a Google Cloud environment such as Compute Engine, App Engine, Cloud functions, etc, you can initialize Firebase without parameters because the credential lookup is done automatically:
import firebase_admin
from firebase_admin import firestore

app = firebase_admin.initialize_app()
firestore_client = firestore.client()
Initialize the Firebase Admin SDK in a non-GCP environment
If your Python code is run in a non-GCP environment, you would need to authenticate Firebase with the private key file of your Firebase service account. This service account is created automatically when a Firebase project is created.
To generate a private key file for your service account, go to the Firebase console, and follow the following instructions:
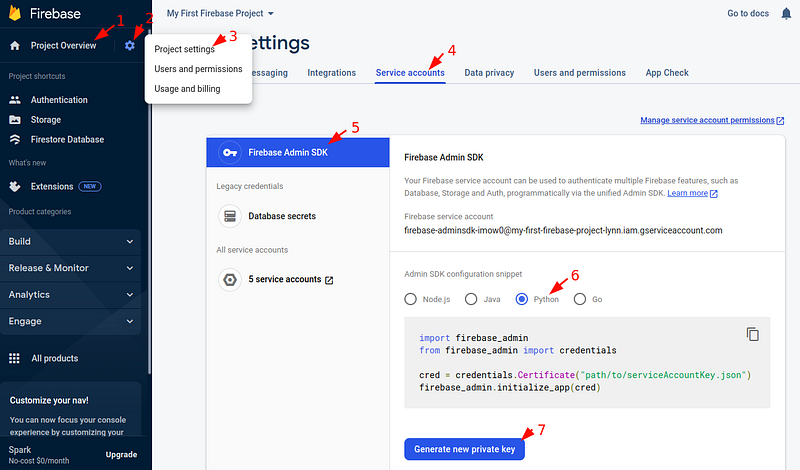
Once the private key file is generated, it can be used to authenticate Firebase. You can use it with the Application Default Credentials (ADC), which means setting the environment variable GOOGLE_APPLICATION_CREDENTIALS to the path of the JSON file that contains your service account private key. In this way, Application Default Credentials (ADC) is able to implicitly determine the Firebase credentials. This way is more secure and is recommended when applicable.
$ export GOOGLE_APPLICATION_CREDENTIALS="/home/lynn/Downloads/service-account-file.json"Then you can initialize your Firebase SDK as follows:
import firebase_admin
from firebase_admin import credentials
from firebase_admin import firestore

# Use the application default credentials.
cred = credentials.ApplicationDefault()
firebase_admin.initialize_app(cred)
firestore_client = firestore.client()
However, setting the GOOGLE_APPLICATION_CREDENTIALS environment variable is not applicable if you have multiple Firebase projects or your Firebase project does not belong to your default Google Cloud Project. In these cases, we need to authenticate with the private key file directly:
import firebase_admin
from firebase_admin import credentials
from firebase_admin import firestore

# Use the private key file of the service account directly.
cred = credentials.Certificate("/home/lynn/Downloads/service-account-file.json")
app = firebase_admin.initialize_app(cred)
firestore_client = firestore.client()
You can initialize your Firebase Admin SDK in any of the three ways demonstrated above. If you are working locally on your laptop, then the third one would most likely be the one for you.
Now that the Firebase Admin SDK is authenticated and initialized, we can start to create collections and documents with it. We will cover common Create, Read, Update, and Delete (CRUD) operations with simple code snippets.
Create documents
Similar to MongoDB, Cloud Firestore is schemaless and has dynamic mapping. It creates collections and documents implicitly the first time you add data to a document. Therefore, we do not need to explicitly create collections or documents and specify the mappings (namely type definitions of fields). We can create a document directly and assign data to it:
doc_ref = firestore_client.collection("laptops").document("1")
doc_ref.set(
    {
        "name": "HP EliteBook Model 1",
        "brand": "HP",
    }
)
Note that the document id (“1”) must be unique and must be a string.
A reference is an object that points to the location of the target collection or document in the Firestore database. The target collection or document doesn’t need to exist when a reference to it is created. We can add data with the reference once it’s created. All CRUD actions in Firestore are achieved with references, as we will see later.
Once this code snippet is run, the collection and document are created, which can be checked in the Firebase console:

Since documents in Firestore are schemaless, meaning there are no predefined fields for the documents, we can have different fields in each document. Now let’s add a new laptop document with some additional fields:
doc_ref = firestore_client.collection("laptops").document("2")
doc_ref.set(
    {
        "name": "Lenovo IdeaPad Model 2",
        "brand": "Lenovo",
        "tags": ["Popular", "Latest"],
        "order": {"price": 9405.0, "quantity": 2},
    }
)
For the second document, two new fields are added, namely an array field and a map field which is a nested object (or dictionary in Python). This is how they are displayed in the Firebase console:

In the above examples, we have specified document IDs, which are unique strings. However, if the documents don’t have a field with unique values, we can omit the document ID and let Firestore assign an auto-generated ID for us with the add() method:
coll_ref = firestore_client.collection("laptops")
create_time, doc_ref = coll_ref.add(
    {
        "name": "Apple macbook air",
        "brand": "Apple",
    }
)

print(f"{doc_ref.id} is created at {create_time}")
# CnidNv3f6ZQD9K7MnLyy is created at 2022-11-13 09:55:23.989902+00:00
Create a document with a subcollection
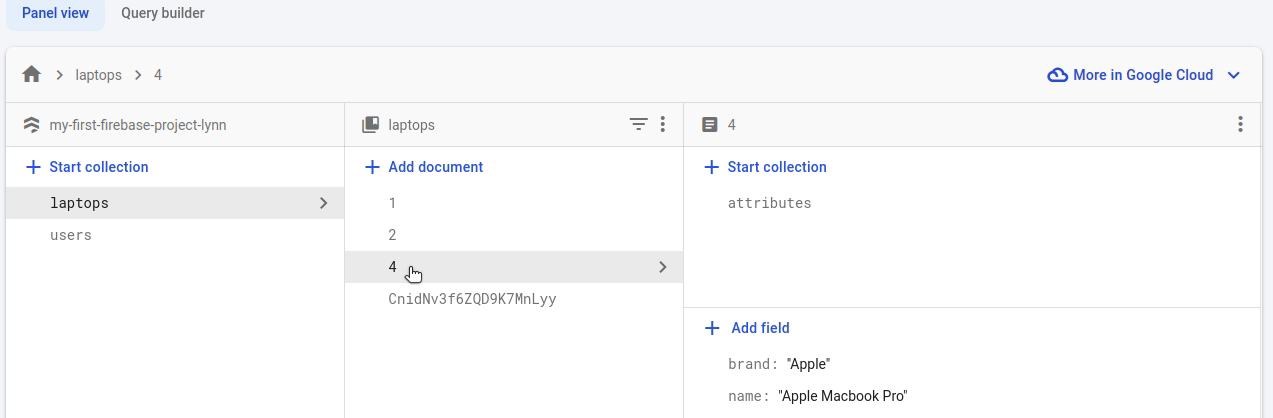
A subcollection is a collection associated with a specific document. In this example, we will create a subcollection containing the attributes of a laptop.
laptop_ref = firestore_client.collection("laptops").document("4")
laptop_ref.set(
    {
        "name": "Apple Macbook Pro",
        "brand": "Apple",
    }
)

# Specify the subcollection for a laptop document.
attr_coll = laptop_ref.collection("attributes")

# Add documents to the subcollection.
attr_ref = attr_coll.document("storage")
attr_ref.set({"name": "Storage", "value": "1", "unit": "TB"})

# We don't need to create the doc ref beforehand if the metadata is not needed.
attr_coll.document("ram").set({"name": "ram", "value": "16", "unit": "GB"})
Note how the subcollection is displayed in the Firebase console:
Using subcollections has many limitations. A major one, which seems buggy to me is that a subcollection is not deleted when the parent document is deleted. However, this may not be a good example of using subcollections. A better one is the chat room example given in the official documentation where the messages in each subcollection are independent and equivalent entities which makes more sense to stay when the parent document is deleted.
In this simple example, the attributes subcollection can be replaced by an array of maps:
laptop_ref = firestore_client.collection("laptops").document("5")
laptop_ref.set(
    {
        "name": "Apple Macbook Pro",
        "brand": "Apple",
        "attributes": [
            {"name": "Storage", "value": "1", "unit": "TB"},
            {"name": "ram", "value": "16", "unit": "GB"},
        ],
    }
)
Firestore is like a point-and-shoot camera for frontend developers, if you need more advanced features for nested documents, you might want to try out more dedicated server-side databases like MongoDB or Elasticsearch.
Read documents
Now that we have inserted some documents, we can try to read them in different ways.
First, let’s read a single document by its ID.
doc_ref = firestore_client.collection('laptops').document("1")

# We can read the id directly:
print(f"The document id is {doc_ref.id}")
# The document id is 1

# We need to use .get() to get a snapshot of the document:
doc = doc_ref.get()
print(f"The document is {doc.to_dict()}")
# The document is {'brand': 'HP', 'name': 'HP EliteBook Model 1'}
Note that we need to call the .get() method of the document reference to get a snapshot of the document data.
Now, let’s read all the documents in a collection:
coll_ref = firestore_client.collection('laptops')

# Using coll_ref.stream() is more efficient than coll_ref.get()
docs = coll_ref.stream()
for doc in docs:
    print(f'{doc.id} => {doc.to_dict()}')
Note that coll_ref.stream() returns a generator of DocumentSnapshot while coll_ref.get() returns a list of them. Therefore, coll_ref.stream() is more efficient and should be preferred in most cases.
This is the result for the code snippet:
1 => {'brand': 'HP', 'name': 'HP EliteBook Model 1'}
2 => {'tags': ['Popular', 'Latest'], 'order': {'quantity': 2, 'price': 9405.0}, 'brand': 'Lenovo', 'name': 'Lenovo IdeaPad Model 2'}
4 => {'brand': 'Apple', 'name': 'Apple Macbook Pro'}
5 => {'attributes': [{'value': '1', 'unit': 'TB', 'name': 'Storage'}, {'value': '16', 'unit': 'GB', 'name': 'ram'}], 'brand': 'Apple', 'name': 'Apple Macbook Pro'}
CnidNv3f6ZQD9K7MnLyy => {'brand': 'Apple', 'name': 'Apple macbook air'}
Note that the subcollection of document 4 is not read by default, but the array of maps of document 5 is. Actually, the documents in a subcollection need to be read explicitly like top-level ones. Let’s read the attribute documents in the attributes subcollection of document 4:
attr_coll_ref = (
    firestore_client.collection("laptops")
    .document("4")
    .collection("attributes")
)

for attr_doc in attr_coll_ref.stream():
    print(f"{attr_doc.id} => {attr_doc.to_dict()}")
This time the attribute documents can be read successfully:
ram => {'value': '16', 'unit': 'GB', 'name': 'ram'}
storage => {'value': '1', 'unit': 'TB', 'name': 'Storage'}
Read documents with filtering queries
In the above read operations, the documents are read with no filtering conditions. In practice, it is common to perform simple and compound queries to get the data we need.
First, let’s try to get all the laptops whose brand is Apple:
# Create a reference to the laptops collection.
coll_ref = firestore_client.collection("laptops")

# Create a query against the collection reference.
query_ref = coll_ref.where("brand", "==", "Apple")

# Print the documents returned from the query:
for doc in query_ref.stream():
    print(f"{doc.id} => {doc.to_dict()}")
And this is what is returned from this code snippet:
4 => {'brand': 'Apple', 'name': 'Apple Macbook Pro'}
5 => {'attributes': [{'value': '1', 'unit': 'TB', 'name': 'Storage'}, {'value': '16', 'unit': 'GB', 'name': 'ram'}], 'brand': 'Apple', 'name': 'Apple Macbook Pro'}
CnidNv3f6ZQD9K7MnLyy => {'brand': 'Apple', 'name': 'Apple macbook air'}
Note that we need to first create a reference to the collection and then generate a query based on it.
The where() method of the collection reference is used for filtering, which takes three parameters, namely a field to filter on, a comparison operator, and a value. A list of common query operators can be found here.
There are two operators that can be easily confused, namely in and array-contains, let's check them with two simple examples.
The in operator returns documents where the given field matches any of the specified values. For example, this query finds the laptops whose brand is either “HP” or “Lenovo”:
query_ref = coll_ref.where("brand", "in", ["HP", "Lenovo"])On the other hand, the array-contains operator returns documents where the given array field contains the specified value as a member. The query below finds the laptops which have the “Popular” tag:
query_ref = coll_ref.where("tags", "array_contains", "Popular")Query for subcollection and adding indexes
Since we have subcollection in one laptop document, let’s see how to filter by subcollection and what the result would look like.
As each laptop document can have its own attributes subcollection, we need to query by a collection group which is just all collections with the same ID.
The collection_group method is used to filter by a collection group. Let’s find the attributes whose name is “Storage”, unit is “TB”, and value is “1”:
query_ref = (
    firestore_client.collection_group("attributes")
    .where("name", "==", "Storage")
    .where("unit", "==", "TB")
    .where("value", "==", "1")
)

for doc in query_ref.stream():
    print(f"{doc.id} => {doc.to_dict()}")
As we see, the where() method can be chained to filter by multiple fields. When the above code is run, there is will an error saying that no index is available.
FailedPrecondition: 400 The query requires an index. You can create it here: https://console.firebase.google.com.....By default, Firestore creates single field indexes for every field automatically which enables filtering by a single field. However, when we filter by multiple fields, a composite index would be needed.
Click the link given in the console and you will be directed to the page to create the corresponding composite index for the above query:
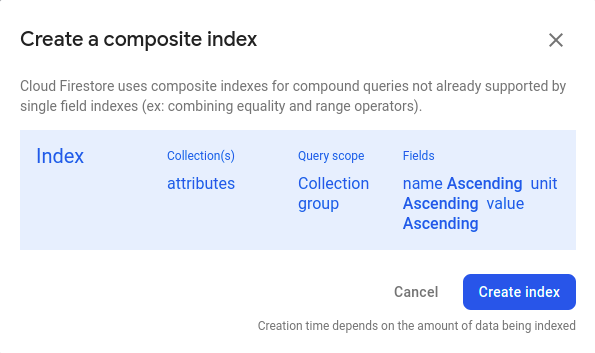
Click “Create index” to create the composite index. It will take some time to complete. Once it’s done, the status will be changed to “Enabled”:

And when you run the above query for subcollection again, you will get the result successfully:
storage => {'value': '1', 'unit': 'TB', 'name': 'Storage'}Note that it just returns the document in the attributes subcollection and doesn’t return the parent document.
The queries of Firestore have a lot of limitations and are not suitable for complex queries, especially for nested fields and full-text searches. For more advanced searches, MongoDB and Elasticsearch should be considered instead. However, for front-end usage, the basic queries provided above should suffice in most cases.
Update documents
Congratulations when you reach here! We have covered the most complex parts of writing and reading. The remaining parts for updating and deleting documents are much more straightforward.
Let’s first update the value of a specific field. For example, let’s update the product name of the Apple MacBook air to be all capitalized:
doc_ref = firestore_client.collection("laptops").document(
    "CnidNv3f6ZQD9K7MnLyy"
)

doc_ref.update({"name": "Apple MacBook Air"})
The changes should be instant as can be found in the Firebase console.
Then let’s see how to update a nested field. Let’s change the quantity to 5 for the document with ID “2”:
doc_ref = firestore_client.collection("laptops").document("2")
doc_ref.update({"order.quantity": 5})
Note that the nested field is specified with the dot notation.
Finally, let’s update the tags field which is an array field. Let’s add the “In Stock” tag and remove the “latest” one:
doc_ref = firestore_client.collection('laptops').document('2')

# Add a new array element.
doc_ref.update({'tags': firestore.ArrayUnion(["In Stock"])})

# Remove an existing array element.
doc_ref.update({'tags': firestore.ArrayRemove(["Latest"])})
Note that the array elements to add or remove are specified as an array itself. It may look weird when a single element is added or removed, but become more natural when multiple ones are processed.
Delete documents
Finally, let’s see how to delete documents. Well, it’s actually pretty simple. We just need to call the delete() method on the document reference:
doc_ref = firestore_client.collection("laptops").document(
    "CnidNv3f6ZQD9K7MnLyy"
)
doc_ref.delete()
As we mentioned multiple times, deleting a document won’t delete its subcollection. Let’s see it in practice:
doc_ref = firestore_client.collection('laptops').document('4')
doc_ref.delete()
When we check document “4” in the Firebase console, we can see the data is deleted but the attributes subcollection is still there. The document ID is italic and gray, indicating the document has been deleted.

As to the collection itself, we cannot delete it directly with a library. We can, however, do it in the Firebase console. To delete a collection with a library, we need to delete all the documents first. And when all the documents are deleted, the collection will be deleted automatically.
In this post, we first introduced how to set up the Firebase Admin SDK to work with Firestore in Python. Using a private key file of the service account would be applicable in most cases for local development. When the client library is authenticated and initialized, we can perform all kinds of CRUD operations in Python. We have covered how to work with basic fields, array fields, nested fields, and also subcollections. With this tutorial, you shall be very confident in managing the data used by your mobile or web applications in Python.


