
ESP32-IDF —HelloWorld Get Started
How To Get Started — ESP_IDF_Series Episode #03
This post will review the code example published by Espressif located at directory <IDF_PATH>\examples\get-started\blink of ESP-IDF installation.
It follows the CMake build system software environment for the hardware-based on the ESP32 chip produced by Expressif.
For official tutorial, please head over to:
(the stable version as of June 2020): https://docs.espressif.com/projects/esp-idf/en/stable/)For Installation of ESP-IDF (Expressif IoT Development Framework) on Windows 10 using the CMake-based build system please take a look at this other post.
These are the steps for an ESP-IDF project:
ESP-IDFMenu Configuration
Building
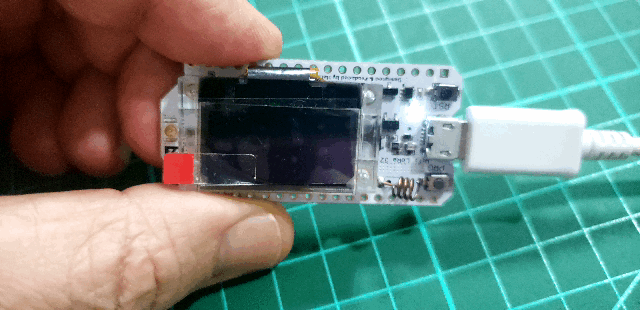
Flashing firmware onto an ESP32 boardLet me show you what I have in my atelier:)
Material Needed
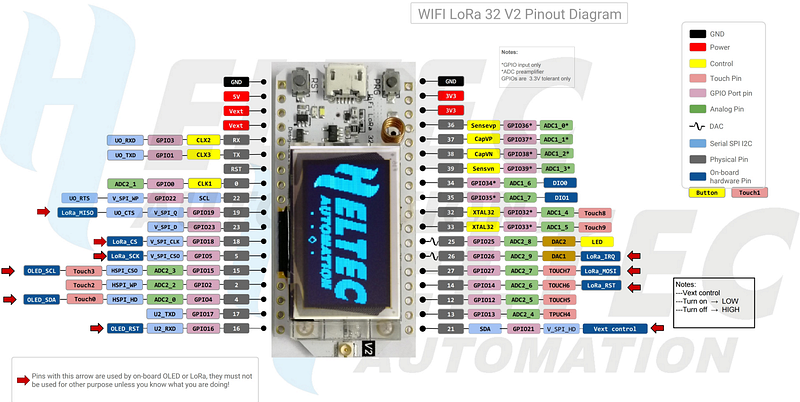
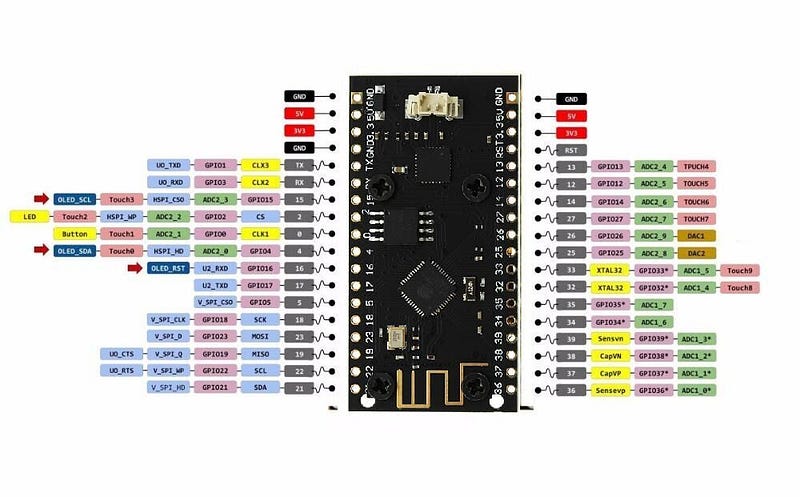
ESP32 kit board
High quality Type B-Micro USB Cable
The ESP-IDF is an amalgamation of a number of components:
1.ESP32 base library;
2.WiFi Drivers;
3.TCP/IP stack;
4.FreeRTOS stack;
5.Webserver;
6.Driver for sensor(s);
7.Main code tying it all together
Follows some concepts and jargons about ESP-IDF:
. ESP-IDF makes these components explicit & configurable;
. To config project use text-based new system (customizable);
. After config, the build system will compile the project;
. The app is inside a directory with all the support files;
. You can modify project config (sdkconfig file) by typing idf.py menuconfig at prompt;
. 1 project builds 2 apps: a) proj app = exe & b) boot app = launcher;
. components = modular pieces linked into app;
. target = hadware = ESP32;
. IDF_PATH = link ESP-IDF project;
. Toolchain = for compilation - should be on the PATH;
Annotation about The CMake-based build system:
There are 2 main build Tools: CMake + Ninja to build a full Application for ESP32 (this post) or GNU Make build system (other post);For CMake build system:
. The CMake-based build system is a front-end command line tool;
. What is idf.py ? idf.py is a top-level config/build command line tool for ESP-IDF;
. It easily managing your project builds;
. esptool.py = Flasher;
. idf.py is a wrapper around CMake for programmer convinience;
. idf.py Commands:
idf.py menuconfig = to config the app;
idf.py build = multiple steps build process; it creaes sub-directories; run Ninja or GNU Make; Building is incremental (no-change; nothing done)
idf.py clean = delating build output files except config files;
idf.py fullclean = delete build directory recursively;
idf.py flash -p PORT -b BAUD RATE = it flashes prog onto chip;
idf.py monitor -p PORT -b BAUD RATE = Serial output;
. You can combine commands, like this: idf.py -p COM4 flash monitor;
. The order is not important (it automatically will be executed in the correct order);
. Python interpreter - ESP-IDF works with Python 2.7 or 3.8;Here is the layout that the ESP-IDF Tools Installer makes in my machine:
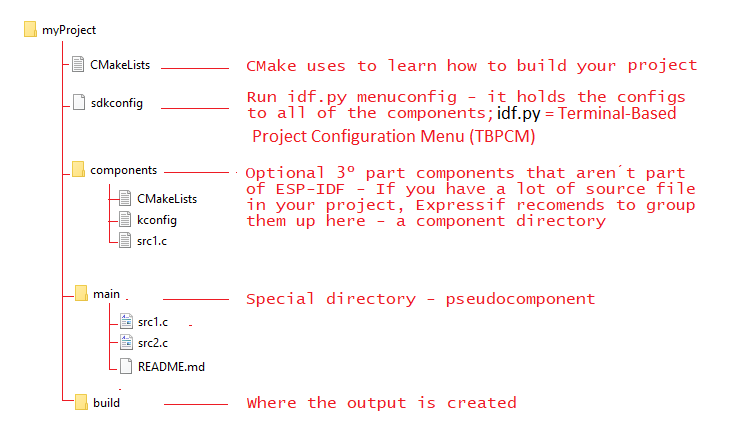
Here is an Espressif recommended ESP-IDF project layout directory (for my custom project I put it inside the Directory Examples above and worked fine):
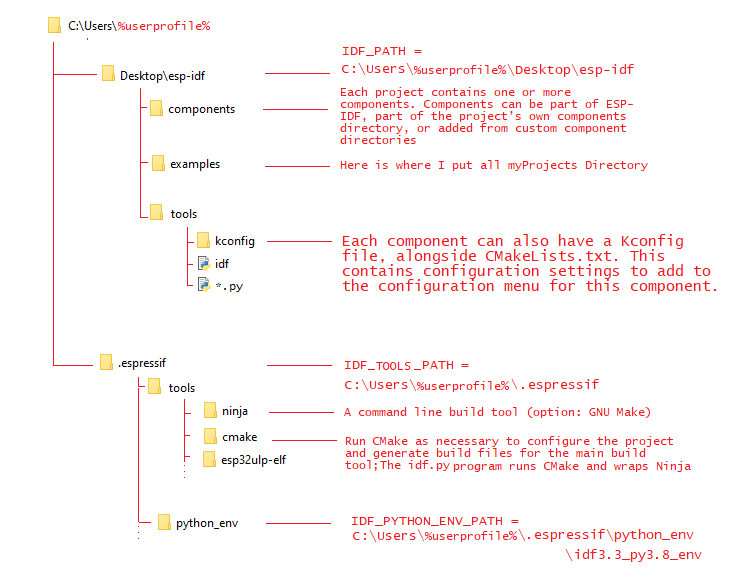
Setup Path to ESP-IDF
IDF_PATH =
C:\Users\%userprofile%\Desktop\esp-idf
IDF_PYTHON_ENV_PATH = C:\Users\%userprofile%\.espressif\python_env\idf3.3_py3.8_envIDF_TOOLS_PATH =
C:\Users\%userprofile%\.espressifFine, now let’s code o/
The first example that I will review is the blink project.
You can find it at this location: C:\Users\%userprofile%\Desktop\esp-idf\examples\get-started\blink.
Here is the blink.c code at \main sub-directory:
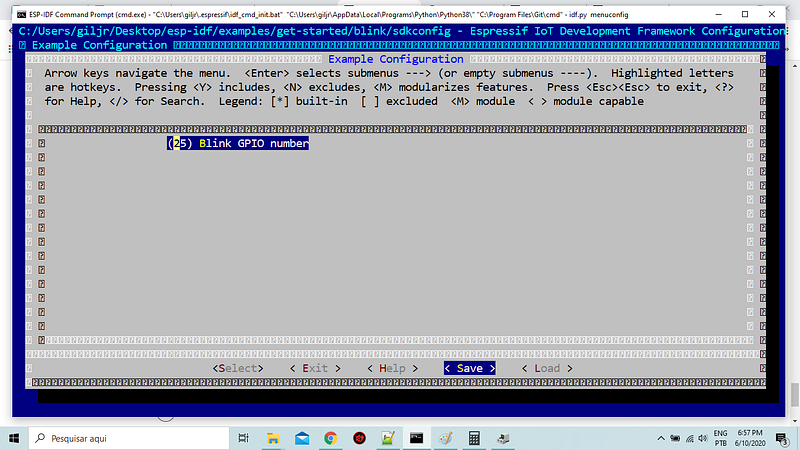
1.Menu Configuration
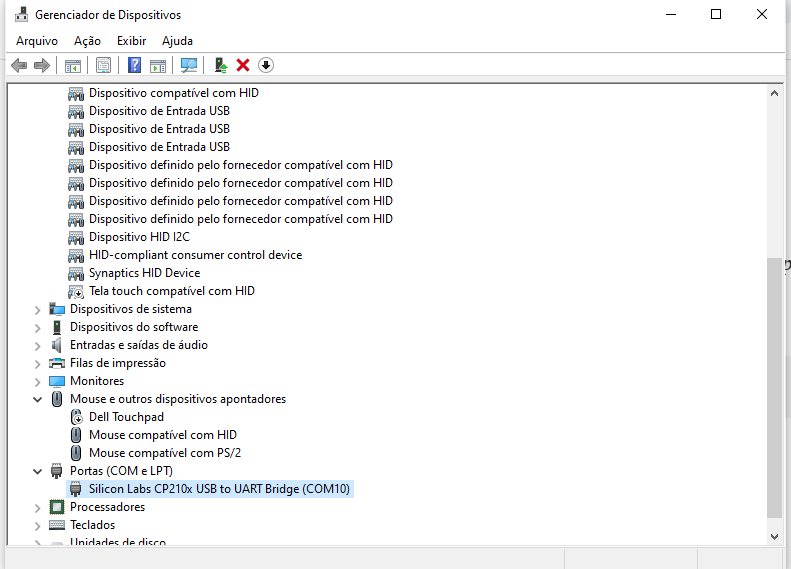
Let’s connect our device to a USB port.
Go to Device Manager and find the port that your ESP device is attached:
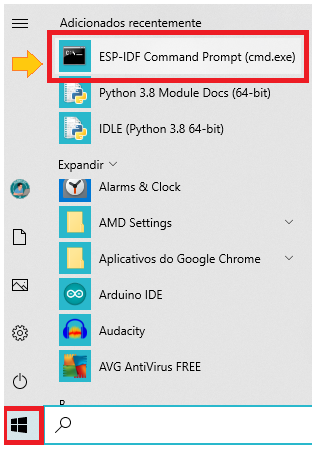
Go to ESP-IDF commands prompt (cmd.exe):
Now go to directory C:\Users\%userprofile%\Desktop\esp-idf\examples\get-started\blink and type:
idf.py menuconfig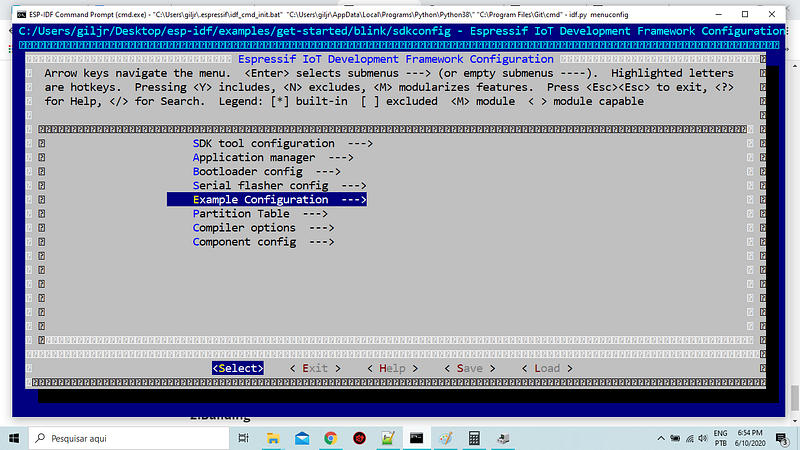
Type cls to clear the screen.2.Building
Type:
idf.py buildThis process will take a long time. Please, take a coffee and relax! ☕
3.Flashing firmware onto an ESP32 board at \main sub-directory:
When it finishes type:
idf.py -p <PORT_NUMBER> flash monitor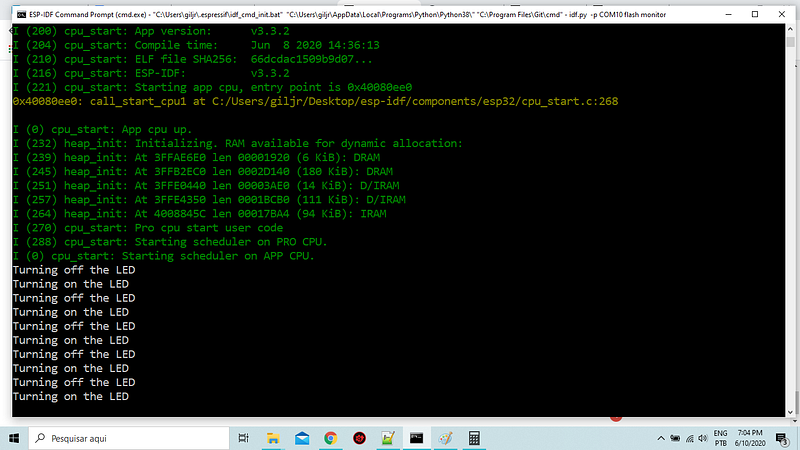
That’s all for now!
In the next episode we won't be shy, let’s get some more stamina, right?
Thank you!
Download All Files For This Project
Credits & References
https://docs.espressif.com/projects/esp-idf/en/v3.3/api-guides/build-system-cmake.html
CMake Tutorial — CMake 3.17.3 Documentation
Related Post
00#Episode — ESP_IDF_Series — ESP-IDF Programming Guide + WiFi LoRa 32 (v2) — How To Get Started
01#Episode — ESP_IDF_Series — LoRa LPWAN — Long Range Low Power Wide Area Network — LoRa was developed by Semtech, founder LoRa Alliance
02#Episode — ESP_IDF_Series — ESP-IDF Programming Guide + WiFi LoRa 32 (v2) + idf.py utility — How To Really Get Started
03#Episode — ESP_IDF_Series — ESP32-IDF — HelloWorld Get Started — How To Get Started (this one:)