avatarAnupam Chugh

Free AI web copilot to create summaries, insights and extended knowledge, download it at here

3506

Abstract

iewItem</span>, <span class="hljs-params">at</span> <span class="hljs-params">modifiedContentsURL</span>: <span class="hljs-type">URL</span>)</pre></div><p id="7794">The above method gets triggered when the <code>EditingMode</code> is <code>createsCopy</code>. It returns the URL of the modified content(the content resides in a temp location). We can then choose to handle the URL and save it in <code>FileManager</code>.</p><h2 id="dc54">Notifying about edited contents</h2><p id="3f81">We can choose to update the user interface after being notified of the successful update of the QLPreviewItem. This gets triggered when the Editing Mode is <code>updatesContent</code> :</p><div id="de43"><pre><span class="hljs-keyword">func</span> <span class="hljs-title function_">previewController</span>(<span class="hljs-keyword">_</span> <span class="hljs-params">controller</span>: <span class="hljs-type">QLPreviewController</span>, <span class="hljs-params">didUpdateContentsOf</span> <span class="hljs-params">previewItem</span>: <span class="hljs-type">QLPreviewItem</span>)</pre></div><p id="9428">In the next section, we’ll be creating a simple iOS application that invokes the Quick Look preview with a sample image, video, and PDF that are available with the source code. Just <code>import QuickLook</code> in your ViewController to get started.</p><h1 id="1af7">Setting Up QLPreviewController</h1><p id="f51e">The following code is used to present the Quick Look Preview controller in our application’s ViewController and enable the Editing Mode:</p><div id="6d97"><pre><span class="hljs-keyword">@objc</span> <span class="hljs-keyword">func</span> <span class="hljs-title function_">onButtonClick</span>(<span class="hljs-params">sender</span>: <span class="hljs-type">UIButton</span>){

    <span class="hljs-keyword">let</span> previewController <span class="hljs-operator">=</span> <span class="hljs-type">QLPreviewController</span>()
    previewController.dataSource <span class="hljs-operator">=</span> <span class="hljs-keyword">self</span>
    previewController.delegate <span class="hljs-operator">=</span> <span class="hljs-keyword">self</span>
    previewController.setEditing(<span class="hljs-literal">true</span>, animated: <span class="hljs-literal">true</span>)
    <span class="hljs-keyword">self</span>.present(previewController, animated: <span class="hljs-literal">true</span>, completion: <span class="hljs-literal">nil</span>)

}</pre></div><p id="ac1e">Next, you need to conform to the <code>QLPreviewControllerDelegate</code> , <code>QLPreviewControllerDataSource</code> protocols and implement the delegate functions in your class.</p><h1 id="7b22">Setting Up Our Data Source</h1><p id="e020">For the data source, we’ve set up an array of file name literals that’ll be used to display the <code>QLPreviewItems</code> as shown below:</p><div id="ff42"><pre><span class="hljs-selector-tag">var</span> items : <span class="hljs-selector-attr">[String]</span> = <span class="hljs-selector-attr">[<span class="hljs-string">"sampleVideo.mp4"</span>, <span class="hljs-string">"samplePDF.pdf"</span>, <span class="hljs-string">"sampleImage.png"</span>]</span></pre></div><p id="f461">Next, we need to implement the data source protocol methods in order to display the <code>QLPreviewItems</code>. The following code is responsible for displaying the data source files in <code>QLPreviewItems</code> :</p><div id="c84a"><pre><span class="hljs-keyword">exten

Options

sion</span> <span class="hljs-title class_">ViewController</span>: <span class="hljs-title class_">QLPreviewControllerDataSource</span> { <span class="hljs-keyword">func</span> <span class="hljs-title function_">numberOfPreviewItems</span>(<span class="hljs-params">in</span> <span class="hljs-params">controller</span>: <span class="hljs-type">QLPreviewController</span>) -> <span class="hljs-type">Int</span> { <span class="hljs-keyword">return</span> items.count }

<span class="hljs-keyword">func</span> <span class="hljs-title function_">previewController</span>(<span class="hljs-keyword">_</span> <span class="hljs-params">controller</span>: <span class="hljs-type">QLPreviewController</span>, <span class="hljs-params">previewItemAt</span> <span class="hljs-params">index</span>: <span class="hljs-type">Int</span>) -&gt; <span class="hljs-type">QLPreviewItem</span> {
    
    <span class="hljs-built_in">print</span>(controller.isEditing)
    
    <span class="hljs-keyword">let</span> name <span class="hljs-operator">=</span> <span class="hljs-keyword">self</span>.items[index]
    <span class="hljs-keyword">let</span> file <span class="hljs-operator">=</span> name.components(separatedBy: <span class="hljs-string">"."</span>)
    <span class="hljs-keyword">let</span> path <span class="hljs-operator">=</span> <span class="hljs-type">Bundle</span>.main.path(forResource: file.first<span class="hljs-operator">!</span>, ofType: file.last<span class="hljs-operator">!</span>)
    <span class="hljs-keyword">let</span> url <span class="hljs-operator">=</span> <span class="hljs-type">NSURL</span>(fileURLWithPath: path<span class="hljs-operator">!</span>)
    <span class="hljs-keyword">return</span> url <span class="hljs-keyword">as</span> <span class="hljs-type">QLPreviewItem</span>
}

}</pre></div><h1 id="e4a8">Saving Updated Contents</h1><p id="98c6">Finally, we’ll add the optional delegate functions in order to save the edited contents as a copy by using the <code>FileManager</code> :</p> <figure id="8ccf"> <div> <div>

            <iframe class="gist-iframe" src="/gist/anupamchugh/bafdea72a505f681f07d623f62dae235.js" allowfullscreen="" frameborder="0" height="undefined" width="undefined">
          </div>
        </div>
    </figure></iframe></div></div></figure><p id="4d49">In the above code, we retrieve the file path using the <code>modifiedContentsURL</code>. Using the FileManager, we save the edited file into our application’s document directory.</p><p id="ccd4">As a result, we get the following application up and running!</p><figure id="33fe"><img src="https://cdn-images-1.readmedium.com/v2/resize:fit:800/1*0s8Wp_3HS3cIz1YZ_gg1rg.gif"><figcaption></figcaption></figure><p id="01a4">We’ve set up our buttons using the new <a href="https://readmedium.com/ios-13-context-menus-and-sf-symbols-a03b032fe330">iOS 13 System Symbols</a>.</p><h1 id="0206">Conclusion</h1><p id="5ea9">So we explored the little gem that largely went unnoticed during WWDC 2019. Quick Look Editing Mode is an interesting feature since it allows us to quickly annotate PDFs in our application by using the PencilKit framework built-in. The full source code is available in the <a href="https://github.com/anupamchugh/iowncode/tree/master/iOS13QuickLook">Github Repository</a>.</p><p id="4f4e">That’s it for this one. I hope you enjoyed reading.</p></article></body>

Edit PDFs, Images, and Videos Using Quick Look in iOS 13

The QuickLook framework introduced an editing mode

Illustration by Undraw

One of the lesser-known gems of iOS, the Quick Look Framework is useful for previewing documents in your application. During WWDC 2019, the framework got a nice upgrade with the introduction of editing mode.

QLPreviewController is the controller responsible for presenting contents of varying types in a view controller. Currently, it supports images, videos, PDFs, CSV, and iWork file types.

QLPreviewItemEditingMode is the new addition to the framework that allows us to annotate images and PDFs and trim or convert videos easily.

QLPreviewItemEditingMode embeds the PencilKit framework for editing images and PDFs.

Our Goal

  • Exploring the new additions in the Quick Look framework
  • Building an iOS Application that uses Quick Look for editing documents
  • Saving the edited documents in the documents directory using the FileManager

Final destination

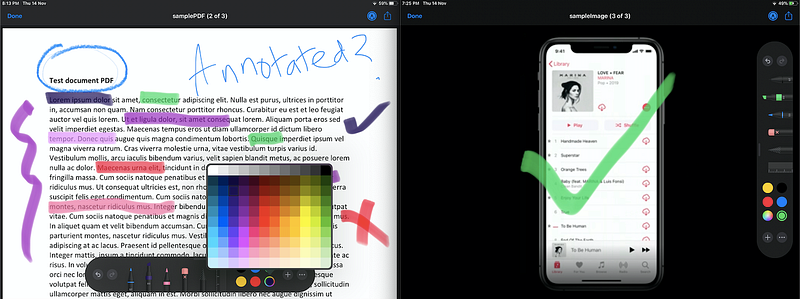
By the end of this piece, we’ll be able to edit and save images, videos, and PDFs as shown below:

A glimpse from the future

What’s New in iOS 13 QuickLook?

Besides the addition of QLPreviewItemEditingMode, the QLPreviewControllerDelegate protocol introduces three new optional delegate methods.

Handling editing mode capabilities

We can handle the editing mode by implementing the following method:

optional func previewController(_ controller: QLPreviewController, editingModeFor previewItem: QLPreviewItem) -> QLPreviewItemEditingMode

In the above method, we can set the return type as createCopy , default or updateContents to handle the editing results accordingly. updateContents overwrites the content of the QLPreviewItems in the FileManager. By default editing mode is off.

Saving the edited contents

Once the edit is done, we can save the modified contents using the below optional method:

func previewController(_ controller: QLPreviewController, didSaveEditedCopyOf previewItem: QLPreviewItem, at modifiedContentsURL: URL)

The above method gets triggered when the EditingMode is createsCopy. It returns the URL of the modified content(the content resides in a temp location). We can then choose to handle the URL and save it in FileManager.

Notifying about edited contents

We can choose to update the user interface after being notified of the successful update of the QLPreviewItem. This gets triggered when the Editing Mode is updatesContent :

func previewController(_ controller: QLPreviewController, didUpdateContentsOf previewItem: QLPreviewItem)

In the next section, we’ll be creating a simple iOS application that invokes the Quick Look preview with a sample image, video, and PDF that are available with the source code. Just import QuickLook in your ViewController to get started.

Setting Up QLPreviewController

The following code is used to present the Quick Look Preview controller in our application’s ViewController and enable the Editing Mode:

@objc func onButtonClick(sender: UIButton){
        
        let previewController = QLPreviewController()
        previewController.dataSource = self
        previewController.delegate = self
        previewController.setEditing(true, animated: true)
        self.present(previewController, animated: true, completion: nil)
}

Next, you need to conform to the QLPreviewControllerDelegate , QLPreviewControllerDataSource protocols and implement the delegate functions in your class.

Setting Up Our Data Source

For the data source, we’ve set up an array of file name literals that’ll be used to display the QLPreviewItems as shown below:

var items : [String] = ["sampleVideo.mp4", "samplePDF.pdf", "sampleImage.png"]

Next, we need to implement the data source protocol methods in order to display the QLPreviewItems. The following code is responsible for displaying the data source files in QLPreviewItems :

extension ViewController: QLPreviewControllerDataSource {
    func numberOfPreviewItems(in controller: QLPreviewController) -> Int {
        return items.count
    }
    
    func previewController(_ controller: QLPreviewController, previewItemAt index: Int) -> QLPreviewItem {
        
        print(controller.isEditing)
        
        let name = self.items[index]
        let file = name.components(separatedBy: ".")
        let path = Bundle.main.path(forResource: file.first!, ofType: file.last!)
        let url = NSURL(fileURLWithPath: path!)
        return url as QLPreviewItem
    }
}

Saving Updated Contents

Finally, we’ll add the optional delegate functions in order to save the edited contents as a copy by using the FileManager :

In the above code, we retrieve the file path using the modifiedContentsURL. Using the FileManager, we save the edited file into our application’s document directory.

As a result, we get the following application up and running!

We’ve set up our buttons using the new iOS 13 System Symbols.

Conclusion

So we explored the little gem that largely went unnoticed during WWDC 2019. Quick Look Editing Mode is an interesting feature since it allows us to quickly annotate PDFs in our application by using the PencilKit framework built-in. The full source code is available in the Github Repository.

That’s it for this one. I hope you enjoyed reading.

iOS
Programming
iOS App Development
Swift
Software Development
Recommended from ReadMedium