
How to Drag & Drop Images — JavaScript
A step by step guide on uploading multiple images on the frontend

How to drag and drop images with JavaScript? In this tutorial, I’ll teach you everything you need to know about uploading images with drag & drop functionality. I’ll even take it a step further and teach you to how to combine this functionality with manually inputting the images by clicking on a button.
Dragging and dropping images might seem like a complicated task, but I assure you, it’s not. By the end of this tutorial, you’ll be an expert and perhaps you’ll even want to learn how to save the images on a server so they don’t disappear off the screen when you click on the refresh button. In case you do, here’s a link to a story that teaches you how to do that with Node.js.
In this tutorial, you’ll build the following application:
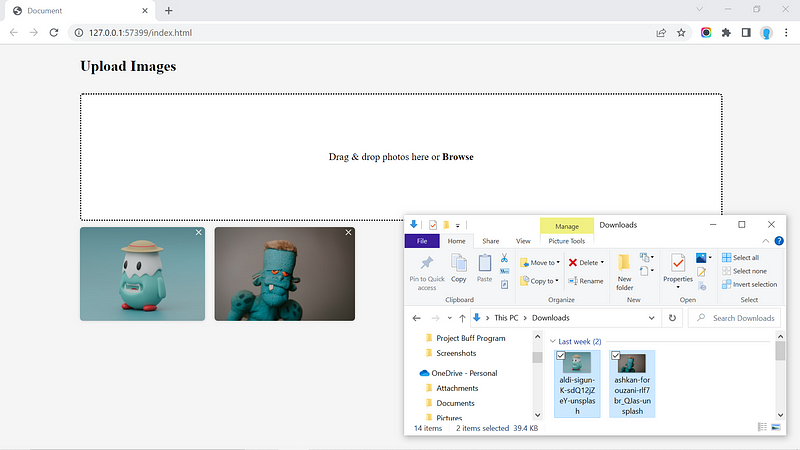
Let’s dive right in.
HTML:
Create a div element with a class name of input-div so the user has somewhere to drop the images into. Within the div, create an input field that processes the images. Also create an output element to display the images on the screen.
<div class="input-div">
  <p>Drag & drop photos here or <strong>Browse</strong></p>
  <input type="file" class="file" multiple="multiple" accept="image/jpeg, image/png, image/jpg">
</div>

<output></output>
JavaScript:
Create a variable for each of the elements in the HTML file and an array named imagesArray to hold the images.
const inputDiv = document.querySelector(".input-div")
const input = document.querySelector("input")
const output = document.querySelector("output")
let imagesArray = []
Add a change event to the input field so users can upload images manually.
input.addEventListener("change", () => {

})
Access the uploaded images through input.files and store them in a variable named files.
input.addEventListener("change", () => {
  const files = input.files
})
Run a for loop on files that pushes each image into the imagesArray.
input.addEventListener("change", () => {
  const files = input.files
  for (let i = 0; i < files.length; i++) {
    imagesArray.push(files[i])
  }
})
Call on a function named displayImages that, well, displays the images on the screen. We’ll create the actual function a little later.
input.addEventListener("change", () => {
  const files = input.files
  for (let i = 0; i < files.length; i++) {
    imagesArray.push(files[i])
  }
  displayImages()
})
Now let’s add the drag & drop functionality. Add a drop event to the inputDiv.
inputDiv.addEventListener("drop", (e) => {

})
Access the uploaded images through e.dataTransfer.files and store them in a variable named files.
inputDiv.addEventListener("drop", (e) => {
  e.preventDefault()
  const files = e.dataTransfer.files
})
Run a for loop on files that checks if the user uploaded an actual image, and not any other file type. If they happen to upload something other than an image, simply use the continue keyword to skip the file.
inputDiv.addEventListener("drop", () => {
  e.preventDefault()
  const files = e.dataTransfer.files
  for (let i = 0; i < files.length; i++) {
    if (!files[i].type.match("image")) continue
  }
})
Also ensure the imagesArray is only storing images that haven’t already been added to the array.
inputDiv.addEventListener("drop", () => {
  e.preventDefault()
  const files = e.dataTransfer.files
  for (let i = 0; i < files.length; i++) {
    if (!files[i].type.match("image")) continue

    if (imagesArray.every(image => image.name !== files[i].name))
      imagesArray.push(files[i])
  }
})
Make a function call to the displayImages function in here as well.
inputDiv.addEventListener("drop", () => {
  e.preventDefault()
  const files = e.dataTransfer.files
  for (let i = 0; i < files.length; i++) {
    if (!files[i].type.match("image")) continue;

    if (imagesArray.every(image => image.name !== files[i].name))
      imagesArray.push(files[i])
  }
  displayImages()
})
Now create the displayImages function. Inside, create a variable named images that will hold the dynamic HTML for each of the images.
function displayImages() {
  let images = ""
}
For each image, create a div with a class name of image and a img tag that holds the URL for the image. Creating a URL for an image is easy, just pass the image as a parameter into URL.createObjectURL. Also create a function named deleteImage that removes the image from the screen.
function displayImages() {
let images = ""
imagesArray.forEach((image, index) => {
images += `<div class="image">
<img src="${URL.createObjectURL(image)}" alt="image">
<span onclick="deleteImage(${index})">×</span>
</div>`
})
}Now set the innerHTML of the output element to the images variable. This will display the images on the screen.
function displayImages() {
let images = ""
imagesArray.forEach((image, index) => {
images += `<div class="image">
<img src="${URL.createObjectURL(image)}" alt="image">
<span onclick="deleteImage(${index})">×</span>
</div>`
})
output.innerHTML = images
}Almost finished, we just need to complete the deleteImage function. Notice that we have index coming in as a parameter, use it to remove the respective image from the imagesArray and call on the displayImages function to display the updated images on the screen.
function deleteImage(index) {
  imagesArray.splice(index, 1)
  displayImages()
}
CSS:
The CSS merely acts as the design so I won’t dive into what each line of code is doing. Feel free to customize it to your liking.
.input-div {
  width: 100%;
  height: 200px;
  border-radius: 5px;
  display: flex;
  justify-content: center;
  align-items: center;
  text-align: center;
  border: 2px dotted black;
  background-color: white;
  position: relative;
}

.file {
  width: 100%;
  height: 100%;
  position: absolute;
  opacity: 0;
  cursor: pointer;
}

output {
  width: 100%;
  min-height: 150px;
  display: flex;
  justify-content: flex-start;
  flex-wrap: wrap;
  gap: 15px;
  position: relative;
  border-radius: 5px;
}

output .image {
  height: 150px;
  border-radius: 5px;
  box-shadow: 0 0 5px rgba(0, 0, 0, 0.15);
  overflow: hidden;
  position: relative;
}

output .image img {
  height: 100%;
  width: 100%;
}

output .image span {
  position: absolute;
  top: -4px;
  right: 4px;
  cursor: pointer;
  font-size: 22px;
  color: white;
}

output .image span:hover {
  opacity: 0.8;
}

output .span--hidden {
  visibility: hidden;
}
Like this story? Applaud and a comment below. Also don’t forget to check out my other stories related to uploading images with JavaScript.
How to Upload Images to a Server with Node.js and Multer — JavaScript
…. or watch the best image uploading system tutorial on the internet below.


