
How to Upload Images with Node.js and Multer— JavaScript
a comprehensive guide on creating a complete image uploading system

How to upload images with Node.js? I’ve written several stories on how to upload images but strictly on the frontend, like this one. This guide shows you how to upload images on the frontend and how to store them in the file system of a server (also known as the backend). One of the easiest ways to do this is with a package named Multer. Multer is a Node.js middleware used for handling multimedia, which is primarily used for uploading images.
This is the application you’ll build:

Notice we have a container with images saved in the server and another with images queued in the frontend. This is to help you understand how uploading images works. You see, you can’t just upload images to the server without keeping track of what you already have saved back there, at least not an efficient one. This is what most, if not all, tutorials don’t teach you and that’s exactly why I’m creating this guide. Keeping saved images separated from queued images is imperative for building an efficient image uploading system.
Lastly, developing a solid image uploading system requires quite a bit of patience and work. Don’t worry though, ill break the process down step by step so its easy for you to understand. Please make sure to read the comments within the code as they provide a lot of insight as to what is going on. This isn’t one of those tutorials you can get away with skimming through while just copying and pasting the codes. That only increases your chances of making a mistake and getting frustrated. Instead, make it worth your while and read this guide carefully.
Backend
1.) Install packages and setup folder structure
You’ll need to create a new project folder, install the necessary NPM packages, and setup the proper folder structure. If you’re a complete beginner, please watch the short video below to learn how to do this.
If your an experienced node developer and don’t need help setting up, please make sure you install the following NPM packages: express, multer, ejs, and nodemon. Also make sure you have the same folder structure and the same contents inside the package.json file as I do below.

2.) Create and start the server
Open up the server.js file and bring in the packages you installed along with the following built-in node modules: path, fs, and util.
// For creating the server
const express = require("express");
// For handling multimedia
const multer  = require("multer");
// For working with the file and directory paths
const path = require("path");
// For interacting with the file system
const fs = require("fs");
// Provides access to utility functions
const util = require("util");
// ...such as this one to unlink or remove files from the file system
const unlinkFile = util.promisify(fs.unlink);
Now setup the server. Notice the comments that say, “Insert Multer middleware here” and “Insert routes here”, we’ll add the code for each of these a little later.
// INSERT MULTER MIDDLEWARE HERE ----------------------


// Port number the server will run on
const port = process.env.PORT || 3000;

// For creating an instance of the express module
const app = express();

// Middleware to deal with incoming data from the frontend
app.use(express.json())
app.use(express.urlencoded({extended: false}))

// For setting EJS as the template engine
app.set("view engine", "ejs");

// For accessing the public folder
app.use(express.static("public"));

// INSERT ROUTES HERE ----------------------------------


// For runnng the server
app.listen(port, () => {
  console.log(`Server started on port ${port}`);
});
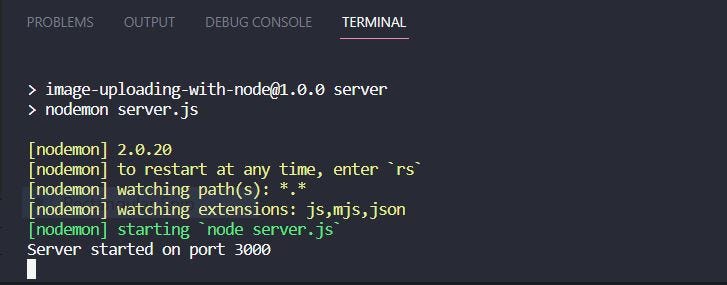
Run the server by typing npm run server in the terminal window.

If you did everything correctly, you should see a message that says, “Server started on port 3000”.
3.) Insert the Multer middleware
Insert the Multer middleware in the location that I indicated above.
We’ll be making use of Multers disk storage engine, which has the following two options: destination and filename.
Destination enables you to choose the folder where you want the uploaded images to be saved.
Filename enables you to choose a name for each of the uploaded images.
Notice we’re storing this information in a variable named storage, which we’ll be using in the next step.
// multer.diskStorage gives you full control of where to store the images
const storage = multer.diskStorage({
// Choose a destination
  destination: function (req, file, cb) {
// Lets store them in the uploads folder
    cb(null, "./public/uploads/")
  },
// Choose a filename for each uploaded image
  filename: function (req, file, cb) {
// Lets create a unique name for each image
    const uniqueSuffix = Date.now() + '-' + Math.round(Math.random() * 1E9)
    cb(null, uniqueSuffix + path.extname(file.originalname))
  }
})
Add in the Multer object. The Multer object has a number of different options available, but we’ll only use the following three: storage, limits, and fileFilter.
Storage enables you to choose a destiny and filename for the uploaded images. We already did this step above.
Limits enables you to set a limit on the image file size. I went ahead and set the max limit to 100000, which is equivalent to 1MB.
Filefilter allows you to filter out file types. For example, say you only allow JPEG, PNG, JPG, and GIF files but the user uploads a PDF, you can detect this with fileFilter.
const upload = multer({
  storage: storage, // Choose destination and filename
  limits: { fileSize: 1000000 }, // Set a max file size
  fileFilter: function (req, file, cb) { // Filter out certain files
    checkFileType(file, cb)
  }
}).any() // accepts all files types coming in through the wire
Notice that within the fileFilter option, we called a function named checkFileType, lets create that now. This function does the job of fileFilter only it does it outside the Multer object. It checks if the incoming images have one of the following extensions: JPEG, PNG, JPG, or GIF. If they don’t, a call back message is sent to the user containing an error message.
function checkFileType(file, cb){
  // Allow the following file types only
  const filetypes = /jpeg|png|jpg|gif/
  // Test if the uploaded image file extensions match the allowed types
  const extname = filetypes.test(path.extname(file.originalname).toLowerCase())
  // Test if the uploaded image mimetypes match the allowed types
  const mimetype = filetypes.test(file.mimetype)
  // If both test return true allow the images to be uploaded
  if(mimetype && extname){
    return cb(null,true)
  } else { // otherwise return the following error
    cb("Please upload images only")
  }
}
You may have noticed that it isn’t necessary to create the checkFileType function outside the Multer object or the storage variable for that matter; you can technically add all that code inside the Multer object. Separating things the way we did just looks cleaner in my opinion.
4.) Insert the routes
Insert the necessary routes in the location that I indicated above.
You’ll need the following three routes: GET, POST, and PUT.
The GET route is responsible for accessing the uploads folder and retrieving the saved images within. Each image will then be stored in an array, which we’ll render and process in the frontend. If there aren’t any images in the folder then it will simply render an empty array, at which point no images will appear in the frontend.
app.get("/", (req, res) => {
  // Initialize an empty array
  let images = []
  // Access the saved images (files) in the uploads folder
  fs.readdir("./public/uploads/", (err, files) => {
    // If there is no error reading the files from this directory...
    if(!err){
      // ... add each file to the array
      files.forEach(file => {
        images.push(file);
      })
      // ... render the index view and the images array
      res.render("index", { images: images})
    } else {
      // Else console log the error
      console.log(err)
    }
  });
})
The POST route is responsible for saving the images the user uploads. Before we save them though, we must ensure the images pass all the tests we set forth in the Multer object and some. Remember, they must all be less than 1MB in size and they must all have a JPEG, PNG, JPG, or GIF extension. While we’re at it, let’s also check if the user uploaded a file because sometimes users click the upload button without selecting anything.
app.post("/upload", (req, res) => {
  // Use the multer object
  upload(req, res, (err) => {
    if(!err && req.files != "") { // ...all tests passed
      res.status(200).send()
    } else if (!err && req.files == ""){ // ...the user didn't upload anything
      res.statusMessage = "Please select an image to upload";
      res.status(400).end()
    } else { // ...the image is bigger than 1MB OR one or more files are not jpeg, png, jpg, or gif
      res.statusMessage = (err === "Please upload images only" ? err : "Photo exceeds limit of 1MB") ;
      res.status(400).end()
    }
  })
})
The PUT route is responsible for deleting images. Before you attempt to delete anything though, check if the user selected any images to delete. If they didn’t, send them an error message, otherwise, remove each selected image from the uploads folder.
app.put("/delete", (req, res) => {
  // Create an array with the images the user wants to delete
  const deleteImages = req.body.deleteImages // mulitmedia object coming from the frontend

  // If the array is empty
  if(deleteImages == ""){
    // ...the user didn't select an image/s to delete
    res.statusMessage = "Please select an image to delete";
    res.status(400).end()
  // Else the array in not empty
  } else {
    // ...delete each of the selected images from the uploads folder
    deleteImages.forEach( image => {
      unlinkFile("./public/uploads/" + image);
    })
    res.statusMessage = "Succesfully deleted";
    res.status(200).end()
  }
})
Our server is officially ready to save and render images.
Frontend
5.) Create the HTML
Open up the index.ejs file and insert the HTML code below. Notice we have two separate forms. One is for deleting saved images and the other is for uploading queued images. Also notice the comment that says, “Insert JavaScript code here”, we’ll add this in the next step.
<!DOCTYPE html>
<html lang="en">
<head>
  <meta charset="UTF-8">
  <meta http-equiv="X-UA-Compatible" content="IE=edge">
  <meta name="viewport" content="width=device-width, initial-scale=1.0">
  <link rel="stylesheet" href="/css/styles.css">
  <title>Document</title>
</head>
<body>

  <main class="app">

    <div class="header">
      <h2>Upload Images</h2>
      <div class="server-message"></div>
    </div>

    <div class="input-div">
      <p>Drag & drop photos here or <span class="browse">Browse</span></p>
      <input type="file" class="file" multiple="multiple" accept="image/jpeg, image/png, image/jpg, image/gif"/>
    </div>

    <form id="saved-form">
      <div class="header">
        <h3>Saved in Server</h3>
        <button type="submit">Delete</button>
      </div>
      <div class="saved-div"></div>
    </form>

    <form id="queued-form">
      <div class="header">
        <h3>Queued in Frontend</h3>
        <button type="submit">Upload</button>
      </div>
      <div class="queued-div"></div>
    </form>

  </main>

  <script>
    // INSERT FRONTEND JAVASCRIPT CODE HERE ------------------
  </script>


</body>
</html>
6.) Insert Frontend JavaScript
Access the many different HTML elements by storing them in variables. Please don’t create a separate JavaScript file for this; instead, insert the code directly inside the script tags. Otherwise, you won’t be able to process the saved images array that’s coming in from the server.
let queuedImagesArray = [],
    savedForm = document.querySelector("#saved-form"),
    queuedForm = document.querySelector("#queued-form"),
    savedDiv = document.querySelector('.saved-div'),
    queuedDiv = document.querySelector('.queued-div'),
    inputDiv = document.querySelector('.input-div'),
    input = document.querySelector('.input-div input'),
    serverMessage = document.querySelector('.server-message'),
    savedImages = JSON.parse('<%-JSON.stringify(images)%>'), // saved images array from server
    deleteImages = [];
Lets deal with the images coming in from the server first. To do this, check if the saved images array contains any images. If it does, call a function named displaySavedImages to display them on the screen.
// Check if the savedImages array contains images
if(savedImages) displaySavedImages()
function displaySavedImages(){
// Create a variable to store HTML
let images = "";
// Iterate the savedImages array
savedImages.forEach((image, index) => {
// For each image, create the following HTML and add it to the images variable
images += `<div class="image">
<img src="http://localhost:3000/uploads/${image}" alt="image">
<span onclick="deleteSavedImage(${index})">×</span>
</div>`;
})
// Add the variable to the savedDiv to display images on the screen
savedDiv.innerHTML = images;
}Notice we created a function named deleteSavedImage for each of the images. This function gets called whenever the user clicks on the X icon located on the upper right hand corner of the image. Don’t get confused though, this function doesn’t technically delete the image from the server, it merely removes it from the screen. It does, however, store all the deleted images in a variable named deleteImages. We’ll make use of this to delete the images from the server a little later.
function deleteSavedImage(index) {
  // add the image to the deleteImages array
  deleteImages.push(savedImages[index])
  // remove the image from the savedImages array
  savedImages.splice(index, 1);
  // call on the displaySavedImages function to update the images you see on the savedDiv container
  displaySavedImages();
}
Before we can delete the images from the server, we’ll need to add an event listener to the savedForm.
savedForm.addEventListener("submit", (e) => {
  // prevent the form from submitting
  e.preventDefault()
  // call on the deleteImagesFromServer function
  deleteImagesFromServer()
});
Now whenever the user submits the form, it will activate this event listener, which calls on a function named deleteImagesFromServer. This function makes a fetch call to the PUT route that we created in the server and it sends over the deleteImages array. I went ahead and added some nice error handling within the promise functions.
function deleteImagesFromServer() {
  // Make a fetch request to the server with the deleteImages array in the body
  fetch("delete", {
    method: "PUT",
    headers: {
      "Accept": "application/json, text/plain, */*",
      "Content-type": "application/json"
    },
    body: JSON.stringify({deleteImages})
  })
  // Catch the response
  .then(response => {
    // If response status is not 200, throw an error
    if (response.status !== 200) throw Error(response.statusText)
    deleteImages = []
    serverMessage.innerHTML = response.statusText
    serverMessage.style.cssText = "background-color: #d4edda; color:#1b5e20"
  })
  // display the error message
  .catch(error => {
    serverMessage.innerHTML = error
    serverMessage.style.cssText = "background-color: #f8d7da; color:#b71c1c"
  });

}
Now let’s deal with the queue images. Create a function that displays the images on the screen as soon as the user uploads them. This function is very similar to the displaySavedImages function. Only this one uses URL.createObjectURL to convert the image into a URL, which we can use to display it on the screen.
function displayQueuedImages() {
// Create a variable to store HTML
let images = "";
// Iterate the queuedImages array
queuedImagesArray.forEach((image, index) => {
// For each image, create the following HTML and add it to the images variable
images += `<div class="image">
<img src="${URL.createObjectURL(image)}" alt="image">
<span onclick="deleteQueuedImage(${index})">×</span>
</div>`;
})
// Add the variable to the queuedDiv to display images on the screen
queuedDiv.innerHTML = images;
}This function also attaches a function named deleteQueuedImages to each of the images. This way the user can remove an image from the queue.
function deleteQueuedImage(index) {
  // remove the image from the queuedImages array
  queuedImagesArray.splice(index, 1);
  // call on the displayQueuedImages function to update the images you see on the queuedDiv container
  displayQueuedImages();
}
Unlike the saved images, which are coming in from the server, the queued images are either uploaded manually through the input field or dragged and dropped in. Let’s add the functionality for manually uploading them first.
input.addEventListener("change", () => {
  // access the user uploaded image/s
  const files = input.files;
  // add each of them to the queriedImages array
  for (let i = 0; i < files.length; i++) {
    queuedImagesArray.push(files[i])
  }
  // reset the form to it's default values
  queuedForm.reset();
  // display the uploaded images on the screen
  displayQueuedImages()
})
Now add the drag & drop functionality. Notice that we’re checking if the user uploaded an image within the for loop. That’s because unlike the input field, we don’t have the option to add an attribute that accepts certain file types in the HTML file; therefore, we must add do it manually.
inputDiv.addEventListener("drop", (e) => {
  e.preventDefault()
  // access the user uploaded image/s
  const files = e.dataTransfer.files
  for (let i = 0; i < files.length; i++) {
    if (!files[i].type.match("image")) continue; // only images allowed
    // Remove any duplicate images
    if (queuedImagesArray.every(image => image.name !== files[i].name))
      queuedImagesArray.push(files[i])
  }
  // display the uploaded images on the screen
  displayQueuedImages()
})
We added all of the functionality that enable users to upload and display images on the queue, now allow them to save the images in the server. Attach a submit event to the queuedForm.
queuedForm.addEventListener("submit", (e) => {
  // Prevent the form from submitting
  e.preventDefault()
  // call on the sendQueuedImagesToServer function
  sendQueuedImagesToServer()
});
Create the sendQueuedImagesToServer function.
function sendQueuedImagesToServer() {
  // The form data class is needed to send multimedia to the server
  const formData = new FormData(queuedForm);

  // append the images from the queuedImages array in the formData
  queuedImagesArray.forEach((image, index) => {
    formData.append(`file[${index}]`, image)
  })
  // Make a fetch request to the server with the formData in the body
  fetch("upload", {
    method: "POST",
    body: formData
  })
  // Catch the response
  .then(response => {
    // If response status is not 200, throw an error
    if(response.status !== 200) throw Error(response.statusText)
    // Otherwise reload the page
    location.reload()
  })
  // display the error message
  .catch( error => {
    serverMessage.innerHTML = error
    serverMessage.style.cssText = "background-color: #f8d7da; color:#b71c1c"
  });

}
7.) CSS
I won’t dive into what each line of CSS code is doing as it merely acts as the design. Feel free to customize this to your liking.
* {
  padding: 0;
  margin: 0;
  box-sizing: border-box;
}

body {
  font-family: 'Jost', sans-serif;
  background-color: whitesmoke;
}

button {
  padding: 10px;
  width: 70px;
  color: white;
  font-family: inherit;
  border-radius: 5px;
  cursor: pointer;
  border: 1px solid black;
  background-color: black;
  box-shadow: 0px 2px 6px 0px rgba(0, 0, 0, 0.5);
  font-size: 0.9rem;
}

.app {
  max-width: 1224px;
  width: 92%;
  margin: 20px auto;
  display: flex;
  flex-direction: column;
  gap: 10px;
}

.header {
  display: flex;
  justify-content: space-between;
  align-items: center;
  gap: 15px;
  width: 100%;
  padding-bottom: 10px;
}

.header h2 {
  min-width: fit-content;
}

.server-message {
  width: 100%;
  padding: 16px;
  border-radius: 5px;
}

.input-div {
  width: 100%;
  height: 200px;
  border-radius: 5px;
  display: flex;
  justify-content: center;
  align-items: center;
  text-align: center;
  border: 2px dotted black;
  background-color: white;
  position: relative;
}

.input-div .browse {
  color: black;
  font-weight: bold;
}

.file {
  width: 100%;
  height: 100%;
  position: absolute;
  opacity: 0;
  cursor: pointer;
}

.saved-div,
.queued-div {
  width: 100%;
  min-height: 150px;
  display: flex;
  justify-content: flex-start;
  flex-wrap: wrap;
  gap: 15px;
  position: relative;
  border-radius: 5px;
  border: 1px dotted black;
}

.saved-div .image,
.queued-div .image {
  height: 150px;
  border-radius: 5px;
  box-shadow: 0 0 5px rgba(0, 0, 0, 0.15);
  overflow: hidden;
  position: relative;
}

.saved-div .image:nth-child(4n),
.queued-div .image:nth-child(4n) {
  margin-right: 0;
}

.saved-div .image img,
.queued-div .image img {
  height: 100%;
  width: 100%;
}

.saved-div .image span,
.queued-div .image span {
  position: absolute;
  top: -4px;
  right: 4px;
  cursor: pointer;
  font-size: 22px;
  color: white;
}

.saved-div .image span:hover,
.queued-div .image span:hover {
  opacity: 0.8;
}

.saved-div .span--hidden,
.queued-div .span--hidden {
  visibility: hidden;
}
Whew, that was a lot of code. I hope your not feeling overwhelmed and if you are, understandably so. But imagine if you had to spend hours trying to figure this out on your own, like I did. This guide teaches you nearly everything you need to know, other than uploading images to a database and hosting them in a third party location like Amazon Web Services (AWS), instead of the file system. Then again, you would only need to know that if your building an enterprise grade application with millions of users. Let me know if you would like me to write a story on how to do that and checkout the GitHub repository for this project here.
Like this story? Applaud and comment below. Also don’t forget to check out my other stories related to uploading images with JavaScript.
How to Upload and Preview Images — JavaScript
How to Upload and Preview Multiple Images — JavaScript
…. or watch the best image uploading system tutorial on the internet below.


