
Dreambooth Training (JoePenna) On Vast.ai
A Guide To Running Joe Penna’s Dreambooth Stable Diffusion 1.5 On Vast.ai
Note : This is now a member-only story. However if you join the Stable Diffusion Training Discord Server, and ask me there (
@yushan.777), I will give you a Friends link to view with free access.
Table of Contents
Training Images Setup Vast.ai Launch The Instance & Jupyter Cell : Build Environment Cell : Download The 1.x Model Cell : Dreambooth Training Environment Setup Cell : Training Delete and Destroy your GPU Instance Other Notes — Max Training Steps — Learning Rate — Flip — Token — Using Your Own Regularization Images — How Do I Change Repeats? — Who is Joe Penna?
Update : Guide updated for repo commit 847eda0 (April 16 2023)

If you are reading this then you are probably wanting to train a face, object or style into a Stable Diffusion model to make cool, fun images that everyone seems to be doing lately.
While it is possible to run JoePenna’s trainer on a local computer using a consumer GPU, only GPUs with 24GB VRAM are up to the task (at the time of writing).
If you do not have such a GPU, then the alternative is to rent a GPU (and computer) online and pay for the compute time and that’s where Vast.ai comes in. It is a cloud service where you can rent GPUs to remotely perform compute-intensive tasks such as Machine Learning. Providers range from large datacenters to individuals with hardware resources to rent out. If you have sensitive datasets and worry about security or privacy then this is what they have to say on the matter in the Security section in their FAQ.
Training Images
Before we start using Vast.ai, we need to prepare your training images beforehand. The last thing you would want is to have a Vast.ai instance running and costing you money while you are prepping your training images.
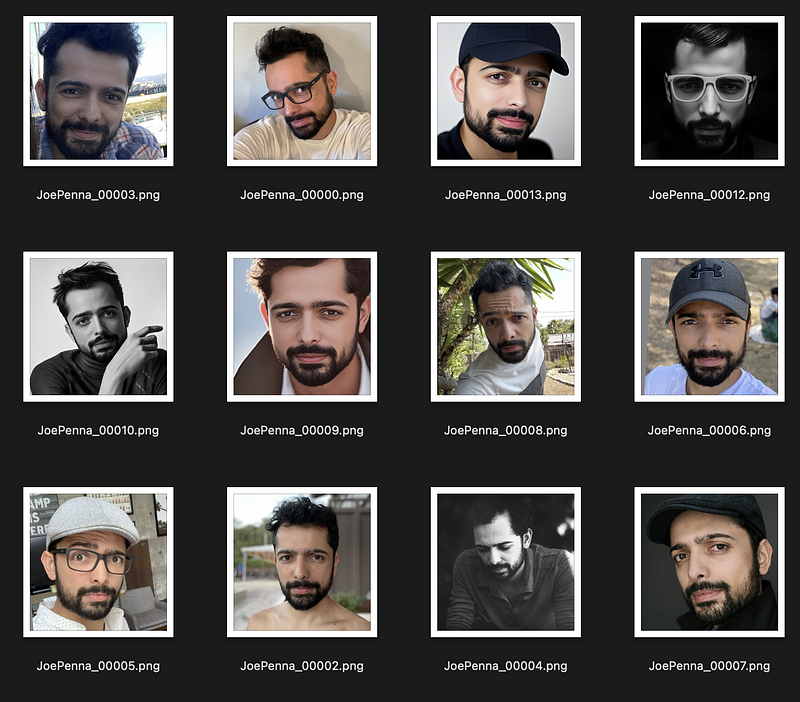
Training Images are those of your subject that you will be training. This can be a person, a pet, an object, an art style. For this tutorial we will just focus on a person and their face since that is what I have had the most experience with.
How many? The ideal number is up for debate but more is not always better. Many have had success with numbers ranging between 12 to 20.
How Big? Training images need to be 512x512 square.
How Should They Look? If you are training a face then ideally the only constant between each picture should be the face. That means you should avoid repeating elements such as backgrounds, clothing, lighting. Also try to keep the age range of the person in the photos roughly the same. You don’t want their appearance to change too much due to age differences (or for other reasons — weight gain/loss etc)
- 2–3 face close-ups of the face (front, side 45 degrees, eyes/nose/mouth only),
- The remainder of the images should be head & shoulder shots of different angles
- If you wish the body type to be learned, then include a couple of full body shots.
- Make sure there is no repetition of images that look similar and the outfits/backgrounds/lighting etc should be different in every shot.
Setup Vast.ai
Sign up or log-in to Vast.ai
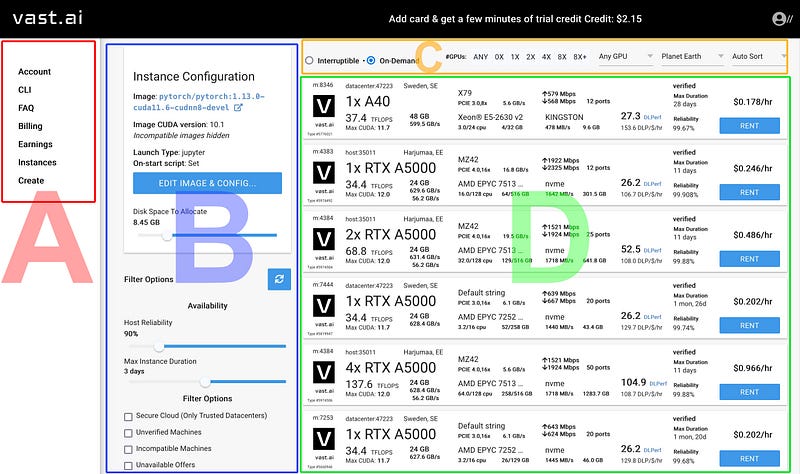
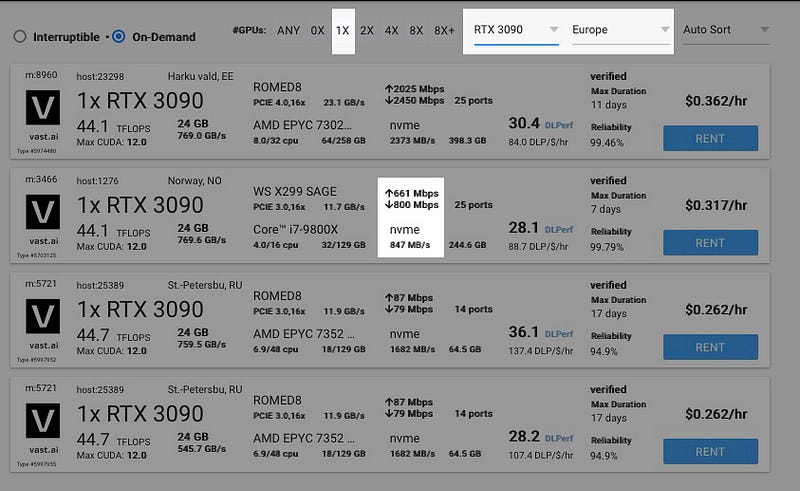
The main view shows :
Sidebar for navigation (A)
Primary options for your GPU instance (B)
Secondary options for your remote instance (number of GPUs, GPU type, geographic location etc (C)
GPU List : List of available GPUs (D)
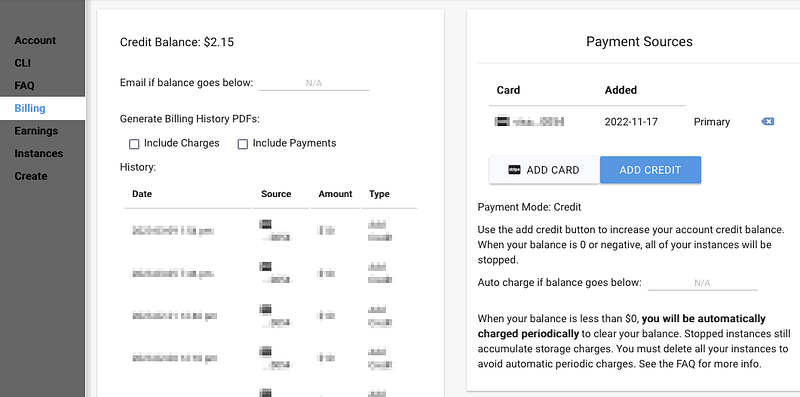
If you have just signed-up as a new member, you need to purchase some credit. Click on Billing in the sidebar (A) and buy $10 worth of credits. At the time of writing, an RTX 3090 instance will cost approximately $0.35 per hour. Other things will also influence the cost such as storage and bandwidth.
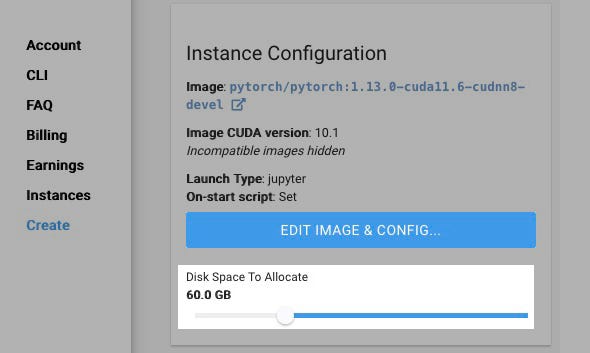
Click on Create in the sidebar (A) and it will take you back to the main view shown in Figure 1. In the Instance Configuration section (B), there will be a specific area near the top with the button EDIT IMAGE & CONFIG. Before we click this button, let’s allocate some storage space. 60GB should be enough for now.
There have been occasions when I have forgotten to allocate enough storage and the default 10GB would run out fast. A model you train on will be betwen 2 and 4GB, and the ones you produce after training are 2GB each, so be sure to allocate enough.
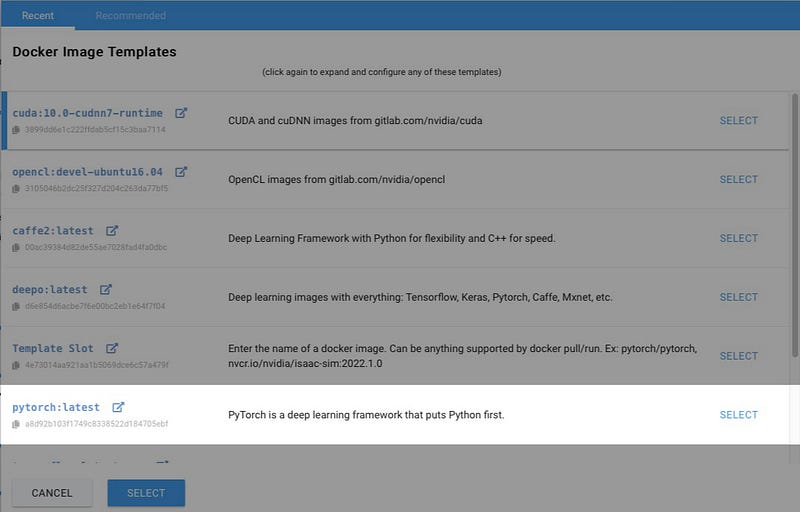
Now Click on EDIT IMAGE & CONFIG button. You will see a list of Templates. The one you want is Pytorch. Click on SELECT or anywhere on that bar to expand it.
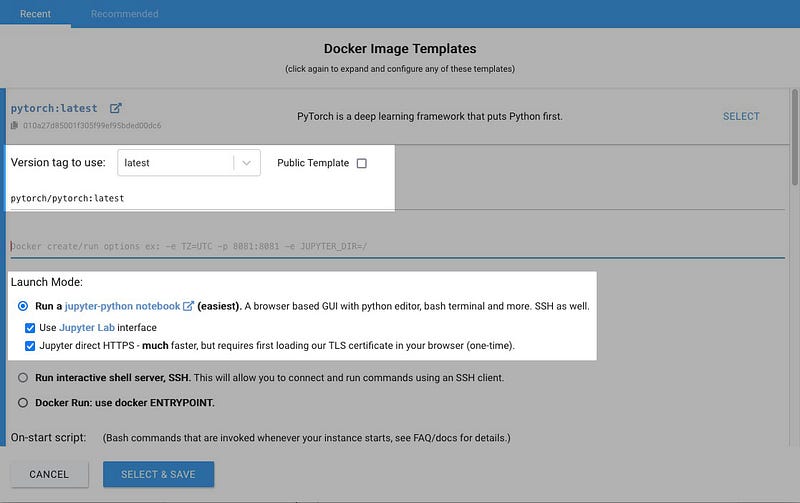
The Version tag dropdown list allows you to select which version of a Pytorch Image to use. For now we will use the “latest” (note: it’s not really the latest, it was just named that way when it was created months ago).
At the time of writing the following template images had been tested and found to be working:
pytorch/pytorch:2.0.0-cuda11.7-cudnn8-runtime pytorch/pytorch:1.13.1-cuda11.6-cudnn8-runtime pytorch/pytorch:1.13.0-cuda11.6-cudnn8-runtime pytorch/pytorch:1.12.1-cuda11.3-cudnn8-runtime pytorch/pytorch:1.12.0-cuda11.3-cudnn8-runtime pytorch/pytorch:1.11.0-cuda11.3-cudnn8-runtime pytorch/pytorch:1.10.0-cuda11.3-cudnn8-runtime pytorch/pytorch:latest
For Launch Mode make sure Use Jupyter Lab Interface is selected. Jupyter direct HTTPS is optional but in my experience it makes downloads more reliable and faster. There is one complication in that in order to use it you need to load Vast.ai’s TLS certificate in your browser which they describe in the Jupyter section of their FAQ.
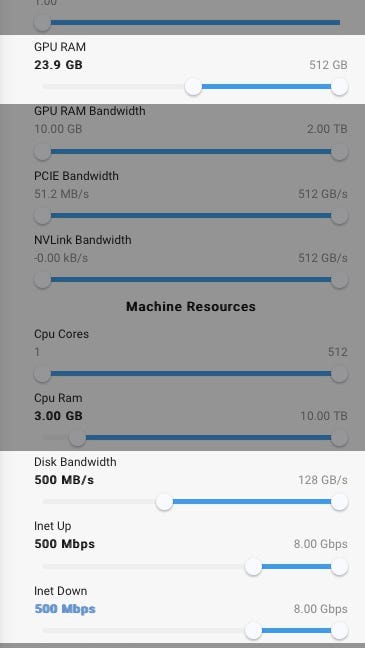
Click SELECT & SAVE Button. Scroll down the config list and enter the values as shown for GPU RAM, Disk Bandwidth, Inet Up, Inet Down. The reason 23.9GB is entered instead of 24GB for GPU RAM is because for some reason entering 24 exactly filters out all the cards that have 24GB of VRAM (which we want).
Now for the main GPU list (D). What I do is use the filter options near the top (C) to show only those that are geographically nearest to me, also I select RTX 3090 as it currently offers the best bang for buck. RTX 4090 will not be twice as fast (for this task) but it will be twice as expensive. Other cards may have more VRAM but they are unnecessary. Also, we select 1x since Dreambooth does not run on multiple GPUs.
I have had good experiences using instances based in Norway. Labeled Norway, NO or VIKEN, NO. One last thing I look for is a decent internet speed and disk speed (which we filtered for earlier). If you are happy with your selection, click RENT.
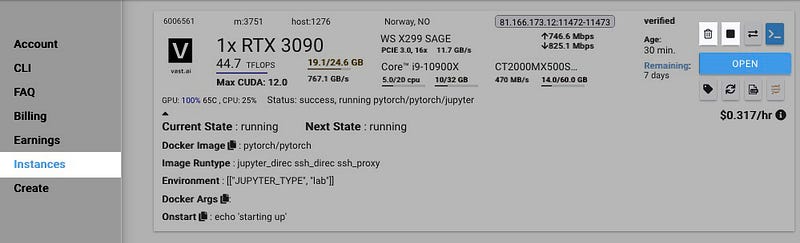
If you click on Instances in the sidebar (A) you will see your GPU instance starting up and building its environment. This can take anything from half a minute to a couple of minutes. If it takes longer than 5–6 minutes (rare) then kill the instance and select another. When it is ready, the OPEN button will be active. Note the delete and stop instance buttons. You need to remember those when you are finished. Click Open.
Launch The Instance & Jupyter
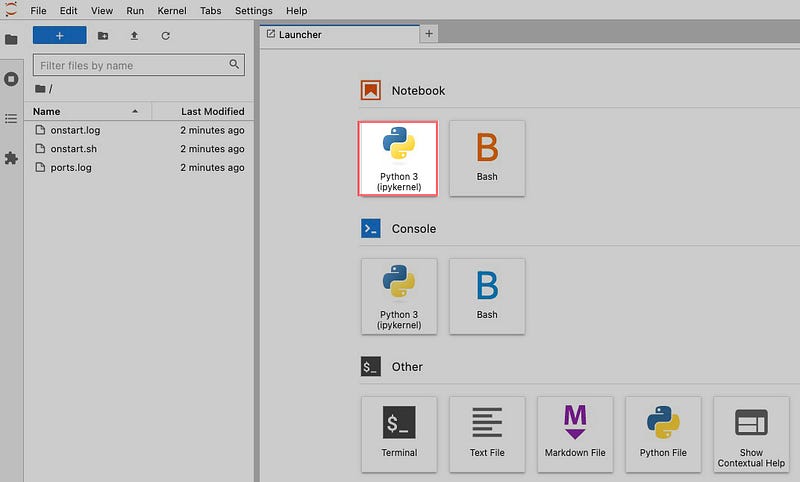
Another browser tab will open and Jupyter Labs will launch, You will see a file manager on the left side an tabbed editor area taking up the rest of the space. Create a new notebook by clicking on the icon Python 3 (ipykernel) under the Notebook section.
A new notebook will be created named Untitled.ipynb and will be opened with a single, empty cell. In this cell type or paste in the following:
!git clone https://github.com/JoePenna/Dreambooth-Stable-Diffusion.git
Click anywhere in the cell to make it active. A cell is active when its border is blue with a thick blue bar beside it.
With the cell active, we will run the cell by clicking on the play button on the toolbar just above the cell, alternatively we can use the shortcut (Shift+Return) to run the current-selected cell.
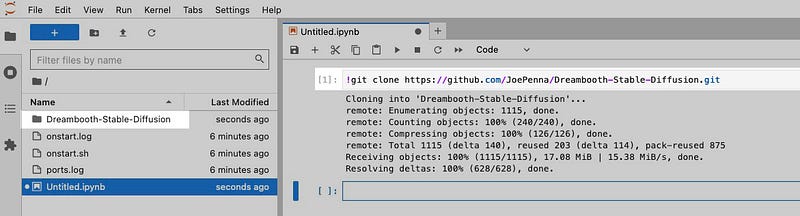
This command will create a copy of the JoePenna Dreambooth repository and the containing folder will be Dreambooth-Stable-Diffusion. If you don’t immediately see this folder, try click on the refresh button the file manager’s toolbar.
Note that your home directory is /workspace/ as shown near the top of the file manager. Therefore the full path to the repository you just cloned is: /workspace/Dreambooth-Stable-Diffusion .
Let’s move into this directory by double-clicking it.
You will see a bunch of folders and other notebooks within this folder. The notebook dreambooth_joepenna.ipynb highlighted below is the one you want to run.
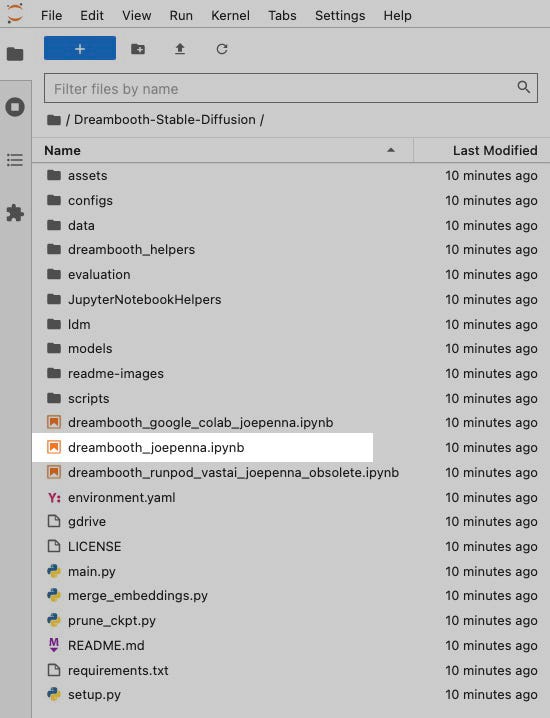
The notebook named dreambooth_runpod_runpod_vastai_joepenna_obsolete.ipynb is an older version and probably will not be updated. Double-click on dreambooth_joepenna.ipynb to open it in the editor area.
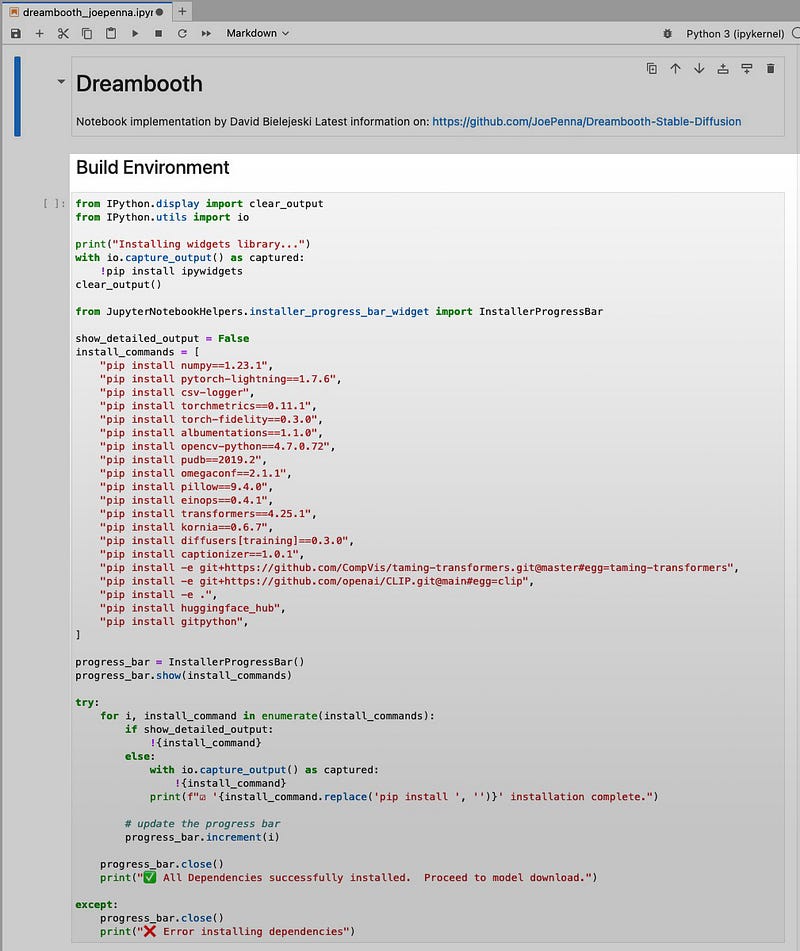
Build Environment
The cell we will start with is the onelabeled BUILD ENV highlighted below. Select that cell so it is highlighted and then press play button in the toolbar or use the shortcut (Shift+Return). This will take a few minutes.
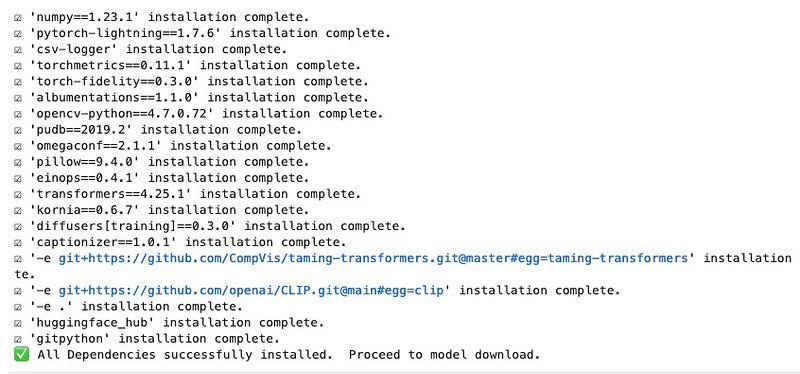
The output generated during the run of this cell should read like below.
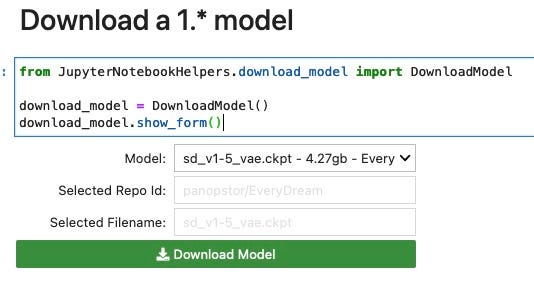
Download a 1.* model
Now for the next cell Download a 1.* model we download the model that will be trained on. Select the cell to run it. A dropdown list and button will appear. Here we will choose the default model to download:sd_v1-5_vae.ckpt which is the Stable Diffusion 1.5 model with the 1.5 VAE embedded in it.
Note: JoePenna only works with the ckpt format (no safetensors)
While a cell is running you will see [*] next to the cell, when it has finished or stopped due to an error it will show [n] where n is a number showing the number of times it has run.
Dreambooth Training Environment Setup
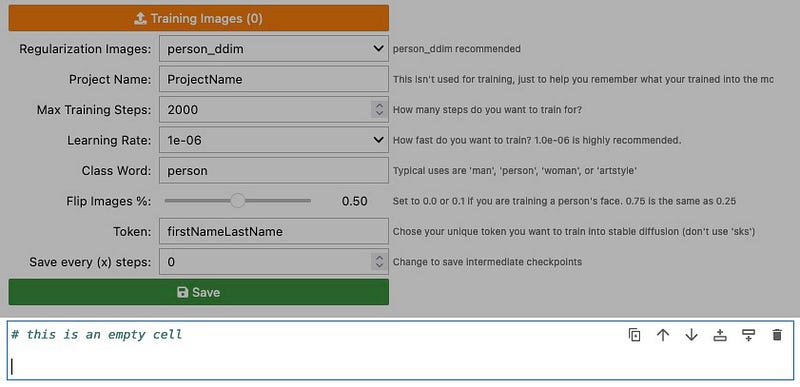
Highlight the cell to run it and it will show another UI shown below.
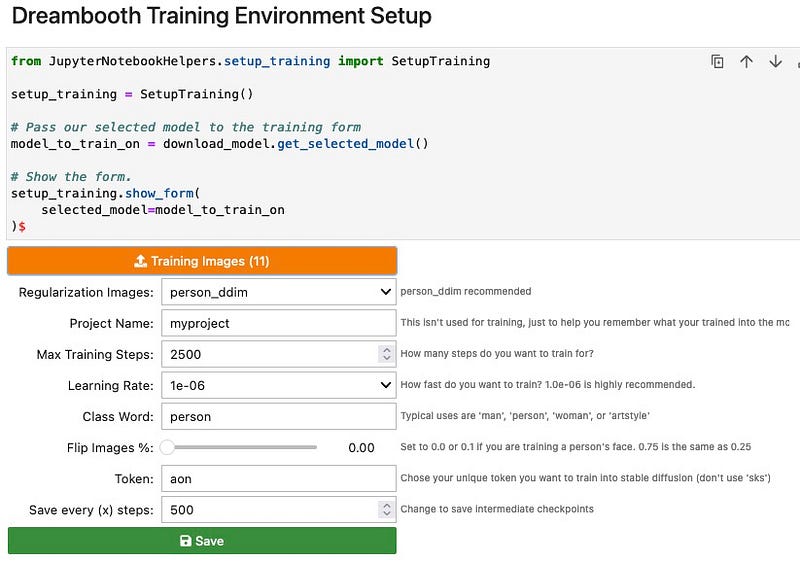
Training Images. Click this button to upload images of the subject you are going to train. Hopefully you will have prepared them earlier.
Update: May 4, 2023, It seems that the File Uploader widget can only handle a maximum of 10MB of files at a time. If you need more than this, you can either 1) upload just one file, and then manually drag and drop the rest of your images into the
training_imagesfolder or 2) convert your images to highest quality setting jpg.
Regularization Images. select the appropriate set that represents your subject. Since the subject I am training is a person and will use the class person, I will download the person_ddim collection. You can use man or woman instead but person keeps things more generalized.
If you have your own regularization images and wish to use those instead then follow these instructions at the end of this guide
# use wget to download your own regulariztion images
# place them in the folder :
!wget https://url-to-your-reg-images.zip
Max Training Steps. 2000 is the minimum default. But I’ve decided to use 2500.
Learning Rate. 1e-06 is the default (0.000001). Learning rate controls how much to adjust the model’s weights after each cycle. More detail at the end of this guide.
Class Word. A word that encapsulates the broad concept you are trying to train. Connected to Regularization Images. If you selected person_ddim, then use person as your class word. if you selected woman_ddim, then use woman as your class word.
Flip Images. People generally don’t have symmetrical faces so set to 0.0. More about this at the bottom of this guide.
Token. a word that will be used to invoke your subject when generating images. Fundamentally this can be anything you like but it’s generally good practice to avoid common nouns or names or well known abbreviations. Having said that, some have not had any problems using firstname+lastname combinations.
More about this at the bottom of the guide. I have also written more extensively about this in Good Token, Bad Token
For the sake of this tutorial, we will use the token “aon” .
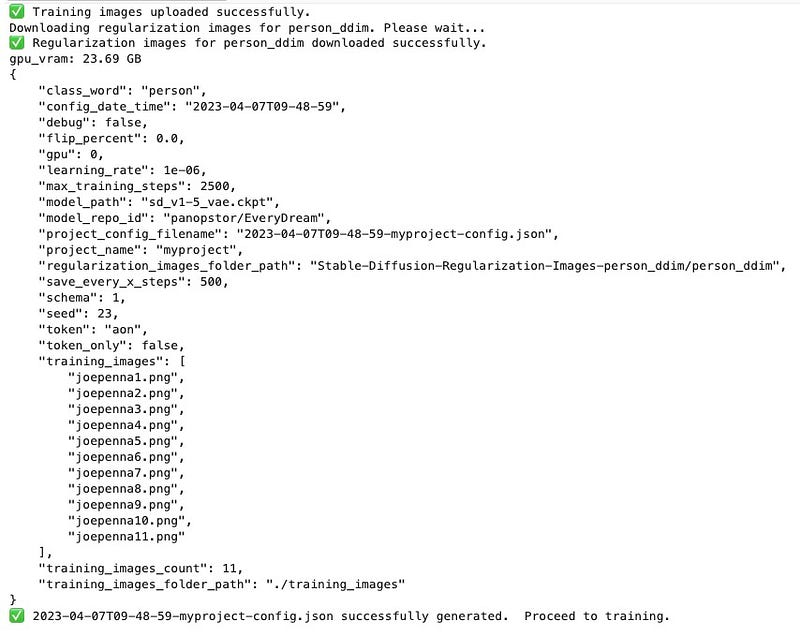
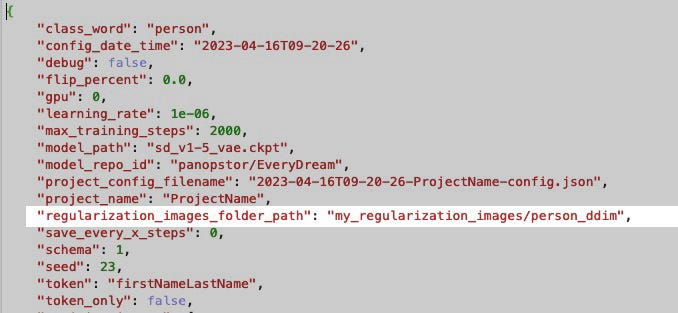
When you click on Save, it will upload your training images as well as fetch the regularization images. If all goes well you should see an output like the one below. Note the output of the training settings.
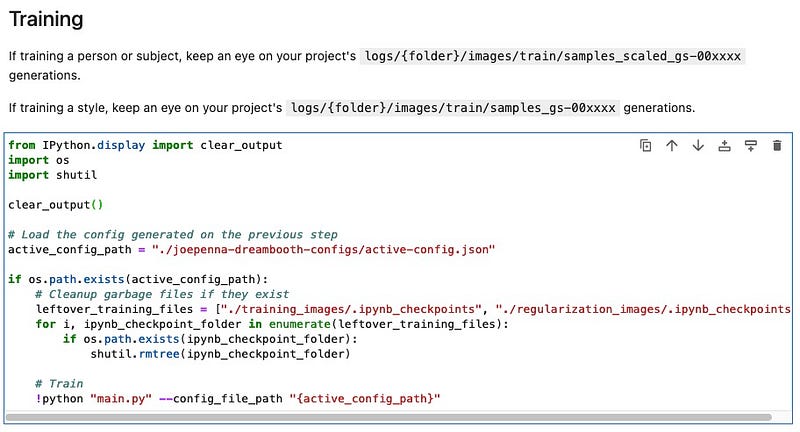
Training
Run the cell to start the training.
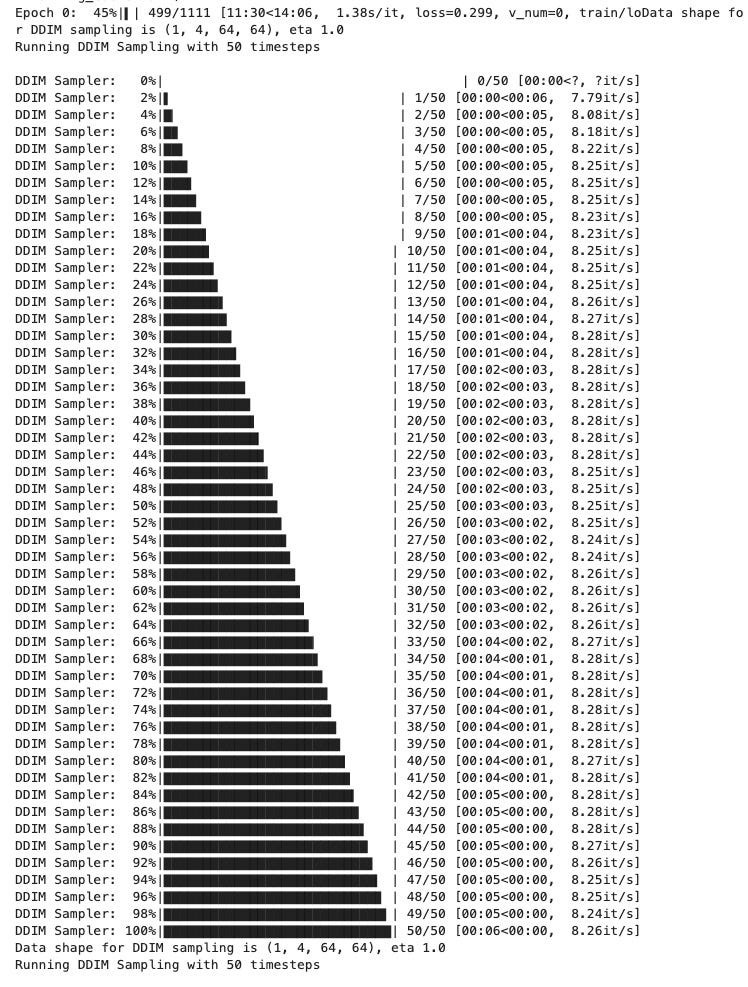
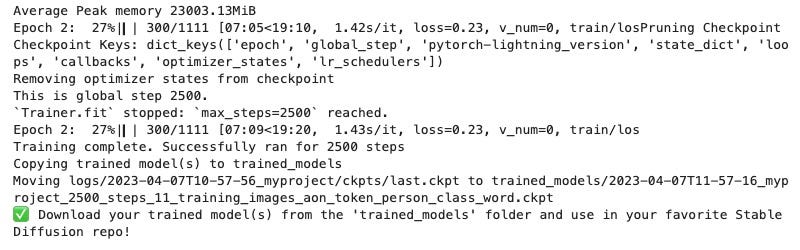
You will see a lot of output before training actually begins. Scroll down to the bottom of the output. If training successfully starts then you will see the line below showing training progress. Most errors occur just at the start of training so be sure to scroll down the output and check.

The above shows that we have yet to complete the first epoch, and is currently at step 100 out of 1111.
An epoch = total number of training images x number of repeats (100 is the default) + 1 validation step. I used 11 training images so 11 * (100+1) = 1111 and therefore an epoch = 1111 steps.
An epoch is a single pass through the entire dataset during training. In other words, each training image in the dataset has been presented to the model once, before its weights are updated.
A repeat is the number of times it goes over a training image within one epoch. More information about this at the end of the guide.
Remember the 2500 maximum number of steps entered for training? 2500 steps will be the point at which training will be stopped. Since 1 epoch = 1111 steps, therefore 3 epochs = 3333. This means that training will stop at around 75% of the 3rd epoch. This isn’t necessarily a problem as the model may well be quite well trained by this point. However if max steps is less than 1 epoch, it means not all your training data has been presented to the model with equal number of repeats.
Log Samples: If you see something like below during training, all it is doing is creating sample images in the log. It’s generating an image at 50 steps — it’s just that the progress bar is broken up into separate lines.
When training is complete you should see the following. Your trained model(s) will be in the folder namedtrained_models.
Delete and Destroy your GPU Instance
When you are finished, go back to the Vast.ai console and remember to delete your instance. If you don’t then you will incur running costs. Even if the notebook is not executing anything you will still be charged for storage. It’s easy to forget when you are busy.
Other Notes
Max Training Steps. 2000 is the minimum default. Anything less then your subject’s likeness may not be quite right (undertrained). Good results can be achieved by going higher (2500,3000). Going even higher means you will be creeping into overfitted (overtrained) territory. When something is overfitted it means the model has been trained too well for your subject and is no longer able to generalise or respond well to new contexts. Instead it tends to reproduce images that look like your training images as the model has become too specific to the subject you trained for the given token. In effect it just becomes a “photocopier” for your trained images.
Learning Rate. 1e-06 is the default (0.000001). Learning rate controls how much to change the model in response to the estimated error each time the model weights are updated.
- Lower learning rate = trains slower, smaller updates, less likely to overshoot the optimal state, but may get stuck.
- High learning rate = trains faster, larger updates, but large updates may overshoot the optimal state.
Like cooking, if you turn the heat up too high, it may cook faster but you risk overcooking or burning the food fast. If you turn the heat down too low, it will cook slower, but never reach the level of doneness. If it’s just right then you will cook the meal in time, and it will be edible.
Flip. This value determines the probability that an image in your dataset will be horizontally flipped (in the image loader event) prior to it being trained.
0.0 = Never flip 0.25 = the image has a one in four chance of flipping 0.5 = the image has a one in two chance of flipping (default) 0.75 = the image has a 3 in 4 chance of flipping 1.0 = the image has a 1 in 1 chance of flipping (always flip)
A value > 0.0 and < 1.0 will increase the size of your dataset since it will flip each image according to the probability value.
With values 0.0 and 1.0, the dataset would not increase since all of the images are either in their original state untouched, or always flipped (as if you had manually flipped them all in Photoshop and saved them in that state).
If an image has been trained unflipped and then in the next pass, the same image is flipped and trained, then this flipped image will be introduced to the network as ‘new’ data.
However, like flipping a coin: you could end up with a sequence where the coin lands on heads several times over (image not flipped)
If the subject in your training data is symmetrical in nature (a car, a plane, a vase, and you leave flip on, you increase the size of your training dataset without impacting results (though you may need more training steps because you have more data).
If your training data is NOT symmetrical, and you leave flip on, you will increase the size of your training dataset AND introduce weird features such as a mole that is normally on the left cheek appearing on both sides of the face. Human faces are generally not symmetrical, so having flip turned off will help the model learn the correct asymmetrical parts of a face.
If I have made any wrong assumptions here please let me know.
Token. There is some debate as to what makes a good token. Fundamentally this can be anything you like but it’s generally good practice to avoid common nouns, names, or well-known abbreviations that have strong prior associations with something already trained in the model.
I have written more about this in Good Token, Bad Token. One way to find a good token is to use it as a prompt in Stable Diffusion (using the model you will train on) or use haveibeentrained.com and see what it generates. If it only generates random images as opposed to a consistent person or object then it is probably good to use it.
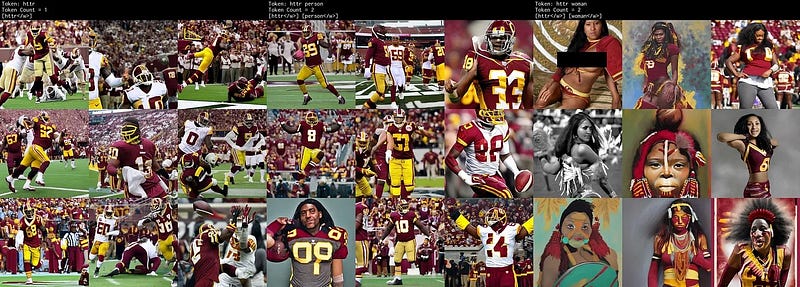
Below are generations using httr, httr person, httr woman. It’s clear to see that httr has a strong prior association in the base model with a certain type of imagery. If you use this token then you might see elements of it creep into your subject’s images since you are pulling existing weights from that token towards your own subject.
Using Your Own Regularization Images
If you have your own regularization images and wish to use those instead, at the time of writing the only way to do that is to run the Training Setup cell as normal, let it do its thing, but instead of using the person_ddim set it downloaded, you will substitute it with yours.
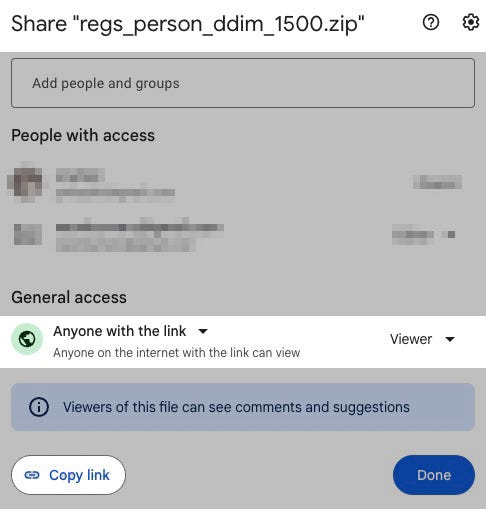
First let’s assume your regularization images are in a zip file on your google drive, and it is named regs_person_ddim_1500.zip. Share the file as you normally do under Google Drive, copy the link.
Next, using the menu or icons that appear on the upper-right of any cell, create an empty cell below the training setup cell.
If your google drive share link is: https://drive.google.com/file/d/1P7_FUUwXWCil7l42jKypjmaGmK-io9rc/ then the part we want is the ID which is
Paste the following into the empty cell. Replace the Share ID and actual file name of the zip with your own.
# install gdown
!pip install gdown
# download using the google drive share ID
!gdown '1P7_FUUwXWCil7l42jKypjmaGmK-io9rc'

# =======================================
# some variables to make things easier
# replace the zip file name with whatever yours is named as
reg_zip_filename = 'regs_person_ddim_1500.zip'
reg_folder = 'my_regularization_images/'

# =======================================
# make a folder called "my_regularization_images"
!mkdir -p {reg_folder}

# =======================================
#move regularization images zip to that folder
!mv {reg_zip_filename} {reg_folder}

# =======================================
# extract zip file
import zipfile as zf
files = zf.ZipFile(f'{reg_folder}/' + f'{reg_zip_filename}','r')
files.extractall(f'{reg_folder}'')
files.close()

# =======================================
# the unzipped images are in a folder named, "regs_person_ddim_1500"
# we will rename it to "person_ddim"
# you can do this via file manager or via command:
!mv '{reg_folder}/regs_person_ddim_1500' '{reg_folder}/person_ddim'

# =======================================
# finally delete the zip file
filepath = f'{reg_folder}/{reg_zip_filename}'
!rm -f $filepathNote: To be fair, you can do a lot of the above via the file manager, but it’s here if you want to give things a try.
Now you have your own regularization images in folder my_regularization_images/person_ddim, we need to tell the config where to find it.
This config is in the folderjoepenna-dreambooth-configs. There are two in there but it's best to edit both. Edit and replace the reg folder path with your own.
How Do I Change The Repeats?
As mentioned earlier, in Joe’s repo a repeat is the number of times a training image in your dataset is introduced to the network for training during each epoch.
image000.png -> train image001.png -> train image002.png -> train …..
this will repeat for 100 times. If you have a particular reason to change this, you can do so by editing the file dreambooth_helpers/dreambooth_trainer_configurations.py. On line 192, there will be the line "repeats": 100. There are other parameters in this file with the same name, so make sure you are looking at the correct one.

If you feel you need to or just wish to experiment, you can change the value to another value. If don’t know what you are doing then just leave this set to the default 100. Note that this will change your total steps per epoch. So if you set it to 50, your total steps will now be total training images * (50 + 1 validation step).
But why do this? An end of an epoch is when it creates a checkpoint. Or if your max steps are lower than the total steps per epoch it creates the checkpoint when it hits that number. In past versions of this repo, changing repeats was a way to control the number of epochs and validation checkpoints it produced. But since the parameter to save checkpoints at specific step intervals was introduced, that isn’t needed so much. However if you wish to have a validation check that matches your save checkpoint intervals then that would require inserting a parameter called val_check_interval. Which will be explained more about below.
Validation Check Intervals
By default a validation step occurs at the end of an epoch where a checkpoint is created. So the validation interval = training images * repeats (once every epoch). If you want this to be more frequent, perhaps to match your save checkpoint intervals, so you can check the loss in the log, then you need to edit the file dreambooth_helpers/dreambooth_trainer_configurations.py. At around line 239 you should see the following:
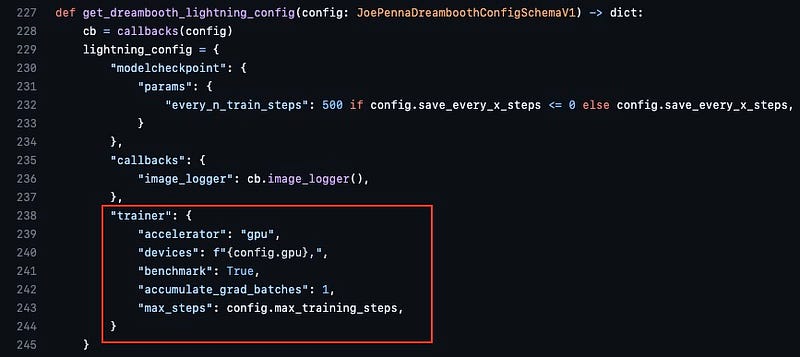
After the max_steps line, add the line val_check_interval = xxx where xxx is your preferred interval.
"trainer": {
    "accelerator": "gpu",
    "devices": f"{config.gpu},",
    "benchmark": True,
    "accumulate_grad_batches": 1,
    "max_steps": config.max_training_steps,
    "val_check_interval: 500
}
What will happen now is that at every 500 steps, a validation step is performed as well as a checkpoint being created (as specified in the training parameters earlier). The validation results will be logged in the file metrics.csv in the logs folder.
Note that changing this will change your total steps per epoch. Let’s break down how that works. Remember earlier it was said that:
An epoch = total number of training images x number of repeats (100 is the default) + 1 validation step. I used 11 training images so 11 * (100+1) = 1111 and therefore an epoch = 1111 steps. This is the most straight-forward way to explain with default settings. But if you change the validation check interval it might confuse things a bit.
1 validation step means at every 1100 steps (training images x number of repeats), it will perform a validation step. Let’s say we want this performed at every 100 steps, so we set the val_check_interval to 100. Your steps per epoch will change like so:
training_images = 11
repeats = 100
val_check_interval = 100

validation_steps = training_images * repeats / val_check_interval
∴ validation_steps = 11

∴ STEPS_PER_EPOCH = training_imgs * (repeats + validation_steps)
∴ STEPS_PER_EPOCH = 11 * (100 + 11)
∴ STEPS_PER_EPOCH = 1221
Who is Joe Penna?
Among other awesome things, he’s a guy who makes cool movies.
https://www.imdb.com/name/nm1020835/ https://en.wikipedia.org/wiki/Joe_Penna
Links
https://github.com/JoePenna/Dreambooth-Stable-Diffusion https://cloud.vast.ai
If you have any questions or just want to learn more then join the Stable Diffusion Dreambooth Discord Server. There are a lot smart people there who I have learnt a lot from. Plus, you might even bump into Joe there.


