
Dreambooth Training (JoePenna) on Google Colab
A Guide To Running Joe Penna’s Dreambooth Stable Diffusion On Google Colab

Note : This is now a member-only story. However if you join the Stable Diffusion Training Discord Server, and ask me there (
@yushan.777), I will give you a Friends link to view with free access.
Table of Contents
Hardware Cell: Clone & Download Repository Cell: Build The Environment Cell: Navigate Back To The Directory Cell: Download the 1.5 SD model With Improved VAE Cell: Download Regularization (class) Images Cell: Training Images Cell: Training Cell: Save Model in Google Drive Other Notes — Max Training Steps — Flip — Token — Training Images — Regularization Images — Who is Joe Penna?
Updated: 9th May 2023
Google Colaboratory is probably the lesser-used JoePenna Dreambooth notebook but deserves to be covered as it is probably the easiest and quickest to get up and running compared to other the cloud-based training solutions. It also has built-in support for accessing Google’s other services namely Google Cloud where once you mount it, it will appear as local drive in your instance. You can also share the notebooks easily without having to mess around hosting them yourself.

Hardware
When you start the colab notebook it will try to allocated an A100 GPU. This will only work if you have enough compute credits or a Colab Pro subscription. JoePenna’s Dreambooth requires a minimum of 24GB of VRAM so the lowest T4 GPU (Standard) that is usually given on the free tier is not enough as it ‘only’ has 16GB. The V100 that is also available only has approximately 16GB.
Go to menu… Runtime > Change runtime type
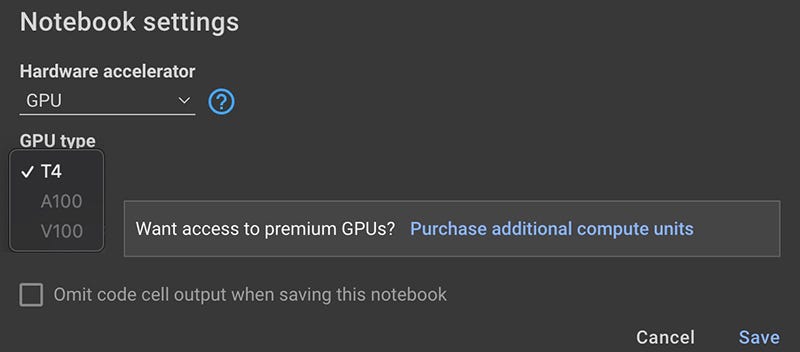
Ensure GPU is selected for Hardware accelerator. For GPU Type there are 3 choices. Two of which are unavailable if you don’t have enough compute units. In order to enable them you can either purchase compute units on a pay as you go basis or subscribe to Colab Pro.

Once the A100 is enabled, select it. One thing to note that by choosing the A100, you will also default to the High (system) RAM runtime shape. Even though this is not needed, you have no other choice. It will also mean more of your compute units will be used.
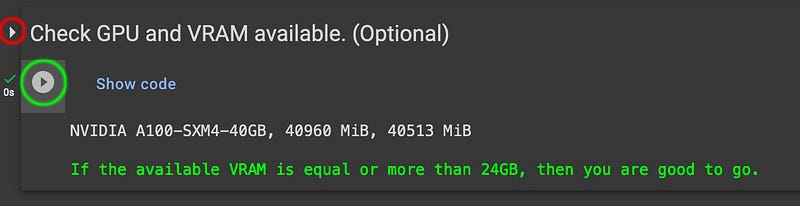
If this is your first time running a Colab or Jupyter notebook, the idea is to just run each cell in order, top to bottom.
The first cell is optional and is just there to check your allocated GPU. Run it by pressing the play button (circled in green). If you see a whole bunch of code and would rather not, then you can hide it by clickin on the small arrow next to the cell’s title (circled in red).
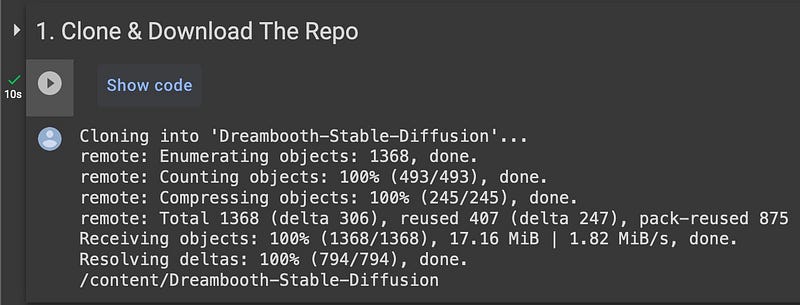
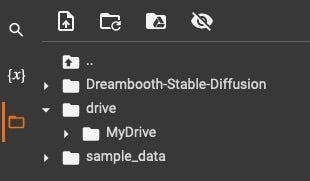
Cell 1: Clone & Download Repository
Cell 2: Build The Environment
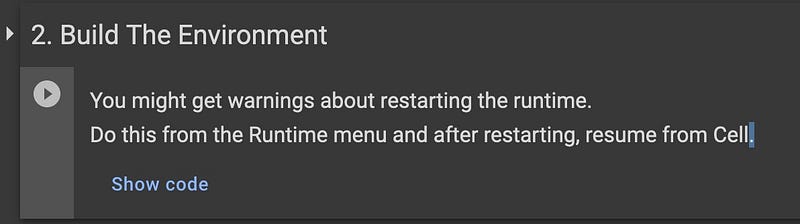
This cell downloads dependencies and builds the environment needed for Dreambooth to run. This might take a few minutes. You may see some warnings about needing to restart the runtime as well as a notification that the cell failed. I have tested it with and without restarting the runtime and in both cases things worked, but it is probably better to restart it. You can do this from the menu: Runtime > Restart runtime.
Cell 3: Navigate back to the directory

Dreambooth-Stable-Diffusion (in case you restarted the runtime).Cell 4: Download the 1.5 SD model with the improved VAE

Cell 5: Download Regularization (class) Images

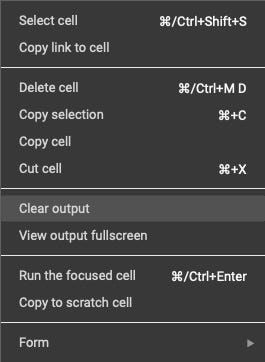
person_ddim.Some cells like this one produce a lot of output, you can clear it from the context menu > Clear output
Cell 6: Training Images
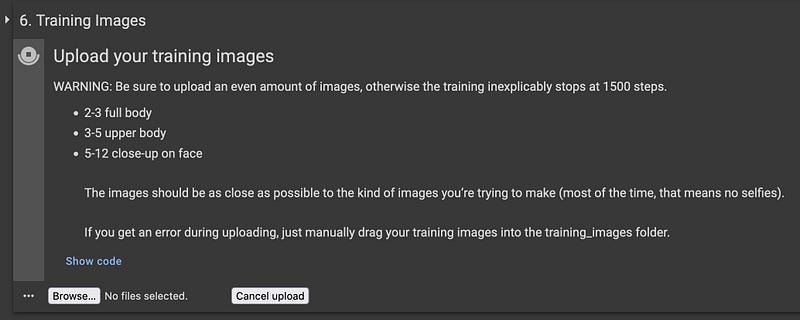
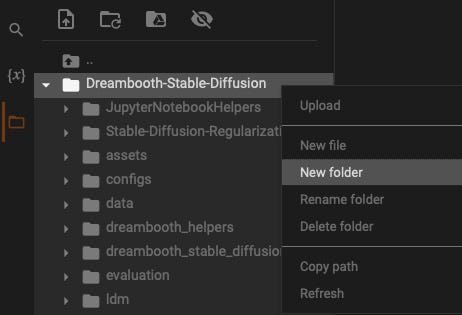
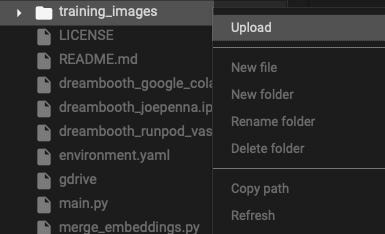
This cell may throw an error on particular browsers. If so, then you can upload manaually. It is actually more efficient to just create the folder and upload via the file manager. Right-click on Dreambooth-Stable-Diffusion, select New Folder, name it training_images, right-click on training_images and select upload. Select your training images to be uploaded.
Cell 7 : Final Setup & Training
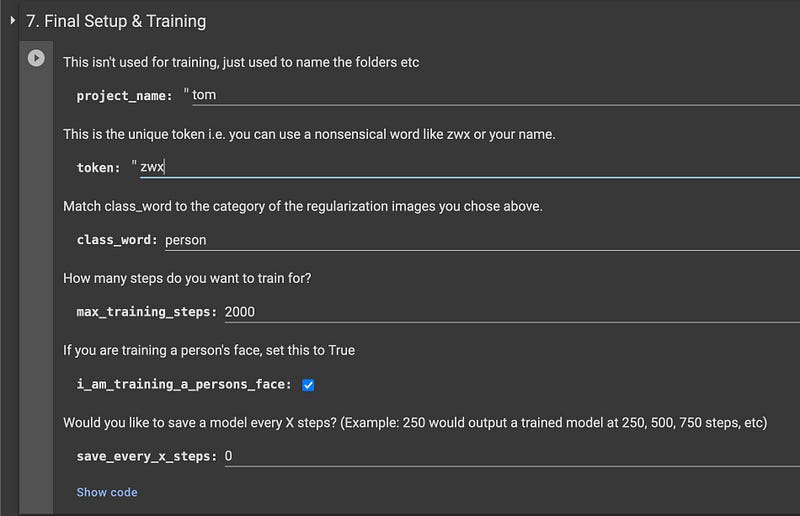
-project_name : This can be anything you want and isn’t important for training. It will be used to name your trained model.
-token : a short, single ‘word’ that will be used with the class word when you generate images of your subject. Some use real names janedoe, some use nonsenical combination of letters zwx. If you would like to read more about this go here.
-class_word : person, man, woman, cat, dog, car, artstyle, aesthetic etc. Your regularization images (i.e. person_ddim) must reflect the class word you have chosen.
-max_training_steps : The number of training steps where training will stop. 2000 is the default for a dataset of 12–20 or so training images.
-i_am_training_a_persons_face : If checked then images will not be flipped during training.
-save_every_x_steps : if you would like to have a model saved at specific intervals then enter a value higher than 0.
Run this cell to start training. It will output a lot of initialization before settling onto something like below. If you see that then you know it’s running okay.
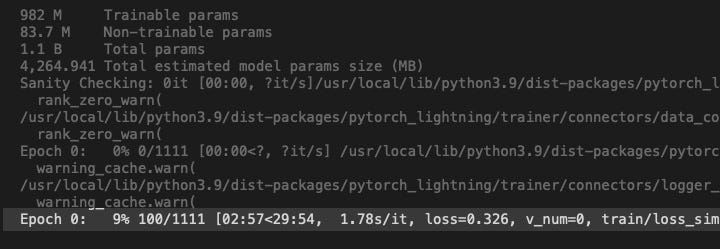
The above shows that we have yet to complete the first epoch, and is currently at step 100 out of 1111.
An epoch = total number of training images x number of repeats (100 is the default) + 1 validation repeat. I used 11 training images so 11 * 101 = 1111 and therefore an epoch = 1111 steps.
An epoch is a single pass through the entire dataset during training. In other words, each training image in the dataset has been presented to the model once, before its weights are updated.
A repeat is the number of times it goes over a training image within one epoch.
Remember the 2000 maximum number of steps entered for training? 2000 steps will be the point at which training will be stopped. Since 1 epoch = 1111 steps, therefore 2 epochs = 2222. This means that training will stop at around 90% of the 2nd epoch. This isn’t necessarily a problem as the model may well be quite well trained by this point. However if max steps is less than 1 epoch, it means not all your training data has been presented to the model with equal number of repeats.
You will see the following when training completes/stops. Your model will be in the folder trained_models.
Training complete. Successfully ran for 2000 steps
Copying trained model(s) to trained_models
Moving logs/2023-04-14T10-27-16_myproject/ckpts/last.ckpt to trained_models/2023-04-14T11-23-15_myproject_2000_steps_11_training_images_zwx_token_person_class_word.ckpt
✅ Download your trained model(s) from the 'trained_models' folder and use in your favorite Stable Diffusion repo!
You can either download it directly or save it to your Google Drive.
Cell: Save Model in Google Drive
Run this cell to mount Google Drive to the folder /content/drive. You will need to grant permission for this.

Once mounted, all ckpt files will be copied to the root folder of your google drive.
Once you are finished, don’t forget to terminate your runtime instance so you don’t unecessarily waste compute units. Runtime > Disconnect and delete runtime .

Other Notes
Max Training Steps
2000 is the minimum default. Anything less then your subject’s likeness may not be quite right (undertrained). Good results can be achieved by going higher (2500,3000). Going even higher means you will be creeping into overfitted (overtrained) territory. When something is overfitted it means the model has been trained too well for your subject and is no longer able to generalise or respond well to new contexts. Instead it tends to reproduce images that look like your training images as the model has become too specific to the subject you trained for the given token. In effect it just becomes a “photocopier” for your trained images.
Flip
This value determines the probability that an image in your dataset will be horizontally flipped (in the image loader event) prior to it being trained.
0.0 = Never flip 0.25 = the image has a one in four chance of flipping 0.5 = the image has a one in two chance of flipping (default) 0.75 = the image has a 3 in 4 chance of flipping 1.0 = the image has a 1 in 1 chance of flipping (always flip)
A value > 0.0 and < 1.0 will increase the size of your dataset since it will flip each image according to the probability value.
With values 0.0 and 1.0, the dataset would not increase since all of the images are either in their original state untouched, or always flipped (as if you had manually flipped them all in Photoshop and saved them in that state).
If an image has been trained unflipped and then in the next pass, the same image is flipped and trained, then this flipped image will be introduced to the network as ‘new’ data.
However, like flipping a coin: you could end up with a sequence where the coin lands on heads several times over (image not flipped)
If the subject in your training data is symmetrical in nature (a car, a plane, a vase, and you leave flip on, you increase the size of your training dataset without impacting results (though you may need more training steps because you have more data).
If your training data is NOT symmetrical, and you leave flip on, you will increase the size of your training dataset AND introduce weird features such as a mole that is normally on the left cheek appearing on both sides of the face. Human faces are generally not symmetrical, so having flip turned off will help the model learn the correct asymmetrical parts of a face.
If I have made any wrong assumptions here please let me know.
Token
There is some debate as to what makes a good token. Fundamentally this can be anything you like but it’s generally good practice to avoid common nouns, names, or well-known abbreviations that have strong prior associations with something already trained in the model.
I have written more about this in Good Token, Bad Token. One way to find a good token is to use it as a prompt in Stable Diffusion (using the model you will train on) or use haveibeentrained.com and see what it generates. If it only generates random images as opposed to a consistent person or object then it is probably good to use it.
Below are generations using httr, httr person, httr woman. It’s clear to see that httr has a strong prior association in the base model with a certain type of imagery. If you use this token then you might see elements of it creep into your subject’s images since you are pulling existing weights from that token towards your own subject.
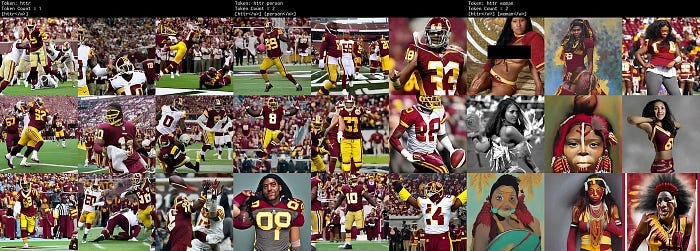
httr, httr person, httr woman
Training Images
Training Images are those of your subject that you will be training. This can be a person, a pet, an object, an art style. For this tutorial we will just focus on a person and their face since that is what I have had the most experience with.
How many? The ideal number is up for debate but more is not always better. Many have had success with numbers ranging between 12 to 20.
How Big? Training images need to be 512x512 square.
How Should They Look? If you are training a face then ideally the onlyconstant between each picture should be the face. That means you should avoid repeating elements such as backgrounds, clothing, lighting. Also try to keep the age range of the person in the photos roughly the same. You don’t want their appearance to change too much due to age differences (or for other reasons — weight gain/loss etc)
- 2–3 face close-ups of the face (front, side 45 degrees, eyes/nose/mouth only),
- The remainder of the images should be head & shoulder shots of different angles
- If you wish the body type to be learned, then include a couple of full body shots.
- Make sure there is no repetition of images that look similar and the outfits/backgrounds/lighting etc should be different in every shot.
Regularization Images
Regularization is a technique used to prevent overfitting.
Overfitting occurs when the model learns the noise or random fluctuations in the training data instead of the underlying patterns that generalize to new, unseen data. In other words, it has learned the training data too well. In the case of Dreambooth Stable Diffusion — it is unable to produce images of your subject in new or different contexts. Instead it produces images looking just like the training data, as if it has memorized it.
Regularization images (aka Class images) serve two purposes : to reduce or avoid overfitting too quickly, and to protect the rest of the model from degrading as it trains. Without them, your subject may bleed into not just the person class of images but maybe also other classes.
How to get them? You can generate your own regularization images from any version of Stable Diffusion. Using the class word as a prompt, i.e. “person”. You can even embelish the prompt such as, “a photo of a beautiful person” or “a painting of a handsome person”
Why do they look weird? And does it matter? It shouldn’t matter that some of the images look strange. The point is that it is what the model knows as a “person”. The idea of using Stable Diffusion-generated images is that they’re not really there for improving the generation of your subject, but you are making sure you don’t change the model’s existing baseline knowledge by reminding the model.. “hey remember this image? it’s a person that you generated.” Some people augment their regularization images with real-world images of people or only use real-world images. Some say doing this adds a positive bias to their generated images. Everyone’s use-case is differet so you’ll have to do your own tests and research on that.
Who is Joe Penna?
Among other awesome things, he’s a guy who makes cool movies.
https://www.imdb.com/name/nm1020835/ https://en.wikipedia.org/wiki/Joe_Penna

Links
https://github.com/JoePenna/Dreambooth-Stable-Diffusion
If you have any questions or just want to learn more then join the Stable Diffusion Dreambooth Discord Server. There are a lot smart people there who I have learnt a lot from and are always willing to help. Plus you might even bump into Joe there.


