avatarZahid Parvez

Free AI web copilot to create summaries, insights and extended knowledge, download it at here

2616

Abstract

Code-Snippets\Tutes\OpenCV\Face\ExampleImgs'</span> imgPaths = glob.glob(os.path.join(basePath, <span class="hljs-string">"*"</span>))

<span class="hljs-comment"># Load the cascade model</span> face_cascade = cv2.CascadeClassifier(<span class="hljs-string">"haarcascade_frontalface_default.xml"</span>)

<span class="hljs-keyword">for</span> im <span class="hljs-keyword">in</span> imgPaths:
<span class="hljs-comment"># read and resize the image (resizing is done to improve preformance)</span> img = ScaleImageToSize(ReadImageRGB(im),<span class="hljs-number">250</span>,<span class="hljs-number">250</span>) imgCpy = ScaleImageToSize(ReadImageRGB(im),<span class="hljs-number">250</span>,<span class="hljs-number">250</span>)

<span class="hljs-comment">#Convert the image to grayscale</span>
gray = cv2.cvtColor(img, cv2.COLOR_RGB2GRAY)

<span class="hljs-comment"># Detect faces</span>
<span class="hljs-comment"># minNeighbors controls the sensitivity of the model, a lower number may result in more false positives. hoever a higher number will result in more processing time</span>
faces = face_cascade.detectMultiScale(gray, scaleFactor=<span class="hljs-number">1.1</span>, minNeighbors=<span class="hljs-number">8</span>)    
<span class="hljs-comment"># Draw boxes around any faces that were found</span>
<span class="hljs-keyword">for</span> (x, y, w, h) <span class="hljs-keyword">in</span> faces:
    cv2.rectangle(imgCpy, (x, y), (x+w, y+h), (<span class="hljs-number">255</span>, <span class="hljs-number">0</span>, <span class="hljs-number">0</span>), <span class="hljs-number">2</span>)
    
DisplayImageComparison(img, imgCpy, <span class="hljs-string">"Faces"</span>)</pre></div><figure id="42e2"><img src="https://cdn-images-1.readmedium.com/v2/resize:fit:800/1*plfGlxp0aJ4UYDIHtQznJA.png"><figcaption>Face detection results from the above code</figcaption></figure><h1 id="064e">Detect faces from a webcam</h1><p id="f614">The code above can be easily modified to capture a webcam stream and run the face detection model:</p><div id="166b"><pre><span class="hljs-keyword">import</span> cv2

<span class="hljs-keyword">import</span> matplotlib.pyplot <span class="hljs-keyword">as</span> plt

<span class="hljs-comment"># Get a pointer to the devides </span> camera = cv2.VideoCapture(<span class="hljs-number">0</span>)

face_cascade = cv2.CascadeClassifier(<span class="hljs-string">"haarcascade_frontalface_default.xml"</span>)

<span class="hljs-keyword">def</span> <span class="hljs-title function_">detectFaces</span>(<sp

Options

an class="hljs-params">bgrImg</span>): gray = cv2.cvtColor(bgrImg, cv2.COLOR_BGR2GRAY) <span class="hljs-keyword">return</span> face_cascade.detectMultiScale(gray, scaleFactor=<span class="hljs-number">1.1</span>, minNeighbors=<span class="hljs-number">5</span>)

<span class="hljs-keyword">def</span> <span class="hljs-title function_">drawFaceBB</span>(<span class="hljs-params">bgrImg, faces</span>): <span class="hljs-keyword">for</span> (x, y, w, h) <span class="hljs-keyword">in</span> faces: cv2.rectangle(bgrImg, (x, y), (x+w, y+h), (<span class="hljs-number">255</span>, <span class="hljs-number">0</span>, <span class="hljs-number">0</span>), <span class="hljs-number">2</span>) <span class="hljs-keyword">return</span> bgrImg

<span class="hljs-keyword">def</span> <span class="hljs-title function_">getFrame</span>(): return_value, image = camera.read() <span class="hljs-keyword">return</span> image

<span class="hljs-keyword">def</span> <span class="hljs-title function_">displayIm</span>(<span class="hljs-params">img</span>):
cv2.imshow(<span class="hljs-string">"Tracking"</span>, img)

<span class="hljs-keyword">if</span> name == <span class="hljs-string">"main"</span>: <span class="hljs-keyword">while</span> <span class="hljs-literal">True</span>: image = cv2.resize(getFrame(),<span class="hljs-literal">None</span>,fx=<span class="hljs-number">0.5</span>,fy=<span class="hljs-number">0.5</span>) faces = detectFaces(image) output = drawFaceBB(image,faces) displayIm(output)

    <span class="hljs-keyword">if</span> cv2.waitKey(<span class="hljs-number">1</span>) &amp; <span class="hljs-number">0xFF</span> == <span class="hljs-built_in">ord</span>(<span class="hljs-string">"q"</span>):
        <span class="hljs-keyword">break</span>

camera.release()</pre></div><p id="0482">If you would like to get a copy of the code used in this article, it can be found on GitHub: <a href="https://github.com/thezaza101/Python-Code-Snippets/blob/master/Tutes/OpenCV/Face/FaceDetect.ipynb">notebook</a>, <a href="https://github.com/thezaza101/Python-Code-Snippets/blob/master/Tutes/OpenCV/Face/findFace.py">webcam stream</a></p><p id="eaee">This article makes use of OpenCV’s resizing function, this function makes use of Image interpolation. You can learn more about how <a href="https://readmedium.com/image-interpolation-in-opencv-5a3b96111872">Image interpolation in OpenCV</a> works in this <a href="https://readmedium.com/image-interpolation-in-opencv-5a3b96111872">link</a>.</p></article></body>

Detect faces using OpenCV (python)

Prior to the rise of CNNs as the default way of recognizing faces (or any other objects), Haar cascade models were used to perform object detection. While the haar cascade model may not be as accurate as modern CNNs, they are more efficient and can be trained up using only a few samples.

All images of faces in this post are from thispersondoesnotexist.com

Haar cascade models

Object detection using Haar feature-based cascade classifiers, which was proposed by Paul Viola and Michael Jones in 2001. It is a machine learning-based approach where a cascade function is trained using positive images (i.e. images of faces) and negative images (i.e. images without faces) to detect objects in other images. The algorithm uses Haar features, which are like convolutional kernels, to extract features from the images. However, unlike CNNs which learn the kernels required for a certain task, Haar features are simple feature detectors that can detect edges, lines and other simple geometric features.
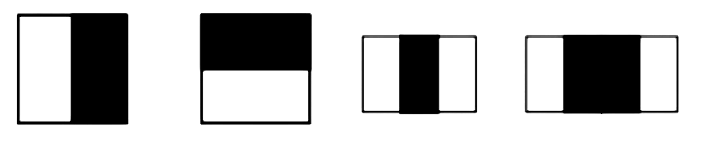
Examples of Haar features

The features are then filtered using Adaboost to select the best features that accurately classify the positive and nevitive images. The final classifier is a weighted sum of these weak classifiers. The method also introduces the concept of Cascade of Classifiers, which applies the features in stages, discarding windows that fail in early stages, to make the process more efficient.

The Code

Firstly, similar to model weights, we need to download the trained cascase classifiers. OpenCV provides a range of these models, the one required for this code is the front face detector: haarcascade_frontalface_default.xml. If you want to follow along with this code, download the file and place it in the same directory as the notebook.

#list images
basePath = 'C:\\Users\\theza\\Documents\\GitHub\\Python-Code-Snippets\\Tutes\\OpenCV\\Face\\ExampleImgs'
imgPaths = glob.glob(os.path.join(basePath, "*"))

# Load the cascade model
face_cascade = cv2.CascadeClassifier("haarcascade_frontalface_default.xml")

for im in imgPaths:    
    # read and resize the image (resizing is done to improve preformance)
    img = ScaleImageToSize(ReadImageRGB(im),250,250)
    imgCpy = ScaleImageToSize(ReadImageRGB(im),250,250)
    
    #Convert the image to grayscale
    gray = cv2.cvtColor(img, cv2.COLOR_RGB2GRAY)
    
    # Detect faces
    # minNeighbors controls the sensitivity of the model, a lower number may result in more false positives. hoever a higher number will result in more processing time
    faces = face_cascade.detectMultiScale(gray, scaleFactor=1.1, minNeighbors=8)    
    # Draw boxes around any faces that were found
    for (x, y, w, h) in faces:
        cv2.rectangle(imgCpy, (x, y), (x+w, y+h), (255, 0, 0), 2)
        
    DisplayImageComparison(img, imgCpy, "Faces")
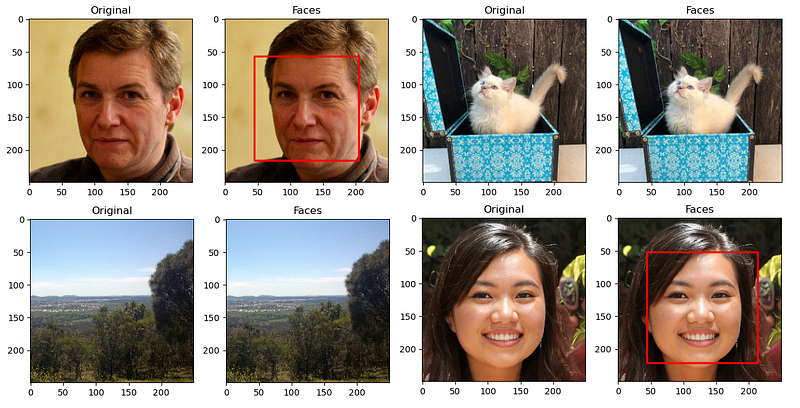
Face detection results from the above code

Detect faces from a webcam

The code above can be easily modified to capture a webcam stream and run the face detection model:

import cv2
import matplotlib.pyplot as plt

# Get a pointer to the devides 
camera = cv2.VideoCapture(0)

face_cascade = cv2.CascadeClassifier("haarcascade_frontalface_default.xml")

def detectFaces(bgrImg):
    gray = cv2.cvtColor(bgrImg, cv2.COLOR_BGR2GRAY)
    return face_cascade.detectMultiScale(gray, scaleFactor=1.1, minNeighbors=5)    

def drawFaceBB(bgrImg, faces):
    for (x, y, w, h) in faces:
        cv2.rectangle(bgrImg, (x, y), (x+w, y+h), (255, 0, 0), 2)
    return bgrImg

def getFrame():
    return_value, image = camera.read()
    return image

def displayIm(img):   
    cv2.imshow("Tracking", img)

if __name__ == "__main__":
    while True:
        image = cv2.resize(getFrame(),None,fx=0.5,fy=0.5)
        faces = detectFaces(image)
        output = drawFaceBB(image,faces)
        displayIm(output)

        if cv2.waitKey(1) & 0xFF == ord("q"):
            break

    camera.release()

If you would like to get a copy of the code used in this article, it can be found on GitHub: notebook, webcam stream

This article makes use of OpenCV’s resizing function, this function makes use of Image interpolation. You can learn more about how Image interpolation in OpenCV works in this link.

Image Classification
Python
Facedetection
Machine Learning
Image Processing
Recommended from ReadMedium