
Detect and Recognize Vehicle’s License Plate with Machine Learning and Python — Part 3: Recognize plate license characters with OpenCV and Deep Learning
Introduction
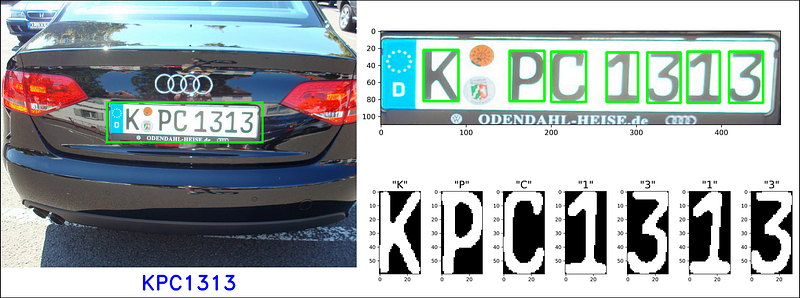
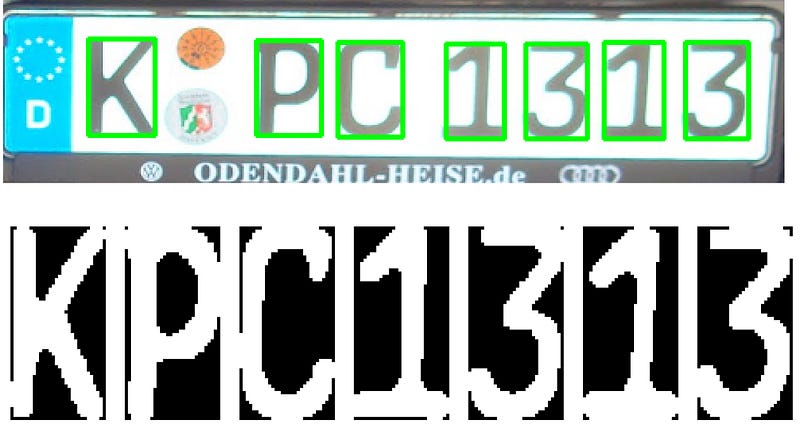
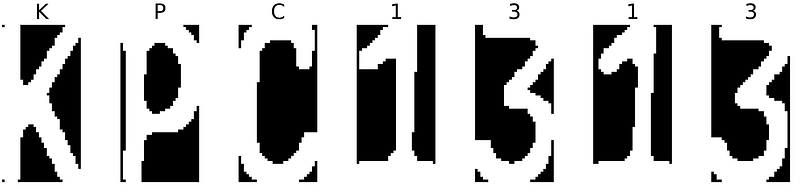
After Part 1 and Part 2, we were able to extract License Plate from vehicle images and segment the characters as shown as Figure 2. As for human perspective, it is pretty easy to understand right away what characters they are. Nevertheless, this is nothing more than a set of black and white pixels according to our digital system. In this last part of the series, we would learn how to train a Neural Network model which is capable of converting input images to digital letters. There is a wide range of prominent Neural Network architectures which you can select to train your model (e.g. ResNet, VGG, DenseNet, Inception, etc.), each of them has its own advantages and disadvantages . For this project, I would use MobileNets — a light weight deep learning network with noticeably favorable accuracy (source) as base model architecture.
Tools and Libraries:
- Python 3.7
- Jupyter Notebook
- Numpy==1.17.4
- Matplotlib==3.2.1
- OpenCV==4.1.0
- Keras==2.3.1
- sklearn==0.21.3
Notebook of part 3: Model training
Notebook of part 3: End-to-end deploying
Before moving forward, it should be mentioned that I have tried using Optical Character Recognition using Tesseract tool, nevertheless, the performance was considerably poor. The reason in my opinion is that Tesseract is developed purposely for ordinary document text instead of plate license characters. My model was trained on Google Colab — a free machine learning cloud sever supporting GPU computation, still it did take a little while. If you do not own a GPU, it is not recommend to train it locally. In that case, you can skip the training stage and directly use the weights from my Github repository.
Dataset
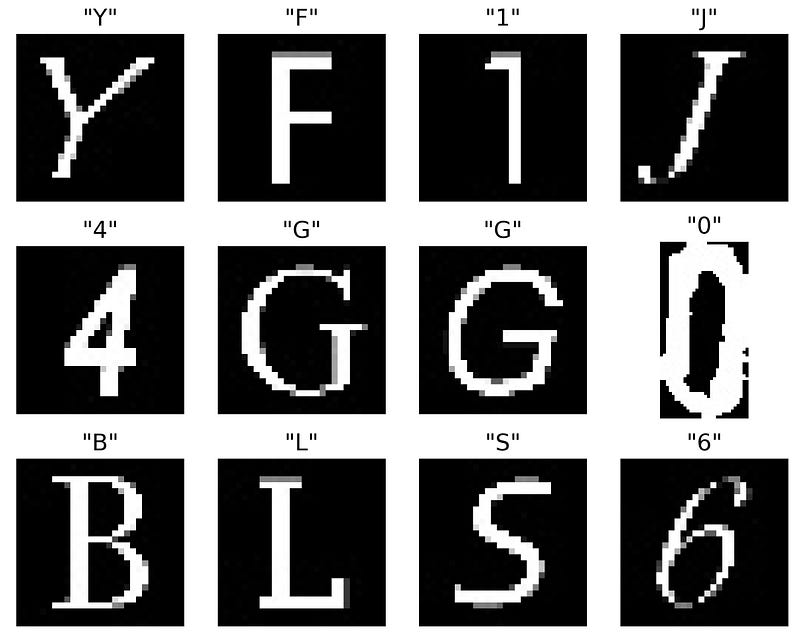
The dataset contain of 34575 images divided into 36 classes of characters, which can be found in my Github repository as dataset_characters.zip (make sure you unzip it before training). The below snippet code was used to visualize our data (Fig. 2):
Data Pre-processing
Next, we need to conduct several data pre-processing techniques as:
- Line 2 ~ 14: Arrange input data and their corresponding labels. The original size of input image for MobileNets is 224x224, however, since COLAB kept crashing when I tried to stack the input data, I reduce the image size to 80x80 as you can see in line 7. This configuration managed to achieve around 98% accuracy, but still, you can try to play with larger image size if your computer is powerful enough.
- Line 20 ~ 26: Convert our labels as 1D-array to one-hot encoding labels. This gives us better representation among our labels. The label classes record need to be save locally (line 26), so it can be used latter for inverse transformation.
- Line 29: Split our dataset into training set (90%) and validation set (10%). This allows us monitoring our model accuracy and avoiding overfitting.
- Line 33: Create a data augmentation method with some basic transform techniques such as rotating, shifting, zooming, etc. Be careful that you don’t overused these techniques, cause a vertically flipping number “6” would give us number “9” — a totally different one.
[INFO] Find 34575 images with 36 classesInitialize MobileNets architecture with pre-trained weights
In this step, we construct our MobileNets architecture with pre-trained weights on imagenet dataset. The model can be imported directly from Keras Application package. There are several crucial elements that require to be noticed here:
- Line 4~5: Discard the last output layers of default MobileNets architecture and replace it with our desired output layer (Line 12). Out output layer would contains 36 nodes associating to 36 characters. Recall that the shape of our input images are (80,80,3), we need to config our input layer as the same dimension (Line 5)
- Line 16 ~ 23: If training=True, defining all layers in base_model as trainable layers (weight can be updated during training); initializing learning rate and decay value; and compiling our model with losses and metrics as categorical cross entropy and accuracy respectively
Train and evaluate model
Now we can start training our model. Depending on your system specification, you can either increase or decrease your BATCH_SIZE value. The trade-off between small and large batch is explained very clearly in this post. Basically, larger BATCH_SIZE means less samples are trained each epoch, which might decline your model performance but reduce the computational expense.
In an attempt to avoid time-wasting of insufficient training, I implement some callbacks function to monitor the metric. EarlyStopping (line 4) would stop training process if val_loss doesn’t improve after 5 epochs, while ModelCheckpoint (line 5) save weight of our model every time val_loss is improved. The model acquired ~95% accuracy after 5 epochs and as the end of training process, it achieved ~99% accuracy (Fig. 3) on validation set.
Epoch 1/30
486/486 [==============================] - 147s 303ms/step - loss: 1.5441 - accuracy: 0.5989 - val_loss: 1.5866 - val_accuracy: 0.6090

Epoch 00001: saving model to License_character_recognition.h5
Epoch 2/30
486/486 [==============================] - 124s 256ms/step - loss: 0.4201 - accuracy: 0.8930 - val_loss: 0.4698 - val_accuracy: 0.8788

Epoch 00002: saving model to License_character_recognition.h5
Epoch 3/30
486/486 [==============================] - 125s 258ms/step - loss: 0.2769 - accuracy: 0.9281 - val_loss: 0.2617 - val_accuracy: 0.9352

Epoch 00003: saving model to License_character_recognition.h5
Epoch 4/30
486/486 [==============================] - 125s 257ms/step - loss: 0.2103 - accuracy: 0.9454 - val_loss: 0.1744 - val_accuracy: 0.9563

Epoch 00004: saving model to License_character_recognition.h5
Epoch 5/30
486/486 [==============================] - 126s 259ms/step - loss: 0.1642 - accuracy: 0.9554 - val_loss: 0.1491 - val_accuracy: 0.9592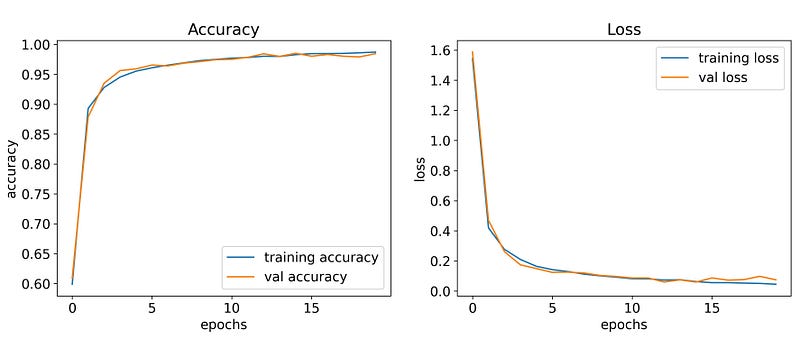
Finally, model architecture need to be save so later we do not have to construct our model architecture from scratch. This act can be done with the snippet code as below:
Combining everything
This series is coming to an end. To summarize, we manged to extract the plate license from vehicle image in Part 1, segment its character as Part 2 and train a CNN model to predict characters from images. To deliver prediction, first we would need to rebuild our model architecture (line 1 ~ 5), load saved weight after training phase (line 6) and origin label classes (line 9 ~ 10).
[INFO] Model loaded successfully...
[INFO] Labels loaded successfully...
Remember that we configure the input layer of our model to receive input images with the shape of (80,80,3). Thus we would need to convert our image to the appropriate size (line 3) and correct channel (line 4). In line 5, we implement the loaded label classes to inverse one-hot encoding label obtained from model to digital characters. A loop is generated over each character image in crop_characters, which stores all predictions from model in to final_result, and plot each image with its corresponding predictions as shown as Fig. 4 (line 8 ~ 21).
KPC1313
Conclusion
Methodologies introduced in this project have demonstrated a sufficient system that can detect and recognize license plate of vehicles. However there are several drawbacks need to be pointed out:
- Wpod-Net might mistakenly detect vehicle license plate along with advertising panels appearing in the frame.
- Segmenting license character using traditional CV is sensible to environment conditions (illumination, obstacles, angular perspectives).
- The model can “understand” only Latin alphabet and number characters, while Japanese, Korean, Chinese and Saudi Arabia license plates do use non-Latin alphabet characters. This can be solved by adding more data in our training dataset and train the model again.
Link to the whole series:
Part 1: Detection License Plate with Wpod-Net
Part 2: Plate character segmentation with OpenCV
Part 3: Recognize plate license characters with OpenCV and Deep Learning


