
Design Dribbble-like Floating Buttons for Your UITabBar in iOS Using Swift 5
Create beautiful UIs for your UITabBar on iOS — Part 3
Hey hey hey! It looks like someone has made it to the last part of this tutorial! Kudos, you successfully passed all the mathematical obstacles and coding challenges!
I hope the previous maths lesson didn’t kill you, because, guess what? There’s going to be more maths to this final part of the tutorial! Don’t worry, I won’t get too deep into the details this time. But it’s still maths. It sucks. So be ready regardless, it’s just one last effort!
Did you mean to check the previous tutorials first? Click here for Part 1 and Part 2!
Step 6: Create the Floating Buttons
Let’s start by defining our buttons names, icons and segue. I will use dummy names and icons:
var index = Int()
var optionButtons: [UIButton] = []
var options = [
   option(name: "A", image: UIImage(systemName: "a") ?? UIImage(), segue: "a"),
   option(name: "B", image: UIImage(systemName: "a") ?? UIImage(), segue: "b"),
   option(name: "C", image: UIImage(systemName: "a") ?? UIImage(), segue: "c")
]
struct option {
var name = String()
var image = UIImage()
var segue = String()
}We will need a function that does the following:
- creates a button with specified appearance;
- specifies the button’s constraints;
- performs animation upon creation.
For this purpose, I created the function createButton(size:) and it looks like this:
With CGAffineTransform, I will create a small “pop” animation by scaling the button to 1.1 and then quickly back to 1, so it gets bigger and then shrinks to original size. I also set the tint of the button’s image view to clear during animation to make sure the image is only visible when the button is in the view.
Before we call this function and actually create the buttons, we need to make sure that once they are inside the view, the user can only either disable them or select one of them. Skipping this step would result in the buttons sticking around even if the user decides to move to different view controllers.
To avoid that, I will simply create a clear coloured background button the size of the screen and place it behind the options buttons. We will later give it an action that triggers the middle button and disables the three option buttons. This way, even if the user tries to select something else while the buttons are in the view, the buttons will go away first.
The function will look like this:
And now the best part: adding our three buttons to the view and setting their constraints! Who’s ready for some more maths lessons?
the boring part…
Today’s lesson will be about trigonometry! For those of you who already know something about it, I suggest you just jump to the next part. If you have no idea what I’m talking about, I’ll try to make it simple for you.
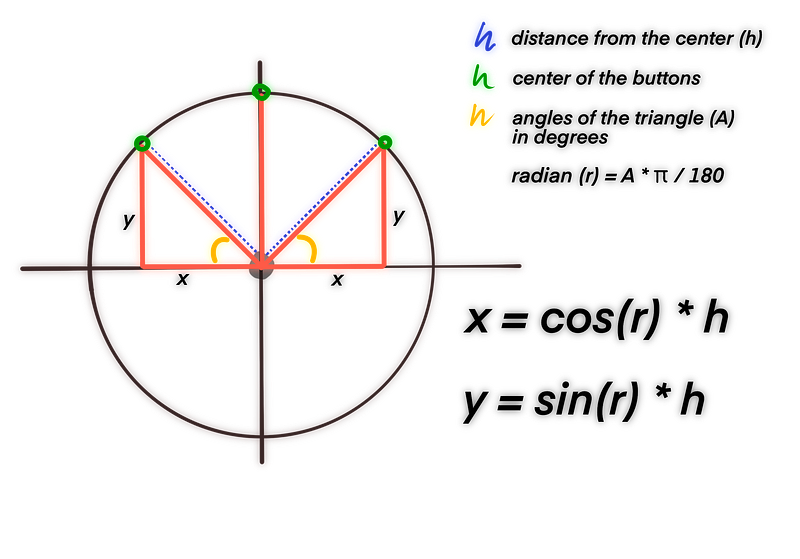
Basically, in a right-angled triangle, you can calculate the length of the sides of your triangle provided that you have at least: - the degrees of one angle (in our case, the one I highlighted in yellow), - and the size of one of the three sides (in our case, blue dotted line). As you can tell from the picture, this logic can be applied to an invisible circle around our middle button to define the position of the three buttons (green) by calculating x and y values with the formulas in the picture.
We do have a rough idea of how far the buttons should be from our middle button; that would be the size of our blue dotted line (h). We also know that we want it to be so that it forms an angle of about 45 degrees (yellow) with the horizontal center of our middle button. That’s already a lot of information! However, there’s no way to tell just that to our Swift function: we need to set a distance on the x and y axis to position our buttons. In order for them to get to our green dots, we will need to do the following calculations:
- firstly, we will need to convert degrees into radians by multiplying our degrees by π /180 like so:
45 * .pi/180 - secondly, we will need to turn that value in
cos()orsin()and multiply it by our hypotenuse, namely the distance that we set for our buttons from the middle button.
Use the formulas in the picture as a guideline.
…the cool part!
From theory to code, here is our formula:
Now all you have to do before you run your project is go back to your buttonHandler(sender:) function and ungrey line 24:
self.setUpButtons(count: self.options.count, center: self.middleButton, radius: 80)Hit ‘run’ and witness the magic!
You can set the buttons’ images to something better, obviously. Or pick random ones. They will still look better than three A’s.
But wait, not so fast! We still haven’t defined our formula to remove the buttons. How will they ever go away? If you keep pressing the button now, all it will do is add more and more buttons every second time you press it. Lucky, while adding our buttons (including the background button) we added each one of them to an array of buttons so we can quickly access them and remove them with a simple function that we can call every second time that the user taps the central button:
Now run your project and… witness the magic!
You should be proud for getting this far. You went through maths, geometry, trigonometry, all to design this little 2 seconds animation. The user will never know what you’ve been through but I do. So good work!
Did you enjoy this tutorial? Did it work well with your project?
Want to Connect?Follow me on…
❤️ YouTube
💖 Dribbble
💜 Instagram
💙 Ko-Fi
🖤 GitHub


