
Deploy your LLM with Inference Endpoints from Hugging Face
Deploying a model is hard.
You have spent days and weeks training and tuning your model on your business case. The results are quite good and you’re ready to push it into production.
However, your model is quite large, which not only leads to increased memory usage but also requires the utilization of GPUs to ensure efficient and speedy performance.
Fortunately, cloud providers such as AWS or Azure offer services that enable ML engineers to deploy their models on endpoints. These endpoints serve as instances that host the model and provide a REST API for invoking its functionalities.
However, the complexity of these services makes them time-consuming and challenging to learn.
For these reasons, Hugging Face developed Inference Endpoints.
Hugging Face - Inference Endpoints
In partnership with cloud providers, like AWS or Azure, Hugging Face created Inference Endpoints, a user-friendly solution to deploy and manage your model in the cloud, directly from your model repositories.
Inference endpoints provides various instances, in exchange for an additional cost compared to deploying the model through cloud providers.
However, the simplicity of the task makes it worth it.
Prepare the model for deployment
For this particular use case, I will deploy LLM-Tolkien, a Bloom-3B model fine-tuned on the “Lord of The Rings” story. I’ll then develop an application that allows end-users to generate completions for any story they write.
If you’re interested in understanding how to fine-tune your own LLM in the same manner, go check this article:
I used Bloom-3B, on which I used the LoRA (Low-Rank Adapters) technique. It is located in my Hugging Face repository.
However, the repository only contains the adapters. In order to use the model, we need to load the base model Bloom-3B, which is not fine-tuned, and then incorporate the trained adapters into it.
Unfortunately, although Inference Endpoints simplify the process by automatically generating pipelines for specific tasks such as text generation or text classification, in this case, customization of the endpoint is necessary.
You can do it by creating your own inference handler script.
Customized the inference handler
Refer to the documentation if you want to know more about how to custom your own inference handler.
To deploy our model on an endpoint, we need to load the model during the initialization and return the generated text based on the initial text input.
The initialization and call phases are handled in the handler.py script.
First, create this new file in your Hugging Face repository. You can do it by cloning it locally using git. Beforehand, you need to log in to Hugging Face using huggingface_cli login .
huggingface_cli login
# Add your token and add it to your git credentials

git lfs install
git clone https://huggingface.co/JeremyArancio/llm-tolkien
Once done, create the handler.py file in the repo.
Check the script located in the repo.
This script must contain a class method called EndpointHandler with 2 methods: __init__ and __call__ .
In the __init__ method, we load the model: the base model Bloom-3B and the adapters.
from transformers import AutoModelForCausalLM, AutoTokenizer
from peft import PeftConfig, PeftModel

class EndpointHandler():
    def __init__(self, path=""):
        config = PeftConfig.from_pretrained(path)
        model = AutoModelForCausalLM.from_pretrained(config.base_model_name_or_path, load_in_8bit=True, device_map='auto')
        self.tokenizer = AutoTokenizer.from_pretrained(config.base_model_name_or_path)
        # Load the Lora model
        self.model = PeftModel.from_pretrained(model, path)
Once the inference endpoints in initialized and the model loaded, we can set up the __call__ method. We have designed it to accept a string as input and provide the generated text as the output.
Additionally, to enable users to customize parameters in our application, let’s include a “parameters” option in the call. This option will encompass all the supported text generation options available in the generate()method from the transformers library. (Refer to the documentation)
import torch.cuda
device = "cuda" if torch.cuda.is_available() else "cpu"

def __call__(self, data: Dict[str, Any]) -> Dict[str, Any]:
        """
        Args:
            data (Dict): The payload with the text prompt
        and generation parameters.
        """
        # Get inputs
        prompt = data.pop("inputs", None)
        parameters = data.pop("parameters", None)
        if prompt is None:
            raise ValueError("Missing prompt.")
        # Preprocess
        input_ids = self.tokenizer(prompt, return_tensors="pt").input_ids.to(device)
        # Forward
        if parameters is not None:
            output = self.model.generate(input_ids=input_ids, **parameters)
        else:
            output = self.model.generate(input_ids=input_ids)
        # Postprocess
        prediction = self.tokenizer.decode(output[0])
        return {"generated_text": prediction}
Once the handler.py script is created, we can push it to Hugging Face. It’s now ready for deployment.
git add .
git commit -m "Create handler"
git push origin main
Deployment
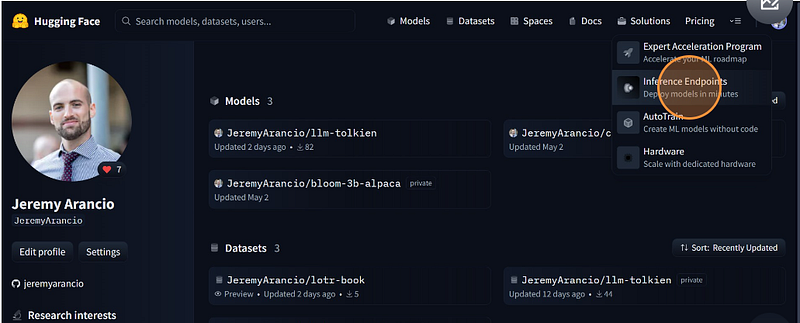
Go to your Hugging Face account and open the Inference Endpoints page.
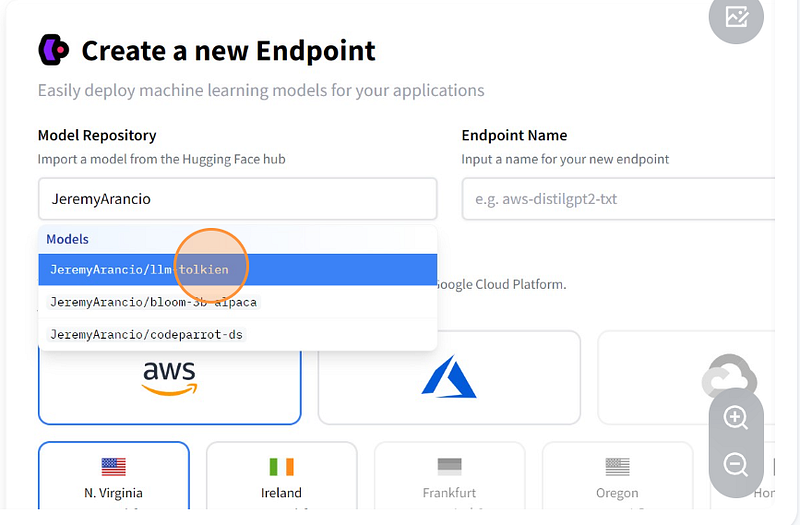
Now, select the HF repository where your model is located. You can then decide to deploy it using any cloud provider provided by Hugging Face.
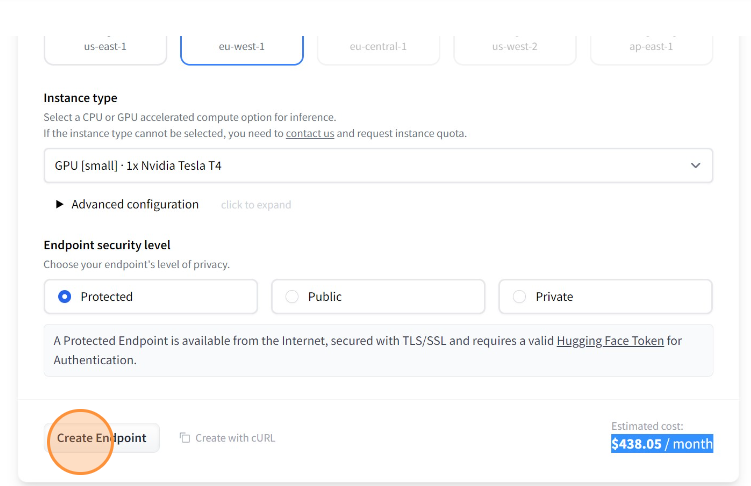
Next, choose the instance on which you wish to execute your model. For our purposes, we will utilize a 16GB CPU coupled with a Tesla T4 GPU, which is the same configuration utilized in the free version of Google Colab.
You can see the monthly price for using this infrastructure, which corresponds to 0.60$/hour.
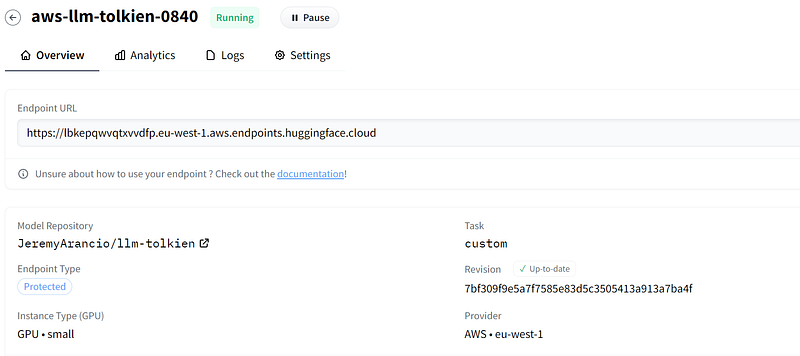
Once the initialization process is complete, you can now access the API using the provided URL. To do this, you can use the requests built-in method (check the documentation)
# Snippet from the official HF documentation
import json
import requests
API_URL = "https://api-inference.huggingface.co/models/gpt2"
headers = {"Authorization": f"Bearer {API_TOKEN}"}
def query(payload):
    data = json.dumps(payload)
    response = requests.request("POST", API_URL, headers=headers, data=data)
    return json.loads(response.content.decode("utf-8"))
data = query("Can you please let us know more details about your ")Congratulations, your model has been successfully deployed! You can now harness its power and leverage its capabilities.
Build the application using Streamlit
We build the storyteller using Streamlit, an easy-to-use solution to create good-looking apps fastly with Python. You can find the complete app code in the project repository.
You need to download Streamlit using pip install streamlit .
Let’s begin by developing the code that will make the API call to the endpoint. To do so we use the requests Python built-in library. We also create a Python class StoryTeller that we will use in the streamlit_app.pyto generate our story.
As we defined in the handler.py script, the API requires a payload containing the initial text and the generation parameters. It then returns the generated text as a dictionary.
from typing import Dict
import requests
import json
import os

# Get your token in your HugginFace settings
API_TOKEN = os.getenv("HUGGINGFACE_INFERENCE_TOKEN")
API_URL = "https://lbkepqwvqtxvvdfp.eu-west-1.aws.endpoints.huggingface.cloud"

class StoryTeller():
    def __init__(self):
        self.headers = {"Authorization": f"Bearer {API_TOKEN}", "Content-Type": "application/json"}

    def __call__(self, payload: Dict) -> str:
        """
        Args:
            payload (Dict): Data containing the initial text and generation parameters.
        Returns:
            str: Story
        """
        # It is required to add "Content-Type", otherwise it doesn't work
        headers = {"Authorization": f"Bearer {API_TOKEN}", "Content-Type": "application/json"}
        data = json.dumps(payload)
        response = requests.request("POST", API_URL, headers=self.headers, data=data)
        # output: {"generated_text": prediction}
        return json.loads(response.content.decode("utf-8"))
We then create our Streamlit application, using the official documentation.
Since we have designed the inference endpoints to consider user-defined parameters, we will incorporate this feature into the application.
The key parameter stores the variable in st.session_state , a dictionary containing the elements that we want to save as long as the browser page is open.
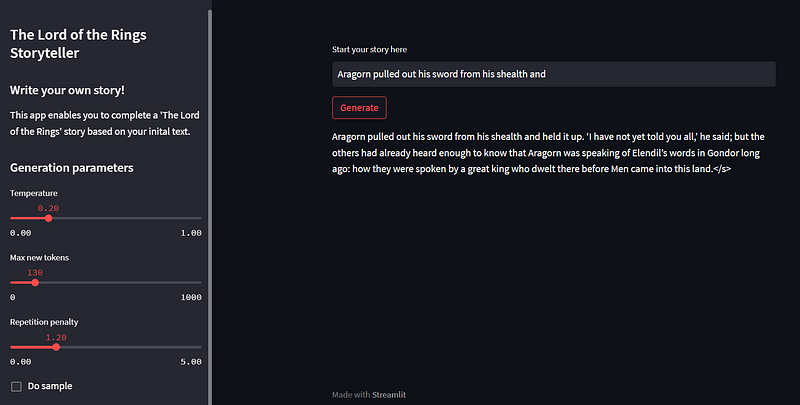
with st.sidebar:
    st.title("The Lord of the Rings Storyteller")
    st.header("Write your own story!")
    st.write("This app enables you to complete a 'The Lord of the Rings' story based on your inital text.")

    st.header("Generation parameters")
    st.slider("Temperature", min_value=0.0, max_value=1.0, value=config.temperature, step=0.1, key="temperature")
    st.slider("Max new tokens", min_value=0, max_value=1000, value=config.max_new_tokens, step=10, key="max_new_tokens")
    st.slider("Repetition penalty", min_value=0.0, max_value=5.0, value=config.repetition_penalty, step=0.2, key="repetition_penalty")
    st.checkbox("Do sample", value=config.do_sample, key="do_sample")
We then define the feature that takes a text as input and returns the generated story. This function will be called when the user presses the generate button. Each element from the session_state dict are called using session_state.<key> .
import streamlit as st
from transformers import AutoTokenizer

# Our modules
from storyteller import StoryTeller
import config

def write(text: str) -> str:
    storyteller = StoryTeller()
    eos_token_id = AutoTokenizer.from_pretrained("bigscience/bloom-3b").eos_token_id
    parameters = {
        "max_new_tokens": st.session_state.max_new_tokens,
        "do_sample": st.session_state.do_sample,
        "temperature": st.session_state.temperature,
        "early_stopping": config.early_stopping,
        "repetition_penalty": st.session_state.repetition_penalty,
        "forced_eos_token_id": eos_token_id
    }
    LOGGER.info(f"Parameters: {parameters}")
    output = storyteller({"inputs": text, "parameters": parameters})
    LOGGER.info(f"Writing finished. The result is: {output}")
    return output["generated_text"]
Finally, we build the button that will generate the story.
st.text_input("Start your story here", key="text_input")
if st.button("Generate"):
    text = st.session_state.text_input
    # Loading widget
    with st.spinner("Generating story..."):
        if text:
            story = write(text)
            st.write(story)
        else:
            st.warning("Please enter some text to start your story.")
And it’s done! You have created an app that calls your model running on GPU and deployed on Inference Endpoints!
To run the app locally, type:
streamlit run <your_streamlit_app_path>.py
You can then deploy this application on any server. In this project, we simply deploy the solution on the Streamlit cloud. Check the documentation and the structure of the repository to know how to do it yourself.
To conclude
In this article, you have learned how to deploy your model using the user-friendly solution developed by Hugging Face: Inference Endpoints. Additionally, you have learned how to build an app using Streamlit.
With Inference Endpoints, you can easily develop prototypes or even production-ready solutions for your business.
I hope you enjoyed the reading.
Don’t hesitate to join the newsletter to stay updated with my latest articles.
You can also contact me or check my social media here.
Happy coding!
Links
- Project repo
- Hugging Face model card
- Inference endpoints documentation


