Customer Churn Prediction Application with Gradio
Introduction
In my previous article (Article), I spoke about the use of the CRISP-DM process to work on the project. I went through all the steps except the deployment phase. This article seeks to show how we can build an application using Gradio for an interactive model interface and later deploy the application.
What is Gradio?
Gradio is the fastest way to demo your machine learning model with a friendly web interface so that anyone can use it, anywhere! (Gradio)
One of the best ways to share your machine learning model, API, or data science workflow with others is to create an interactive app that allows your users or colleagues to try out the demo in their browsers.
Gradio allows you to build demos and share them, all in Python. And usually in just a few lines of code! (Getting Started)
Gradio and Streamlit are both excellent tools for building interactive web apps in Python, with slightly different design philosophies and feature sets. The choice between them depends on your specific needs and preferences.
Difference between Gradio and Streamlit
- Design: Streamlit is focused on creating data science apps quickly and easily, with a simple and intuitive interface. Gradio, on the other hand, is designed to be more flexible and customizable, allowing users to build a wider variety of interactive apps.
- Features: Streamlit has a range of built-in widgets for displaying and manipulating data and tools for sharing and collaborating on projects. Gradio has similar features but also supports audio and video inputs, image segmentation, and other advanced machine-learning tasks.
- Ease of use: Both Streamlit and Gradio are designed to be easy to use, with simple APIs and documentation. However, Streamlit’s focus on simplicity means that it may be easier for beginners to get started, while Gradio’s flexibility may be more appealing to experienced developers.
- Deployment: Both Streamlit and Gradio make it easy to deploy apps to the web, with built-in support for hosting on services like Heroku or Google Cloud. However, Gradio also includes a built-in hosting platform allowing users to share their apps directly.
Application Building Process
The following are the processes we will be going through to build an application for the machine learning model.
· Setting up an environment to make sure our application is stable, reproducible, isolated, and consistent, and that it will work as intended.
· Building the interface
· Importing the machine learning components into the workspace.
· Setting up the backend to process inputs and display outputs
· Deploying the application
Setting up Environment
A Python environment is a collection of resources, tools, and configurations that allow you to work with Python and its libraries. The essence of a Python environment is to provide a consistent and reproducible set of conditions for your Python code to run in, regardless of the underlying hardware or software on which it is executed.
Creating the environment
The environment that will be created for building the gradio app is the gradio_venv environment created using the venv module in Python.

Activating the environment

Installing dependencies and requirements
After the environment has been set and activated, the application’s requirements and dependencies are installed to ensure that the model has the same dependencies and requirements used during its training.
Begin by installing gradio using pip

Then install the requirements and dependencies saved in the requirement txt file.

Creating the App Interface
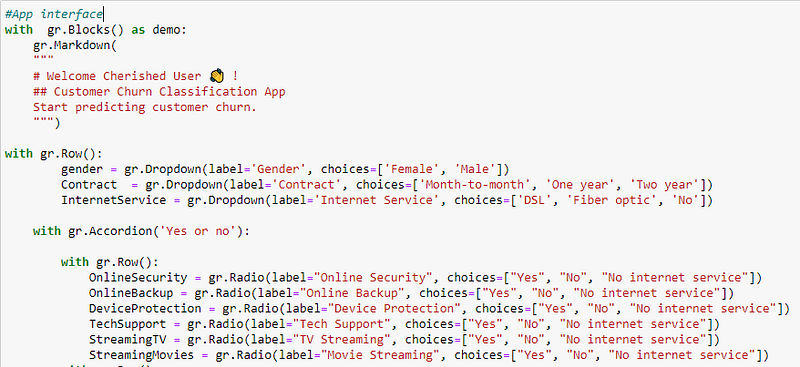
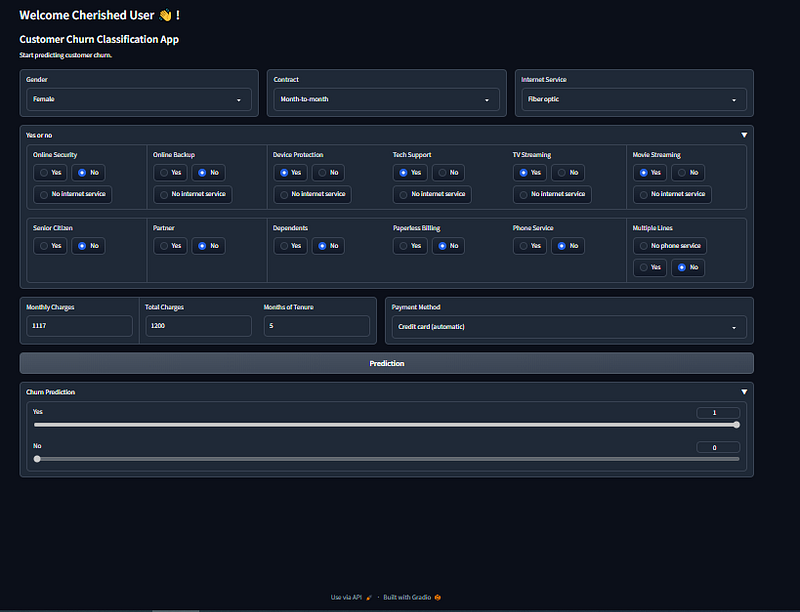
Gradio offers two options for building interfaces: the default interface and Gradio blocks. In this particular case, Gradio blocks were utilized to gain more precise control over the app’s interface compared to the default layout, which has a pre-defined structure. The app’s interface includes three primary components: inputs, outputs, and a button to initiate the prediction process.
To create the input fields, a combination of dropdown menus, radio buttons, and number fields was employed. Dropdown menus were used for selecting features such as Gender, Contract, and InternetService. Radio buttons were utilized for selecting options related to OnlineSecurity, OnlineBackup, DeviceProtection, TechSupport, StreamingTV, StreamingMovies, SeniorCitizen, Partner, Dependents, PaperlessBilling, PhoneService, and MultipleLines. Finally, Number fields were employed to input data related to MonthlyCharges, TotalCharges, Tenure, and PaymentMethod.
The output field was created using Sliders to display the prediction results.
Code Snippet of the Interface
Import Machine Learning (ML) Components
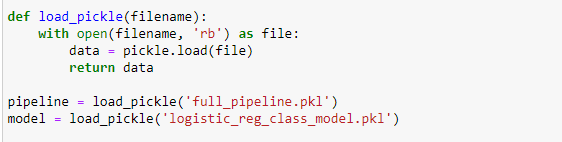
Here, the ML components which were exported when the model was built were imported. I exported the full pipeline and the model separately in a pickle file. Code snippet to show model importation.
Setup the backend to process inputs and display outputs
The app collected user inputs and converted them into a dataframe that mirrored the structure of the data used to train the model, ensuring uniform column names. Furthermore, the pickled pipeline was loaded and utilized to transform the collected data into a format that can be understood by the model.
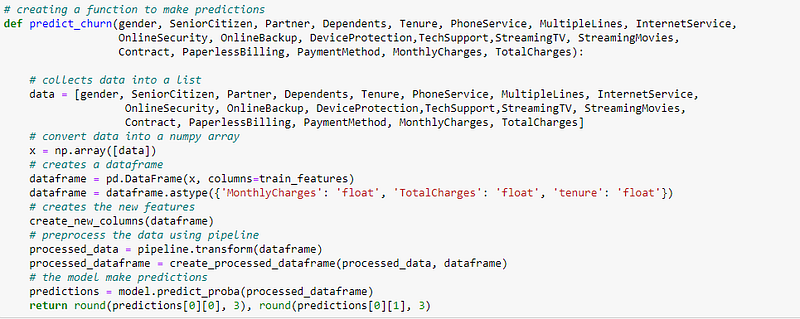
When the submit button is clicked, the predict_churn function is activated. It receives the input field values, converts them to a list, and then to a numpy array. This numpy array is utilized to create a pandas dataframe. The dataframe is processed with the same function used during training, then transformed by applying the pipeline loaded from the pickle file. The predict_proba method is ultimately invoked on the model to produce churn probabilities for the customer. These probabilities are then presented as a slider output within the app.
Output Prediction
Gradio requires you to define a function to process the inputs. It requires the use of three main things (function, inputs, and outputs) in one place.

Launching the app
In the demo.launch() you can state inbrowser= True or share=True.
The “inbrowser = True” argument is specified so that the app loads in the browser when the script is run.
By adding “share = True” inside your launch function, you deploy it for free and stay online for about 72 hours.

Picture of the App Interface
Conclusion
This is a summary of how to build an application using Gradio for an interactive model interface. Thank you for reading.
Check my GitHub repo for details on the codes.


