
Create The Most Photorealistic Images on MidJourney — Success Prompting Formula & 100+ Cheat Codes (Part 4)
Sharing 3 of my 8 Secret Bonus Tips to create the most Jaw-Dropping Photorealistic AI Images on MidJourney! (Part 4)
If later you find this article valuable, throw me some Medium love! 🥰 What you can do to support me: Clap up to 50, leave a message, highlight some text if you see fit & be sure to follow. 💌
Here comes Part 4 of this “Create The Most Photorealistic Images on MidJourney” series— the Grand Finale Series that lots of you are waiting for. I’d like to take this opportunity to express my heartfelt appreciation for all of your amazing support and response for the Part 1, Part 2, and Part 3 that were published! 🥰
In this article, I’m going to share 3 of the 8 Secret Bonus Tips that I have discovered to create the Most Jaw-Dropping MidJourney AI Photorealistic Images with you today.
And I have covered the rest of the bonus tips in Part 5!
👉🏻 In case you’ve missed the first 3 parts of this article…
In Part 1, Part 2 and Part 3 of this article, I have shared:
- My MidJourney Photorealistic Images Success Prompting Formula
- Cheat codes for:
Photography Theme/ Style+Image Angle+Image Focus+Lighting+Weather / Time of Day+Camera/ Film Types+Description of Realism+Aspect Ratio - Amazingly realistic images I’ve created on MidJourney & their prompts
In case you have missed the last 3 parts of this article, you may want to go through them first. Here you go:
This article's last part (Part 5) has just been published. Check it out afterward!
👉🏻 Let’s take a look at my “MidJourney Photorealistic Images Success Prompting Formula” again!
Photography Theme/ Style + Description of Image Content + Image Angle + Image Focus + Lighting + Weather / Time of Day + Camera/ Film Type + Description of Realism + Complete Guide to Aspect Ratios + My Secret Bonus Tips
Based on this success formula, I’ve categorized the cheat codes into the following:
📌 Photography Themes/ Styles (Covered in Part 1 of the article)
📌 Image Angles (Covered in Part 1 of the article)
📌 Image Focus (Covered in Part 1 of the article)
📌 Lighting (Covered in Part 2 of the article)
📌 Weather / Time of Day (Covered in Part 2 of the article)
📌 Camera/ Film Types (Covered in Part 3 of the article)
📌 Description of Realism (Covered in Part 3 of the article)
📌 Complete Guide to Aspect Ratios (Covered in Part 3 of the article)
✨ My Secret Bonus Tips (Covering in THIS Article & Part 5!)
👉🏻 In this article, let’s explore:
My Secret Bonus Tips to create The Most Photorealistic Images on MidJourney
The 3 Secret Bonus Tips I’m going to share with you today are:
🔮 The Magic Parameter Combo: --style raw & --stylize
💦 Don’t Sweat the Camera Models & Settings!
📆 Add a Specific Year in Your Prompt for the Magic
👉🏻 For the rest of the Secret Bonus Tips, make sure you check out Part 5!
Let’s go! 🏃🏻
Bonus Tips #1: 🔮 The Magic Parameter Combo: --style raw & --stylize
📌 What is --style raw for?
Simply put, --style raw can be used when users want more control over their images. The images created with --style raw have less default MidJourney aesthetic algorithm applied, which means you will get a more accurate match when you prompt for a specific style, in this case, photorealistic images.
By adding --style raw, you don’t need a whole bunch of words to describe what you want. MidJourney will use an algorithm that will follow your prompt in a more literal way.
From my experience, it is an essential parameter when aiming to create very photorealistic images.
📌 How about the --stylize value?
The MidJourney bot has been trained to produce images that favor artistic color, forms, and composition. Adding the --stylize (or --s) parameter can influence how strong you’d like this training to be applied. For MidJourney Version 5.2, the --stylize's default value is 100 and accepts integer values from 0–1000.
While low --stylize values produce images that are closely connected to the prompt but are less artistic; high --stylize values create images that are very artistic but relatively less matched to the prompt.
🪄 The Magic Combo
So, to raise the likelihood of generating photorealistic yet beautiful images, you don’t want the --stylize value to be too low or too high. After I tested out different values numerous times, I discovered that value 400 is the sweet spot. Anything higher than that doesn’t really make much of a difference.
So there you have it! The Magic Parameter Combo to create beautiful photorealistic images is:
--style raw & --stylize 400
👉🏻 Simply add this magic parameter combo to the end of your prompt like this:

🪄 Let’s Test Out This Magic Parameter Combo!
I’m going to show you two image examples to compare the photorealistic images I created on MidJourney without using my magic parameter combo versus using my magic combo.
— Without using my magic parameter combo (Images on the left): No special MidJourney parameter was added to the prompts except the aspect ratio.
— Using my magic parameter combo (Images on the right):
Other than aspect ratio, the magic combo --style raw and --s 400 are added to the prompts.
Let’s see the comparison!
🖼️ Example 1
Realistic close-up photo of 6 years old Sophia in a botanical garden, golden hour --ar 16:9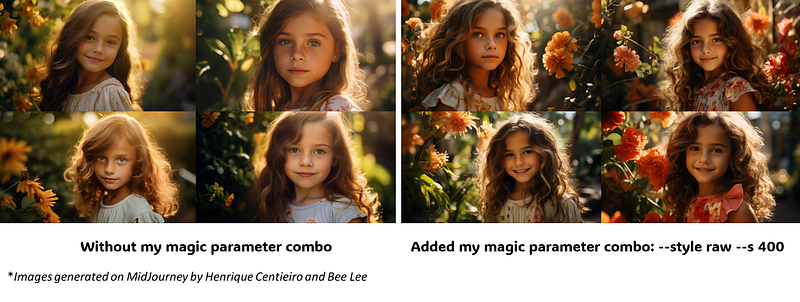
🖼️ Example 2
A 70 years old cheerful female vendor selling spices in a busy outdoor food market in Mumbai. Cloudy day. Realistic documentary photo --ar 16:9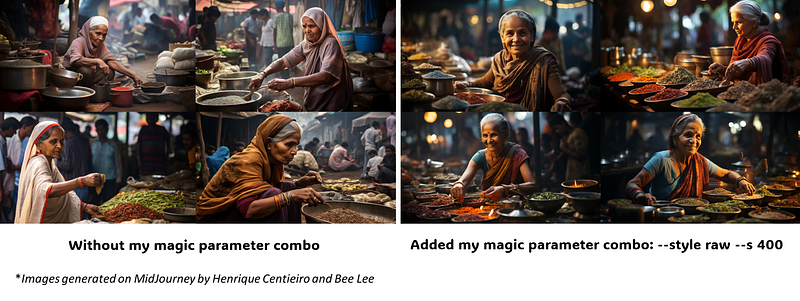
You can clearly see that the images on the right with the Magic Parameter Combo are way more artistic-looking and aesthetically pleasing.
And, of course, you can always test out different values to see what works best for you! 🥰
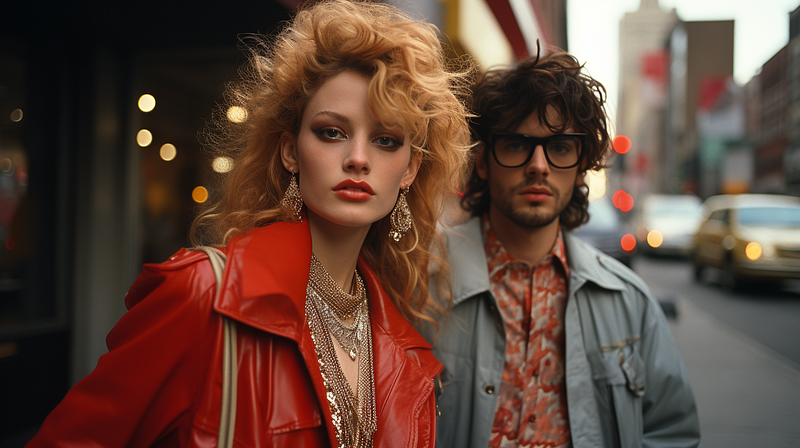
Bonus Tips #2: 💦 Don’t Sweat the Camera Models & Settings!
I’m sure you’ve seen tutorials or articles suggest adding a whole bunch of DSLR (Digital Single-Lens Reflex) camera model names and camera settings, including lens sizes, film sizes, focus, aperture, shutter speed, white balance, etc, to the prompt, that looks something like this:
Canon EOS R5, f/2.8, 1/500 shutter speed, 300mm focal length, autofocus, ISO800
If you are not a photography person, I’m sure you have no idea what those camera models and complex settings are. Don’t sweat it, I have some great news for you…🍾 What if I tell you, you don’t actually need to worry about those settings at all!
After a lot of trials, I came to the conclusion that MidJourney gives extremely minimal if not zero response to specific DSLR camera model names and all those camera settings! It’s a total myth it actually makes any difference to the image outcome adding them to the prompts.
So, what can you add to the prompt instead to tell MidJourney the specific type of photorealistic image you want?
📸 For DSLR camera models, as I suggested in Part 3 of this article:
You can, however, include names of special camera types like night vision camera, fisheye camera, lomo camera, etc, as well as names of film types like Kodak Tri-X, Agfa Vista, etc, if you’re looking for specific photo styles. I’ve tested them all out, so I know that MidJourney understands them!
You can learn more about these special camera and film types in Part 3 of this article.
📸 For camera settings, you can replace them using these cheat codes I have shared:
Photography Themes/ Styles&Image Focusin Part 1 of the articleLightingin Part 2 of the article
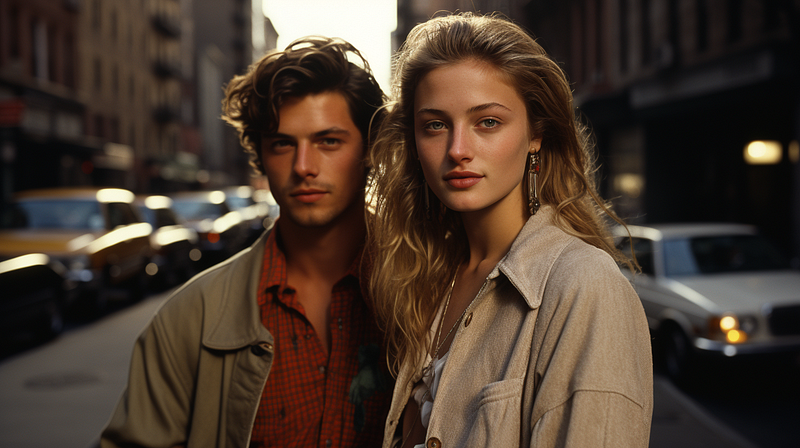
📸 Let me show you some examples for comparison!
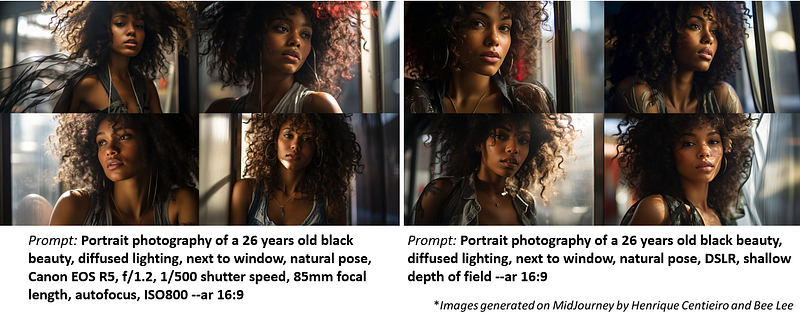
🖼️ Example 1
For the images on the left, I added the camera model that is well-known for taking portraits and the commonly used camera settings for portraits.
For the images on the right, I simply added my cheat codes DSLR, shallow depth of field instead of the whole chain of camera settings.
🖼️ Example 2
For the images on the left, I added the camera model that is well-known for light trail photography and the commonly used camera settings for light trails.
For the images on the right, I simply added my cheat codes wide angle, DSLR, time lapse photography instead of the whole chain of camera settings.
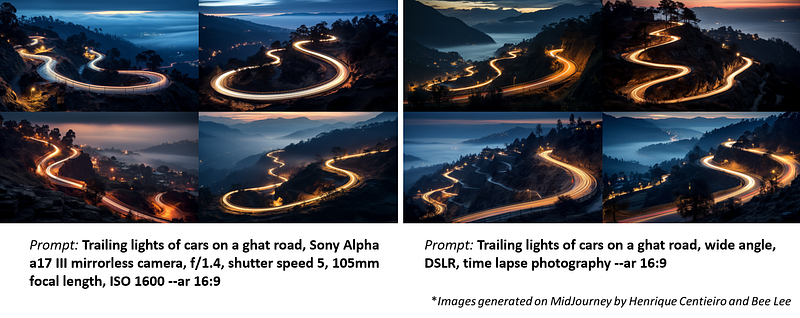
👉🏻 Can you actually tell much difference between the images on the left and the images on the right?
So, now you know you can stop spending time adding a whole bunch of words that MidJourney doesn’t even understand and just use my simple cheat codes instead! 😉
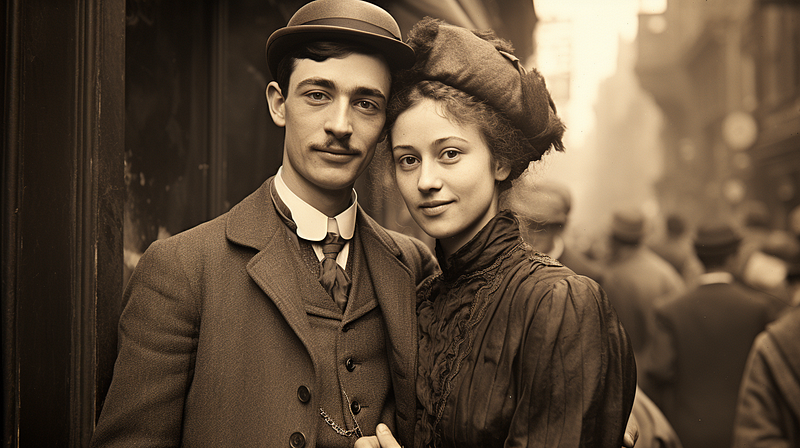
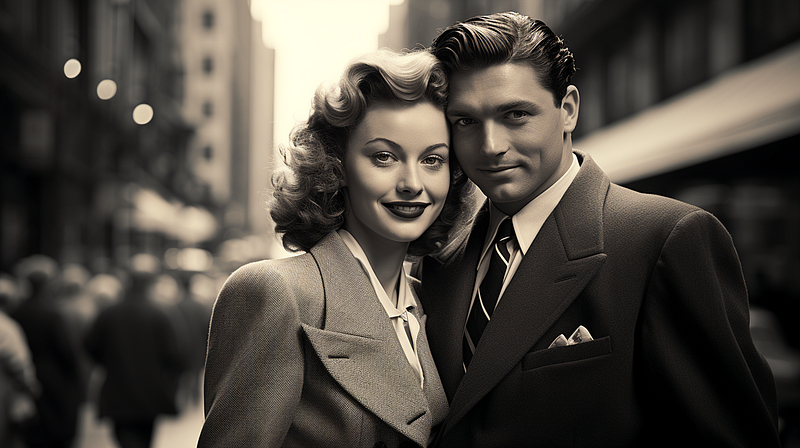
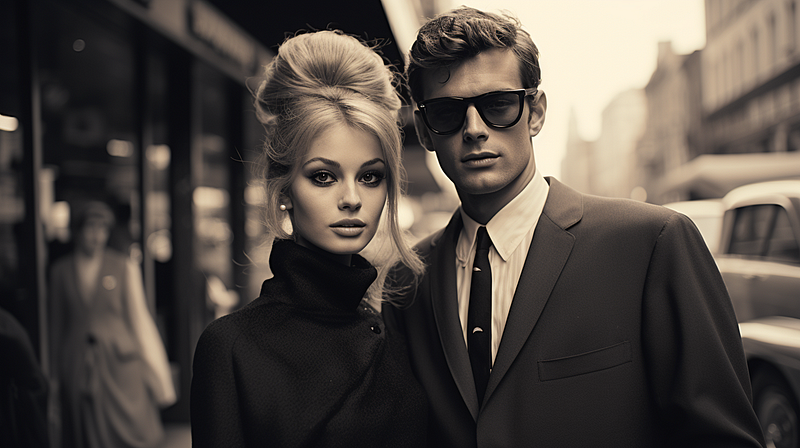
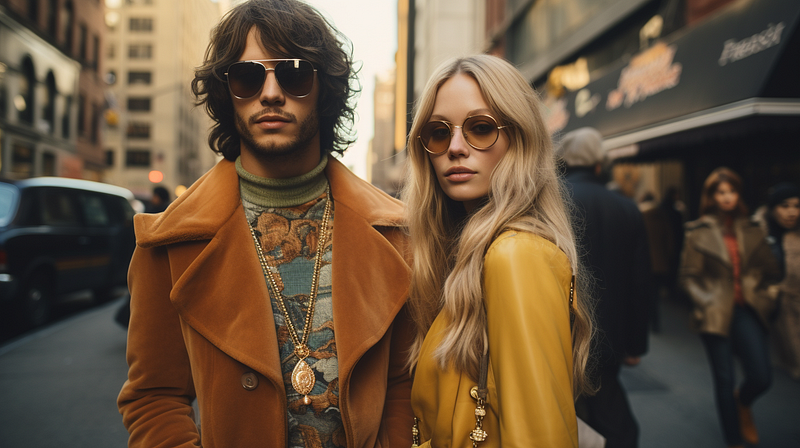
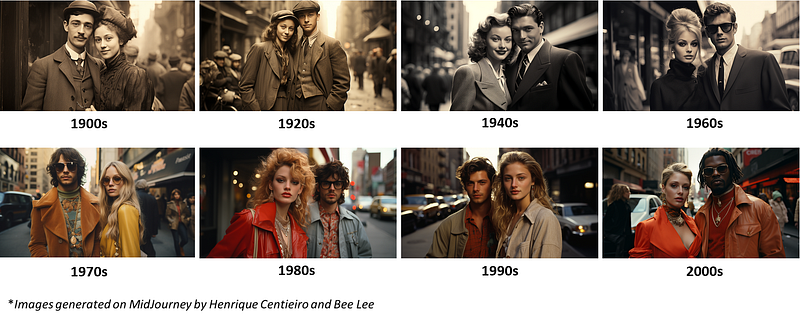
Bonus Tips #3: 📆 Add a Specific Year in Your Prompt for the Magic
The year a photo was taken can influence its appearance through the distinct color tones, grain, resolution, and, of course, the subject matter typical of that era, like how people would look or dress at those times.
Did you know, by adding a specific year to your MidJourney photorealistic prompt, you can guide MidJourney to create images with a specific aesthetic associated with those times, that look like what you may only see in your grandma’s album?
👇🏻 Let’s see some image examples of different eras!
To compare the difference, I’ve used the exact same prompt for all the images except the year:
[insert year] photography of a fashionable couple in the streets of New York, cinematic --style raw --s 400 --ar 16:9📌 1900s
📌 1920s
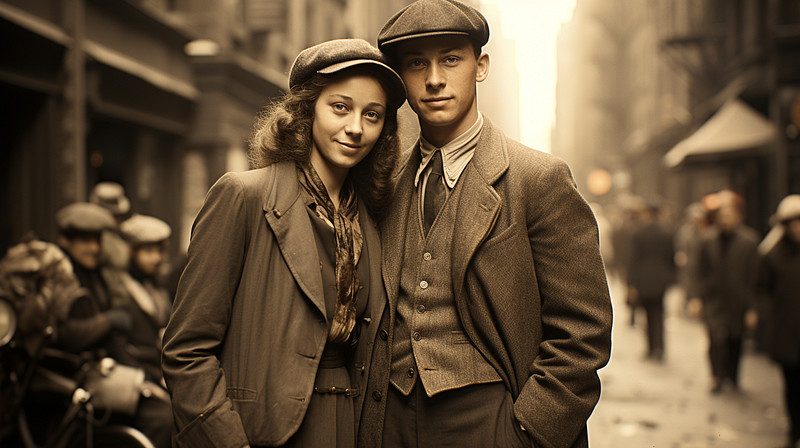
📌 1940s
📌 1960s
📌 1970s
📌 1980s
📌 1990s
📌 2000s

As you can see, just by adding a specific year to your MidJourney photorealistic prompt, you can get pretty distinctive aesthetic associated with those times.
Isn’t that pretty magical?! ✨ Go try it out yourself!
🥰 For you to visualize better, I have put together all the above image examples:
Want more Secret Bonus Tips?! This is not the end…
In the upcoming Part 5 (the Final Part) of this article, I will share the rest of My Secret Bonus Tips to complete my MidJourney Photorealistic Images Success Prompting Formula! That will include the rest of my personal Tips & Tricks to create the Most Photorealistic Images on MidJourney, which I have discovered throughout the countless hours of trial and error.
You sure don’t want to miss it! ✨ Stay Tuned!
If you found this article valuable, why not throw me some Medium love? 🥰 What you can do to support me: Clap up to 50, leave a message, highlight some text if you see fit & be sure to follow. 💌
In case you have missed Part 1, Part 2, and Part 3 of this article, where I shared the cheat codes for Photography Theme/ Style + Image Angle + Image Focus + Lighting + Weather / Time of Day + Camera/ Film Types + Description of Realism + Aspect Ratio, here you go:
In the last Part 5, I shared the rest of My 8 Secret Bonus Tips :
Meanwhile, feel free to check out all my other articles here to learn more Tips and Tricks on using MidJourney:
Here’s a special shoutout to Ms. Bee Lee, for her crucial effort that contributed to creating this article. Follow her Twitter for her “Daily Dose of AI Art”!
🌞 Stay in touch with me:


