Create Highly Available Kubernetes cluster with Minimal Dependencies
Components to build a close-to-production grade cluster
Introduction
Kubernetes is a popular topic nowadays. There are numerous articles on Medium and everywhere. The big name cloud providers have great Kubernetes support that you can create a usable cluster as quick as in minutes. There is also kubernetes-the-hard-way to build everything from scratch.
What if you are like me, using a (relatively) small cloud provider, in need of the flexibility to move vendor at any time and detailed control of the things running on your cluster?
In this article I describe my experiences to create Kubernetes cluster on self-managed cloud. I intend to use only the very basic resources, e.g. excluding any vendor-specific resources, to create a close-to-production grade cluster.
I will go straight into details. There are lots of good introductions to Kubernetes and I found this one nice. This article help me get a understanding of HA Kubernetes.
I only cover small sized clusters in this article, which is suitable for my use scenarios.
Highly Available or Single Master?
It depends on the need. If the applications running on the cluster requires HA(high availability), the cluster as the infrastructure must be highly available. If the service could tolerate some outages, a single-master cluster could also run very well.
Below 2 diagrams describe a minimal highly available cluster , which is composed of 8 host machines, and a single-master cluster, which is composed of 4 host machines.
List of required resources
- A cloud provide to get Virtual Hosts CPU, Memory, Storage Networking, IP Addresses(Public, Private) Floating IP address if HA is needed
- Domain Name provider
- DNS provider
A minimal single master cluster could be created with below resources.
A minimal highly available cluster could be created with below resources.
A cluster is created to provide services. The resources to support the services running on the cluster need additional estimation. It’s easy to up-size the masters/workers, or add additional workers to the cluster. Of course I mean it’s only easy to a certain extend, like dozens of workers.
I won’t cover auto-scaling the worker nodes here, e.g. automatically adding/removing worker nodes to the cluster.
Software Components
The minimal cluster is composed with below software components to meet the basic requirements: networking, persistent volumes, monitoring, logging, Ingress and backup.
There are lots choices to make, from architecture to components, and my decisions are mostly based on one precondition: minimal vendor dependencies.
To list them all here:
- Host provisioning
- Haproxy
- Bootstrap
- Networking
- Persistent volume
- Monitoring
- Logging
- Ingress
- Backup
Virtual Host provisioning
I’m not going to describe the very details of host provisioning, as it depends a lot on the cloud provider, choice of Linux flavor and requirements of security.
The goal is to prepare the virtual hosts for the cluster, make them safe, make them controllable, and make them automatically.
In my own experience, I use Terraform to manage the hosts and create the same “bare” hosts. After the provisioning, I collect all the hosts in a “resource file”, for example named as “clustera_hosts” , like below, with all private IPs.
192.168.3.122 haproxy1.example.com haproxy1
192.168.2.17 haproxy2.example.com haproxy2
192.168.4.114 master1.example.com master1
192.168.5.58 master2.example.com master2
192.168.1.203 master3.example.com master3
192.168.3.72 worker1.example.com worker1
192.168.5.67 worker2.example.com worker2
192.168.7.180 worker3.example.com worker3
192.168.4.130 haproxy.example.com haproxy
The “bare” hosts have these features:
- Allow full ssh access from a dedicated “bastion host” only.
- All hosts know about each other and opens all ports among them on the private IP network interface.
- Use iptables to block all network access for both public/private IPs, except 80/443.
- So these hosts are isolated as a group that they could communicate with each other, but prevent access from other tenants of the cloud provide and public Internet, like AWS VPC.
- Postfix configured to send out emails
- Install docker, kubelet(except haproxy host), kubeadm
Haproxy and Keepalived
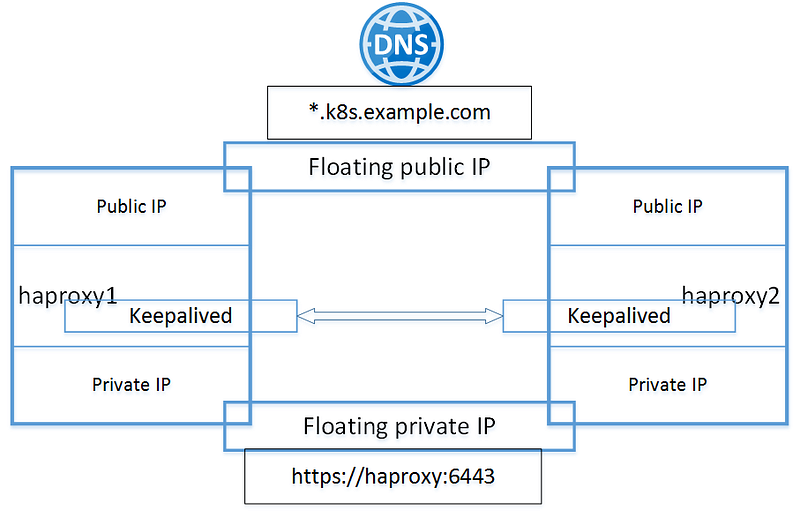
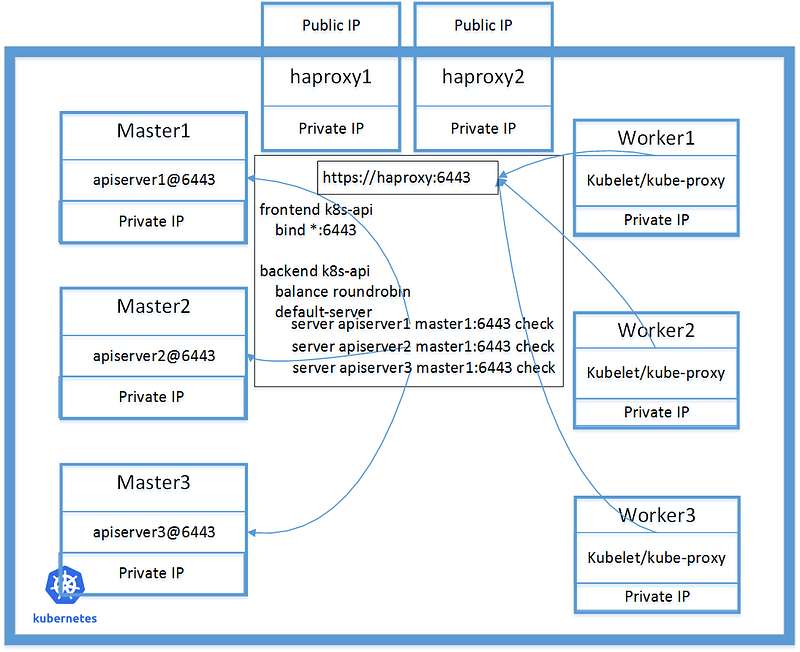
To create highly available cluster, I use 2 hosts running haproxy and keepalived in front of the cluster. These 2 hosts have additional floating IP addresses for both private network interface and public network interface.
The floating ip addresses is a vendor dependency that I don’t think there is a way to bypass. If the cloud provider has the capability to provide any HA service this is a must have.
Sample haproxy configuration
Sample keepalived configuration
Bootstrap — kubeadm
The official document has detailed steps to bootstrap single master cluster and HA cluster.
There is one thing I’d like to mention when bootstrapping the cluster. It’s important to plan the network beforehand. There are a few names here about networks:
- Host’s public IP range, which is provided by the cloud and not related here
- Host’s private IP range, which is provided by the cloud, and it’s the “physical” network used by the cluster
- Pod network IP range, e.g. pod-network-cidr, which is for the pods in the cluster to communicate
- Service cluster IP range, e.g. service-cluster-ip-range, which is for the services in the clusters, default “10.96.0.0/12”
These 3 IP ranges, MUST be different. There is a good video to explain the idea. Normally these 3 IP ranges shall fall in “Private IPv4 network addresses” (link).
In my case, the cloud provider’s private IP range is 192.168.0.0, so the other 2 IP ranges couldn’t be the same. It has to be considered together with next step.
Command for single master cluster bootstrap:
sudo kubeadm init --pod-network-cidr=10.0.0.0/16 --apiserver-advertise-address=$(hostname -I | awk '{print $2}') --ignore-preflight-errors=NumCPU2 parameters are used in the command, first is to define the IP range for Pod network, second is to define the Apiserver to listen on the private network IP address. If necessary define “ — service-cidr” too.
- — pod-network-cidr=10.0.0.0/16
- — apiserver-advertise-address=$(hostname -I | awk ‘{print $2}’)
Command for HA cluster bootstrap on host master1:
sudo kubeadm init --ignore-preflight-errors=NumCPU --config=kubeadm-config.yaml --experimental-upload-certsThe official document doesn’t provide enough detail about how to write kubeadm-config.yaml. I found this guide and this godoc is useful if you need fine tune the content.
In below sample kubeadm-config.yaml, “podSubnet” is equivalent to parameter “pod-network-cidr”, and “advertiseAddress” is equivalent to parameter “apiserver-advertise-address” for single master cluster bootstrap command.
apiVersion: kubeadm.k8s.io/v1beta1
kind: ClusterConfiguration
kubernetesVersion: "1.14.1"
controlPlaneEndpoint: "haproxy.example.com:6443"
networking:
  podSubnet: "10.0.0.0/16"
---
apiVersion: kubeadm.k8s.io/v1beta1
kind: InitConfiguration
localAPIEndpoint:
  advertiseAddress: "192.168.4.114"
Networking — calico, calicoctl
After bootstrapping and before adding other masters/workers, a pod-network add-on must be installed so that pods can communicate with each other.
There are choices and it’s better to plan which one to use beforehand. The official document has the list of available choices. It’s lots of reading and lots of considerations to do the right choice. There is a comparison article here. It must be chosen based the actual environments and requirements of the services.
For me I chose “calico” at the time simply because it’s the first in the choice list 😸
HOWEVER, the easy choice gave me hard time. This is because the default pod network for calico is “192.168.0.0/16” and it conflicts with my private IP range. So I have to do some tuning, to tell calico that I want the pod network to be “10.0.0.0/16”.
Long story short, below is the diff that I did. Some changes are to reduce the logging from calico. It’s important to define “IP_AUTODETECTION_METHOD” as “can-reach=192.168.4.130”, which is the private IP of haproxy to make sure the pod network goes through the private network interface, not the public IP address.
It’s based on calico v3.7.
$ diff calico.yaml calico.yaml.ori
27c27
<           "log_level": "warn",
---
>           "log_level": "info",
599,601d598
<             # use private ip address
<             - name: IP_AUTODETECTION_METHOD
<               value: "can-reach=192.168.4.130"
615c612
<               value: "10.0.0.0/16"
---
>               value: "192.168.0.0/16"
627c624
<               value: "warning"
---
>               value: "info"
630,631d626
<             - name: BGP_LOGSEVERITYSCREEN
<               value: "warn"
Add other nodes
After pod network is up, it’s easy to follow the official guide here or here to add other nodes into the cluster.
Storage — rook-ceph
Persistent volume is the next resource to add. I’m going to do monitoring and logging inside the same cluster and the services that I plan to run on the cluster requires persistent storage too. So I do need persistent volumes ready before adding others.
Storage is a complex topic. The official document has list of choices and I choose rook-ceph as it has no vendor dependency and it all runs inside the cluster.
Rook’s document is easy to follow and their slack channel is helpful too.
In my cluster I use these files from cluster/examples/kubernetes/[email protected]
cluster.yaml
dashboard-ingress-https.yaml
storageclass.yaml
common.yaml
operator.yaml
rook-config-override.yaml
toolbox.yaml
“rook-config-override.yaml” is to adjust log level per doc here.
apiVersion: v1
kind: ConfigMap
metadata:
  name: rook-config-override
  namespace: rook-ceph
data:
  config: |
    [global]
      debug rocksdb = 1/5
After rook-ceph is up, I could use the spec as below when needed.
    spec:
      storageClassName: rook-ceph-block
      accessModes: [ "ReadWriteOnce" ]
      resources:
        requests:
          storage: 16Mi
Monitoring — Prometheus Operator
I actually use kube-prometheus instead of only prometheus-operator. It’s like a natural choice after reading the official doc.
kube-prometheus provide these all in the cluster.
The Prometheus Operator
Highly available Prometheus
Highly available Alertmanager
Prometheus node-exporter
Prometheus Adapter for Kubernetes Metrics APIs
kube-state-metrics
Grafana
I believe the proper way to use kube-prometheus is to follow the customization steps.
Below is my steps to prepare a env and do the customization.
# Install gimme$ curl -sL -o ~/bin/gimme https://raw.githubusercontent.com/travis-ci/gimme/master/gimme
$ chmod +x ~/bin/gimme# Install go
$ eval `gimme stable`# Install jb, jsonnet, etc
$ go get github.com/jsonnet-bundler/jsonnet-bundler/cmd/jb
$ go get github.com/google/go-jsonnet/jsonnet
$ go get github.com/brancz/gojsontoyaml# Copy from document$ mkdir my-kube-prometheus; cd my-kube-prometheus
$ jb init
$ jb install github.com/coreos/kube-prometheus/jsonnet/[email protected]# Copy build.sh and example.jsonnet from document./build.sh example.jsonnet
My example.jsonnet to use rook-ceph as Prometheus’s storage.
Here I use 10G storage for 30 days of retention in one of the clusters and the storage is normally used for 50%. So it is based on experimental result and shall be adjusted based on use scenario.
It’s important to export prometheus/alertmanager/grafana web UI for via Ingress. I choose to use basic auth to protect them from anonymous access.
This doc has steps to do it for Nginx Ingress. As I’m going to use Traefik Ingress, here is my example.
Logging — Elasticsearch and Kibana
I’m using a combination of kubernetes’ addon + fluent-bit + Curator-cleanup from kubernetes-elasticsearch-cluster. I call it fluent-bit-elasticsearch for logging. To actually run elasticsearch reliably, the minimal size of worker nodes with 4G memory is not enough and need be doubled.
The 2-pods elasticsearch installation from the addon is not as powerful as a 7-pods cluster from here, but I think it’s good enough for a small size Kubernetes cluster. I want to use the curator-cleanup jobs to remote the logs older than 90 days. I replace fluentd with the lightweight fluent-bit.
In es-statefulset.yaml, volumeClaimTemplates is required. The volume size need some estimation and experiments. I use 40G volume to retain 90 days of logs.
es/kibana from the addon
curator from kubernetes-elasticsearch-cluster
fluent-bit files
- fluent-bit-service-account.yaml
- fluent-bit-role.yaml
- fluent-bit-role-binding.yaml
- fluent-bit-configmap.yaml
- fluent-bit-ds.yaml
Move all of them into namespace “kube-system”.
Finally, add ingress for kibana
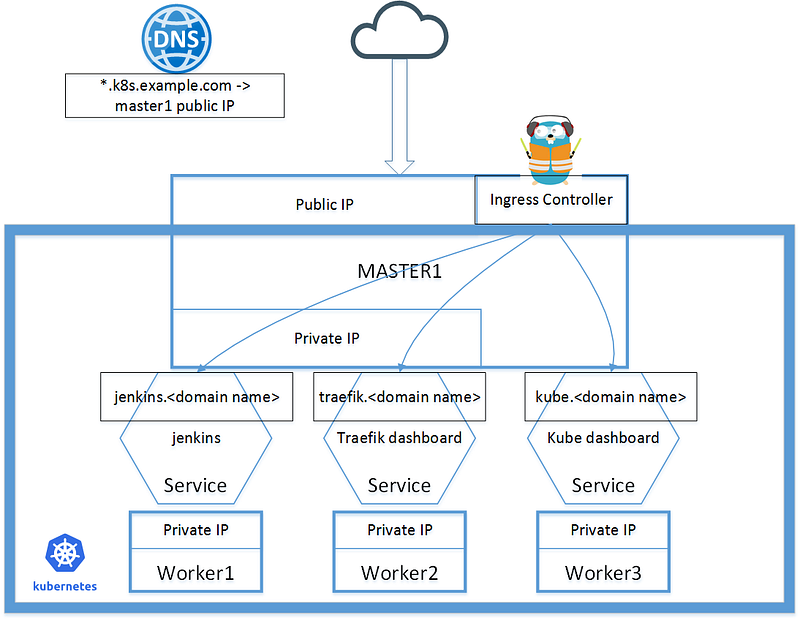
Ingress Controller — Traefik
Ingress Controllers are the portal to the services running on the cluster.
For a single master cluster, I deploy the Traefik Ingress Controller following the example on the master node, as it’s very simple to point the whole DNS domain to the master’s public IP address. I think this is acceptable for small size cluster with low network traffic, and it actually works great in one of my clusters.
For HA cluster, multiple Traefik instances in cluster mode is a must have. The official document of Traefik is very brief. I shared some details about creating Traefik cluster as Ingress Controller here. The basic idea is to deploy a consul cluster as the KV store for Traefik. Use Haproxy in front of the traefik cluster and point DNS domain to the haproxy.
In my HA cluster I deploy the Traefik cluster on the master nodes. It’s also because the expected network traffic for the cluster is low. I think for high traffic cluster it’s worth to deploy more Traefik instances on worker nodes. In this case an automatic update to the haproxy backend is needed.
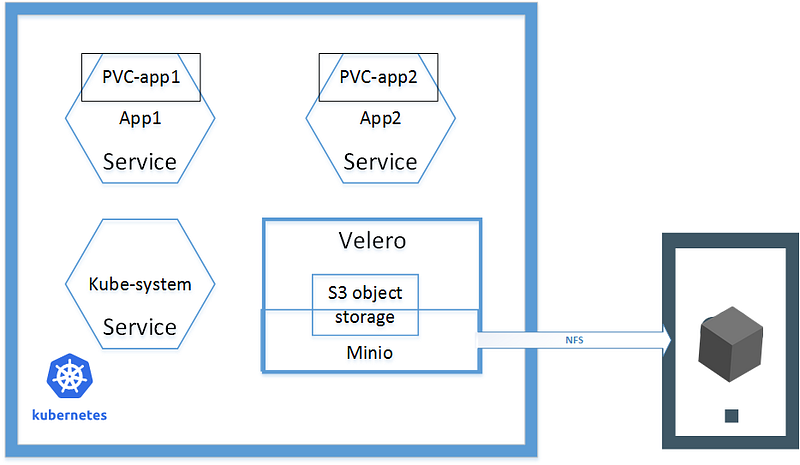
External Storage and Backup — NFS, minio and velero
To run production level cluster backup is must have. Backup consists of 2 parts: the etcd cluster and the services on the cluster. I only describe about the latter, using Velero(previous Ark) to backup cluster resources and persistent volumes.
To do backup, of course we need a destination to store the backups and it couldn’t be inside the cluster itself. Velero supports various storage providers, and to be vendor-independent, Minio, an S3-compatible storage service that runs locally on your cluster, is the choice. Minio will use a persistent volume provided over NFS from another host outside of the cluster. Below diagram
The latest version of velero has removed the sample files for minio deployment. I’m using the previous version 0.11.1 and the config/minio has the contents. It only need a change to use the NFS volume.
diff --git a/velero/config/minio/00-minio-deployment.yaml b/velero/config/minio/00-minio-deployment.yaml
index bd262b7..9dad144 100644
--- a/velero/config/minio/00-minio-deployment.yaml
+++ b/velero/config/minio/00-minio-deployment.yaml
@@ -30,12 +30,14 @@ spec:
     spec:
       volumes:
       - name: storage
-        emptyDir: {}
+        persistentVolumeClaim:
+          # Name of the PVC created earlier
+          claimName: minio
       - name: config
         emptyDir: {}
       containers:
       - name: minio
diff --git a/velero/config/minio/00-minio-pvc.yaml b/velero/config/minio/00-minio-pvc.yaml
new file mode 100644
index 0000000..553f04d
--- /dev/null
+++ b/velero/config/minio/00-minio-pvc.yaml
@@ -0,0 +1,28 @@
+apiVersion: v1
+kind: PersistentVolume
+metadata:
+ name: minio
+ namespace: velero
+spec:
+ capacity:
+ storage: 10Gi
+ accessModes:
+ - ReadWriteMany
+ nfs:
+ server: "test"
+ path: "/test/minio/"
+
+---
+kind: PersistentVolumeClaim
+apiVersion: v1
+metadata:
+ name: minio
+ namespace: velero
+spec:
+ accessModes:
+ - ReadWriteMany
+ storageClassName: ""
+ resources:
+ requests:
+ storage: 10Gi
+After deployment, these pods are running
$ kubectl -n velero get pod
NAME                     READY   STATUS    RESTARTS   AGE
minio-757cdf7d7d-qfnqx   1/1     Running   1          3d20h
restic-78hf4             1/1     Running   6          94d
restic-g4txc             1/1     Running   4          94d
restic-krm28             1/1     Running   4          94d
velero-6f6f6999b-qctcw   1/1     Running   1          3d20h
To create backup plans and specify what volumes to backup
# daily backup all
velero schedule create all-namespaces-daily --schedule="@daily"
# backup a specific namespace test daily and keep 7 days
velero schedule create test-daily --schedule="@daily" --include-namespaces test --ttl 168h0m0s# To backup a persistent volume, annotate the pod
kubectl -n test annotate pod/test-0 backup.velero.io/backup-volumes=test-volumeActually it’s better to annotate the services which requires persistent volume backup with ‘backup.velero.io/backup-volumes’, like this example.
Summary
This article is already too long but still only cover the components of a Kubernetes cluster briefly.
I hope this is helpful if you would like to create Kubernetes from scratch and put it into production.


