
CI/CD for a Flutter app with Github Actions: build, analyze and test
Welcome to this CI/CD series! 👋

In this article we will implement the “Continuous Integration” part of our CI/CD process 🧪📦👀
If you need more context please read my previous articles on the environments we are using and on our branching strategy.
A quick tour
Now might be a good time to show you the app.
So far we discussed different topics that were interesting and definitely needed, however they were general and not related to Flutter: it’s time to correct that!
A multi-package app
Implementing a complete CI/CD for a classical app is not always a piece of cake. I will however add a layer of complexity by dealing with a multi-package app… not because I like to suffer, but because this is what I had to do, it’s my real-world example 🤷
In this demo app (you can find the code in my Github repository), the structure is the following:
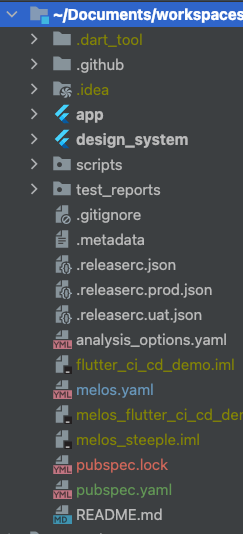
As you can see we only use two packages that are app and design_system. Obviously there is no real need in doing that for such a simple app, however the simple fact that we have two packages forces us to think differently for building, testing and everything: that’s what we are going to see here! In a real real-world app we would have more than that, but that’s a topic for an entire separate article 📄🔮
In this articles serie we will use Melos to handle multi-package commands.
Static analysis
We use a customized set of analysis rules as well as Dart Code Metrics package for additional rules. For more information check the analysis-options.yaml file.
Going full test
When I develop I like to write tests to make sure everything works as expected, on both fonctionnal and technical sides. In a real-world app I will usually write a lot of tests with various goals:
- Unit tests to validate business logic
- Widget tests to validate simple components (widgets)
- Golden widget tests to validate the design system rendering or to make screenshot of global app’s screens
Although it is not the goal of this article to explain what each type of test is and how to write good tests, it is important to keep in mind that having a bunch of tests in multiple packages requires a way to launch them all at the same time, optionally update the goldens, generate a unified test report or a unified code coverage report, etc.
Github Actions overview
Here is the summary of the different CI steps we will implement in this article:
- Building the Android app in debug mode
- Running complete Dart analysis to clear any potential code or linting issue
- Running the tests (unit tests and widget tests)
- Checking code coverage to make sure we match our target coverage
Note: you might have noticed that we do not include building the iOS app in debug mode in our CI steps. That’s indented because macOS minutes on Github Actions are very expensive (10 times more than Ubuntu minutes!) and adds little value, it would basically just be checking that iOS app compiles. We mitigate this by still building the Android app so any Flutter code not compiling will be seen at this step, and seeing potential iOS build failures when releasing UAT versions is an acceptable compromise for us because we release often to UAT (one or many times a day).
Implementing the CI
Github Actions introduction
We will talk a lot of Github Actions concepts here so if you are not at least a bit familiar with Github Actions workflow syntax you might want to head to Github Actions documentation.
Github Actions is all about workflows. For details about workflows please check them in the source repository. The worfklow we will study in this article is build.yaml, and the reusable workflow _test_with_coverage.yaml.
All workflows must be located in .github/workflows. Also, we separated them with the following logic:
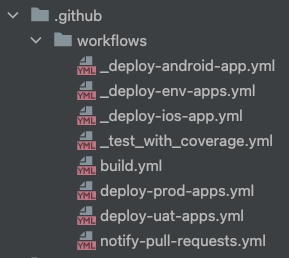
- Files prefixed with an underscore are not workflows per-se but reusable workflows (see Reuse workflows on Github Actions doc
- Other files (without a prefix) are our actual workflows.
Last point before we talk about what actual workflows do: note that they extensively use Github Actions secrets and Github Actions variables.
🧪 And now, let’s go with a step-by-step demo of how to implement a CI for testing our feature branches!
Trigger
Every time a commit is pushed to a pull request (PR), we should build the source branch and execute a series of actions to make sure code is ready to be merged to the main branch. To be triggered, a PR must match all following conditions:
1️⃣ The pull request is ready for review and not draft, to avoid generating minutes cost on unready PRs
2️⃣ The pull request targets main branch, also to avoid useless cost because we do not really care about PRs that are not going to be merged in the trunk
3️⃣ The update is about code changes (git history changes) or status is changing from “Draft” to “Ready for review”
4️⃣ Updated files include files other than documentation (e.g. not only Readme or files in doc/ folder)
We will do that with the following top-level lines:
on:
  pull_request:
    types: # 3️⃣
      - opened
      - reopened
      - synchronize
      - ready_for_review  1️⃣
    branches:  # 2️⃣
      - 'main'
    paths-ignore:  # 4️⃣
      - '**.md'
      - 'doc/**'
      - '.git/'
      - '.vscode/'
The first requirement needs the github context and must be done on each job:
jobs:
  someJob:
    name: Job name
    if: github.event.pull_request.draft == false  1️⃣
Unrelated to workflow trigger but important, we will add the following top-level instructions:
permissions: write-all  # 1️⃣

concurrency:  # 2️⃣
  group: ${{ github.workflow }}-${{ github.head_ref }}
  cancel-in-progress: true
1️⃣ We need to ask for write-all permissions, that will allow custom actions to publish reports back to the PR
2️⃣ We set a concurrency group based on the branch name and set the cancel-in-progress parameter to avoid useless cost if successive pushes to the same PRs are made in a short period of time.
Running the tests with coverage
These steps are declared in our reusable workflow _test_with_coverage.yml because we will later use them in our release workflows.
We will call this worfklow from our main testAndCoverage job:
jobs:
  testAndCoverage:
    name: 🧪 Test
    if: github.event.pull_request.draft == false   # 1️⃣
    uses: ./.github/workflows/_test_with_coverage.yml  # 2️⃣
    secrets: inherit  # 3️⃣
1️⃣ As explained earlier, we do not run the tests for a draft pull request
2️⃣ This is where we call our reusable workflow
3️⃣ We use secrets: inherit so our reusable workflow can access all secrets like the top-level job would.
Now let’s see the actual worfklow content:
name: 🧪 Test with coverage 📊

on:
  workflow_call:

jobs:
  coverage:
    name: 🧪 Test
    runs-on: ubuntu-latest
    timeout-minutes: 30
    steps:
      - name: ⬇️ Checkout repository
        uses: actions/checkout@v3
      - name: ⚙️ Install lcov
        run: |
          sudo apt-get update
          sudo apt-get -y install lcov
      - name: ⚙️ Setup Flutter
        uses: subosito/flutter-action@v2
        with:
          channel: 'stable'
          cache: true
      - name: ⚙️ Setup Melos
        uses: bluefireteam/melos-action@v2
      - name: ⚙️ Install dependencies for all packages
        run: melos build:pub_get:all
      - name: 🧪 Run tests with coverage
        run: melos test:with-lcov-coverage:all
      - name: 🧪✅❌ Publish test results
        id: compute_test_results
        uses: dorny/[email protected]
        with:
          name: '🧪📊 Unit tests report'
          path: test_reports/*_test_report.json
          reporter: 'flutter-json'
          max-annotations: '50'
          token: ${{ secrets.GITHUB_TOKEN }}
      - name: 🧪📊 Publish coverage report
        if: github.event_name == 'pull_request'
        uses: romeovs/[email protected]
        with:
          lcov-file: coverage_report/cleaned_combined_lcov.info
          github-token: ${{ secrets.GITHUB_TOKEN }}
          title: 'Coverage Report'
Wow, that’s a lot 🤯
Don’t worry, we will break it down.
on:
  workflow_call:
↪ this is a simple instruction to create a reusable worfklow. Note that we could pass inputs, but we don’t need to for this workflow.
jobs:
  coverage:
    name: 🧪 Test
    runs-on: ubuntu-latest
    timeout-minutes: 30
↪ job description including the runner it will run on (Ubuntu in our case) and a timeout to make sure our job don’t get stuck somehow, it can sometimes happen with a leaky test with some kind of await that waits forever…
- name: ⬇️ Checkout repository
  uses: actions/checkout@v3
↪ I think this step is self explanatory, we checkout the repository for the job!
- name: ⚙️ Install lcov
  run: |
    sudo apt-get update
    sudo apt-get -y install lcov
↪ here we simply install lcov, a small binary that will later help us with code coverage
- name: ⚙️ Setup Flutter
  uses: subosito/flutter-action@v2
  with:
    channel: 'stable'
    cache: true
- name: ⚙️ Setup Melos
  uses: bluefireteam/melos-action@v2
↪ also self explanatory, we install Flutter framework and Melos lib because we will need them to run the tests.
Important: note the cache instruction, this will allow sharing Flutter installations between builds which will save you a lot of time, and any build minute you don’t consume is a minute you don’t pay 🤑
- name: ⚙️ Install dependencies for all packages
  run: melos build:pub_get:all
↪ here we are running a simple flutter pub get to get all the dependencies, but we do it with Melos because we have a multi-package app 📦📦
- name: 🧪 Run tests with coverage
  run: melos test:with-lcov-coverage:all
↪ oh, that’s where it gets interesting 🤩 this line is very simple but it’s actually much more complex than it looks, because behind the scenes we are executing a Melos script that itself calls shell scripts. Phew 🫣
1️⃣ The first script called is named test-with-coverage.sh and is called for each package in our app with the following code:
#!/bin/bash

# Generate coverage report
PROJECT_ROOT_PATH=$1    # 1️⃣
PACKAGE_PATH=$2
PACKAGE_NAME=$3

# 2️⃣
PACKAGE_LCOV_INFO_PATH=$PROJECT_ROOT_PATH/coverage/lcov_$PACKAGE_NAME.info
PACKAGE_TEST_REPORT_PATH=$PROJECT_ROOT_PATH/test_reports/${PACKAGE_NAME}_test_report.json

mkdir -p $PROJECT_ROOT_PATH/coverage/
# 3️⃣
flutter test \
  --no-pub \
  --machine \
  --coverage \
  --coverage-path $PACKAGE_LCOV_INFO_PATH > $PACKAGE_TEST_REPORT_PATH

# 4️⃣
escapedPath="$(echo $PACKAGE_PATH | sed 's/\//\\\//g')"

# Requires gsed on MacOS machines because otherwise sed is not the same...
if [[ "$OSTYPE" =~ ^darwin ]]; then
  gsed -i "s/^SF:lib/SF:$escapedPath\/lib/g" $PACKAGE_LCOV_INFO_PATH
else
  sed -i "s/^SF:lib/SF:$escapedPath\/lib/g" $PACKAGE_LCOV_INFO_PATH
fi
1️⃣ We initialize a bunch of values corresponding to Melos variables which contain the project root path and the current package path and name. Remember, this script will be run for each package in our app
2️⃣ We define a variable for the coverage info and one for the test report (in a json format), both specific to our current package
3️⃣ We run actual Flutter tests.
— no-pubparam indicates that we don’t want to runflutter pub get, that’s because we already did it in a previous step.machineparam tells the command to not generate the console output, because we will exploit test results differently in a future step. We will actually write the test results as a json report at the location defined earlier.— coverageandcoverage_pathask the test command to generate a coverage report at a certain location. At this point the generated coverage report will only be for the current package, and will uselcovformat.
4️⃣ Here we need to escape package path and replace with a relative path, that will be needed for combining the reports later on.
😮💨 Okay, back to our Melos script. At this point we ran the tests but the outputs we have are not great: we have one json test report and one coverage report per package, but what we really want is a combined of test results and coverage for all our packages at a single place!
Right, let’s create another script for combining code coverage, that’s combine-coverage.sh:
#!/bin/bash

PROJECT_ROOT_PATH=$1
# 1️⃣
while read FILENAME; do
  LCOV_INPUT_FILES="$LCOV_INPUT_FILES -a \"$PROJECT_ROOT_PATH/coverage/$FILENAME\""
done < <( ls "$1/coverage/" )

# 2️⃣
eval lcov "${LCOV_INPUT_FILES}" -o $PROJECT_ROOT_PATH/coverage_report/combined_lcov.info

# 3️⃣
lcov --remove $PROJECT_ROOT_PATH/coverage_report/combined_lcov.info \
  "lib/main_*.dart" \
  "*.gr.dart" \
  "*.g.dart" \
  "*.freezed.dart" \
  "*di.config.dart" \
  "*.i69n.dart" \
  "*/generated/*" \
  "*.theme_extension.dart" \
  -o $PROJECT_ROOT_PATH/coverage_report/cleaned_combined_lcov.info
1️⃣ We create a string with command line parameters that will contain a parameter for each package. Example: -a package1 -a package2 -a package3 -a ...
2️⃣ We use previous command parameters string to actually call lcov library and combine our individual package files into a single one
3️⃣ We finalize our combined coverage by removing Dart files that we do not want to include in our global code coverage. As you can see that’s especially useful to exlude generated files, and we use them extensively 🏭
And that’s it, we now have a combined code coverage report in the lcov format! Let’s continue with next steps 🧪
- name: 🧪✅❌ Publish test results
  id: compute_test_results
  uses: dorny/[email protected]
  with:
    name: '🧪📊 Unit tests report'
    path: test_reports/*_test_report.json
    reporter: 'flutter-json'
    max-annotations: '50'
    token: ${{ secrets.GITHUB_TOKEN }}
↪ well yes, we generated json test reports in the previous step, it’s now time to display it back to the pull request! We use an existing Github Action for this, luckily for us it accepts a list of json reports. Note that it needs a token to publish back to the PR, but fear not, we can use Github Actions predefined secret secrets.GITHUB_TOKENfor this 😎
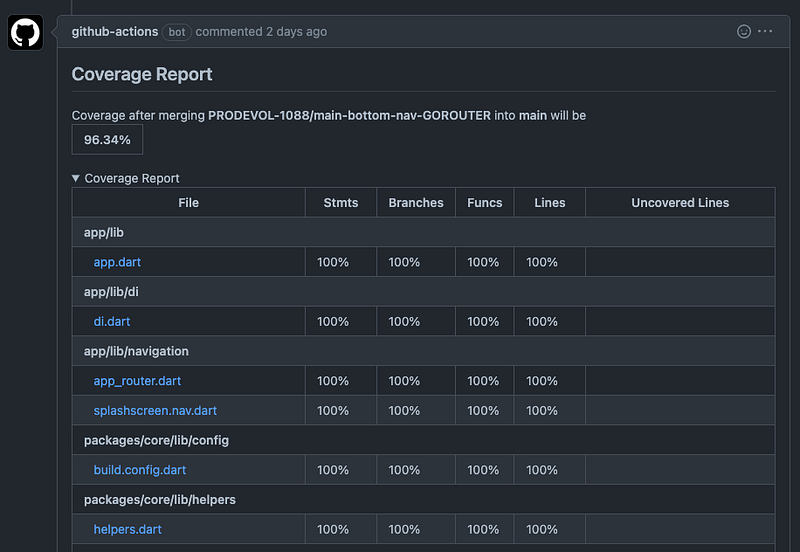
Tests report will be available as a build output, here is an example:

- name: 🧪📊 Publish coverage report
  if: github.event_name == 'pull_request'
  uses: romeovs/[email protected]
  with:
    lcov-file: coverage_report/cleaned_combined_lcov.info
    github-token: ${{ secrets.GITHUB_TOKEN }}
    title: 'Coverage Report'
↪ similarly to the previous test, here we use an existing Github Action to publish the coverage report back to the PR, directly as a PR comment:
🤩 Isn’t it great?
Although we could make the code coverage a PR blocker (e.g. fail the PR if you generate a lower coverage than before), we chose not to go too extreme with this as we want to see code coverage as an indicator, not as a strong KPI.
Runing code analysis
Code analysis is separated in two phases:
- Standard Dart analysis using
dart analyze, based onanalysis-options.yaml - Dart Code Metrics (DCM) analysis and code metrics
Here is the complete code for the analyze job:
jobs:
  analyze:
    name: Analyze
    if: github.event.pull_request.draft == false
    timeout-minutes: 30
    runs-on: ubuntu-latest
    steps:
      1️⃣
      - name: ⬇️ Checkout repository
        uses: actions/checkout@v3
      - name: ⚙️ Setup Flutter
        uses: subosito/flutter-action@v2
        with:
          channel: 'stable'
          cache: true
      - name: ⚙️ Setup Melos
        uses: bluefireteam/melos-action@v2
      - name: ⚙️ Install dependencies for all packages
        run: melos build:pub_get:all
      2️⃣
      - name: ⚠️ℹ️ Run Dart analysis for app package
        uses: zgosalvez/[email protected]
        with:
          working-directory: "${{github.workspace}}/app/"
      - name: ⚠️ℹ️ Run Dart analysis for data package
        uses: zgosalvez/[email protected]
        with:
          working-directory: "${{github.workspace}}/packages/package1/"
      3️⃣
      - name: 📈 Check metrics
        uses: dart-code-checker/[email protected]
        with:
          github_token: ${{ secrets.GITHUB_TOKEN }}
          pull_request_comment: true
          check_unused_files: true
          folders: 'app, packages/package1'
1️⃣ Checkout and setup steps, just like we had for the test part. These are pretty much the basic steps you will find in all of our workflows.
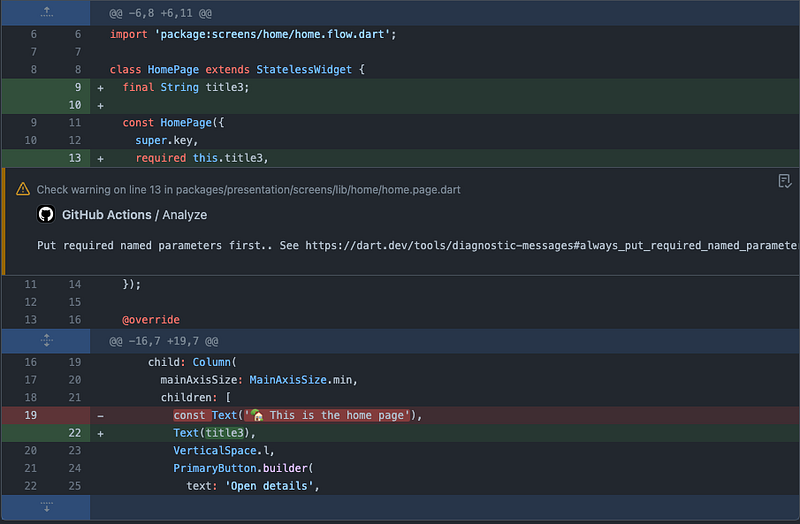
2️⃣ We run a standard Dart analysis based on analysis-options.yaml. Note that we need to run this command for each package in our app because it does not support multi-packages (yet?). The great thing about this is that it annotates the code with the linter warning/info, which can be seen when reviewing a PR.
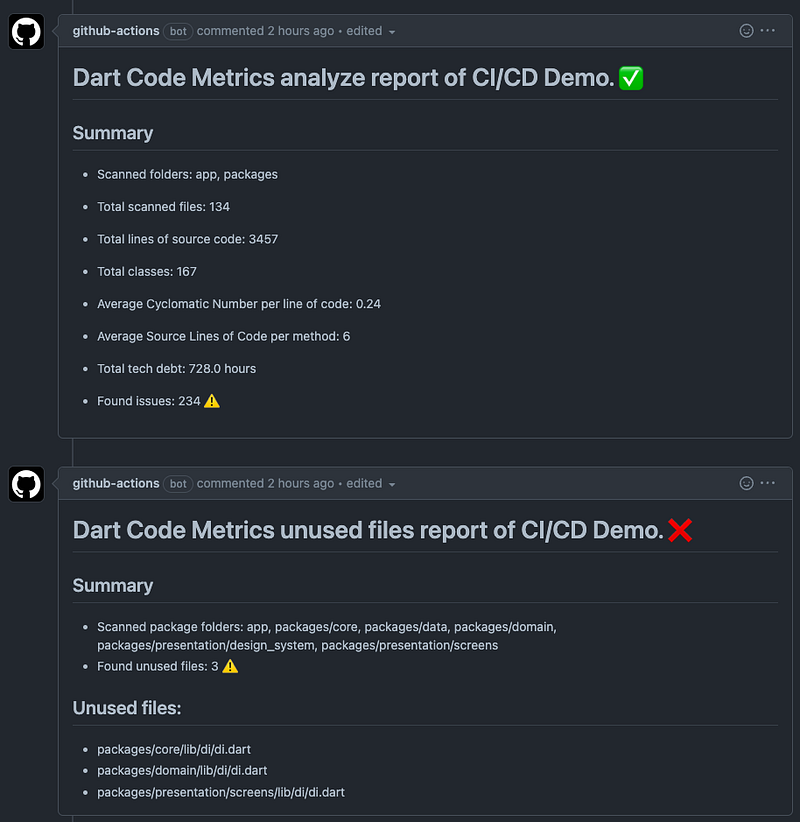
3️⃣ We run Dart Code Metrics analysis that will generate additional metrics such as the cyclomatic complexity, an estimation of the tech debt and check if any unused files are found
Here is an example of an annotation (== comment) raised by the Dart analysis plugin directly in a PR:
And here is a sample report of Dart Code Metrics in the PR conversation:
That’s it for the analysis part! ✅
Building Android app in debug mode
I must say, if you survived the last two jobs, this one should be dead-simple:
jobs:
  build:
    name: Build Android
    if: github.event.pull_request.draft == false
    runs-on: ubuntu-latest
    timeout-minutes: 30
    steps:
      1️⃣
      - name: ⬇️ Checkout repository
        uses: actions/checkout@v3
      - name: ⚙️ Setup Flutter
        uses: subosito/flutter-action@v2
        with:
          channel: 'stable'
          cache: true
      - name: ⚙️ Setup Melos
        uses: bluefireteam/melos-action@v2
      - name: ⚙️ Install dependencies for all packages
        run: melos build:pub_get:all
      2️⃣
      - name: ⚙️ Setup Java
        uses: actions/setup-java@v3
        with:
          distribution: 'zulu'
          java-version: "12.x"
          cache: 'gradle'
        id: java
      3️⃣
      - name: 🤖🔨 Build Android app
        run: |
          pushd app/
          flutter build appbundle --debug --flavor dev -t lib/main_dev.dart
          popd
        shell: bash
1️⃣ Checkout and setup steps, same as before.
2️⃣ Install Java. That will allows us to build the Android app, and we can also benefit from the cache parameter, just like we did with Flutter install.
3️⃣ The actual build is there. We just go to the app/ package because that’s where the actual Android app is located, and then we just run a simple flutter build appbundle in debug mode and with our dev flavor and entrypoint.
That’s all. I told you it was going to be simple, didn’t I? 😎
🎉 Read till there? Good job!
Note: if you look at the workflow source file you will notice that there are some additional steps that we didn’t describe. That is because those steps are only used when calling this workflow from a release, which means we will check them in the article about releases ⌛️
Next step: creating a Git release using tags and automatic versioning to prepare our UAT and prod deployments!
🗃️ Source code: https://github.com/orevial/flutter-ci-cd-demo/


