
FOOD
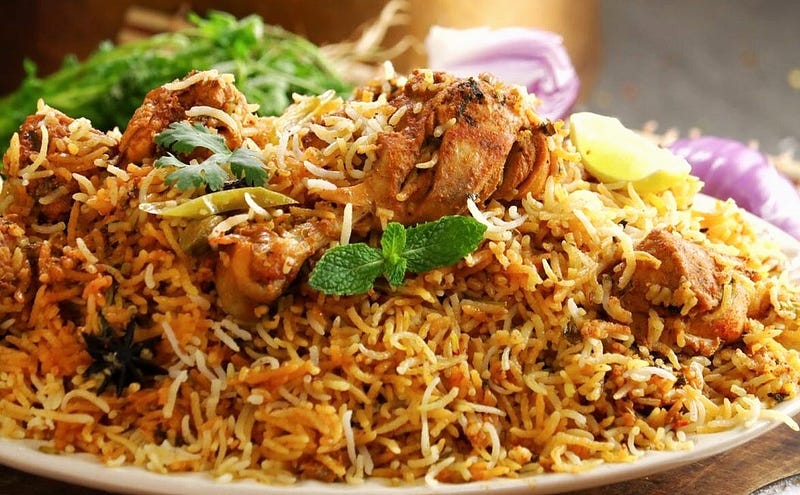
Chicken Dum Biryani — One-Pot Dish
The best way you can celebrate a festival is to go for biryani
I’m sharing the ‘Chicken Dum Biryani’, recipe today. This recipe has been long pending on my draft list as it took may nay hours to edit. The biryani that I’m sharing today is the authentic style biryani.
As in, we’ll cook the chicken, & cook the rice, & then layer them to make this awesome recipe. It turns out incredibly delicious. With the taste & aroma of this biryani & the texture of the rice, everything will be absolutely perfect. Usually, the complaint that people have is that rice grains break apart & aren’t fluffy or separate. So, I’m sharing all the tips & tricks for the same in this recipe.
It makes a delectably beautiful ‘Chicken Dum Biryani’.
For this Chicken Biryani, I’ve ordered all the ingredients from ‘Swiggy Instamart’ Which is available on the Swiggy app. Now, the special feature about Swiggy Instamart is that sitting at your home, you can order out of 4000+ products like fresh fruits, vegetables, meats, beverages, snacks, & many such things you can order from the comfort of your home & they get delivered at your home within minutes.
They deliver to you from 6 am in the morning till late at night. So all my ingredients for the Biryani have already arrived & the prep is done.
Make crispy fried onions for Biryani —
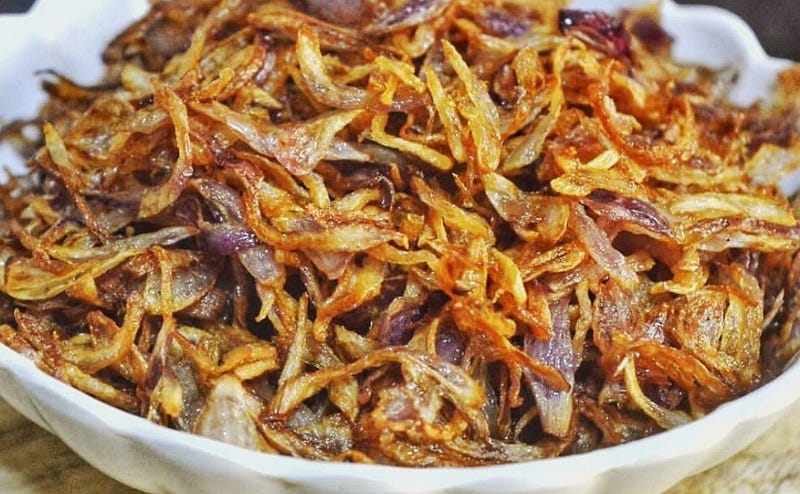
- First of all, for the biryani, we need to make crispy fried onions, so let’s prep for that. First of all, to make the fried onions, I’ve taken 1/2 kg of onions Peel the onion & cut it in half. Then, we have to cut it lengthwise, not like slicing the onions regularly.
- You have to keep the onion slices neither too thick nor thin. Now, after slicing the onions, you have to separate their layers. This is a very important step for frying. So just like this cut all the onions & your onions are ready to be fried.
- Now, to fry the onions, we have to heat up the oil here. So, don’t take very hot oil. Once your oil comes up to temperature, then add the sliced onions to it. After adding the onions, you will notice that the level of oil is just up to the surface of the onions.
- It’ll be okay, even if it’s slightly at the lower level. Don’t take too much oil here. Now, you have to fry the onions on a high flame initially.
- Fry the onions till they turn light golden brown in color. But the most important technique in making the fried onions is onions are high in moisture, which we have to let evaporate from the onions slowly.
- As it slowly evaporates from the onions, then your onions will fry crispy & they will be perfect. To achieve that, you have to keep the temperature under control.
If at any moment, you feel that the temperature is too high then lower the flame to a minimum, & patiently fry the onions. You may need a minimum of 15–20 minutes to fry them. So slowly & gradually, while stirring in between, fry the onions for 15–20 minutes, nicely.
- After frying the onions patiently for almost 15–20 minutes, you can see that the color is changing slightly as well. At this stage, you have to be very careful, and lower the flame and you have to fry it only until your fried onions turn just lightly golden brown in color.
If you fry it until it’s dark brown, then it will be burnt. Coz, even after you remove it from the heat, they will continue to cook with the heat of the oil. It’s known as ‘Carry Forward Cooking’ and your fried onions will be spoiled.
- So, you can see, that whenever your onions reach this color, quickly remove them from the oil. Use a spoon to gently press it & drain out excess oil. This step is really important here.
- After draining the oil, spread it out on tissue paper. So after placing it on the tissue, using a fork, spread it out giving it space. If you want, you can even dab it further with another tissue from the top. You can see, from the time that we removed the onions, until now, the color has deepened a little bit.
- Let it rest as is, for 5–6 minutes and now you have your perfect fried onions ready. It’s turned out crispy and our Biryani will taste really amazing with this.
Now, I’ve just demonstrated in detail how to make crispy fried onions for Biryani. If you don’t want to do this entire process, you even get ready-made and use that. But fresh homemade is just another level of fantastic.
Plus this oil is rich in onion flavor, So, don’t discard this oil.
We can use some in the Biryani as well & you can even use this oil for making other curries, this oil isn’t bad. So do keep a note of this.
Make Home-made Biryani Masala
Now, whenever I make Biryani at home, I make a fresh, homemade Biryani Masala. That makes the Biryani absolutely amazing If you don’t feel like putting in the effort for the Biryani Masala, then, you can use readymade Biryani Masala too.
And just skip to the next part.
I always make it fresh, so I’m going to show you, how to make it. This Biryani Masala is quick to make. So let’s see how to make Homemade Biryani Masala.
- To roast the whole spices, heat a pan on high heat nicely first. Once your pan is hot, then reduce the flame to a minimum. Now, to this add 2 tbsp whole coriander seeds, 1 tsp cumin seeds, 2 tsp caraway seeds (Shahi Jeera), 2 tbsp green cardamom, 5–6 black cardamom, 3 inches cinnamon, 1 tbsp whole black peppercorns, 7–8 spicy dried red chilies, 7–8 bay leaves, 2 tsp cloves, and 3 blades of mace.
- After adding all the spices, you have to slow roast all the spices on a low flame. You should start smelling a slight fragrance from the spices and your spices should warm up a little bit. Make sure that you are careful not to burn the spices.
- Once you start smelling a faint fragrance from your spices, and the spices warm up a little bit, then in the end, I’m adding 1 tbsp dried fenugreek leaves (Kasuri methi) to this.
- After adding Kasuri methi, just lightly mix it & then you can transfer these spices into a bowl. After transferring to a bowl, let these spices cool down properly.
- Once your spices are cooled down, then transfer these spices into a mixer-grinder Along with that, I’m going to add finely grated 1/2 nutmeg to it. After adding nutmeg, add 1/2 tsp turmeric powder, & add a pinch of salt.
- Now, you have to grind these spices together well. You don’t need to grind the spices very finely. Even if you leave it a little coarse, it’ll do. or even if some spices aren’t ground at all, would be fine.
- Now we have ground the masala ( spice mix) In between, you can see small bits of whole spices, so try grinding it so coarse. & our homemade Biryani Masala is ready to use.
You can store this masala in an airtight container & easily use it for 2–3 months. So the homemade Biryani masala is ready. It takes just 5–7 minutes to make it, so definitely make it. This garam masala is the real essence of the Biryani. So surely, make it yourself.
Marinate the Chicken For Biryani —
Now, our next step is that we have to marinate the chicken for the Biryani. So let’s see how to marinate the chicken. Here, we have to take 1/2 kg chicken. We can take leg & thigh pieces, you can choose the cut as per your liking.
- Add this to a big bowl. Now, to this add salt to taste, juice of 1 lemon, 4 tbsp ginger-garlic paste, a paste made of 3 green chilies, 2 tbsp Kashmiri red chili powder, 1/2 tsp turmeric powder, 2 tsp coriander powder, 1.5 tbsp Biryani masala that we made earlier.
- Now to this, I’m adding 3–4 tbsp of the leftover oil from fried onions. Now, you have to mix everything well & coat the chicken properly with the spices.
Now, at this stage, you can marinate the chicken overnight. So, if you want to marinate it overnight, then let it marinate without adding the curd & fried onions we made. But, if you want to make it instantly, then you have to add some more ingredients, so let me tell you what they are.
- So here, we have to add 200 ml curd. Whisk the curd nicely, this is an important step. After whisking, add the curd to the chicken. Along with that, we have to add the fried onions, that we fried earlier to this.
- Here, add almost 80% of fried onions to it. Save the 20% to use while layering the Biryani. Along with it, add a potato. The potato is completely optional. Some chopped mint leaves, & add a handful of chopped coriander to this.
- Now after adding everything, mix it well, to combine everything together nicely.
- Now, we have to smoke it to give that smoky flavor. Take burning coal, & add some ghee to it, As soon as you add the ghee, cover it with a lid. After covering it, you have to smoke it just for 2–3 minutes. It will give a faint smoky flavor & it will give a very nice flavor & aroma to the Biryani.
- And the taste of Biryani will be superior too. After 2–3 minutes, lift the lid & remove the coal too. & And now our chicken is ready to cook.
Here, we have taken a thick-bottomed pot for the Biryani. It is very important that you take the pot with a thick bottom.
Cooking the Chicken —
- Now we have to add 2 tbsp ghee to it, to cook the chicken. Once your ghee is nice & hot, then you have to add your chicken. After adding the chicken, cook it while stirring.
- Initially, for 5–6 minutes, you have to cook it on a high flame, to sear the chicken really well. After searing the chicken on high flame for 5–6 minutes, lower the flame & cover & cook the chicken.
- You have to cook the chicken just up to 85–90%. The rest 10–15% of the cooking process of cooking will happen when it is cooked after layering the Biryani. The chicken will take around 10–12 minutes to cook up to 85–90%.
- Based on the quality of your chicken, the time may vary slightly. Cover & cook the chicken until is 85–90% cooked.
- Now, when it’s 10–12 minutes, check how is your chicken cooked. You can see that all the fat, oil & ghee has separated from the chicken. Even the chicken is 85–90% cooked.
- At this stage itself, taste the gravy for the seasoning & spice. The gravy should be on the saltier & spicier side. It’s easier to adjust at this stage, later it will be difficult to add salt or spice to the Biryani.
- Stir it well & turn off the stove. & Let’s prep for the rice now.
The gravy of chicken is made & ready. Now, let’s make the rice.
Make Rice —
While making the rice, you have to keep in mind certain things. I’m going to tell you those things. Make the rice similarly, then your Biryani will be absolutely perfect.
- So while your chicken was cooking, keep water to boil in a stockpot. It takes about 10 minutes for the water to boil. Bring the water to a rolling boil meaning water should be boiling properly before adding in the rice.
- Once your water has come up to a nice boil, then to it add 1–2 bay leaves, 1-inch cinnamon, 1 tsp caraway seeds (shahi jeera), 3–4 green cardamom, 4–5 cloves, 1-star anise, 3–4 whole black peppercorns, 1–2 slit green chilies, squeeze the juice of half a lemon, & drop in the skin of the lemon as well.
- This makes your rice whiter & fluffier. & with it add salt to taste. Add salt enough to make the boiling water as salty as the seawater. Now, here you have to take rice in equal quantity as the chicken.
- I’ve used basmati rice & washed them nicely 3–4 times, & then soaked it in water for at least 1 hour. You have to soak the rice for 1–1.5 hours & then cook it.
- When you soak the rice for 1 hour, then your rice will turn out really fluffy and excellent. Now, drain the soaking water from the rice & add the rice to boiling water to cook. Now, we have to cook the rice until it’s 90% cooked.
If you have soaked the rice for a good 1 hour then, within just 4–5 minutes, your rice will be 90% cooked. Be very careful here. Don’t stir the rice a lot, otherwise, the rice grains will break apart, so don’t turn around with your spatula a lot. Lightly just stir the grains around & let it cook for 4–5 minutes.
Your cooked rice should still have a slight bite to it.
- At that stage remove the rice from heat. Now, it’s been just 4–5 minutes, & my rice is perfectly cooked up to just 90%. You can notice how fluffy & separate each grain looks.
- Remove the rice from the hot water with a spider. After removing them, spread the rice on a big open platter. After adding the rice to the platter, spread it nicely around & for 5–10 minutes, let the rice be just like this Just with a help of a fork, lightly fluff up the rice to let the excess steam & moisture out.
- At this stage, remove the lemon rind, & you can even remove the whole spices if you want to remove them. If you don’t like whole spices in your Biryani, then you can add these whole spices as a ‘bouquet Garni tied in a muslin cloth, so that you don’t need to remove them.
Now, let the rice rest for 5–10 minutes. Once your rice is rested, then we can start layering the Biryani.
Layering the Biryani —
To layer the Biryani,
- Firstly spread the chicken in the bottom of the pot nicely. Your chicken pieces should be well distributed. After doing that, add some freshly chopped coriander leaves to it.
- Along with it, add some chopped fresh mint leaves, A pinch of Biryani masala, & the fried onions that we had saved earlier, add some of it too.
- Now, on top of it, you need to add boiled rice to it. So very gently spoon the rice & sprinkle a layer on top. Even at this stage, the rice can break apart, so add rice very gently.
- Add the entire batch of cooked rice After adding the rice, spread it nicely & now, we’ll add some more goodies on top of this.
- You can add 3–4 tbsp warm ghee to this. Nicely spread it on the entire surface.
Now, here you have to make an emulsion containing water, milk & saffron. It will give a beautiful color, enchanting aroma & alluring taste.
- Spread this emulsion on the entire surface of the Biryani nicely. Now, in the end, add chopped coriander leaves, and some chopped mint leaves & sprinkle some of our remaining fried onions on top.
- Now we have to give ‘Dum’ to Biryani (cooking enclosed within own juices & flavors). Here, we have to take a wet muslin cloth, wrung it, & placing it on the rim. You can even use wet dough here Then cover it with a lid & apply some pressure on the top.
- Now, we have to place this prepared pot (handi) onto a griddle pan. So take a pan & place the pot (handi) on top of it. Now, you have to keep something heavy on top, Here, you can place a mortar & pestle. You can even place a large saucepan filled with water.
- After placing the pot on the griddle, turn the stove on. And just for 5 minutes on high flame, you need to ‘Dum’ the Biryani. Once 5 minutes are done, then lower the flame to a minimum & then on a low flame, you have to give ‘Dum’ to this Biryani for 10–15 minutes.
- After 10–15 minutes, your Biryani will be perfectly ready to devour. Once 10–15 minutes are over, turn the gas off & minimum for 10 minutes, you have to let this Biryani rest.
Don’t open directly. Let it rest, only then your Biryani will be perfect. After resting, you can serve this Biryani. Now, we’ve given ‘Dum’ to our Chicken Biryani, kept it for rest & it’s rested as well.
I have also shared a similar recipe for Chicken Hyderabadi Biryani. If you want you can also check that too…
So our Chicken Dum Biryani is ready & what can I say about this Chicken Biryani! The kitchen is full of enchanting aromas & each grain of rice is fluffy & alive.
So follow all the tips & tricks & definitely try this recipe. You can definitely give this recipe of Biryani a try. & tell me how you liked this recipe.


