
Centralized Configuration for Microservices using Spring Cloud Config
Hello everyone. In this article, we are going to see what is a Spring Cloud Config server and we will see step by step how to set up the Config Server and the Config Client and how to update the property values and refresh them dynamically on run time. Then we will go through the encryption and decryption mechanisms and understand how to encrypt the property value to store sensitive information in our configuration repository. Let's get started.
In my previous article, I mentioned in detail how communication between Config Server and Config Client happens. Please read it before you proceed to this article as it is a prerequisite to this.
What is Spring Cloud Config?
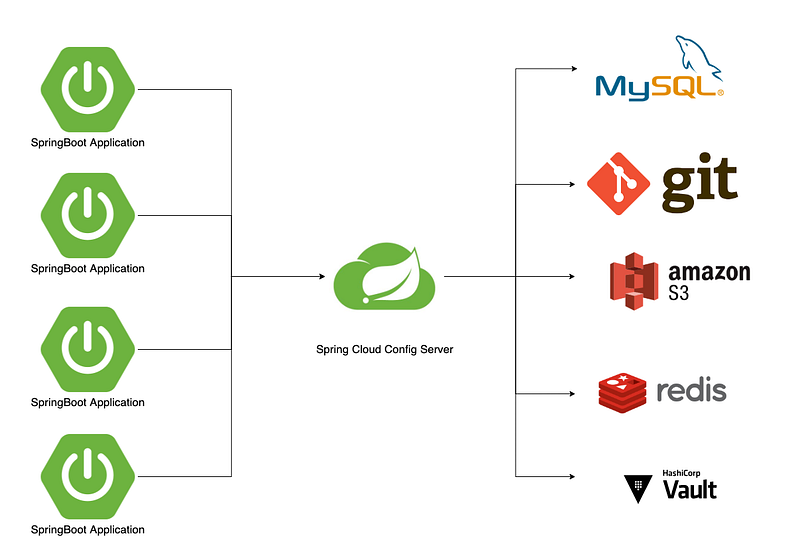
The Spring Cloud Config is a library that provides support for having an external configuration for the microservices that use the Spring Boot framework. It follows a client-server architecture where a dedicated config server reads configuration data from an external data source like a git repo. Using the Rest endpoint, the configuration data is queried by a config client which is a microservice.
Spring Cloud Config makes it very easy for a Spring Boot application to connect to the config server automatically by getting its location from the discovery server. The configuration data that is provided by the config server can then be used just like any other properties source inside the client application. At startup, microservices load the configuration from the external store using the config server.
Even though the Config Server can be connected to various external sources to retrieve the config data, we will focus on using a git repo in this article.
Lets us look step by step at how to create a config server, and config client and how to configure them to make the communication happen
Steps
- Run Eureka Discovery Server
Discovery service is the first thing needed for running microservices in Spring boot. We just need the 2 following dependencies for the discovery server to run
  <dependency>
   <groupId>org.springframework.boot</groupId>
   <artifactId>spring-boot-starter-actuator</artifactId>
  </dependency>
  <dependency>
   <groupId>org.springframework.cloud</groupId>
   <artifactId>spring-cloud-starter-netflix-eureka-server</artifactId>
  </dependency>
2. Create a Config Server
Add the following 4 dependencies to run a Spring Cloud Config Server. An important point to note is that the Config Server is also a Eureka Client. This is needed for the config server to register itself to the Eureka discovery server for the other microservices to discover it and obtain its location to load the config.
<dependencies>
  <dependency>
   <groupId>org.springframework.boot</groupId>
   <artifactId>spring-boot-starter-actuator</artifactId>
  </dependency>
  <dependency>
   <groupId>org.springframework.cloud</groupId>
   <artifactId>spring-cloud-config-server</artifactId>
  </dependency>
  <dependency>
   <groupId>org.springframework.cloud</groupId>
   <artifactId>spring-cloud-starter-netflix-eureka-client</artifactId>
  </dependency>
  <dependency>
   <groupId>org.springframework.boot</groupId>
   <artifactId>spring-boot-starter-security</artifactId>
  </dependency>
 </dependencies>
3. Enable Config Server
Spring Cloud Config Server provides HTTP API for the microservices to connect to it. For that, we need to use the annotation@EnableConfigServer. Then spring config server is embedded in our spring boot application. We also need to use @EnableDiscoveryClient to register it to the eureka server.
@EnableConfigServer
@SpringBootApplication
@EnableDiscoveryClient
public class SpringConfigServerApplication {

    public static void main(String[] args) {
        SpringApplication.run(SpringConfigServerApplication.class, args);
    }
}
4. Create a configuration repository
Now create a git repository to store the configuration that needs to be injected into the application. Create a .properties or .yaml file in the git repository and specify the values
The file name can also be used as user-service-development.properties where development is the name of the environment/profile. The config values from the below file are used for the development environment.
database.url=jdbc:postgresql
database.username=dev
database.password={cipher}aaaaaaaaaaaa
database.driver=org.postgresql.Driver
s3.bucket.name=dev
The file name can also be used as user-service-production.properties where production is the name of the environment/profile. The config values from the below file are used for the production environment.
database.url=jdbc:postgresql
database.username=prod
database.password={cipher}bbbbbbbbbbb
database.driver=org.postgresql.Driver
s3.bucket.name=prod
So, we need to use the same keys in both files but different values for different environments. The User Microservice will retrieve the user-service-{development/production}.properties based on the environment it is running.
Likewise, every microservices has its set of configuration files defined in the Configuration repo.
5. Map the configuration in the Config Server property file
Once we define the configuration in the config repo, we have to map it in the application.yml file in the Config Server project.
As seen below, we need to specify the name, and port for the Config Server and also provide the URL of the git repo for the Config Server to read the config values. We will talk about encryption and decryption in the later part of the article.
spring:
  application:
   # name of the application
    name: spring-config-server
   # available profiles of the application
  profiles:
    active: development,production
  cloud:
    config:
      server:
        git:
          # git url where the configurations are stored
          uri: https://github.com/test/spring-config-server
          # To search for the files in the config repo
          search-paths: '*-service'
        # disable server-side cryptography and handle the
         # decryption of property-values locally
        encrypt:
          enabled: false
  # Credentials for the config client to connect to the config server
  security:
    user:
      name: admin
      password: password

server:
  # config server port
  port: 8083
6. Start the configuration server
Start the Config Server and verify in the Eureka server dashboard whether the Config Server is registered as a Eureka client.
Make a curl with the following command and see if you obtain the response from the config server. In the response, you will see that it shows the configuration repo it is connected to and also the environment/profile.
curl -u admin:password  --request GET 'http://admin:admin@localhost:8083/spring-config-server/master' \
--header 'Content-Type: application/json'
7. Create the config client project
Now, create a new microservices project and add the following dependencies to make it a Eureka client as well the Spring Cloud Config Client.
  <dependency>
   <groupId>org.springframework.boot</groupId>
   <artifactId>spring-boot-starter-actuator</artifactId>
  </dependency>
  <dependency>
   <groupId>org.springframework.boot</groupId>
   <artifactId>spring-boot-starter-web</artifactId>
  </dependency>
  <dependency>
   <groupId>org.springframework.cloud</groupId>
   <artifactId>spring-cloud-starter-config</artifactId>
  </dependency>
  <dependency>
   <groupId>org.springframework.cloud</groupId>
   <artifactId>spring-cloud-starter-netflix-eureka-client</artifactId>
  </dependency>
8. Configure the Spring Cloud Config Client
We usually have the application.yml file for every microservice
server:
  servlet:
    context-path: /
  port: 8086
spring:
  main:
    banner-mode: off
  profiles:
    active:
    - dev
  application:
    name: user-service
Now we need to add another file called bootstrap.yml to specify the properties to be loaded on application start-up.
We have enabled the refresh, health, and info endpoints on Actuator. Then we enabled the Spring Cloud Config and also made it discovery enabled. The user service will use the discovery service to look for the IP of spring-config-server. Then it will make an API call to Config Server with the username and password. Upon authenticating, the Config Server provides the property values for the requested file
management:
  endpoints:
    web:
      exposure:
        include: refresh, health, info
spring:
  profiles: development,production
  cloud:
    config:
      enabled: true
      discovery:
        enabled: true
        service-id: spring-config-server
      username: admin
      password: password
    discovery:
      enabled: true
9. Verify the configuration retrieved
To verify, we can make a curl request to the Config Server as follows
curl -u admin:password  --location --request GET 'http://localhost:8083/user-service-development.properties' \
--header 'Content-Type: application/json'
It will load all the decrypted properties for the user service for the development environment
database.url=jdbc:postgresql
database.username=dev
database.password=password
database.driver=org.postgresql.Driver
s3.bucket.name=dev
Upon startup of the service, these values would be retrieved and injected in the code in the placeholder @value
@Value("${s3.bucket.name}")
private String bucketName;
So, the bucket name will have the value dev
If the specified value is not found, the application will throw an error and fail to start.
10. Refreshing the Config Values
Let us say that a developer has updated the bucket name in the config store repo to dev-temp. But the latest value is not used by the user-service
s3.bucket.name=dev-temp
In order for the user service to retrieve the latest value without the application restarting, we have a mechanism to tell it to pull the latest config by calling the Config Server again with the user name and password.
This is achieved by calling the /refresh actuator endpoint.
http://localhost:8086/actuator/refresh
Calling this endpoint will force the user service to pull the latest configuration values for all the properties for the specified environment.
We have seen all the steps to set up and verify the Spring Cloud Config. Let us look at the encryption and decryption in detail
Encryption and Decryption in Spring Cloud Config
The Spring Cloud Config Server supports the encryption and decryption of the property values that are stored in the configuration repository and this allows us to store the credentials in the repository.
Encrypted values are prefixed with the string {cipher} as shown below for the password and these encrypted values cannot be directly used by the consuming microservices.
database.url=jdbc:postgresql
database.username=prod
database.password={cipher}bbbbbbbbbbb
database.driver=org.postgresql.Driver
s3.bucket.name=prod
Config Server decrypts the values and sends them to the Config Client all the time.
Types of encryption
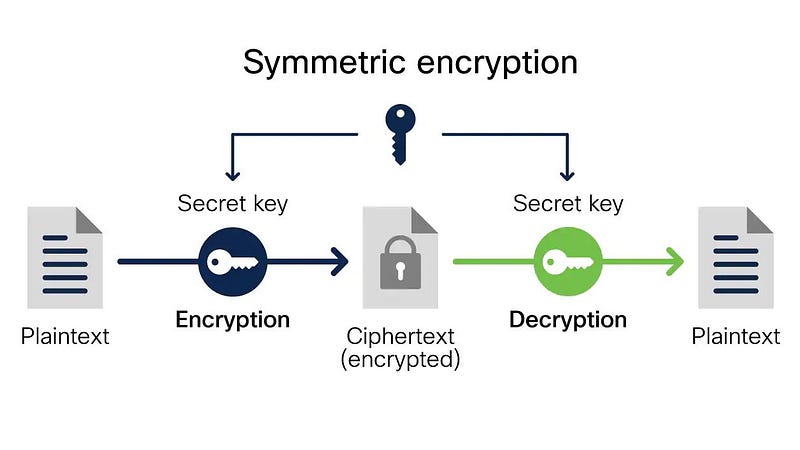
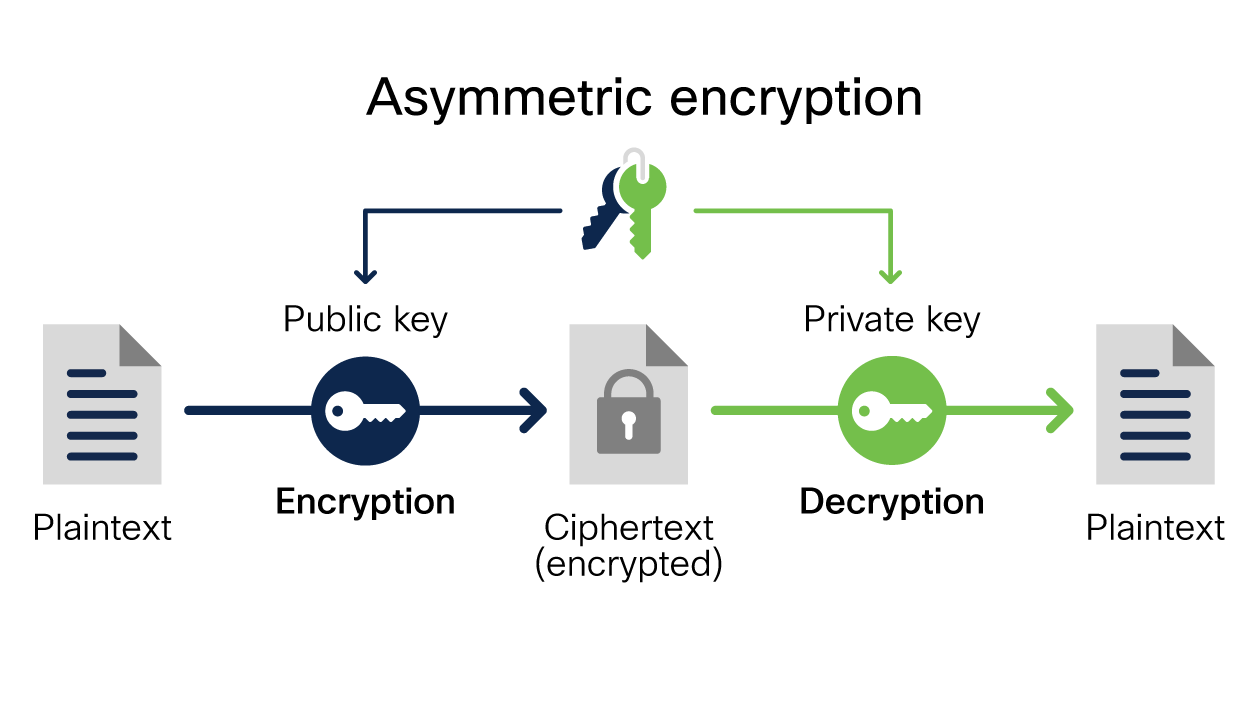
The config server supports both symmetric and asymmetric encryption to encrypt the property values.
For symmetric Cryptography, we just need to use an encrypted key in the property file or use it in the environment variable to be more secure.
To use an asymmetric cryptography, we need to use a PEM-encoded string value or use a Keystore to use.

We can also use AWS KMS for encryption please go through the below link for more details on how to use the SDK
In this article, our focus is only on symmetric encryption.
Spring Cloud Config Server provides APIs to encrypt and decrypt the credentials. Let's look at them below
Encrypt API
We need to call the /encrypt the API with the plain value for the server to decrypt for us.
In the Config Server bootstrap.yml file, we need to have the following property for encryption. Usually, the encrypted key is stored in the environment variable of the server
encrypt:
  key: ${ENCRYPT_KEY}
This is a sample curl request for the encrypt API exposed by the config server running in port 8083
curl --location --request POST 'http://localhost:8083/encrypt' \
--header 'Content-Type: text/plain' \
--data-raw 'testpassword'
Once we make this API call, the Config Server will use the encrypt key to encrypt the value ‘testpassword’ in a cryptographic form. We will then need to save this encrypted value in our config repo using {cipher} as follows
database.password={cipher}bbbbbbbbbbb
Decrypt API
We can use the /decrypt API to decipher the encrypted value. The Config Server uses the same encryption key to decrypt the value since we use symmetric encryption
We can use the curl request to make Decrypt API exposed by the config server running in port 8083
curl --location --request POST 'http://localhost:8083/decrypt' \
--header 'Content-Type: text/plain' \
--data-raw 'bbbbbbbbbbb'
The Config Server will respond with a plain value ‘testpassword’
Summary
In this article, we saw what is a Spring Cloud Config server and we saw step by step how to set up the Config Server and the Config Client. We also saw how to update the property values and refresh them dynamically on run time. Then we went through the encryption and decryption mechanisms and understand how to encrypt the property value to store sensitive information in our configuration repository.
Hope it was useful to you and thanks for reading this
If you like to get more updates from me,
please follow me on Medium and subscribe to email alert.

If you are considering to buy a medium membership,
please buy through my referral link


