
Call Your Own API Inside AI Assistant — OpenAI Function Calling
In this article, I’ll explain how we can make a call to external functions and this we will be doing using OpenAI’s Assistant API. If you’re not sure about how to get started with Assistant API, then I would recommend you to go back and have a look at my previous article ‘Create Your First AI Assistant — OpenAI Assistant API’.
Well, as we know that using Assistant API, we can build AI assistants in our own applications with just few sets of instructions.

Before we get started, make sure that you have installed OpenAI, a python library. Let’s get started by grabbing the keys.
Get OpenAI API Key And Organization ID
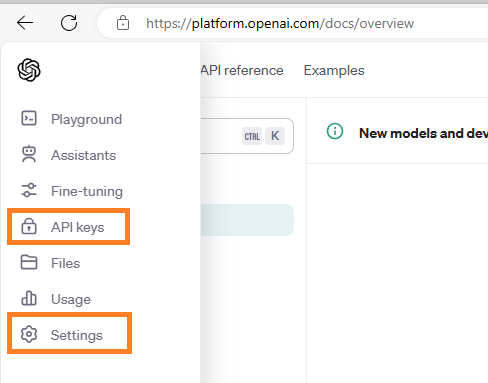
To get the keys, you need to go to https://openai.com/, login and then grab the keys using highlighted way.
Here we need to grab 2 things — API key and Organization ID
Then set these values in an environment variable:
import os
os.environ["ORGANIZATION_ID"] = "ORG_ID_HERE"
os.environ["OPENAI_API_KEY"] = "API_KEY_HERE"
Import Required Packages And Create Client Object
Do install the dependent library OpenAI and import the below package:
from openai import OpenAIOnce package is installed, we are good to go ahead and create client object for OpenAI, which takes 2 parameters:
client = OpenAI(api_key=os.environ["OPENAI_API_KEY"],organization=os.environ["ORGANIZATION_ID"])Add Function
Next, we need to create a function, along with all the required properties for parameters:
get_homeless_count = {
    "name" : "get_homeless_count",
    "description" : "Function takes in country name, year and returns count of homeless people",
    "parameters" : {
        "type" : "object",
        "properties" : {
            "year": {
                "type":"integer",
                "description" : "Year for which data needs to be fetched"
            },
            "country":{
                "type" : "string",
                "description" : "Country for which data needs to be fetched"
            }
        },
        "required" : ["year","country"]
    }
}
For detailed explanation of above JSON, please watch the video attached at the end of this article.
Create Assistant
Here comes the important part, where in we will setup our assistant. It is assistant’s responsibility to pack all the required parts together:
- Instructions — This contains the instruction for the assistant, which should clearly depict what an assistant is supposed to do.
- Model — This contains the model’s name that assistant should be using to respond to user queries. You can specify any GPT 3.5 or GPT-4 models, compatible with the tool.
- Tools — Currently it supports 3 tools — Code interpreter, Functional Calling and Retrieval.
assistant = client.beta.assistants.create(
    instructions="You are a bot who works like a data analyst",
    model="gpt-3.5-turbo-1106",
    tools = [{"type":"function", "function":get_homeless_count}]
)
Create Thread And Run Instance
Next, we need to define a thread to handle user messages and that can be done by calling create() on threads class.
And once we have thread id and assistant id, we are ready to create our un object as shown below:
thread = client.beta.threads.create()
run = client.beta.threads.runs.create(
    thread_id=thread.id,
    assistant_id=assistant.id
)
Create Message
In order to have communication between the user and the assistant, we need messages and messages are handled using thread. So, let’s go ahead and define our message:
message = client.beta.threads.messages.create(
    thread_id=thread.id,
    role='user',
    content='How many people were homeless in ABC in 2022?'
)
Make sure to define the correct thread id and associate the role.
Invoke Tool
Till this point, we are done with our initial setup. The only thing remaining is invoking the tool and read the response.
run = client.beta.threads.runs.retrieve(
    thread_id=thread.id,
    run_id=run.id
)
Check the status of run using run.Status and print the message, if status is requires_action.
Status requires_action means here comes the role of agent as API cannot make calls outside directly.
Associate Action With Tools
Next, we need to submit all the tool calls to status and that can be done as:
tool_calls = run.required_action.submit_tool_outputs.tool_calls
print(tool_calls)
On execution of above statement, you will the response as:

We can easily validate the response above.
Making An API Call And Collecting the Response
Now, we are ready to make a call to our external APIs or private functions. Once the call is made, make sure to append proper mapping of id and output as well.
if tool_calls[0].function.name == "get_homeless_count":
    # place to make a call and fetch data
    response = "123"

tool_outputs = []
tool_outputs.append({"tool_call_id":tool_calls[0].id, "output": response})
Once the results are collected, we need to associate them to run:
run = client.beta.threads.runs.submit_tool_outputs(
    thread_id=thread.id,
    run_id=run.id,
    tool_outputs=tool_outputs
)
It’s time to check the status and then move ahead. Here is the loop to do so:
import time
while run.status not in ["completed", "failed","requires_action"]:
    time.sleep(5)
    run = client.beta.threads.runs.retrieve(
        thread_id=thread.id,
        run_id=run.id
    )
Reading The Response
Finally, time to read the response from our assistant and that can be done using below lines of code:
messages = client.beta.threads.messages.list(thread_id=thread.id)
for msg in messages:
    print(msg.content[0].text.value)
I hope, you enjoyed calling external functions from your AI assistant.
Join Medium with my referral link — Shweta Lodha
Takeaway
I hope you enjoyed reading this article. If you feel, there is anything which is not clear, I recommend you watch my video explaining each and every step in more detail.


