
Create Your First AI Assistant — OpenAI Assistant API
Last week OpenAI announced a whole bunch of new features. Out of those, some are game-changing ones like extremely high context length with GPT-4 turbo, reduced prices of existing models, Assistant API, Vision API with GPT 4 turbo, Dall.E API and, lot more. So, out of all those, let’s have a closer look at the Assistant API today and see how we can create our own assistant in just a few lines of code.
Using Assistant API, we can build AI assistants in our own applications with just few sets of instructions.
Before we get started, make sure that you have installed the OpenAI, a python library. Let’s get started by grabbing the keys.
Get OpenAI API Key And Organization ID
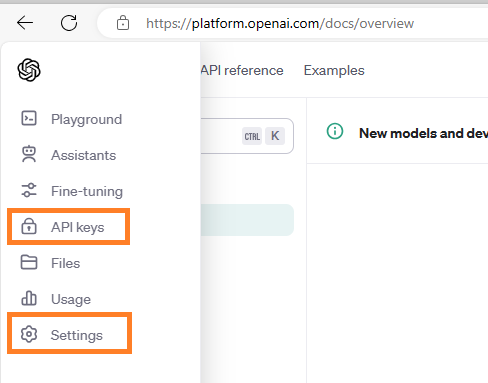
To get the keys, you need to go to https://openai.com/, login and then grab the keys using highlighted way.
Here we need to grab 2 things — API key and Organization ID
Then set these values in an environment variable:
import os
os.environ["ORGANIZATION_ID"] = "ORG_ID_HERE"
os.environ["OPENAI_API_KEY"] = "API_KEY_HERE"
Import Required Packages And Create Client Object
Do install the dependent library OpenAI and import the below package:
from openai import OpenAIOnce package is installed, we are good to go ahead and create client object for OpenAI, which takes 2 parameters:
client = OpenAI(api_key=os.environ["OPENAI_API_KEY"],organization=os.environ["ORGANIZATION_ID"])Add Documents
Next, we need to associate all the files which we want to use as our doc store and that can be done as shown below:
file = client.files.create(
    file=open("Homelessness.txt","rb"),
    purpose="assistants")

client.files.list()
Here, I’m taking just one file, but you have more than one, feel free to add those as well. Once all the files are added, you can list them out using list(). Output would look like this:
SyncPage[FileObject](data=[FileObject(id=’file-JBQqsCgW7xoMbYhzU4DvXnii’, bytes=11822, created_at=1700080318, filename=’Homelessness.txt’, object=’file’, purpose=’assistants’, status=’processed’, status_details=None), FileObject(id=’file-TRX9GcPWz427qhxto7KyCIcV’, bytes=11822, created_at=1700076225, filename=’Homelessness.txt’, object=’file’, purpose=’assistants’, status=’processed’, status_details=None)], object=’list’, has_more=False)
Create Assistant
Here comes the important part, where in we will setup our assistant. It is assistant’s responsibility to pack all below four things together:
- Instructions — This contains the instruction for the assistant, which should clearly depict what an assistant is supposed to do.
- Model — This contains the model's name that assistant should be using to respond to user queries. You can specify any GPT 3.5 or GPT-4 models, compatible with the tool.
- Tools — Currently it supports 3 tools — Code interpreter, Functional Calling and Retrieval.
- Files — This hold the collection of file ids, which were generated in previous step
assistant = client.beta.assistants.create(
    instructions="You are a teacher....add more detials here",
    model="gpt-3.5-turbo-1106",
    tools = [{"tools":"retrieval"}],
    file_ids=[file.id]
)
Create Thread And Run Instance
Next, we need to define a thread to handle user messages and that can be done by calling create() on threads class.
And once we have thread id and assistant id, we are ready to create our un object.
thread = client.beta.threads.create()
run = client.beta.threads.runs.create(
    thread_id=thread.id,
    assistant_id=assistant.id,
    instructions="Please do not answer the questions which are outside the document."
Create Message
In order to have communication between the user and the assistant, we need messages and messages are handled using thread.
message = client.beta.threads.messages.create(
    thread_id=thread.id,
    role='user',
    content='How is poverty related to homelessness?'
)
Make sure to define the correct thread id and associate the role.
Invoke Tool
Till this point, we are done with our initial setup. The only thing remaining is invoking the tool and read the response.
run = client.beta.threads.runs.retrieve(
    thread_id=thread.id,
    run_id=run.id
)
Check the status of run using run.Status and print the message, if status is completed.
Reading The Response
It's time to read the response from our assistant and that can be done using below lines of code:
messages = client.beta.threads.messages.list(thread_id=thread.id)
for msg in messages:
    print(msg.content[0].text.value)
I hope, you enjoyed writing your first assistant.
Testing The Assistant
Well, let’s test it out by going to Assistants — OpenAI API. If everything went well with code, then you should see an entry on above URL with your new assistant listed:

You will be able to see below view on click of your recently created assistant:
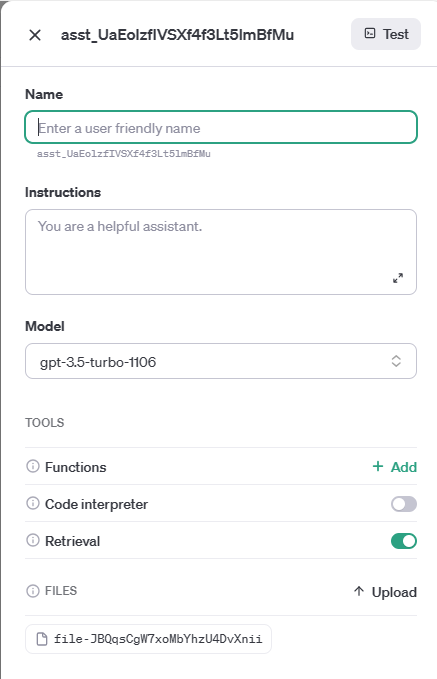
Using above view, you can re-configure your assistant by giving it a nice name, choosing a different model and description, you can even add more tools to it, you can upload files directly from here. Isn’t it impressive?
In a nutshell, you can test your assistant from here.
Join Medium with my referral link — Shweta Lodha
More…
I hope you enjoyed reading this article. If you feel, there is anything which is not clear, I recommend you watch my video explaining each and every step in more detail.


