THE ULTIMATE GUIDE — BUILD YOUR OWN FULL-STACK REACT APP
Building the Frontend for a Milestone Referral Program (I/II)
Learn how to scaffold a React.js app, change the defaults, set up a columnar layout and build your first component with react-bootstrap.

This article is the first of a planned series of articles to develop, build, and deploy a full-stack app. The pieces are all intended as code-along articles and to be as self-contained as possible. There is a repo accompanying the series. In the repo, there will be a branch to reflect every step of the app development.
The app itself is going to be a template for a milestone referral program and can thus be easily adjusted and used for various scenarios. The idea behind a milestone referral program is that every referral somebody makes brings them closer to achieving a particular milestone and claim a prize. For our example, we are going to use cute kitten images, because, who doesn’t love kittens?
Note: It hopefully goes without saying that there are no live kittens involved.
Structure of this article
This article deals with setting up the foundation of our app and is the first part of the frontend series.
Table of contents:
- Main features of the final app
- Tech stack of the final app
- React intro
- Scaffolding the application
- Getting rid of the defaults
- Creating the first component
Main features of the final app

The main user-facing features of the final app are going to be:
User management/authentication:
- creation,
- verification (e.g., email verification)
- social logins (third-party)
Sharing:
- sending emails
- social sharing (third-party)
Tech stack

I am going to only list the main components here and what purpose they serve:
- Frontend: React.js (to build the user-facing part of the app)
- Backend: Node.js + Express.js (we will create a simple backend to serve our app and manage user functionality like delete and update)
- Authentication/Social Login: Passport.js (we will explore how to use passport.js to manage user sessions and social logins like Facebook, Google, Spotify, …)
- Hosting: AWS EC2 (we will discuss how to set up a small EC2 instance)
- Database: MongoDB (you will learn how to set up a database locally, but also on the EC2 instance)
- Domain Registrar: GoDaddy (we will buy a domain)
- SSL Certificate: letsencrypt.org (the web is becoming more secure, which is why we will look into how to set up an SSL certificate)
- Emails: Nodemailer (we will use Nodemailer to send verification mails and make sure that our referrals are legit)
- Deployment: Docker / CircleCi (we will dockerize our app for easy deployment and ultimately automate the entire deployment process via CircleCi, such that a push to the GitHub Repo deploys our app)
React intro:

React.js or ReactJS is the most popular JavaScript library for building user interfaces. React was developed and is maintained by Facebook and some individual developers/companies. React in its core is only concerned with rendering data to the DOM. This singular focus means that a developer will need additional functionalities for more advanced interactions.
Luckily since the early days of React, a vast ecosystem of libraries and supporting tools has developed over time. I generally try to minimize the number of third-party tools and libraries in my projects. My rationale is that every tool or library introduces new complexities (concepts, workflows, commands, and naming conventions) as well as dependencies that might break and make your code less resilient.
However, for me, it comes down to weighing the benefits (standardization, well-tested code, and speed of implementation) against the drawbacks, as mentioned earlier. I typically decide in favor of a third-party library when it is dawning on me that I am about to write the library myself or when I realize that inconsistencies creep into my builds.
Having said that, we will be using the following main libraries for now:
create-react-app — is a library to quickly set up a self-contained react app with local development capabilities like hot reloading (this means that your app updates in the browser as soon as you make changes to the code).create-react-appincludes a set of compelling scripts (start, build, test, and eject). For the time being, we will stick to start, which starts up a development server to show your app in a browser. One thing I find relevant to mention here is that running an app in production is somewhat different as you have to “build” your app and set up a webserver (sounds more complicated than it is) to serve your app. Serving the app in development is taken care of under the hood.react-bootstrap — is the react implementation of the popular bootstrap framework. By reimplementing the Bootstrap Javascript, react-bootstrap could get rid of unneeded dependencies like jQuery (i.e., one less thing to worry about). React-bootstrap comes with a powerful grid system and a variety of components (like buttons, modals, cards, forms, and many more).react-icons — is a collection and standardization of the most wildly used free icon providers. What is particularly useful about react-icons is that the fact it utilizes ES6 imports means that you will only have to include the icons your project is using in the final build.
Scaffolding the application

Firstly, let’s create a folder for your app. I called mine fb-tutorial-social-login. Feel free to name the folder whatever you prefer. I like to prefix my projects with two-letter abbreviations (e.g., fb, which stands for Fabian Bosler for private projects), such that it is easy to differentiate the context of my projects quickly.
We are going to use create-react-app to instantiate a basic react app. For this, run:
yarn create react-app clientNote: In case, you prefer npm or npx, you could also use:
npm init react-app client (npm is the default package manager for javascript, npm includes a large package registry)
npx create-react-app client (npx is intended to use CLI tools or to run executables hosted on the npm package registry)
I like yarn and have been using it for a while, so I am going to stick with it. But there is not much that differentiates it from npm at this point.
Run the application
Navigate into the client folder and type
yarn startand your development server boots up to serve your app (on http://localhost:3000/). Et voilà.
Getting rid of the defaults

Scaffolding an app with create-react-app takes care of a whole lot of boilerplate. However, this also means that it comes with certain predefined defaults. These defaults include a favicon (the icon used in the browser tab), a manifest.json, and metadata in your index.html, to name a few examples. While your app runs just fine with the defaults, this is a good point in time to clean up the app to give it your personal note.
Favicon
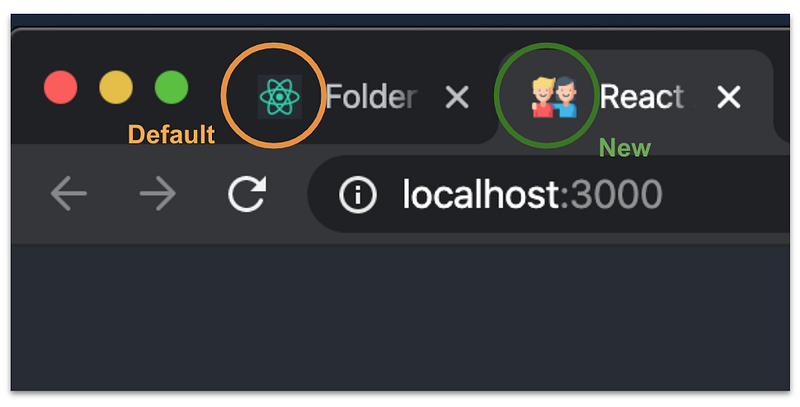
The default is the React atom logo. This logo is one of the first things people will see from your page, which is why we really should change it. To generate a favicon, we will use:
- IconGenerator
- Icon from www.flaticon.com (don’t forget to attribute the author if you are using a free version)
Download the image you want to use from Flaticon or another source and upload it to IconGenerator. After the upload, you will have some options to tweak the background color, amongst others. After you have applied your tweaks, download the generated zip file. This file includes different versions of your icon, and the content will look something like this:

We are going to use three images, rename them and copy them into the public folder of our freshly created app (overwrite the current ones):
favicon.icoandroid-chrome-192x192.pngrename tologo192.pngandroid-chrone-512x512.pngrename tologo512.png
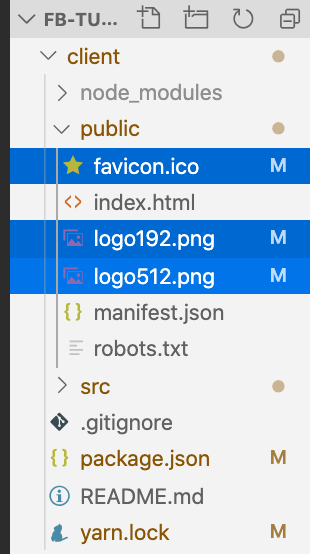
The larger versions (192 and 512 pixels) will be used in places like the home screen, app launcher, task switcher, splash screen, etc. when a user adds your site to their home screen.
Manifest.json
The web app manifest is a simple JSON file that tells the browser about your web application and how it should behave when ‘installed’ on the user’s mobile device or desktop. Having a manifest is required by Chrome to show the “Add to Home Screen” prompt. The default manifest will look like this:
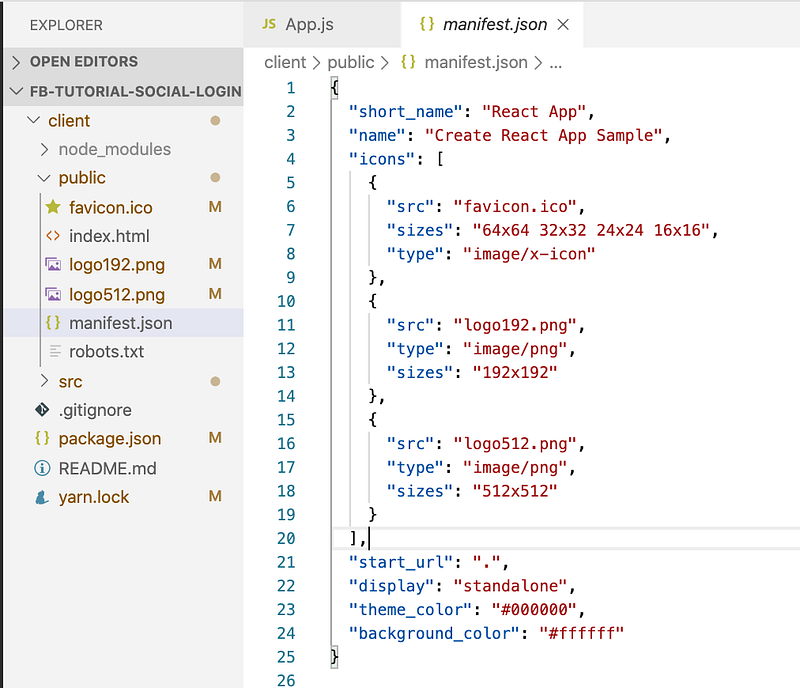
We already took care of changing the logo files themselves, so we don’t have to change the names here. Now let’s change the short_name and name in the manifest.json. You can change it to whatever you want.
Index.html
The index.html is the file that will be served to any visitor, and it is also the file that you see when you navigate to http://localhost:3000/. The index.html looks like this:
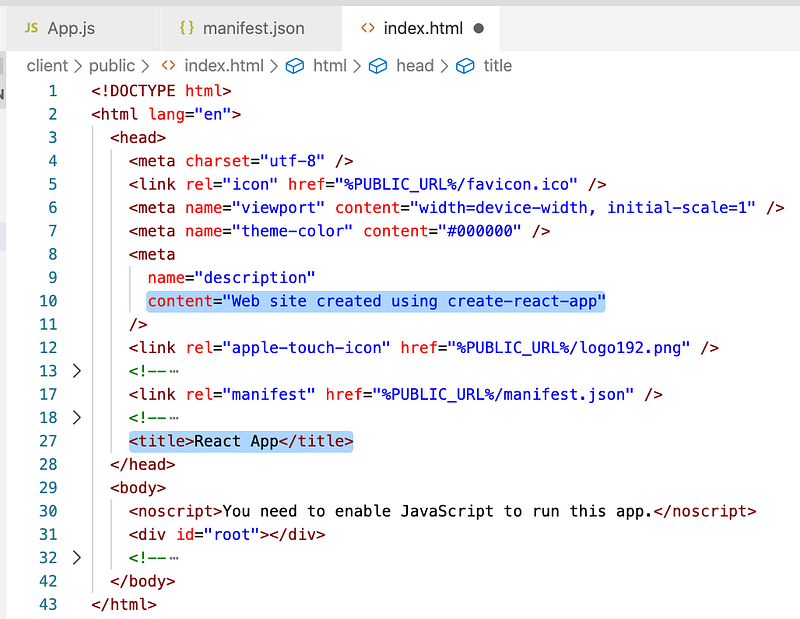
The defaults we are going to change are highlighted (lines 10 and 27).
- Line 10: This is a meta-tag, which helps search engines understand your page. Users will not see this.
- Line 27: This is the title of your app. The title is displayed right next to the favicon in the browser tab.
Let’s change those two lines to something more descriptive of what your app is going to be doing. I changed mine to:
Line 10: content="Social referral app to help users share information"Line 27: <title>Social Referral</title>Your app should now be consistent with the following version of the GitHub repository.
Creating the first component
We are going to create a reusable Milestones component that shows people the achievable referral milestones (and later on their progress towards completion). We create a component because we might want to use this component on the landing page, but maybe also in a profile section.
Folder Structure:
A typical react.js app contains a component subfolder in the src folder. This folder is used to structure your reusable components and keep them modularized logically. So let’s go ahead and create a component folder.
In our components folder, we want to create a subfolder called layout. In our layout folder let’s create a Milestones folder. Having a three-level deep nested folder structure might seem a little bit excessive right now, but a clear folder structure will prove invaluable later on. Within the Milestone folder, let’s create an index.jsx file and a styles.js file. The .jsx ending indicates a syntax extension of JavaScript and contains a mixture of JavaScript and HTML. JSX files are used and understood by React. For simplicity, I will refer to the src/components/layout/Milestones/index.jsx file as Milestones component going forward.
Assuming that you are currently in theclient folder, run the following commands in your console:
cd srcmkdir components
cd componentsmkdir layout
cd layoutmkdir Milestones
cd Milestonestouch index.jsx
touch styles.jsCode — v0:
For the first version, let’s create a raw component without content and import the component to make sure that we have hooked up everything correctly.
Put the following code into your index.jsx:
And change your App.js file to this:
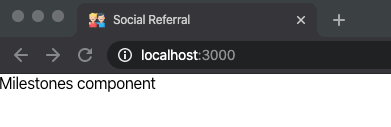
Now if you save and run yarn start again, you will see not much. However, you will see that the Milestones component got imported and is displayed correctly.
Alright, now that this is working, it’s time to work towards our final layout.
Code — v1:
We would like to go with a columnar format, which is one of the many things react-bootstraps provides, so let’s install react-bootstrap by running:
yarn add react-bootstrap bootstrapTo get the columnar layout, we utilize a concept called grid system. In essence, it boils down to having containers. Containers contain rows, and rows themselves, in turn, contain columns. Combining those three pieces gives developers plenty of freedom to arrange the screen based on their liking.
We will also use a circular progress bar to indicate the progress towards the next milestone. Luckily, there is already a library for that. Let’s install it with:
yarn add react-circular-progressbarTo display that we have met a particular milestone, we will use a check icon, for which we will need react-icons, let’s run:
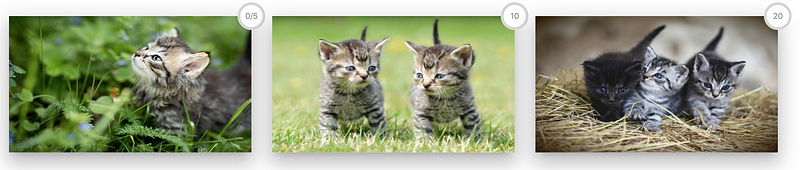
yarn add react-iconsBefore going through the code of Milestones component, we also need to download some images and place them in public\assets. For our example, to work, we need to download three pictures and call them 1_kitten.jpg, 2_kitten.jpg, and 3_kitten.jpg. You can find some lovely kitten images on Pixabay, but it does not matter what’s on the photos.
Now to get that beautiful elevated look, we need to add some impression of visual depth. Material Design is heavily based on paper-like design patterns. Material-Ui is probably the most common framework based on material design principles. However, we already have a Bootstrap as a framework. Mixing of the two frameworks requires some work, which is why we are only going to use the bare minimum from Material-Ui. All we are going to do for now is add the following classes into our index.css in the top-level folder:
After combining all of the above, our Milestones component will contain the subsequent parts (code right after):
ProgressBarText: Logic to generate text to display inside the progress bar (depends on the number of referrals, percentage achieved and the upper threshold)Milestone: One individual milestone component, i.e., the image and the placement of the circular progress bar.Milestones: All the milestones generated based off ofmilestoneList.
And our styles.js will contain the following:
ACHIEVED_COLOR: The color used for the progress bar and text of achieved milestonesOPEN_COLOR: The color used for the progress bar and text of open milestonesmilestoneList: Dynamic list of the milestones used to generate our layoutaspectRatio/colStyle: Style objects used to force a specific aspect ratiotopRightCorner: Style object used to place the progress bar in the top right corner
Our Milestones component tries to get the number of referrals from the props field called referrals. To test our code, let’s give it an arbitrary number for now. For this let’s change our App.js to the following:

Feel free to play around with the number of referrals to see how the output changes.
This number will, at some point later in this series, become a number that is informed by our backend.
Your app should now be consistent with this version of the GitHub repo.
Summary
In this article, you learned how to scaffold a react app and get rid of unwanted defaults. You learned how to set up react-bootstrap, react-icons, react-circular-progressbar to design the first version of a Milestone component. You learned how to make sure that your images adhere to a certain aspect ratio and most importantly you laid the foundation for the following articles.
Good job, and thanks for reading! See you in part II.